![]() EC 311 S, EC 311 S6 & EC 311 S6 CEE
EC 311 S, EC 311 S6 & EC 311 S6 CEE
EC Ladestationen
Installation Guide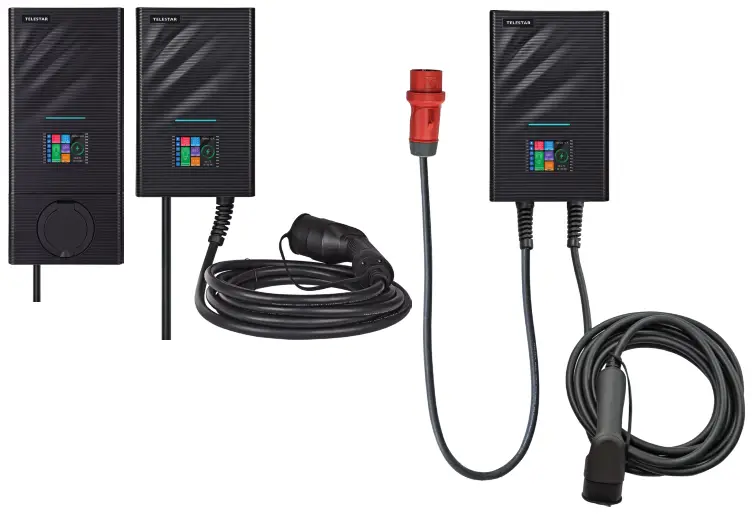
SUMMARY
With this AC charging station, you can comfortably and safely charge your electric vehicle at home.
It is suitable for installation on the wall and on a standing pole. It‘s equipped with a color touch display and internal metering. It supports plug-and-play operation or can be controlled via an APP and is applicable to a wide range of usage scenarios.
ENVIRONMENT CONDITIONS
Operating ambient temperature: -25˚C to +55˚C;
Storage temperature: -40˚C to +70˚C.
Elevation above sea level: < 2000M
Operating humidity: 5% ~ 95%RH, non-condensing.
PRODUCT NAME
PICTURES
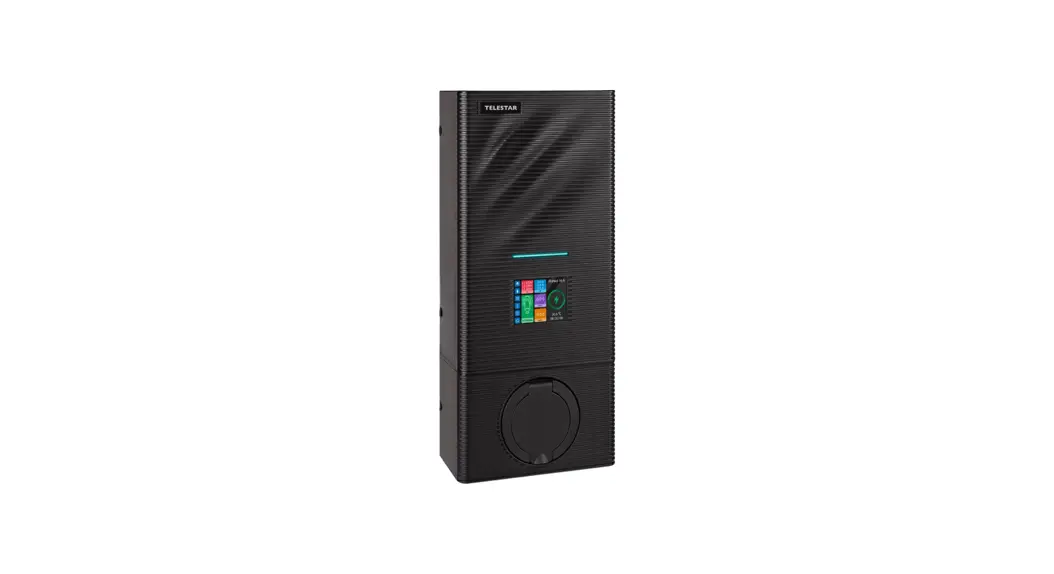
4.1 PHOTOS OF THE CHARGING STATION
TELESTAR EC 311 S / TELESTAR EC 311 S6 / TELESTAR EC 311 S6 CEE
Figure 1: Physical outline
4.2 EXTERNAL DIMENSIONS OF THE DEVICE
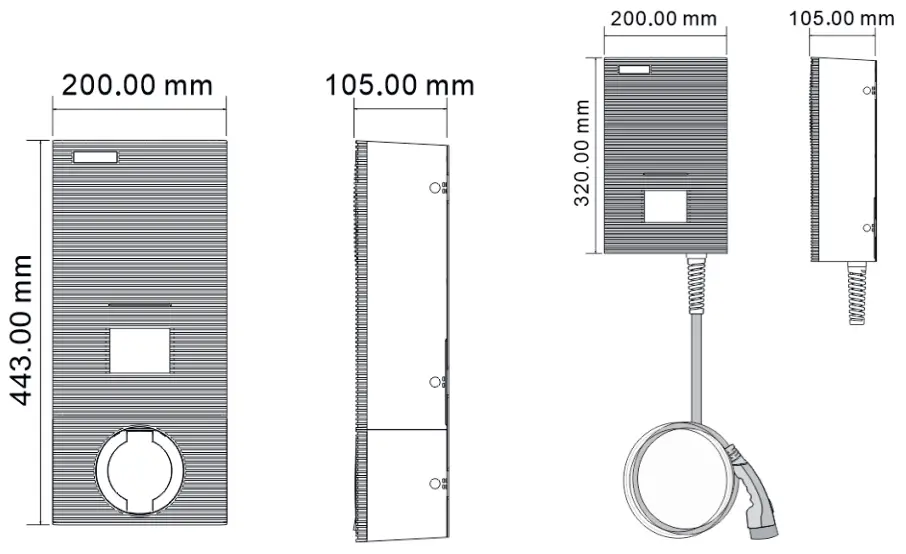
Abb. 2.1: External dimensions of the devices TELESTAR EC 311 S, TELESTAR EC 311 S6/ EC 311 S6 CEE
SAFETY INSTRUCTIONS
![]() The installation may only be carried out by qualified electricians, otherwise, there may be a life-threatening electric shock.
The installation may only be carried out by qualified electricians, otherwise, there may be a life-threatening electric shock.
Make sure the input power supply is completely disconnected before wiring; otherwise, it could result in a dangerous electric shock.
5.1 SAFETY
Before installing and commissioning the charging station, carefully read the enclosed safety instructions.
5.2 REQUIREMENTS
- The wall box may only be installed vertically operate.
- If possible, the wall box should be installed in such a way that it is protected from direct rain, to prevent, for example, icing, damage from hail, or the same to avoid. Do not expose the wall box to direct sunlight as this can cause it to overheat.
- The individual phases of the supply voltage must be protected with residual current protective devices and miniature circuit breakers.
- No single wires may be used for the power supply.
INSTALLATION GUIDE
First, start with the installation and cabling of the charging station, and, in the second step, install the cable in the meter cabinet.
Please note that there must be corresponding protection in the meter cabinet. Ask your electrician about this.
6.1 STEP 1: INSTALLATION OF WALL MOUNTING PLATE
6.1.1 With the TELESTAR EC 311 S
As shown in Figure 3, drill 4 mounting holes with a diameter of 5 mm and a depth of 50 mm at the corresponding height at a distance of 140mm x 80mm and fasten the mounting plate with the dowels and screws included in the packaging (M5 * 30) on the wall.
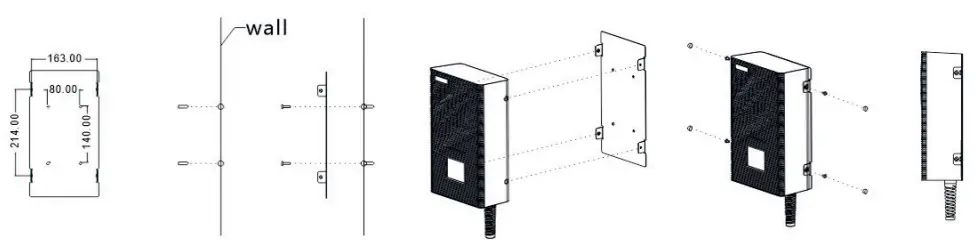
Figure 3: Installation drawing of TELESTAR EC 311 S charging station mounting plate
6.1.2 With the TELESTAR EC 311 S6/ EC 311 S6 CEE
As shown in Figure 4, drill 6 mounting holes with a diameter of 5 mm and a depth of 50 mm at the appropriate height and attach the mounting plate to the wall using the dowels and screws (M5 *30) included in the packaging.
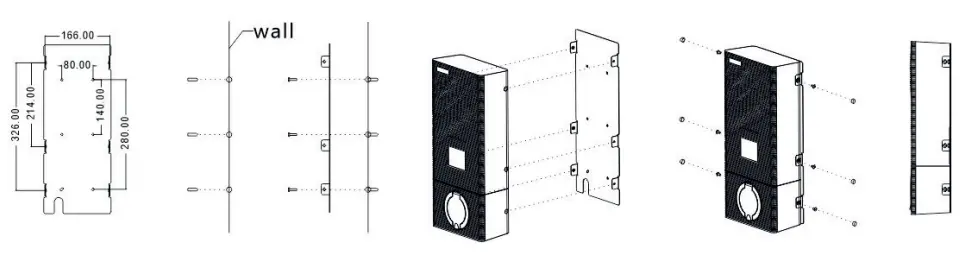 Figure 4: Installation drawing of TELESTAR EC 311 S6 / EC 311 S6 CEE charging station mounting plate
6.2 STEP 2: CABLING (INPUT POWER INTERFACE OF THE DEVICE)
- Remove the cover of the protection box (Figure 8)
- Insert the input cable and clamp the cable accordingly
It is recommended to use a copper cable with a rubber core (NYM-J) as the input cable, route the cable through the cable opening of the charging station, then the neutral conductor, the live conductors (L1 / L2 / L3), and attach the PE conductor to the corresponding terminals and finally fix the cable.
Note: If you have purchased an EC 311 S6 CEE, this step is not necessary, because, thanks to a pre-installed CEE 16A plug, this version is „plug & play“ ready.
Please see additional warning information on page 25
Important: Select the input cable specification according to the maximum current of the charging station using a minimum of 2.5mm² cables required for the 16A charging station. - Reattach the cover of the protection box (Figure 8).
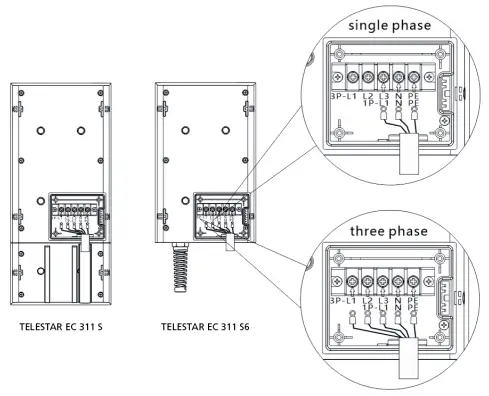 | 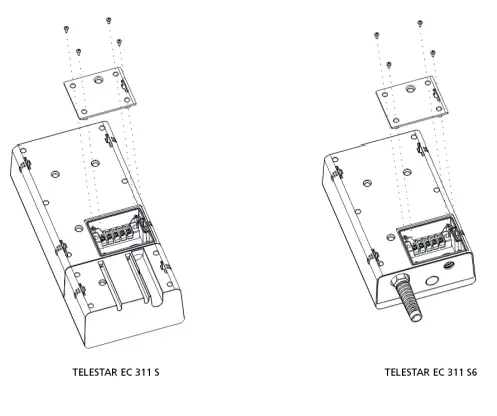 |
| Figure 7: Details on the cabling at the entrance terminal from the charging station. | Figure. 8 Fixed terminal cover |
6.3 STEP 3: WALL-MOUNTING
Embed STATION into MOUNTING PLATE on the wall.
6.4 STEP 4: FIX THE CABLE HANG
Fix the cable hanger in the right place you want.

TECHNICAL SPECIFICATIONS
| MODEL | TELESTAR EC 311 S / TELESTAR EC 311 S6 |
APPEARANCE MATERIAL
| Product name | single phase / three phase AC Station |
| Shell material | Polycarbonate (PC) |
| Wiring material | lower incoming line, the lower outgoing line |
| Charging interface | Charging socket Type 2 / Charging Connector Type 2 |
| External Dimensions | EC 311 S: 443 x 200 x 105mm / EC 311 S6/ EC 311 S6 CEE: 320 x 200 x 105mm |
| Weight | EC 311 S: 4,3 kg / EC 311 S6/ EC 311 S6 CEE: 7,5 kg |
ELECTRICAL INDICATORS
| Input / Out voltage | AC 230 V/400 V |
| Input / Output current | Maximum 16 A |
| Frequency | 50 / 60 HZ |
| Maximum power | 11 KW |
| Metering function | Yes |
| Measuring accuracy | Level 2 |
| Power dissipation | ≤10 W |
| Standard | EN 61851-1:2017 |
| MIBG | 100.000 hours |
| Leakage detection | AC 30 mA + DC 6 mA |
ENVIRONMENTAL INDICATORS
| Applicable scenario | Outdoor / Indoor |
| Operating ambient temperature | -25 ˚C bis +55 ˚C |
| Operating humidity | 5 % bis 95 % |
| elevation above sea level | < 2000 m |
| IP class | IP66 |
SAFETY PROTECTION
| Over-voltage protection | Yes |
| Under-voltage protection | Yes |
| Overload protection | Yes |
| Short-current protection | Yes |
| Leakage protection | Yes |
| Over temperature protection | Yes |
| Lightning protection | Yes |
| Grounding protection | Yes |
| Emergency stop button | Yes |
OPERATING ELEMENTS
| LED light | Yes |
| color display | Yes |
| APP | Yes |
Table 1: Technical specifications
CHARGING STATE INDICATOR
| State | Disconnected Mode | Connected Mode | Charging Mode | FinishMode | Fault Mode |
| Indicator light | (Green) | (Green) | (Green) | (Red) |
Figure. 9: Diagram of charging state indicator in different colors
8.1 INTRODUCTION OF FAILURES SHOWN BY INDICATOR LIGHT
| FAULT CODE | CAUSE OF FAILURE | DISPLAY MODE |
| 1 | CP fault | The red light flashes 1 time, and the rest are off |
| 2 | Under-voltage | The red light flashes 2 times, and the rest are off |
| 3 | Over-voltage | The red light flashes 3 times, and the rest are off |
| 4 | Undergrounded protection | The red light flashes 4 times, and the rest are off |
| 5 | Over-current | The red light flashes 5 times, and the rest are off |
| 6 | Short-current | The red light flashes 6 times, and the rest are off |
| 7 | Short-current | The red light flashes 7 times, and the rest are off |
| 8 | Temperature sensor 1 is overheated | The red light flashes 8 times, and the rest are off |
| 9 | Temperature sensor 2 is overheated | The red light flashes 9 times, and the rest are off |
| 10 | CP Fault | The red light flashes 10 times, and the rest are off |
| 11 | Emergency stop protection | The red light flashes 11 times, and the rest are off |
Table 2: Introduction of failures shown by the indicator light
Red light flashing fault code introduction: red light flashing indicates that there is a fault in the system and the number of flashing times corresponds to the fault code.
For example, if fault code 5 appears, the red light will flash 5 times.
When there are multiple faults, the device only displays one fault code.
When short-circuit protection fault and leakage fault appear, the device will not continue to charge.
These faults cannot be recovered until the charging plug is disconnected and then reconnected while other faults do not need to disconnect and then reconnect the charging plug because the charging process will automatically resume after the faults are recovered.
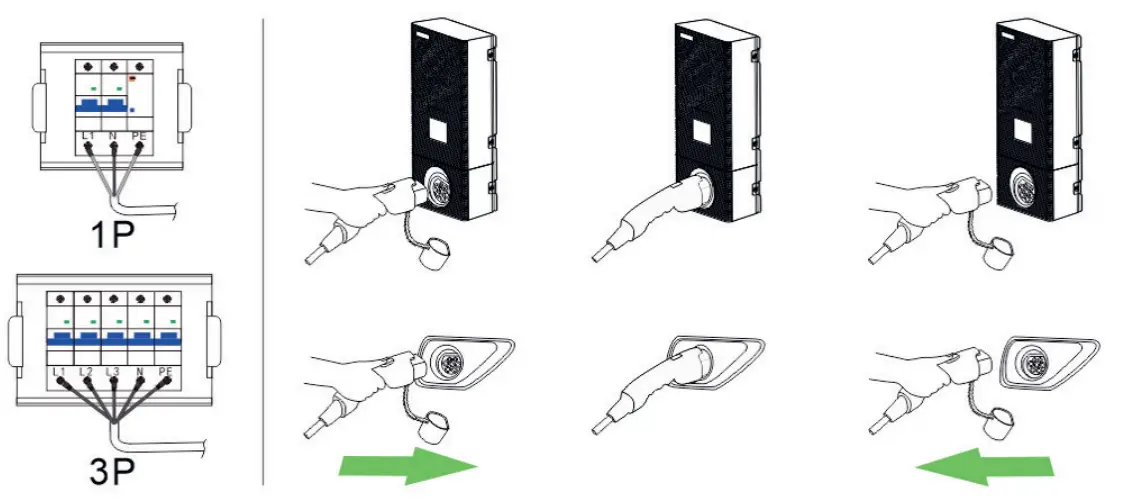
INSTRUCTION FOR USE
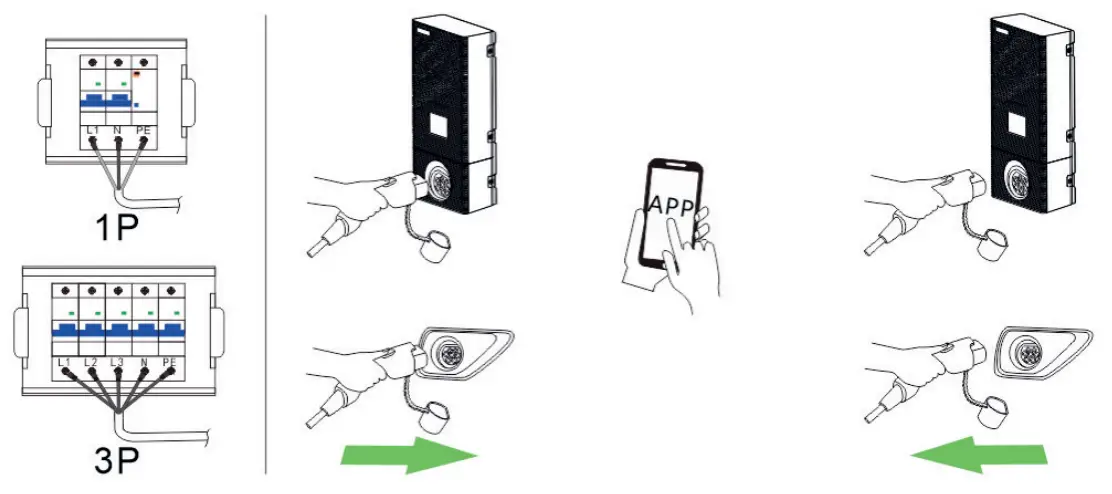
Choose different starting methods according to the specifications used:
TELESTAR EC 311 S:
Connect one end of the charging gun to the charging socket on the charging station and the other end to the vehicle charging port. When the indicator light on the charging station turns green, it indicates that the charging station is connected to the car and is ready to start the charging process.
TELESTAR EC 311 S6:
Insert the charging gun into the car charging port. When the indicator light of the charging station turns green, it indicates that the charging station is connected to the car and is ready to start the charging process.
9.1. PLUG-AND-PLAY-BETRIEB
- Make sure the charging station is connected to a power source.
- Connect the EV and the charging station with a charging plug.
- After connecting the plug, follow the prompt on display and click the APP on the mobile phone to start charging.
- To stop charging, just click the APP to stop the charging process and then pull out the plug.
9.2. START BY APP
EVSE Master App:
Scan this code to download the EVSE Master App (for operating the TELESTAR EC charging stations).
Note: The EVSE Master App is an offer from third-party developers. Using the TELESTAR EC charging stations without the application will not result in performance limitations.

- Make sure the charging station is connected to a power source.
- Connect the EV and the charging station with a charging plug.
- After connecting the plug, follow the prompt on display and click the APP on the mobile phone to start charging.
- To stop charging, just click the APP to stop the charging process and then pull out the plug.
ILLUSTRATION OF THE SCREEN
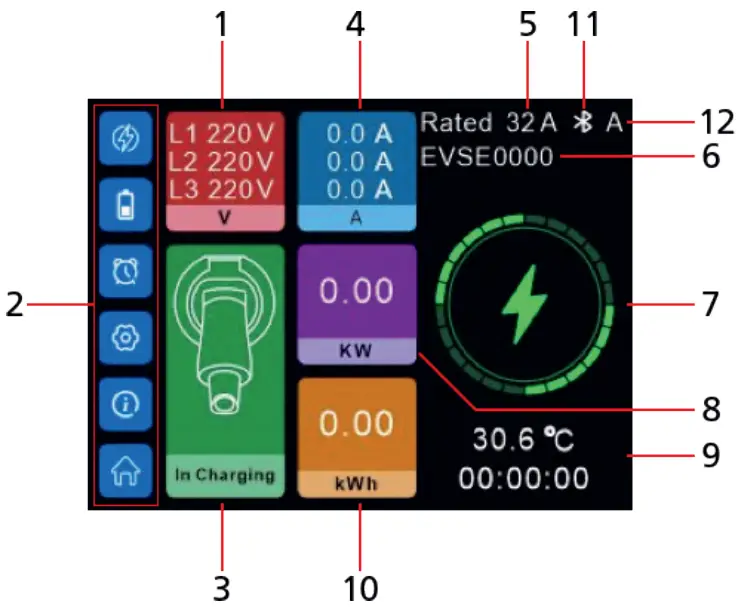
| 1. Real-time voltage 2. Settings menu 3. Status of charger 4. Real-time charging current 5. Rated charging current 6. Bluetooth name | 7. Charging status icon 8. Charging power 9. Temperature and Charging duration 10. Charging capacity 11. Communication Way (Bluetooth or WIFI) 12. Charger’s Start mode |
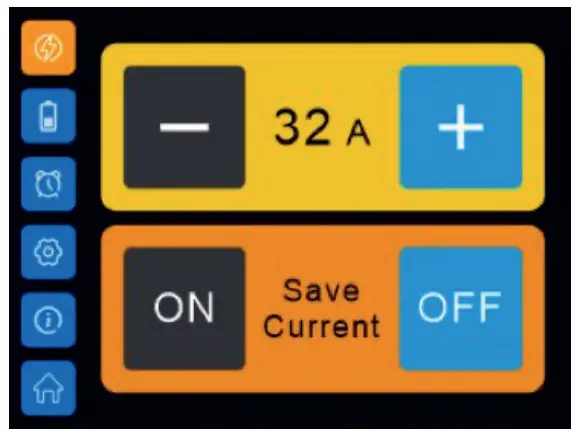 | 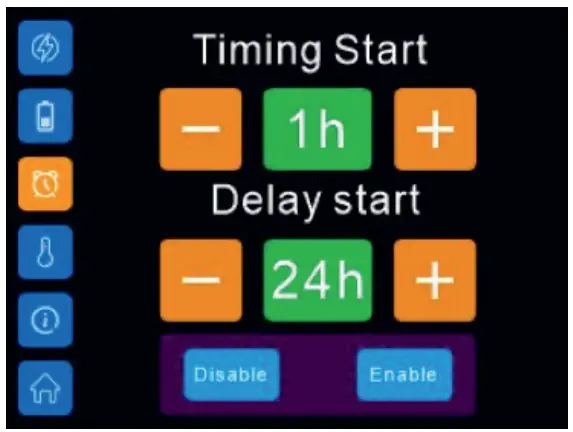 |
| Current-setting interface | Charging duration and delayed start setting interface |
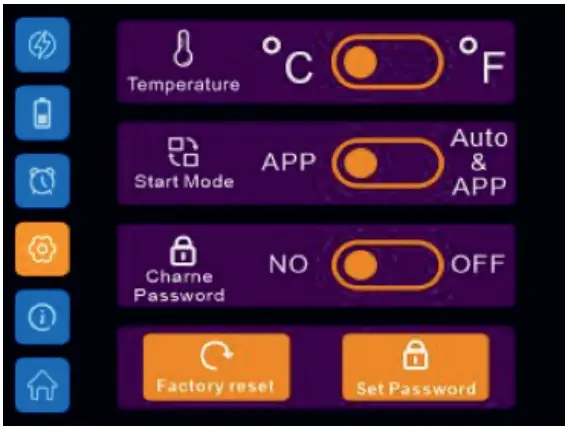 | 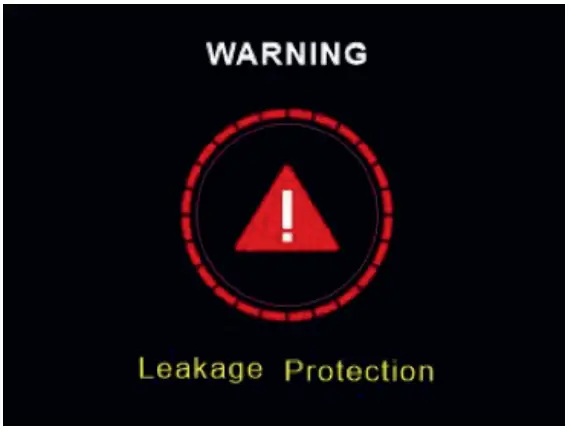 |
| Settings interface | Fault interface |
For serious faults, the charger cannot recover automatically.
In order to remind the user of a certain serious fault that happened, the system will automatically count down 10 seconds to restart after the charging plug is pulled out.
AFTER-SALE SERVICE
11.1. SERVICE
Our product meets the legal requirements and was manufactured under constant quality controls.
The technical data corresponds to the current status at the time of printing. Changes are reserved.
We offer a telephone HOTLINE service with professional help. Professional service specialists are available to answer your questions.
You can ask any questions you have about TELESTAR products as well as receive tips on localizing a possible cause of error here. Our technicians are available from Monday to Friday from 8:00 a.m. to 4:45 p.m. at the following number +49 (0)2676 / 95 20 101 or via Email at: [email protected]
If the service hotline cannot help you, send your device back, if possible in the original packaging, but packed securely for transport in any case, to the following address:
TELESTAR – DIGITAL GmbH
Service Center
Am Weiher 14 (industrial area)
56766 Ulmen/Germany
11.2. TERMS OF WARRANTY
TELSTAR grants a 24-month warranty on all TELESTAR products, starting from the date of purchase.
Warranty includes repair of defects without needing to prove that there was a material or manufacturing error at the time of purchase. Excluded from this warranty are in particular external optical faults as well as damages/defects that result from improper installation and operation as well as if fabrication and serial numbers have been removed or mechanical damage.
Warranty is void by unauthorized third-party intervention.
To fully ensure all terms of the warranty, please make sure to only use original TELESTAR accessories when using or installing the device. The warranty includes repairing or replacement of the defective device, however, it does not include your necessary expenses.
Please note that we will deny the delivery of new items if it causes unreasonable costs in comparison to the remedy of the defect (this is usually the case). Costs resulting from repairs done by unauthorized third parties are not covered by TELESTAR. In case of a warranty claim, the device has to be sent back to TELESTAR in the original gift box (incl. accessories) as well as including a detailed description of the defect plus a copy of the invoice.
DISPOSAL
![]() This device is used to charge electrically powered vehicles and is subject to EU Directive 2012/19 / EU on waste electrical and electronic equipment (WEEE).
This device is used to charge electrically powered vehicles and is subject to EU Directive 2012/19 / EU on waste electrical and electronic equipment (WEEE).
Disposal must take place in accordance with the national and regional regulations for electrical and electronic equipment. Old devices and batteries must not be disposed of with household or bulky waste. Before the device is disposed of, it should be made inoperable. Dispose of the packaging material using the collection bins for cardboard, paper, and plastics that are common in your region.
DECLARATION OF CONFORMITY
TELESTAR EC 311 S:
www.telestar.de/de_DE/Konformitaetserklaerung/352-529/?productID=23597
TELESTAR ES 311 S6
www.telestar.de/de_DE/Konformitaetserklaerung/352-529/?productID=23598
TELSTAR EC 311 S6 CEE
www.telestar.de/de_DE/Konformitaetserklaerung/352-529/?productID=24437
ADDITIONAL WARNING
The device must be installed, adjusted, and serviced by qualified electricians or people who are familiar with the construction and operation of this type of EV-Charger Failure to follow this precaution could result in death or serious injury.
- Incorrect installation and testing of the charger can lead to damage no liability is assumed for the resulting damage.
- Make sure that the charging cable is well positioned during the charging process and cannot be walked on, damaged, or burdened.
- Check the wire diameter according to the local electrical requirements
- Switch off the corresponding power supply before starting the installation.
All technical data and functions described in this operating manual correspond to the status at the time of printing and can change without notice. We assume no liability for misprints or errors.
Copying and reproduction are permitted only with expressed approval from TELESTAR-DIGITAL GmbH.
©TELESTAR-DIGITAL GmbH, As of: 06/2022


