![]()
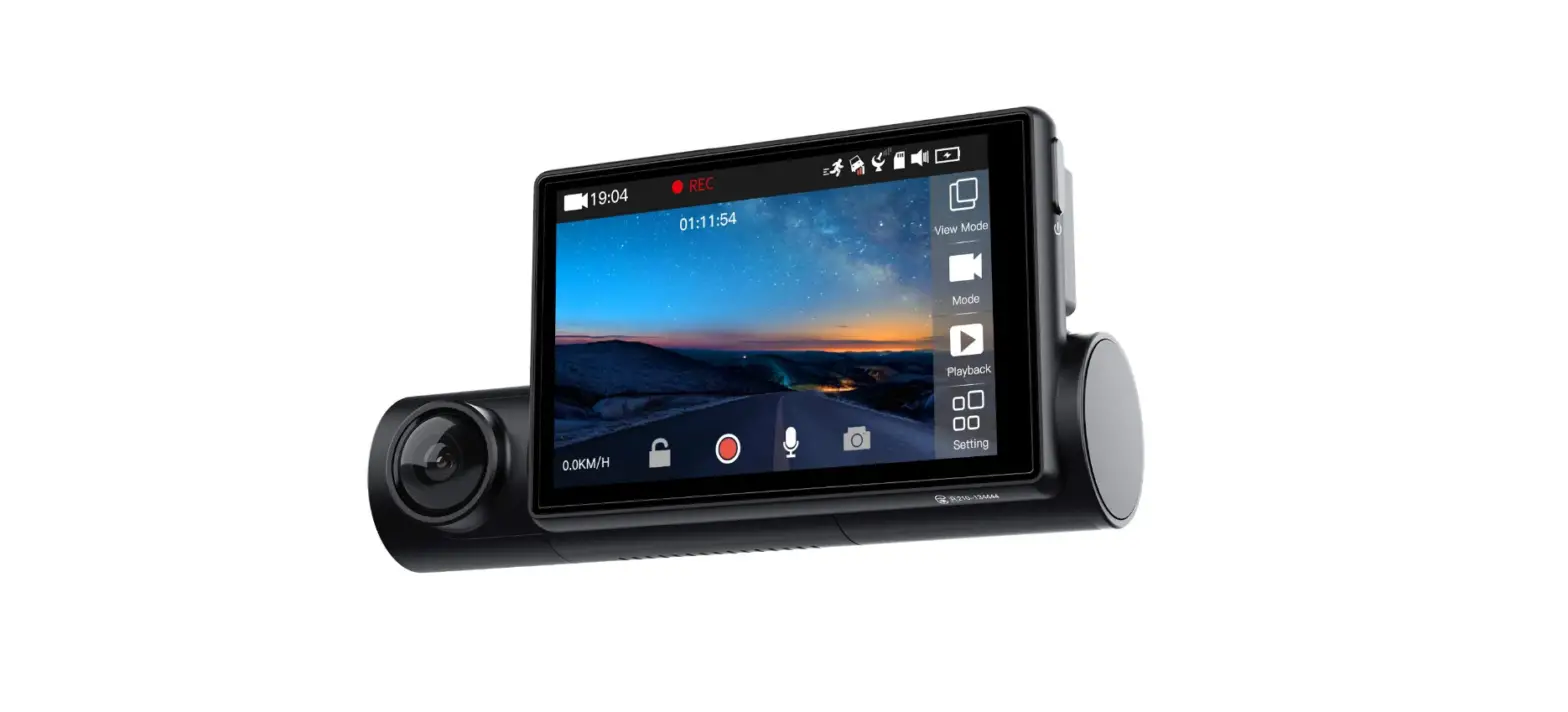
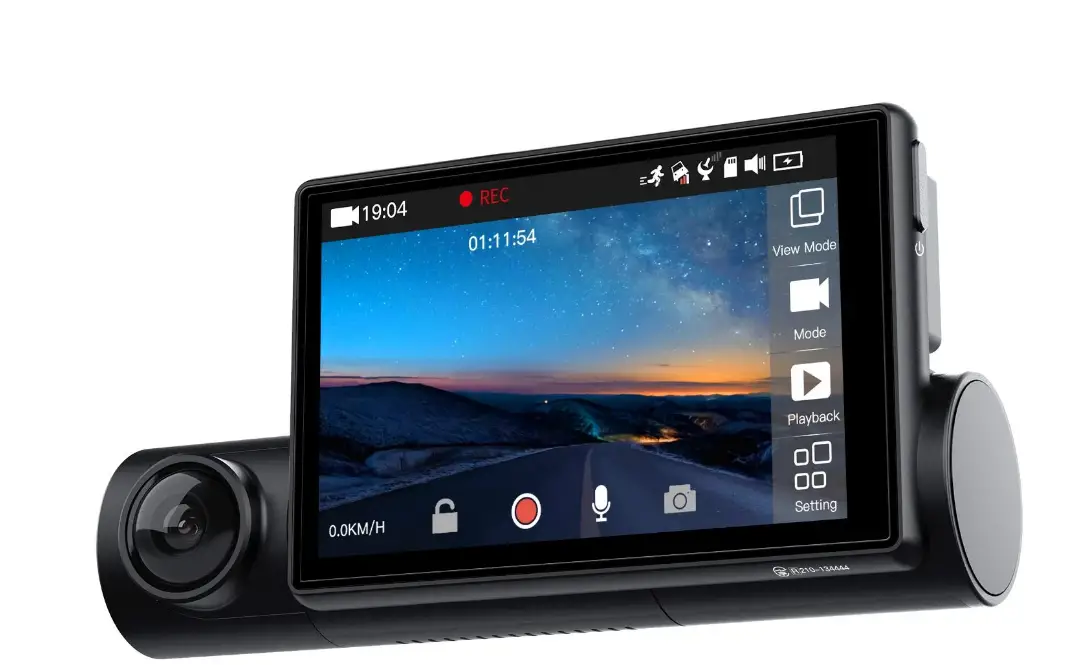
COOAU D68 1080P FHD Dash Cam
Packing list
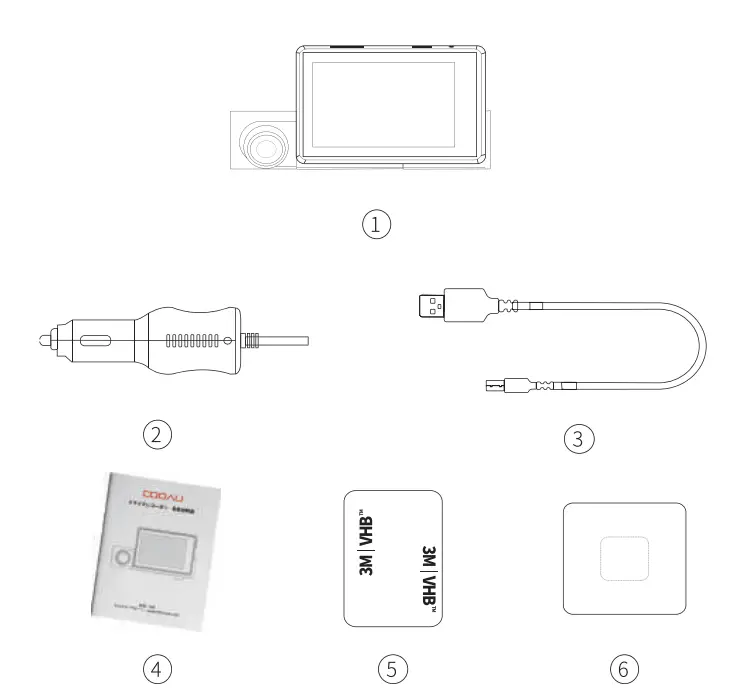
- COOAU Dash Cam {Model:D68)
- Car Charger
- USB Cable
- User Manual
- 3M Tape
- Electrostatic Sticker
SPECIFICATION
| Model | COOAU D68 |
| Display | 3.0 inch OLED touch screen |
| Languages | English/Fran ais/Espafiol/Portugues/ PyccKvii-1/Deutsch/ltaliano/ /§jjljl:q:,y:/ i!l!’t’Y:/B:zjs: /OrlloPolski |
| Video Resolution | Front Camera:1920*1080P 30FPS |
| Inside Camera: 1920*1080P 30FPS | |
| Photo Resolution | 12M 4032×3024 BM 3264×2448 SM 2592×1944 2M 1600×1200 |
| Image/Video Storage Format | JPG; MP4 |
| Audio | Built-in microphone and speaker |
| Charger | 5V/2.5A |
| Battery | 400 mAh |
| Memory Storage | External: Micro SD Card (32 to 128GB Card, Class 10) |
| USB Port | Micro USB |
| Working Temperature | -10°c – 60°C |
Camera Overview

- SD Card Slot
- Micro USB Charging Port
- Reset Button
- Power Button
- Inside Camera Lens
- Indicator
- Microphone
- Front Camera Lens
- OLED Touch Screen
- GPS Module
- 3M Tape Holder Base
- Speaker
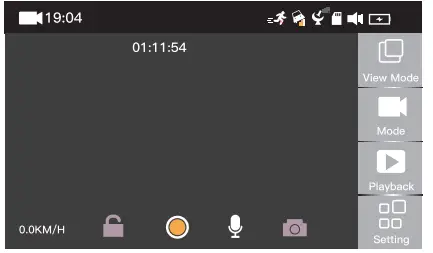
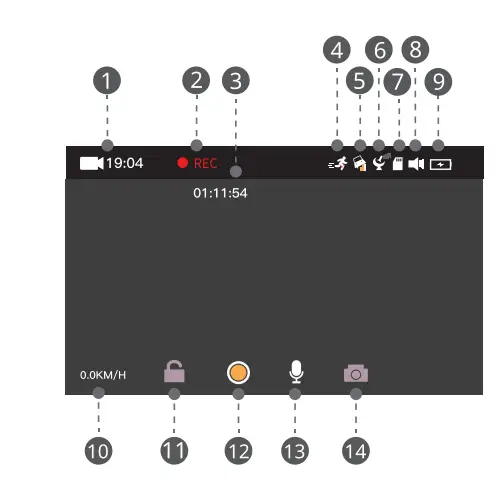
User Interface Overview
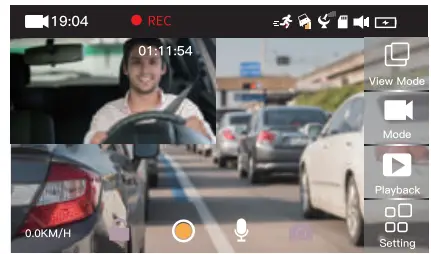
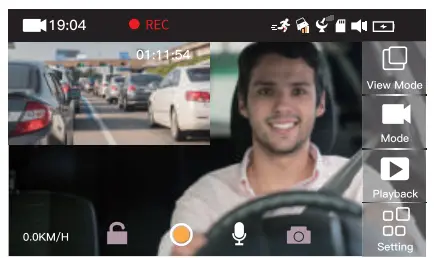
View Mode: Front Camera/Inside Carner a/PIP Front Full Screen/PIP Inside Full Screen.
(Default: PIP Front Full Screen)
- Front Camera – The image captured by the front cam will be displayed in full screen.

- 4.1.2 Inside Camera – The image captured by the inside cam will be displayed in full screen.

- PIP Front Full Screen – The image captured by the inside cam will be displayed in the upper left corner, while the image captured by the front cam will be displayed in full screen at the same time.

- PIP Inside Full Screen – The image captured by the front cam will be displayed in the upper left corner, while the image captured by the inside cam will be displayed in full screen at the same time.

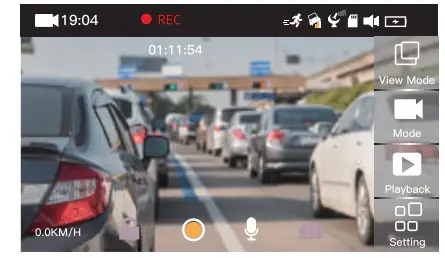
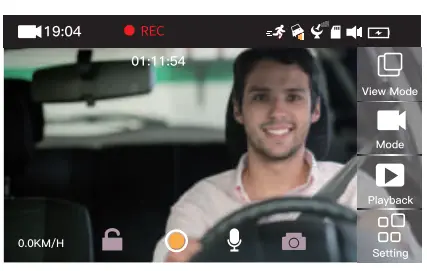
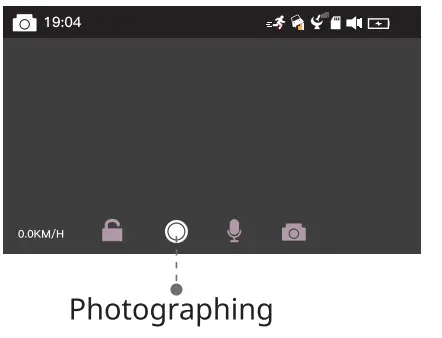
Mode: Video/Photo mode. (Default: Video mode) You can switch the display mode.
- Video Mode

- Current Date
- Recording
- Recording Time 0 Motion Detection 0 G-Sensor 0GPS
- Micro SD Card t3 Beep Sound
- Battery Icon
- Speed
- Lock/Unlock Button
- Start/Stop Recording
- MIC
- Snapshot
- Photo Mode

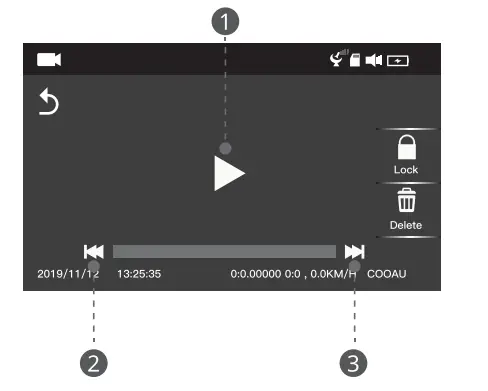
Playback: You can view videos and photos.
- View the files
- Back
- Current Page Number/Total Pages
- Go Left
- Go Right

- View the file name: click the files you want to view, and the file name will appear at the top of the screen.
- Current Date/Time
- Front Camera
- Inside Camera
- MP4: Video JPG: PhotoNote: In the same video, the small number represents the rear camera and the large number represents the inside camera. For example, the selected video is recorded by the inside camera as is shown in above.
 Play the video: click the file you want to view again, then you can play the video.
- Play
- Rewind
- Fast Forward
- Lock
- Lock all files
- Lock current file
- Unlock all files
- Unlock current file

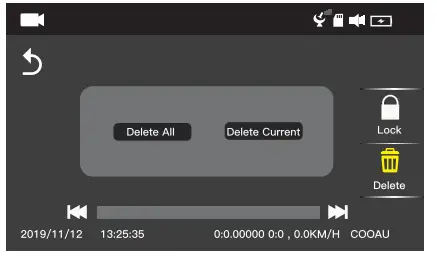
- Delete
- Delete all files
- Delete current file

- Setting: You can set all functions of the camera here.

 Play the video: click the file you want to view again, then you can play the video.
How to Install Your Dash Cam
Insert a Memory Card
- The Precautions of Micro SD Card(Not Included):
- Class10, SDHC, Micro SD card. 128GB max supported;
- We suggest that you should chose Micro SD card from big brand, such as Samsung or Toshiba. We do not suggest Sandisk.
- There are many fake cards in the current market. Every card has its limited times of writing and deleting. So if there is something wrong with the card after a long time use, it is quite normal. You just need to change to another new qualified card.
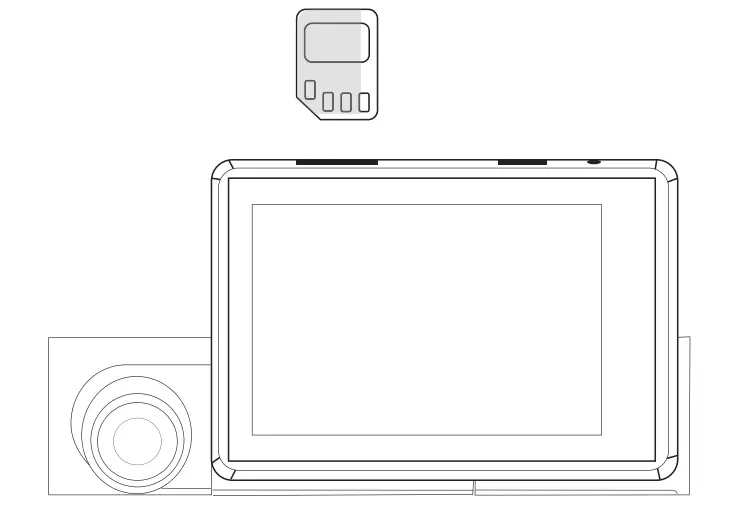
- How to Insert a Memory Card.
- Please insert the Micro SD card as the following picture shows. (Pay attention not to insert in the wrong way or the card will get stuck and break the cam.)
- To remove the card, gently press inward its top edge with a fingertip and it will jump out.

Format a Memory Card
- To format the Micro SD card correctly:
- Format the Micro SD card on your computer to FAT32;
- Click the “Setting” icon to enter the menu; if the dash cam is recording video, please stop the recording first;
- Find the “Format” icon and click it to choose OK to format the card.
- Important Notice:
- Please use a genuine Micro SD memory card from 32GB to 128GB with a speed rating of class 10 or above.
- If you are using a 64GB, or1 28GB Micro SD card, please format it to FAT32 on the dash cam first. If you don’t know how to format it on computer, please contact us ([email protected]) for more information and help.
- Ideally, the Micro SD card should be formatted every 2 weeks to maximize the lifetime of the memory card.
- Do not remove or insert a Micro SD card when the camera is on. It may damage the card or cause data loss.
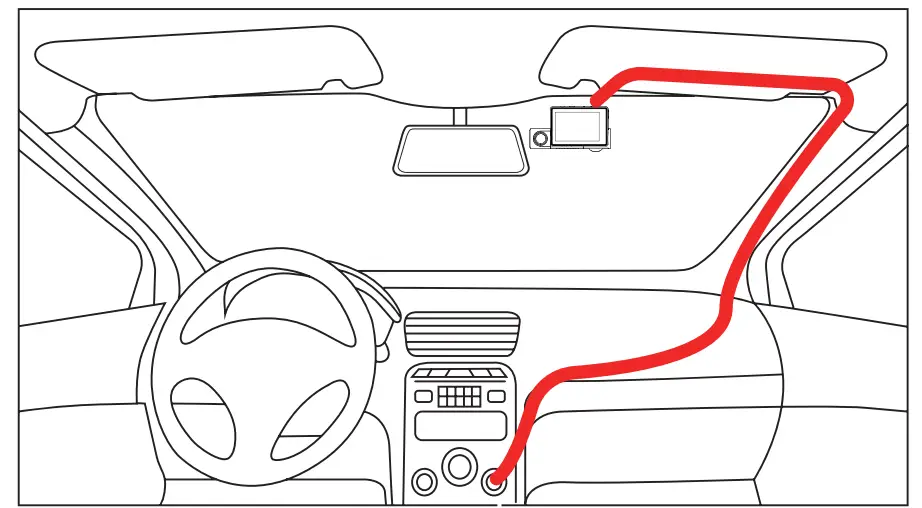
Install the Dash Cam onto the Windshield
- Clean the windshield using water or alcohol.
- Tear off the protective film of the electrostatic sticker.
- Paste the electrostatic sticker onto your windshield.
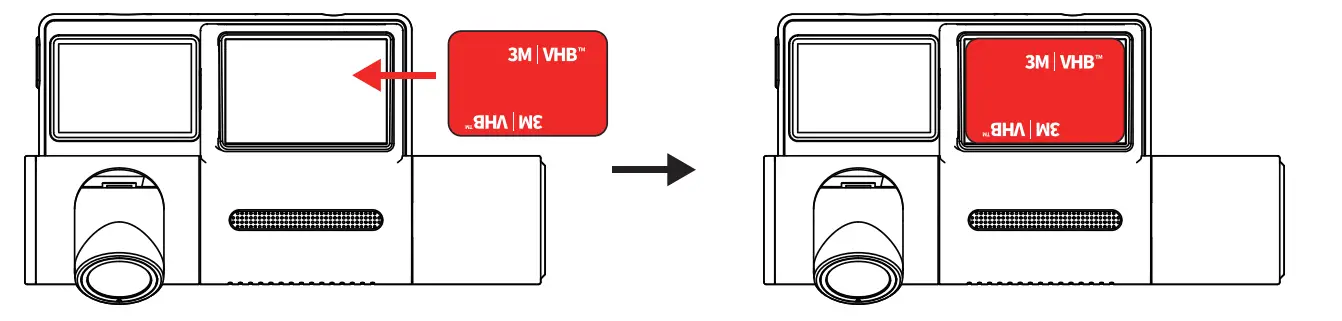
- Clamp the 3M tape holder firmly to the base on the back of the camera as the picture shows.

- Remove the red protective film and paste the camera onto the electrostatic sticker.
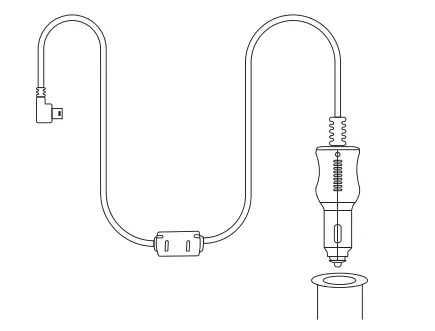
- Carefully route the power cable around the windscreen and tuck it under the trim.

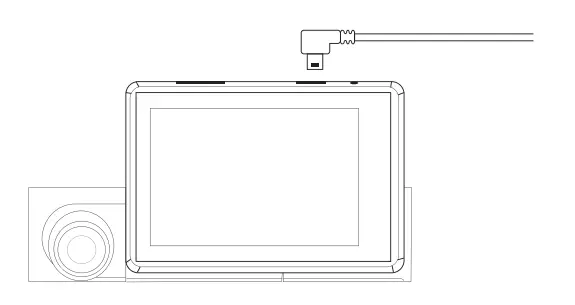
- Connect the supplied car charger to the dash cam charging port.

- Insert the car charger into your vehicle’s cigarette lighter port.

- Start the car.
- The dash cam will power on and start recording automatically.
Camera Settings& Functions
- Resolution: You can view and change the current resolution. Resolution Option: 1080P+1080P 30FPS, 1080P+720P 30FPS, 720P+720P 30FPS, Single Front 1080P 30FPS, Single Front 720P 30FPS. Default 1080P+1080P 30FPS.
- Loop Recording: Off/1 Minute/3 Minutes/5 Minutes (Default: 3 Minutes) While recording, the blue LED indicator flashes. The camera will overwrite the oldest file to save the current file automatically when the card reaches its capacity. You can set the time intervals as you like.
- Mirror Image: On/Off (Default: Off) Generally speaking, the images recorded by the inside camera are opposite to the actual images in reality. If you turn it on, the left and right positions of the image will be consistent with the actual situation.
- GPS Information: You can view GPS information on the screen.

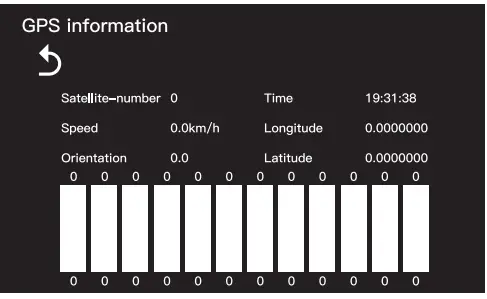
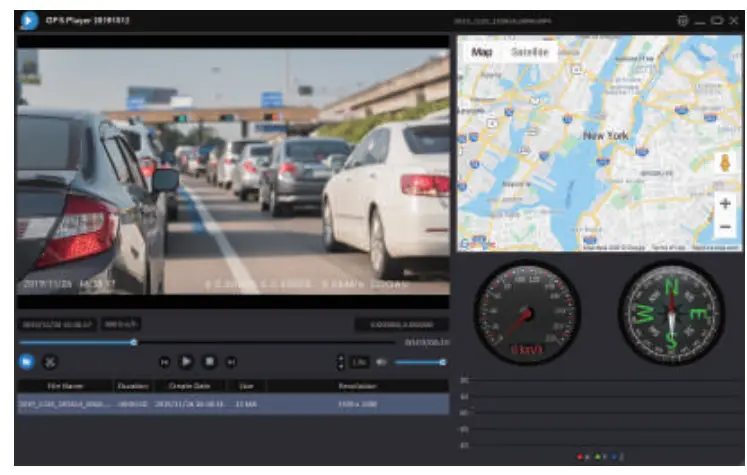
How to view GPS information.
You can view the videos which are recorded by this dashcam on common player. If you turn on the watermark function, time, speed, latitude and longitude are directly printed on the video as water marking. But, if you want to check the driving route, please download the dedicated player: 0 GPS Player
GPS Player download access:
- Link: http://c3v.cn/3bFMT
- QR code:

Note: If QR code or link is invalid, please contact at [email protected] in time.

Steps to use the GPS player.
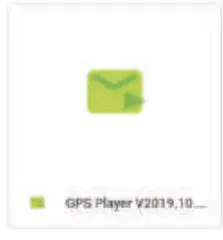
- Download the installation package from the link or QR code. Install the GPS Player to your computer.

- Click
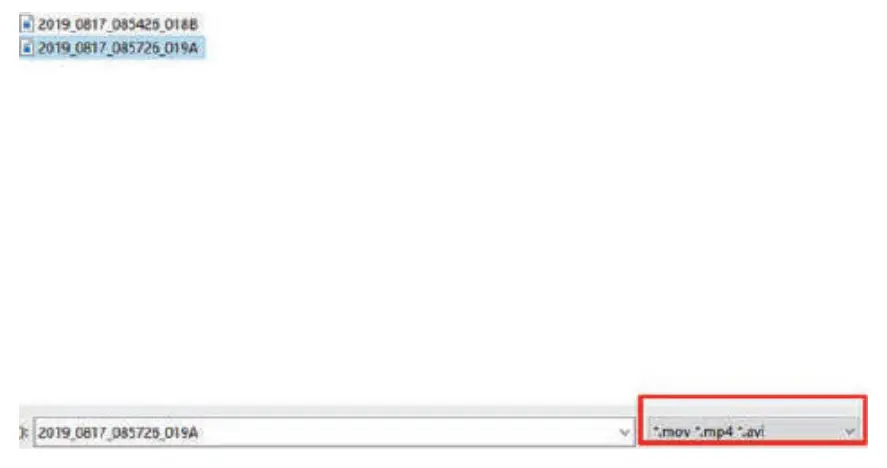
 then select the files you want to play.
Note: Please pay attention to choosing the right format. Wrong format selection may lead to the files of mp4 not being found. - Click
 to play the video.
Note:
- After the camera is turned on for a short period of time, the GPS will start automatically and you don’t need to turn it on manually.
- In places with obstructions above, such as gas stations and indoor parking lots, there will be no GPS signal and position deviations may occur.
- GPS is already installed onto the dash cam. Do not remove and insert it frequently during use. Otherwise it will cause poor GPS signal reception and even disable GPS function.
- If you have any questions about the GPS, please contact us at [email protected].
Beep Sound: On/Off (Default: Off)
- Turn on/off the “beep” when you operate the camera.
- It is also used to turn on/offt prompt volume when the dash cam is powered on/off.
Language: English/Français/Español/Português/P yccKn/Deutsch/Italiano/*PT/KPž/BAË /OrlloPolski (Default: English).
Time Setting: Click the “Up” or “Down” button to set the date and time. Then click the “Back” button to save and exit.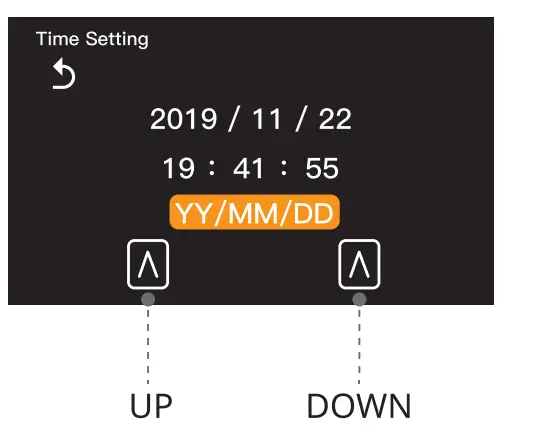
Parking Mode: On/Off (Default: Off)
- When the camera detects any collisions or vibrations, it will automatically turn on and record 20s locked video. If no collision or vibration is detected, the dash cam will power off automatically.
- If the camera continues to detect any collisions or vibrations, it will automatically turn on and record the 20s locked video again. If the camera does not continue to detect any collisions or vibrations, it will turn off directly to save power.
Motion Detection: On/Off (Default: Off)
Once the motion detection detects any movements in front of the lens. The camera will record 1 Os video clip automatically and save it. After that the dash cam will pause the recording.
Note
- In order to make this function work, you need to keep the cam in a state of power on. You’d better Connect your cam to the external power supply.
- Please remember not to turn on motion detection when you drive or the loop recording will be affected.
G-Sensor: Off/Low/Medium/High (Default: Low)
- Once the G-sensor detects collision and vibration, it will lock the current video clips automatically. The locked files won’t be overwritten by loop recording. So the important events will be saved and can be used as evidence.
- To maintain good read/write performance, the micro SD card should be formatted every 1-2 weeks.
- There are 3 levels of sensitivity: High, Medium, and Low. We suggest you should choose medium because high sensitivity will lead to many uncle sary video clips being saved as locked files. This will occupy a large part of SD card storage space, and the normal recording will be affected
- Time Lapse: On/Off (Default: Off)
Time-lapse creates video from frames captured at 1-second intervals. Time-lapse video is captured without audio. When played at normal speed, time appears to be moving faster and thus lapsing. For example, an image of a scene may be captured at 1 frame per second, but then played back at 30 frames per second; the result is an apparent 30 times speed increase. - WDR: On/Off (Default: Off) Suitable for situations like low light or backlight, WDR is able to restore the true colors of objects to the greatest extent.
- Speed Unit: MPH KM/H (Default: KM/H) This is to set the speed unit of your car.
- Watermark: On/Off (Default: Of If you turn it on, the video will be added with date, time, latitude and longitude and speed.
- Screen Saver: Off/1 Minute/3 Minutes/5 Minutes (Default: off) If you have no operation on the camera during the setting time, the screen will automatically go off. You can touch the screen to return to the recording interface.
- Auto Power Off: Off/1 Minute/3 Minutes/5 Minutes (Default: 1 Minute) If you have no operation on the camera during the setting time or the camera is not recording, the camera will automatically power off.
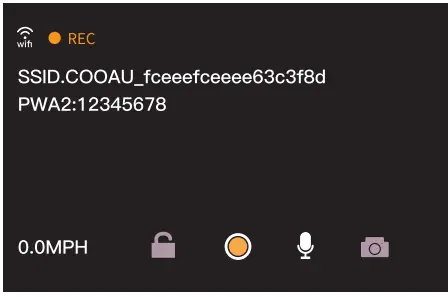
- Wi-Fi: On/off (Default Of (1) How to turn on Wi-Fi? You can press the power button when the cam is power on. You can also turn on Wi-Fi in settings.
(2) How to use WIFI?
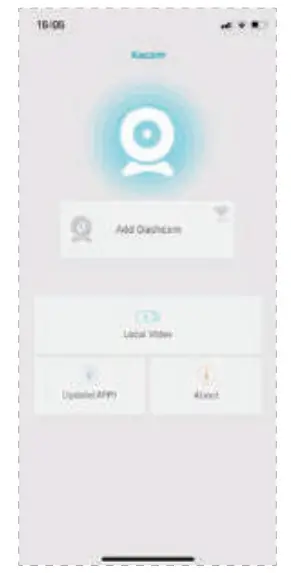
- Download the “Kacam” app from Apple
App Store or Google Play on your mobile device. - Turn on the dash cam, and press the power button to turn on the WIFI. Wait for few seconds. Then “SSID: WIFI Name” and “PWA2:password” will display on the screen.

- Enter the WLAN of your phone and find the WIFI named “COOAU-XXXX”;
Connect it with the WIFI password:12345678. - Open the “Kacam” and connect to the dash cam.

- If you want to turn off WIFI, please press the power button.
Note:
- The Kacam app is compatible with Android 5.0 and above and IOS 9.0 and above.
- If you need to view the video in real time, it may be slower to load the video. We recommend you to download it before you view it.
- When using the WIFI function, be sure to connect the cigarette lighter to the dash cam all the time. Please do not use USB cable to charge in case of insufficient power supply.
- Please use the WIFI function within 5 meters.
Frequency: 50Hz/60Hz. (Default: 60Hz) Please choose the proper one according to local situation.
Note: the screen will appear as horizontal strip interference during the recording because of the wrong setting of frequency.
SD Storage: You can check the total capacity and remaining space.
Format: If you choose “OK”, all data will be deleted.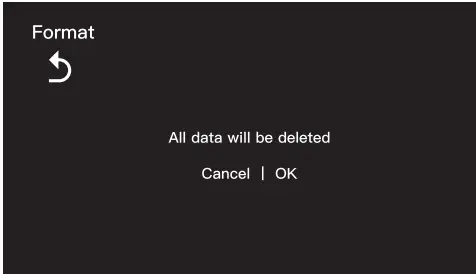
Default Setting: Return menu setting to defaults-Cancel or OK? If you choose OK, all the settings will be restored to the factory setting.
Version: You can view the software information.
Frequently Asked Questions
| Problems | Reason Analysis | Solutions |
| The camera is unable to record video/photo. | There are too many locked files and there is not enough space on the micro SD card. | Please delete files or format the micro SD card. |
| Unable to play the files properly. | Abnormal and wrong files. | Please format the micro SD card. |
| Grainy image. | 1. The protective film is not torn off. 2. The lens is dirty. | 1. Remove the protective films of front and inside lens. 2. Wipe the lens clean. |
| There are horizontal stripes on the screen | Incorrect frequenc setting. | 1. Choose the proper frequency according to local situation. 2. Press the reset button to reset. |
| The camera starts and shuts down repeatedly. | Loose contact between car and car charger, or loose contact between camera and USB interface. | Check whether the car and car charger are closely connected, or check whether the camera and USB interface are closely connected. |
| The camera is unable to identify card / media not verified. | Micro SD card is not formatted. | Please format the micro SD card. |
| White screen, blurred screen. | The camera is out of order. | 1. Restart the camera. 2. Press the reset button to reset. |
| The screen goes black when the camera is recording. | 1. Screen saver is running. 2. Loose contact between car and car charger, or loose contact between camera and USB interface. | 1. Turn off the screen saver. 2. Check whether the car and car charger are closely connected, or check whether the camera and USB interface are closely connected. |
| Video is played at high magnification. | Time lapse function is on. | Turn off the time lapse function. |
| There is no GPS driving route in the video. | 1. Download other GPS player. 2. Weak/No GPS signal when the camera is recording. 3. Choose the wrong map. | 1. Download the dedicated GPS player. (See Chapter 6) 2.GPS signal may be weak on elevated roads, tunnels, high-rise buildings, rural areas, etc. 3. Please choose Google Maps. |
| DashCam Player is not available. | WIFI signal is weak. 2. WIFI password error. 3. The phone system version is not compatible with the APP. 4. The distance between your phone and camera is more than 5 meters. | 1. Reconnect it where there is a good WIFI signal. 2. Please enter the WIFI password correctly. 3. Please use the phone system version which is compatible with app. 4. Please connect WIFI within 5 meters. 5. Please see chapter 6(WIFI) for more information. |
Warranty & Support
The COOAU D68 Dual Dash Cam comes with a full 12-month warranty. If you have any questions, please contact us at [email protected], we will reply you within 12 hours (There is time difference. So please do not worry, we will definitely get back to you as soon as we see your message.)
COOAU is firmly committed to improving our products, services, and user experience. Any constructive suggestion for the development of our products is welcomed by us.
(Contact e-mail: [email protected])
Thank you for choosing COOAU!


