
![]()
T3 operating instructions
Foreword: We are very happy that you have chosen this car navigation audio and video products. This manual will systematically introduce the basic functions, usage skills, and precautions of the car. Let new users quickly get to know, please read carefully before using, thank you!
boot and shutdown
| boot | Plugin the car key, turn on the ACC power, the device will automatically boot, display the boot LOGO animation |
| and shutd own | After removing the car key and turning off the ACC power, the device will automatically shut down. |

| Power | Power on the state.Long press, system off-screen Short press, mute | |
 | Main interface | Press to return to the main interface |
| return | Press to return to the previous interface and exit the current source | |
| Volume plus | Press volume up | |
| Volume reduction | Decrease the volume |
main interface and application interface
1. This device has a multi-page screen, and slide to the left or right to switch between them.
2. Click the application icon ![]() on the main interface to enter the application interface.
on the main interface to enter the application interface.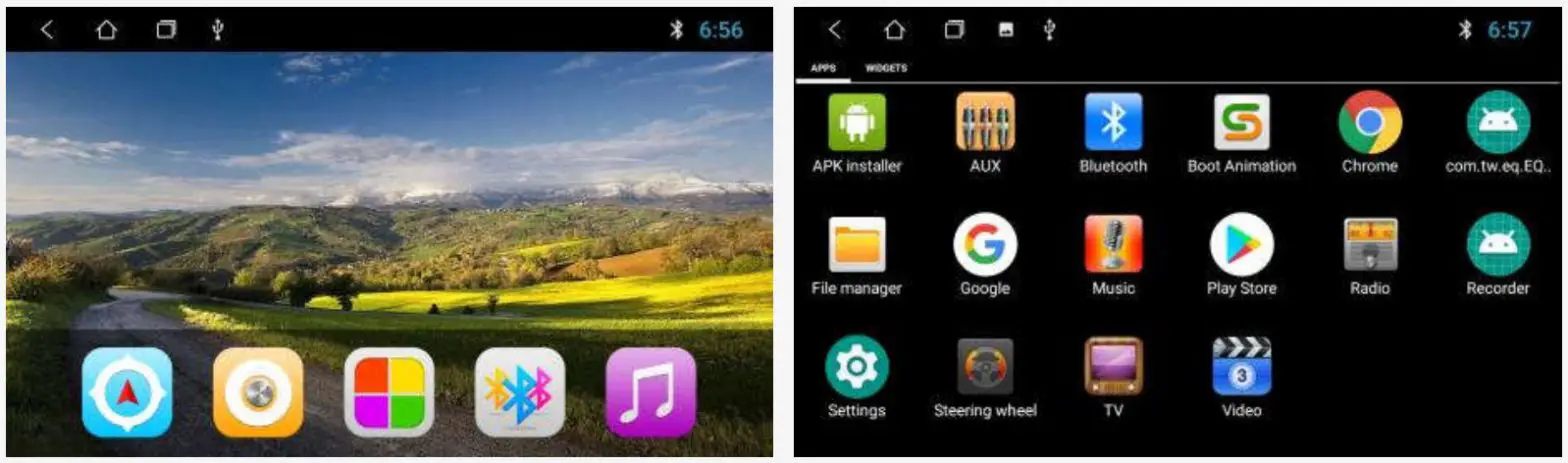
The car status bar and drop-down menu functions are as follows: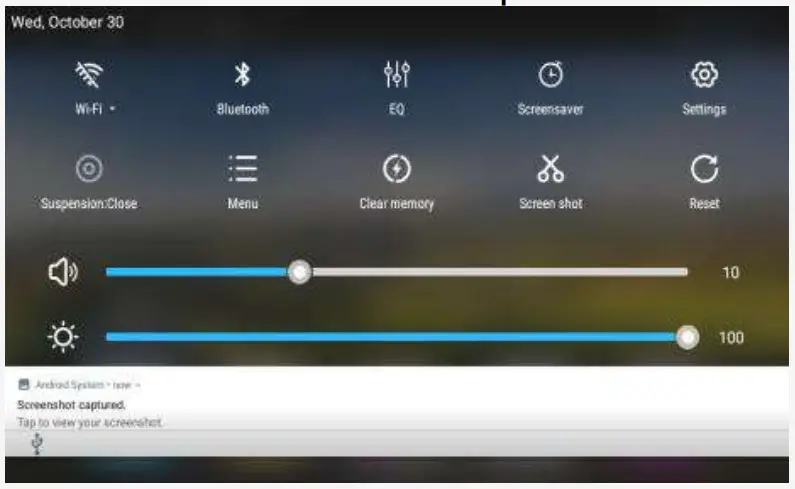
 | WiFi | Suspension switch | |
| Bluetooth | menu | ||
| Equalizer sound | Clean up memory | ||
| Offscreen | Screen capture | ||
| Setting | Restart | ||
| volume | brightness |
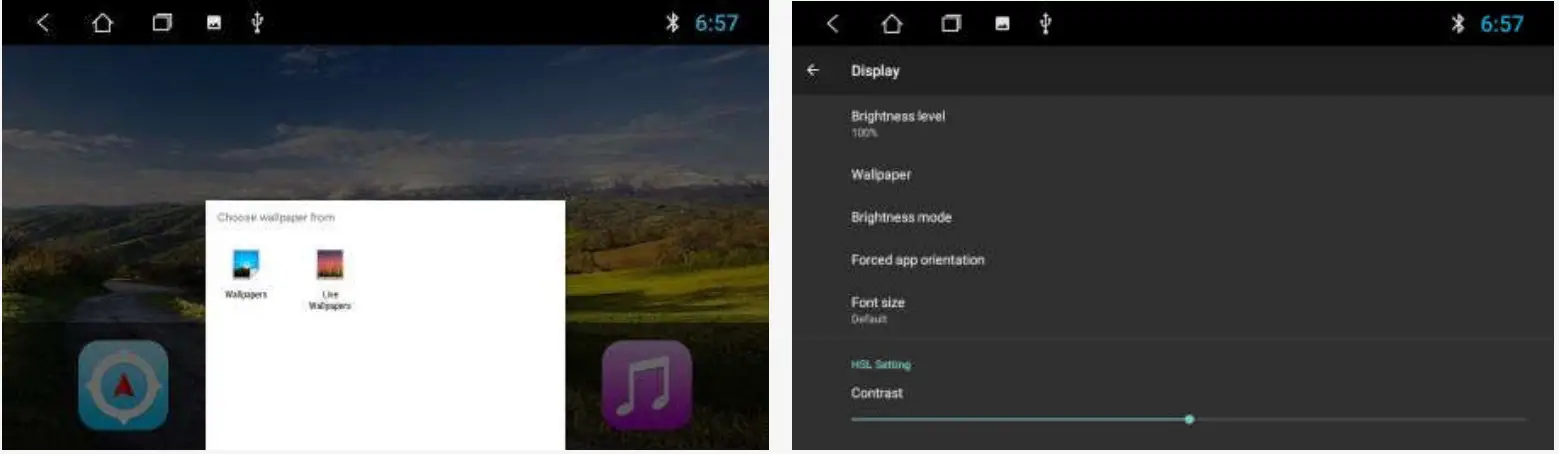
wallpaper replacement
There are two ways to set the wallpaper:
1. When you press and hold in the blank space of the main interface, then select wallpaper source” box will pop up.
2. In Settings > Display —> Wallpaper, choose the wallpaper source according to our •ersonal •references.
boot animation settings
1. application interface to open [boot animation], select an animation click to confirm the change
2. Custom animation: Copy the animation file in the root directory of the Scard or U disk of the car, click the “Menu button” in the drop-down bar to pop up. “Import from external storage” bar, pop up the password box, enter: Topway to import the animation in the U disk File, select and confirm Replacement

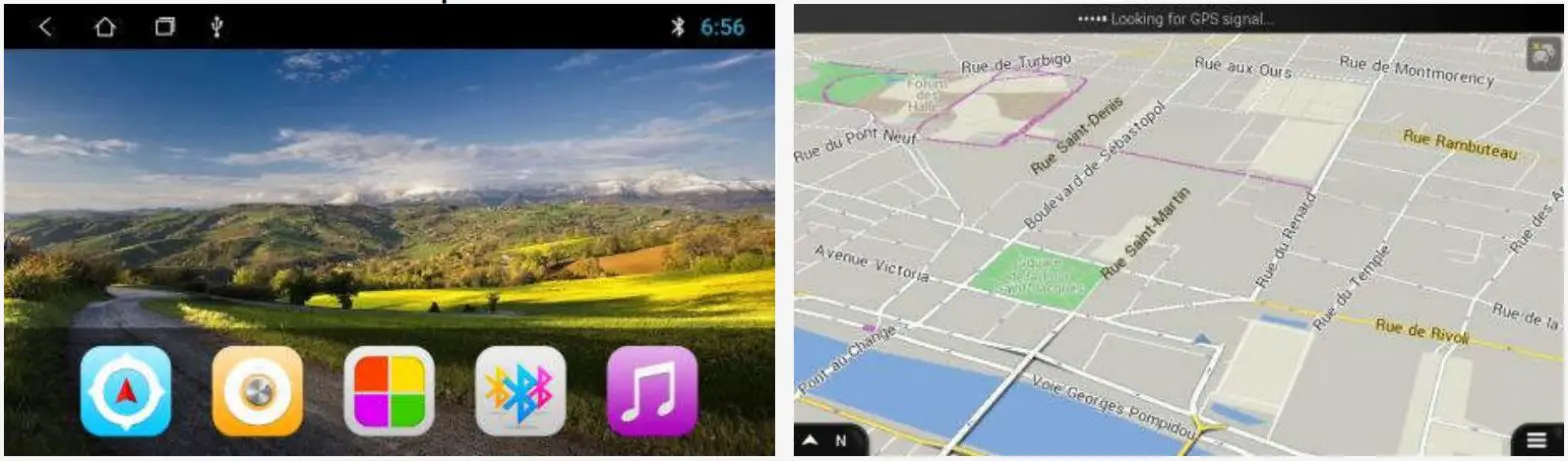
2.1.1 Use of maps
main interface click navigation icon ![]() or application interface click navigation function to enter the map interface
or application interface click navigation function to enter the map interface
Copying and installing maps
1. How to copy and install if the car has no map? The following IGO maps are given as examples
2. Copy the map package and APK to the SD card or USB flash drive (example copy on the USB flash drive)
3. Click ![]() to enter the application interface, open [File Manager], the left directory can see the U disk path)
to enter the application interface, open [File Manager], the left directory can see the U disk path)
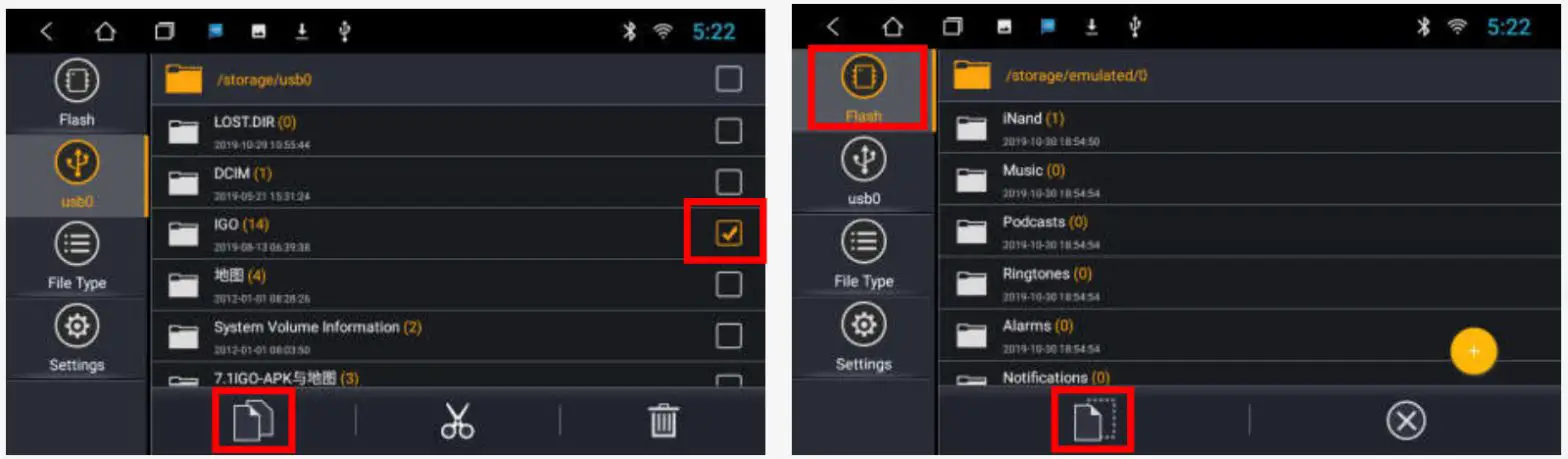
4. Enter the U disk, check the map data package and APK, click [Copy] in the lower-left corner; switch to the “Local” directory, click [Paste] in the lower-left corner. The copy is estimated to take 10 minutes. After the copy is complete, click on the map APK to install it.
After copying the map offline data and installing the map APK, how to associate the navigation icons of the main interface?
Settings Car Settings Navigation Software, find the IGO map and click to select. 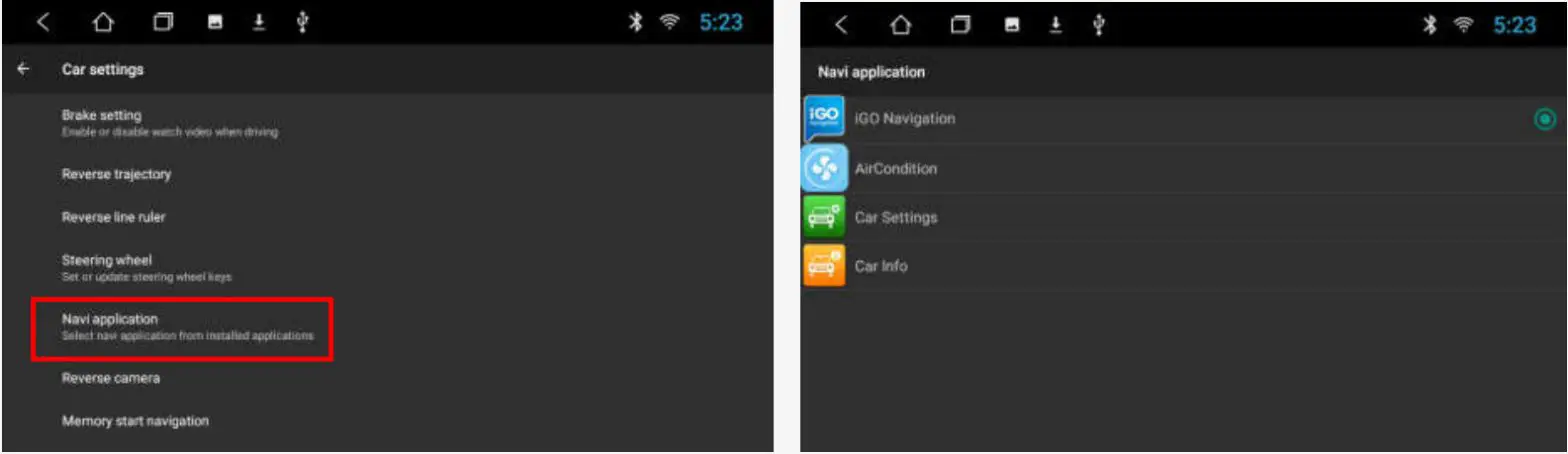
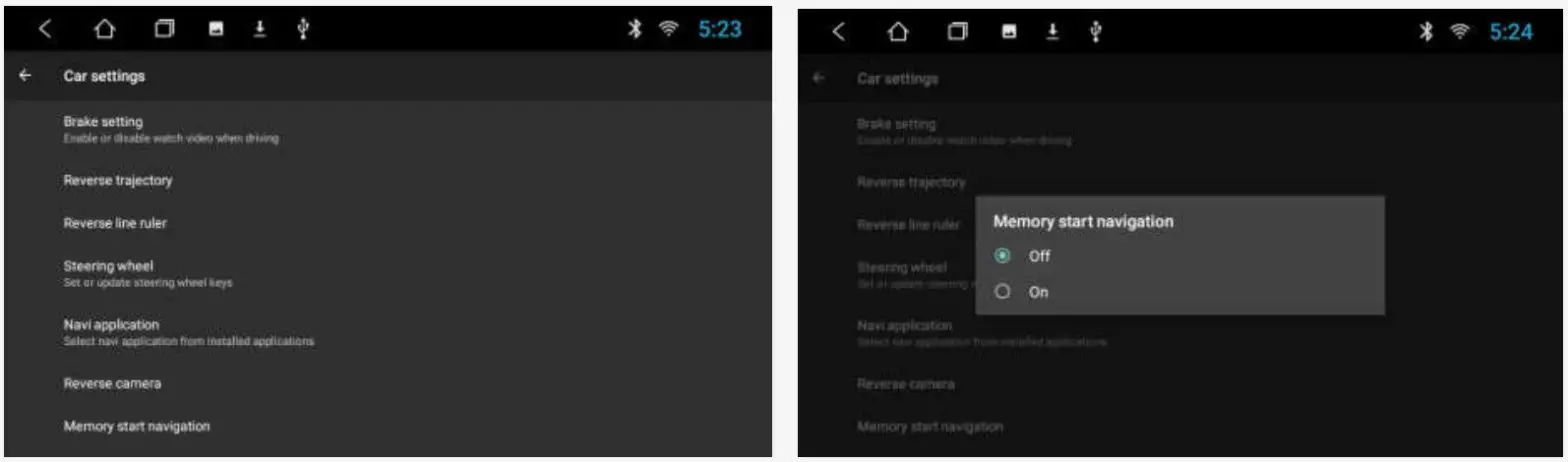
How to display the map interface after booting? 1. Settings—>Car Settings.—›Navigation Startup, the default is off, set to open.
2. You must close the ACC on the map interface, otherwise will not enter the navigation interface.
Radio function
Click the radio function on the main interface or application interface to enter the radio interface:
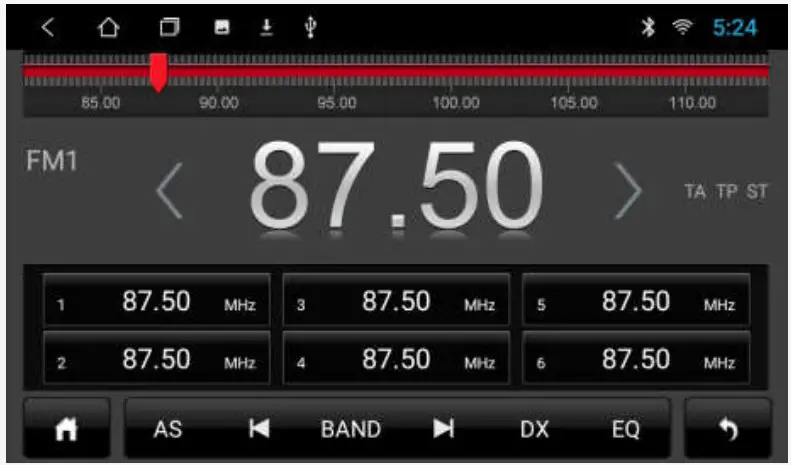
| HOME button | DX | Remote/short-range switching |
| AS | Storage station | EQ | Sound effect |
 | Low-frequency sweep |  | return key |
| BAND | Band switching FM1/2 | Low-frequency stepping | |
| High-frequency sweep | High-frequency stepping |
Bluetooth function
Click on the Bluetooth function to enter the Bluetooth interface
2.3.1 Paired devices
1. When you are not paired with the device, you can only enter the settings and search interface.
2. Pairing interface Click ![]() to find nearby devices, select the device to be paired, the phone will pop up the PIN code box, enter the PIN code the
to find nearby devices, select the device to be paired, the phone will pop up the PIN code box, enter the PIN code the ![]() icon indicates that the connection was successful.
icon indicates that the connection was successful.
Bluetooth music
Click the icon to enter the music player interface. After connecting with the phone, you can operate the [Play and Pause] and [Previous/Next] functions. 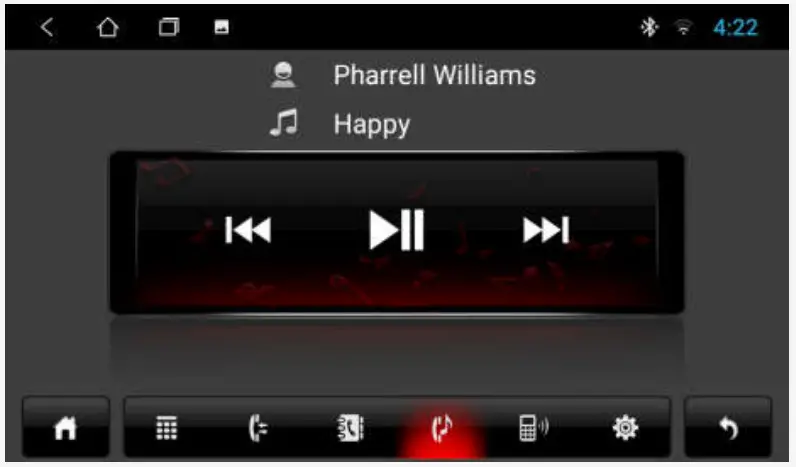
Note: Using the Bluetooth music function, the music player of some mobile phones needs to open the music page from the mobile phone first.
Bluetooth Address Book
1. Bluetooth interface click to ![]() enter the address book interface
enter the address book interface
2. Download Step: Select Phone/SIM–Click the [Download] button to confirm the box synchronization address book request. 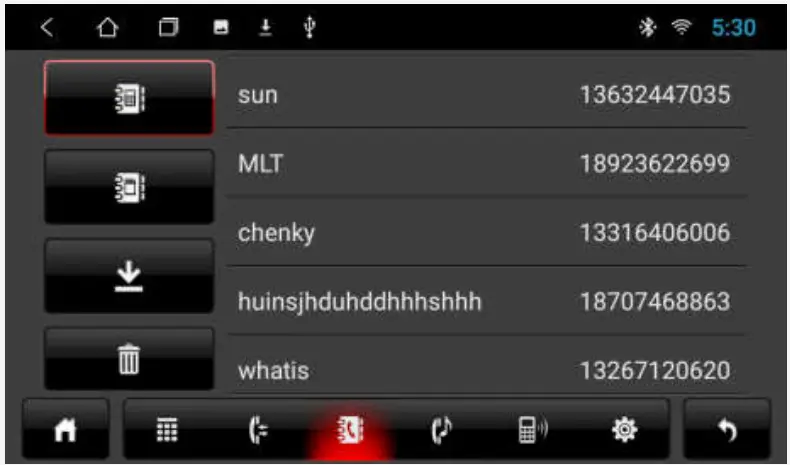
 | Mobile phone book |
 | SIM card phone book |
 | Download button |
 | Delete all imported phonebooks |
2 Find a contact: After synchronizing the address book, click the corresponding phone/SIM button. A search box pops up.
Dialing function
Click ![]() to enter the Bluetooth dialing interface and enter the number you want to dial.
to enter the Bluetooth dialing interface and enter the number you want to dial. 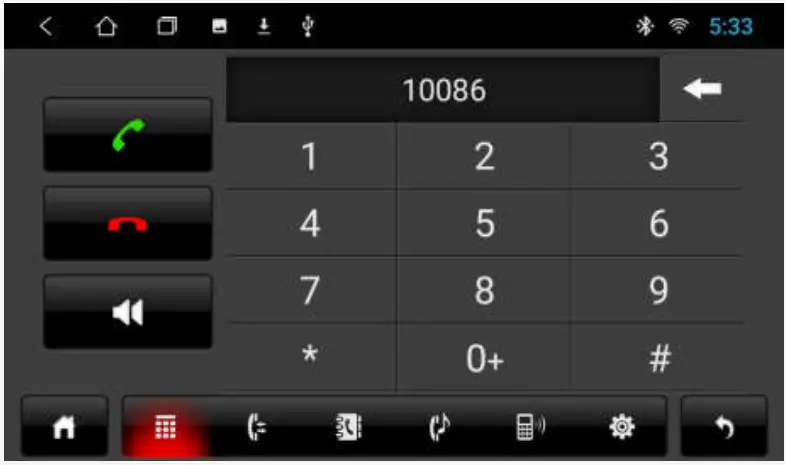
1. Click on the number to enter the phone number, enter the error and click ![]() to delete it bit by bit.
to delete it bit by bit.
2 After entering the number, click ![]() Dial;
Dial; ![]() ends the current call. When you’re on a call,
ends the current call. When you’re on a call, ![]() switches to a mobile phone call.
switches to a mobile phone call.
Call function
When the mobile phone book/unfamiliar number is not downloaded, the caller can only display the phone number. After downloading, the contact name is displayed when the call is made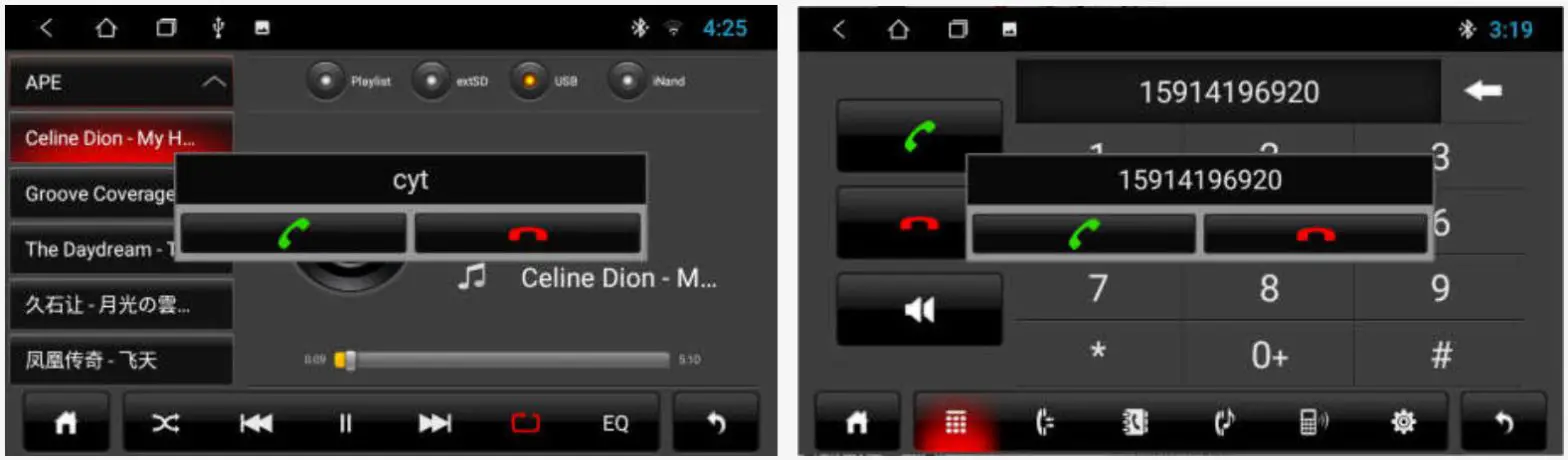
Note: The floating small window disappears automatically after the call ends.
Call history
1.Click to enter the call history interface, only the call history when pairing Bluetooth is synchronized.
2. call record interface, click the contact in the list to broadcast the call 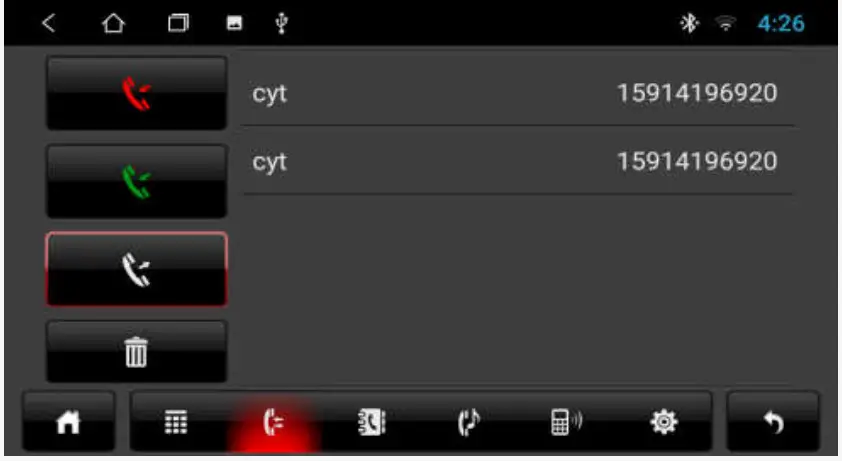
 | Missed call |
| Received call | |
| dial number | |
| Delete call history |
Music function
Click the music icon button to enter the music player interface. Select the playback path [Playlist], [SD Card], [U Disk], [Local] at the top of the interface.
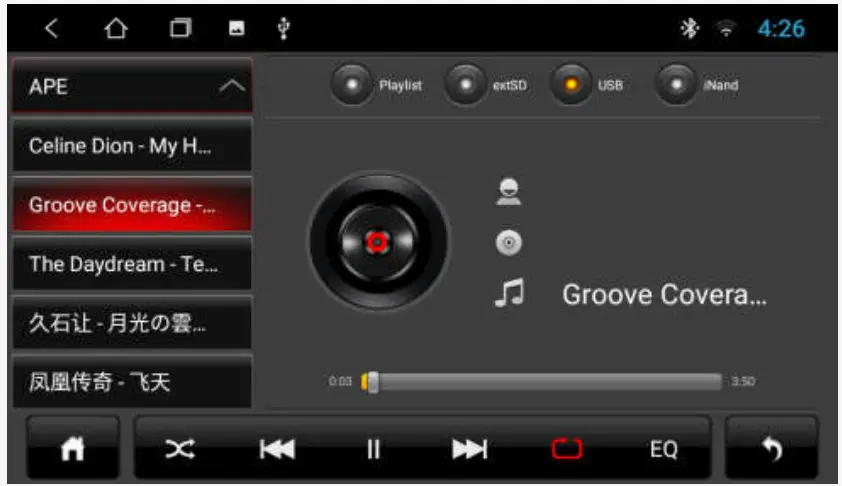
| HOME button | Next song | |
| Random mode | Single/list loop | ||
| Previous song | EQ | Sound effect |
| Pause / resume playback | | return key |
Video function
Click the video function to enter the video playback interface. The format supported by the video player is as follows: MP4/AVI/WMV//MOV/MKV/MPEG/RMVB, etc. 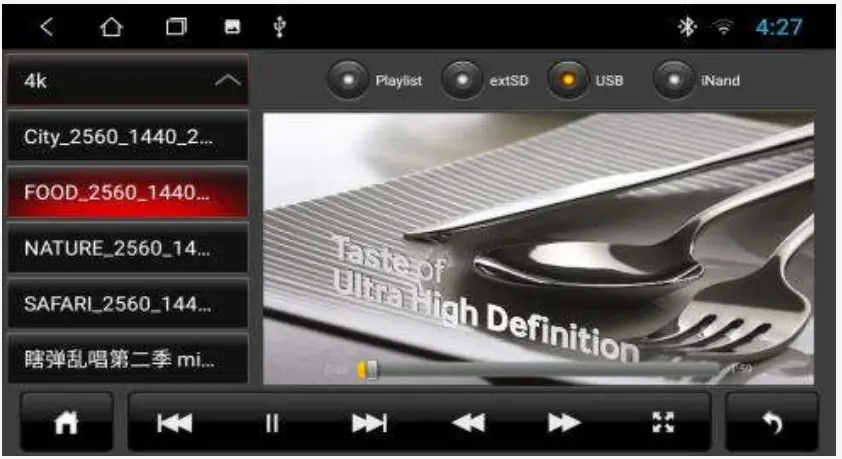
| HOME button | Rewind | |
| Previous song | Fast forward | |
| Pause / resume playback | full/small screen | ||
| Next song | | return key |
Equalizer (EQ)
.1 There are two ways to enter the EQ interface:
1. application interface, click ![]() to enter the equalizer setting
to enter the equalizer setting
2. Click EQ on the radio and music interface to enter the equalizer setting interface.
2.6.2 Classification: Equalizer and sound field settings
1. Equalizer settings with 8 sound effects to choose from
2. Sound field setting, the user can freely adjust the contrast of the bass and loudness, and adjust the volume of the front left, front right, rear left, rear right in four directions.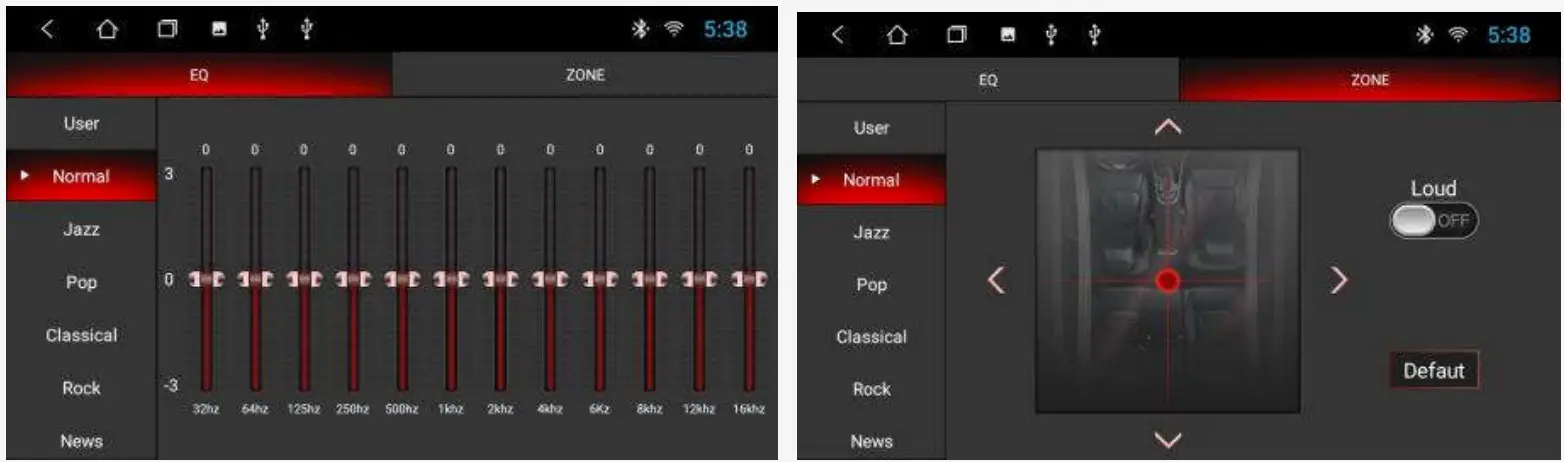
Aux In function
Enter the AUX IN interface;
1. When the video input signal is not connected, the AUX IN interface displays: no video signal
2. access signal, AUX interface displays video screen, returns to the previous interface, ![]() returns to the main interface, timeout is hidden
returns to the main interface, timeout is hidden 
Third-Party Application – EasyConnect:
Four functions of EasyConnect: Android USB/Android WiFi/iPhone USB/iPhone WiFi EasyConnect version:
EasyConnect. TW12.6.1.2.-7233490-201910121553. release.apk
Note: You need to activate before using EasyConnect, otherwise you can’t use it; at the same time, the mobile phone also needs to download the EasyConnect APP. Mobile phone download EasyConnect way: EasyConnect home page – click “How to connect?” Follow the prompts to download 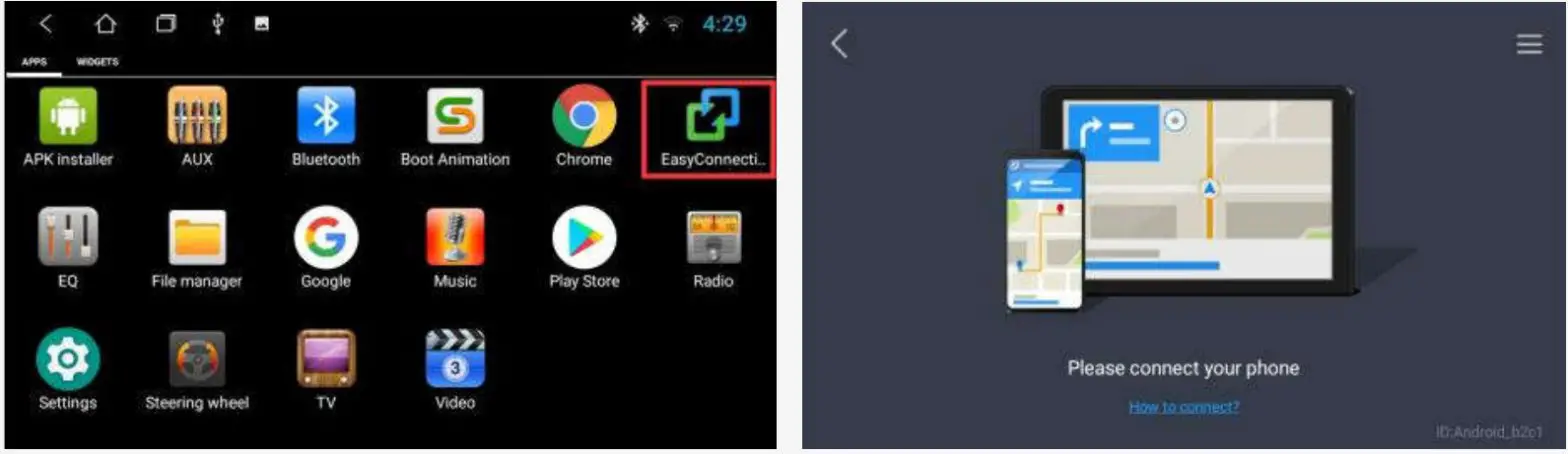
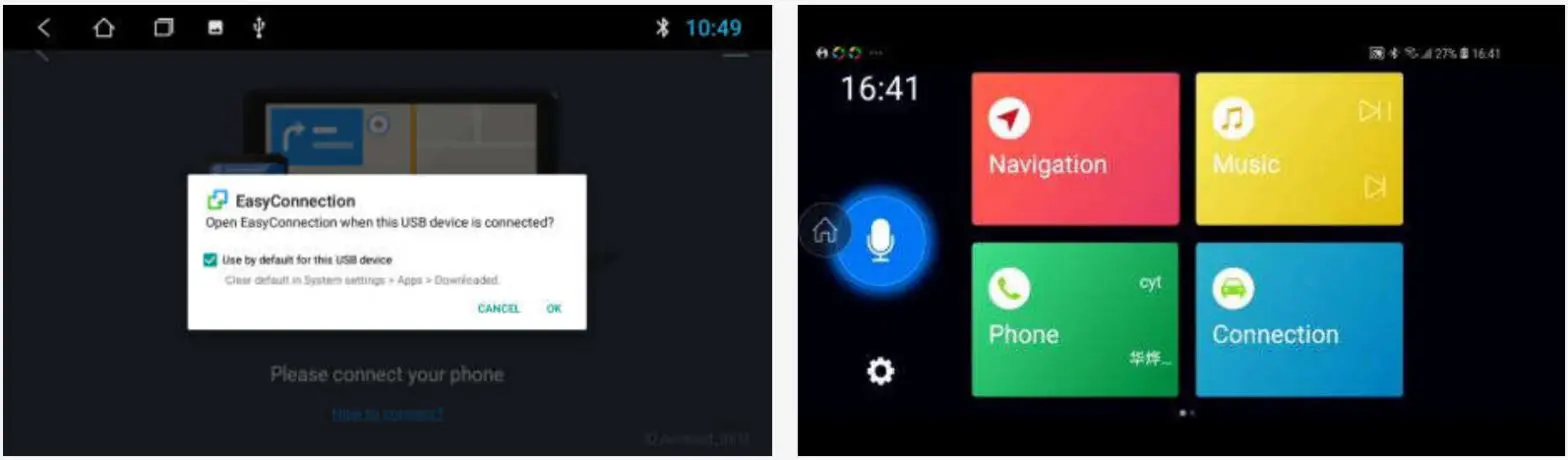
EasyConnect -android USB use
- Android EasyConnect sound is a Bluetooth channel. It is recommended to pair the Bluetooth device first, otherwise, the sound will be output from the mobile terminal.
- Connection steps: After entering EasyConnect, connect the mobile phone and the car through the USB data cable, EasyConnect will automatically detect and click the Control screen pairing application click to confirm the connection. (Do not connect other devices during operation)
Easy Connect-USE of Android WIFI
Android Yilian sound, you need to pair with Bluetooth devices. There are three states of WIFI connection:
1. Turn on the mobile data and hotspot switch, and connect the mobile phone hotspot (recommended)
2. car and mobile phone connected to the same LAN
3. The Yilian application of the mobile phone, manual opening, or automatic detection, the connected car will automatically detect the connection.
Easy Connect-iPhone
1. Apple and Android are connected in the same way.
2. Apple billion sound independent, no need to pair Bluetooth. The default is the car output.
3. Apple opens the phone hotspot and supports mirroring
WIFI
There are two ways to open and close WiFi:
1. drop-down menu WLAN function. Short press: Turn off/on the switch. Long press: Enter the WLAN settings interface.
2 settings _Network and internet WLAN
3.2 sound
The sound settings are mainly about four common functions: reversing mute, navigation channel, navigation volume, and device ringtone.
3.2.1 Reversing mute: When checked, any mode reverses, the car has no sound output; when unchecked, there is sound output
3.2.2 Navigation channel: Prerequisites: Bind navigation, (Navigation software interface select map APK)
1. Front left and front right: When navigating, it is not a system sound source, such as radio/AUX/DVD/TV/external Bluetooth mode, navigation only outputs from the front left and front right, and the left and right rear keeps the sound of the current source;
2. All: When navigating, all four channels have navigation sounds.
1. Navigation: slide the progress bar, adjust the volume of the navigation, and then navigate after setting.
2. background music: slide the progress bar, adjust the current source sound size, adjust the size, reduce the current source sound when navigating; adjust to 0, insert the video when navigating, (the current source has no sound output when navigating the broadcast); The source sound is raised.
3.2.4 Device ringtone: music played when the car calls
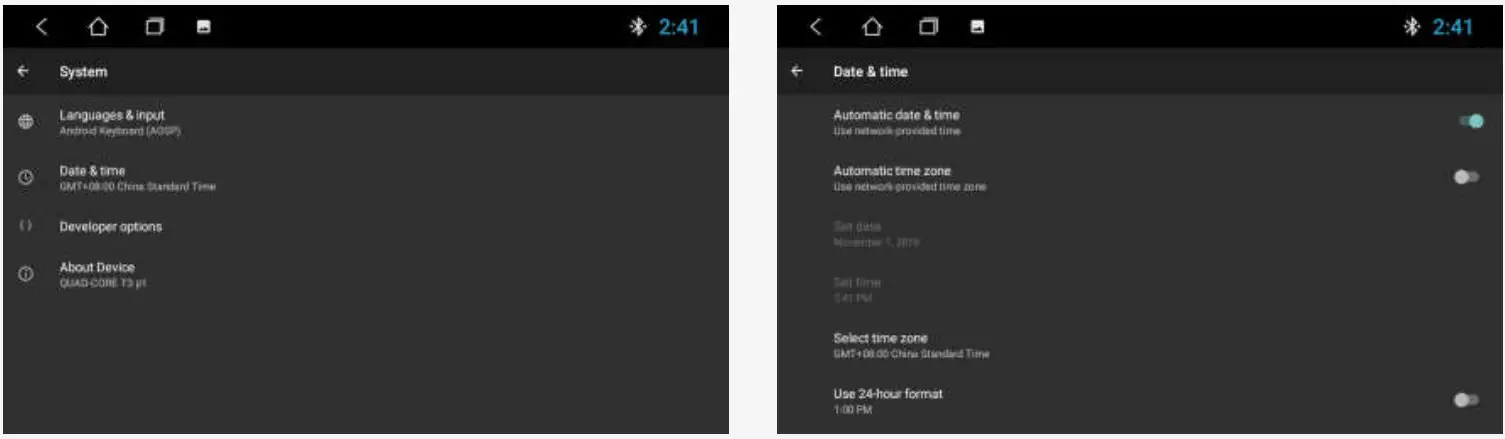
Date and time
The device automatically calibrates the current time, manually setting the date, time, time zone, and format using the time and time zone provided by the network.
Settings-System – Date and time you can set the time zone and time format as needed
switching input method Settings Language and Input Method -.> Virtual Keyboard Manage Keyboard. The opening that will be used, the remaining is closed.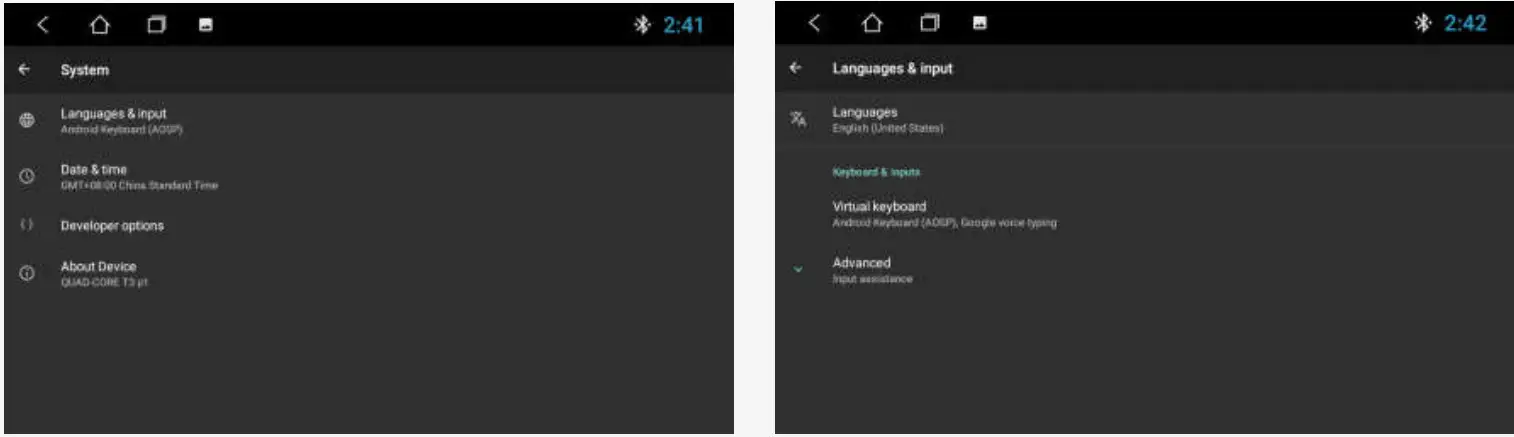
Steering wheel learning
Apply menu —> steering wheel, the user can set according to the prompts. The square control interface is only for models without the CAN protocol. Learning steps:
1. First click the [Start] button.
2. Click on the button you need to learn
3. Press the corresponding button on the steering wheel of your car. If the learning is successful, the buttons on the square control interface will have corresponding color changes.
4. Repeat steps 2 and 3. Until you finish setting all the buttons on the car’s steering wheel.
5. Click [End] and the controller setting process ends.
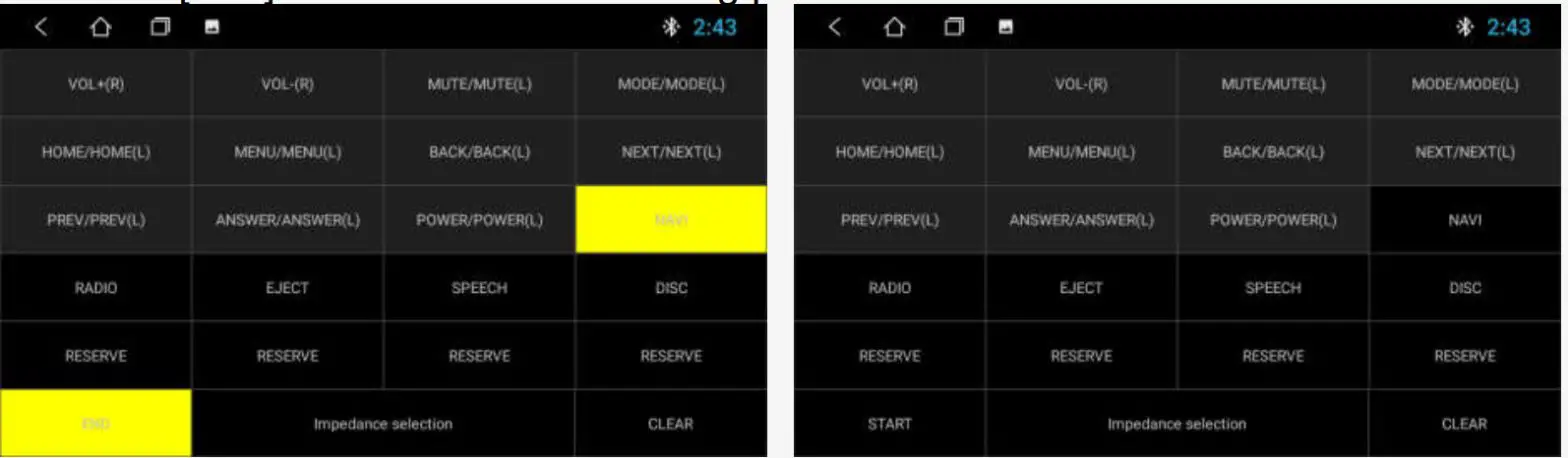
Note: If you want to relearn the steering wheel button, click [Start] and then click [Clear], then repeat steps 1, 2, and 3.
At this point. the description is over, thanks for reading
FCC Statement
This equipment has been tested and found to comply with the limits for a Class B digital device, pursuant to part 15 of the FCC Rules. These limits are designed to provide reasonable protection against harmful interference in a residential installation. This equipment generates, uses, and can radiate radio frequency energy and, if not installed and used in accordance with the instructions, may cause harmful interference to radio communications. However, there is no guarantee that interference will not occur in a particular installation. If this equipment does cause harmful interference to radio or television reception, which can be determined by turning the equipment off and on, the user is encouraged to try to correct the interference by one or more of the following measures. Reorient or relocate the receiving antenna. Increase the separation between the equipment and receiver. Connect the equipment into an outlet on a circuit different from that to which the receiver is connected. Consult the dealer or an experienced radio/TV technician for help. Caution: Any changes or modifications to this device not explicitly approved by the manufacturer could void your authority to operate his equipment. This device complies with part 15 of the FCC Rules. Operation is subject to the following two conditions: (1) This device may not cause harmful interference, and (2) this device must accept any interference received, including interference that may cause undesired operation. RF Exposure Information This equipment complies with FCC radiation exposure limits set forth for an uncontrolled environment. This equipment should be installed and operated with a minimum distance of 20cm between the radiator and your body.


