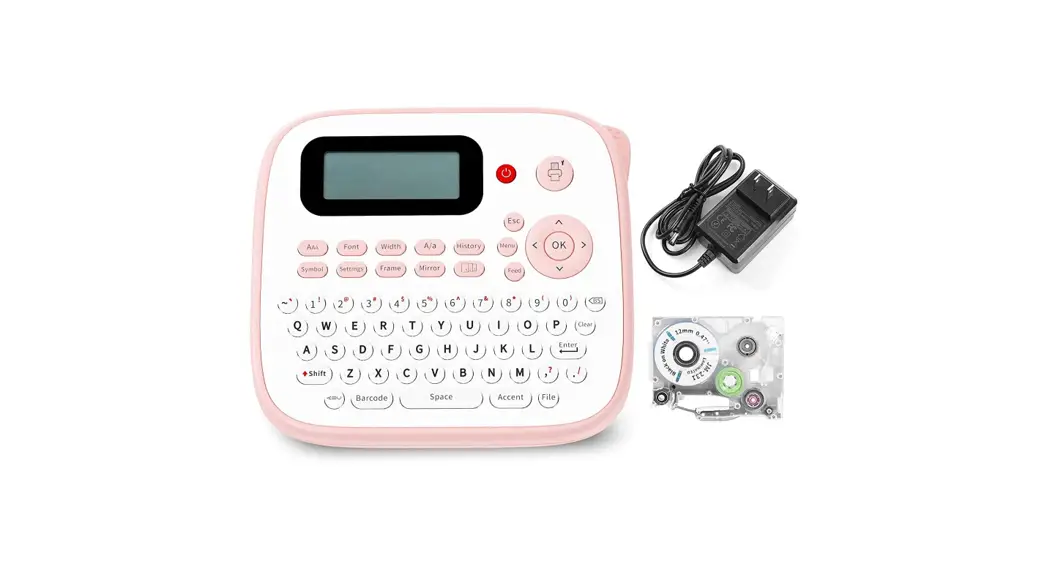
![]() D210S Handheld Label Printer
D210S Handheld Label Printer
User Guide
Please read this user manual carefully before using this product, and store it for future reference.
Contents Checklist
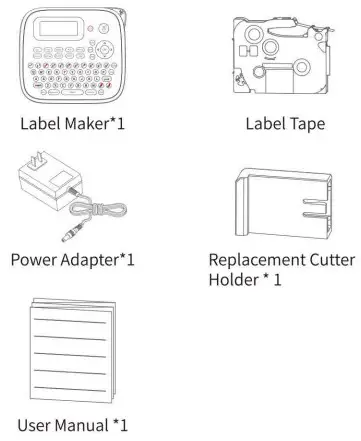
 The quantity of included label tape is subject to the actual delivery
Specification
D21OS | |
| Tape width and maximum number of print lines | 3.5/6mm: 1 Line 9mm: 3 Lines 12mm: 4 Lines |
| Max Print Width | 9mm on 12mm tape |
| Print Technology | Thermal Transfer |
| Print Resolution | 180’180dpi |
| Print Speed | 20mm/s |
| Cutting Method | Manual cutting |
| Automatically turns off after | 5 minutes |
| Automatic memory function | Support |
| Ribbon tightening function | Support |
| Consumables identification function | Manual selection |
| Power supply | Power Adapter or 6 AAA batteries |
| Item Size | 213mm*116.5mm*61.5mm /83.8’45 8.24 2 inches |
| Font Style | Normal, Bold, Italic |
| Width | Normal, X 2,x 1/2 |
| Frame | Support |
| Label Length | The label length for each label depends on the label content, which is up to 800mm |
| Margin | Full: Equal margins on both sides are 25mm Half: Equal margins on both sides are 12mm Narrow: Equal margins on both sides are 4mm |
| Mirror Mode | Support |
| Available Memory | 15 labels. Up to 80 characters per label |
| Switching upper case/Lower case | Press A/a button to switch to upper case or lower case |
| Shortcut Keys | ®Shift+Print Ker Multiple Copies[1-9] ©Shift+Number (0-9) =Access to special characters |
Parts Description
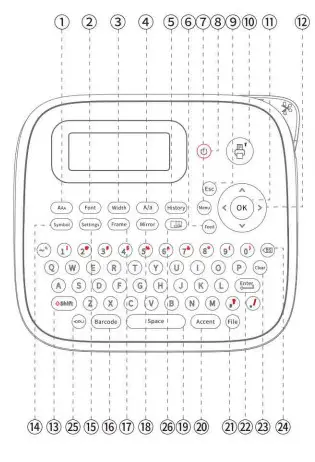
| 1 Font size 2 Font type 3 Word width 4 Caps key 5 Print history key 6 Feed key 7 Menu key 8 Power key 9 Escape key 10 Print key 11 OK key 12 Cursor key 13 Shift key | 14 Symbol key 15 Label setting key 16 Barcode key 17 Frame key 18 Mirror mode key 19 Space key 20 Accent key 21 File key 22 Enter key 23 Delete all key 24 pack space key 25 Font orientation key 26 Multiple labels editing key |
Turning on the Power
Method I: Power on with the adapter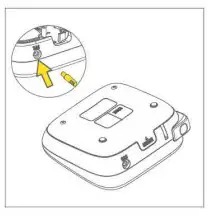 Method II: Power on with AAA alkaline battery
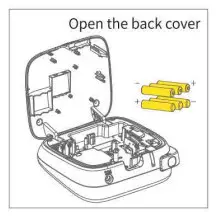
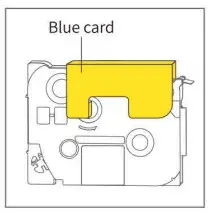
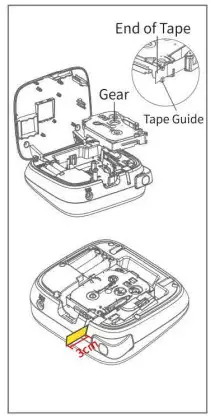
Installation for Label Tape
- Take outthelabeltape and remove the blue card

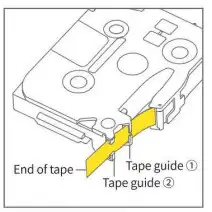
- Make sure the end of tape passes through both tape guide 1 and 2, then extend the end of the tape by about 1.18 inch (3cm) from tape guide 2.

- Turn the toothed wheel in the direction of the arrow on the label tape until tight to avoid damage.

- Install the label tape correctly as indicated, and make sure that the extended tape comes out through the tape exit slot of label maker.

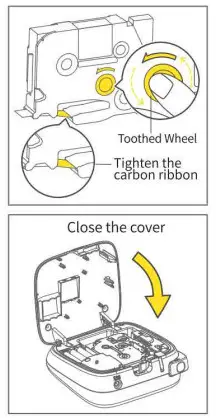
We recommend installing label tape after the label maker power on.
Common Functions
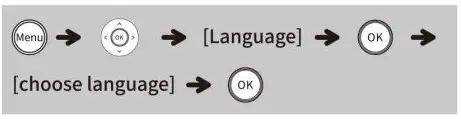
6.1 Language
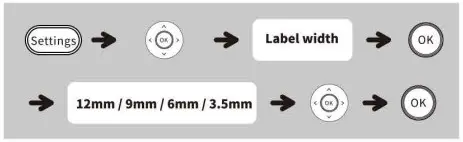
 6.2 Select label width
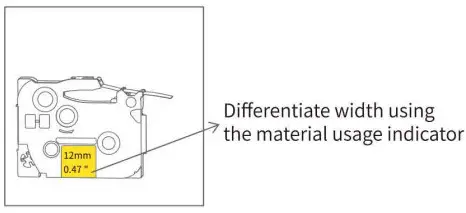
- When using the label maker for the first time, install the label tape and select the label width. Use the navigation keys to select the label width

- Whenever you replace the label tape during use, you need to re-select the label width


6.3 Text format
- Font Size

- Font Style

- Width

- Symbols & Punctuation

- Frame

- Switching upper case/lower case
Press key to switch to upper case or lower case.
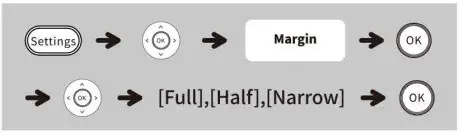
 - Setting margins
 Margin function sets equal margins on both sides of the text
 1. After setting [Half] and [Narrow], the display shows the label length from the printed dots (:) to the end of the label
2. In order to save label tape, set the margin to [Narrow] - Entering multiple lines of text
a. 12mm wide label tape: Support print 4 lines of text, After entering the 4th line of text, do not press the [Enter] key, otherwise the error message “Please reduce the number of lines!” will be displayed. b. 9mm wide label tape: 3 lines of text can be printed.
After entering the 3rd line of text, do not press the [Enter] key, otherwise the error message “Please reduce the number of lines!” will be displayed.
c. 3.5mm, 6mm wide label tape: 1 line of text can be printed, after entering the first line of text, do not press the [Enter] key, otherwise the error message “Please reduce the number of lines!” will be displayed.


 Margin function sets equal margins on both sides of the text
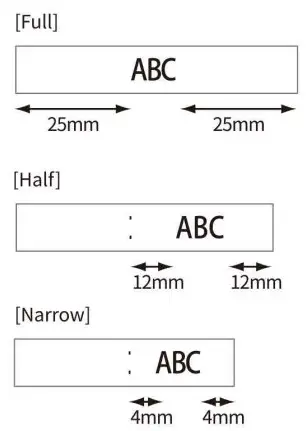
 b. 9mm wide label tape: 3 lines of text can be printed.
6.4 Clearing
(1) Press) ![]() (backspace) key] to delete the letters one by one
(backspace) key] to delete the letters one by one
(2) 1 To delete all text and format: 2 To delete all text only:
 6.5 Label printing function
(1) Printing single copies
- If you need only 1 copy of the label, press [print key]
- To prevent damage to the tape, do not touch the cutter lever while the screen displays “Printing…..” or”Feeding”
- To cut off the label, push the tape cutter lever on the upper-right corner of the printer
- Peel the printed label from the backing and apply the label
(2) Printing multiple copies
Use the navigation keys to select the number of copies The number of copies can also be specified by pressing a number key
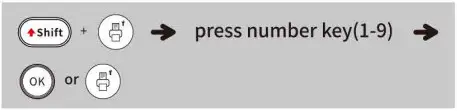 Up to 9 copies of each label can be printed at a time
6.6 Multi-copy editing function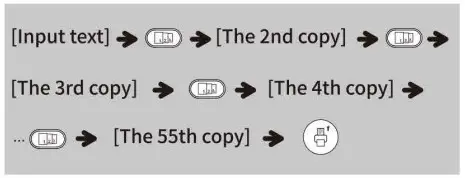 Multi-copy editing: Use this function to UC continuously edit up to 55 different labels
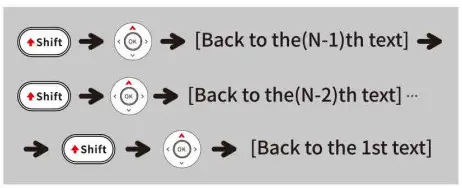
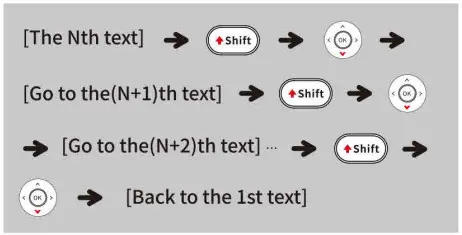
Review/Modify the Text
- Browse up and modify

- Browse down and modify
6.7 Selection of Cutting Method
Turn on Cutting (If print the label with “narrow margin” or “half margin”, or print several labels, it is recommended to turn on “Cutting” to manually cut the label one by one, and no need to cut by scissor.) 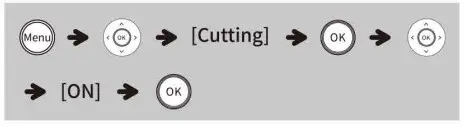 Turn off Cutting (Manually cut the whole label after printing, then cut the label by scissor when needed)
 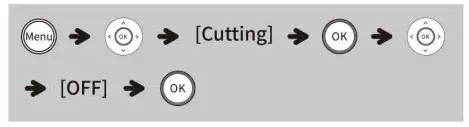 Please do not press the cutter button before a reminder to cut, otherwise it will prompt Cutter Error!” and the printing work will be terminated.
6.8 Set mirror mode
a. Mirror mode must be turned off when using laminated label tapes
b. Mirror mode must be turned on when using cloth label tapes and non-laminated label tapes 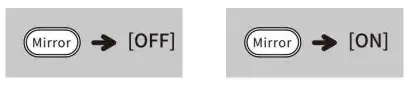
(1) Barcode Set
When you need to print a barcode on a label for the first time, you can choose a barcode set to do it. 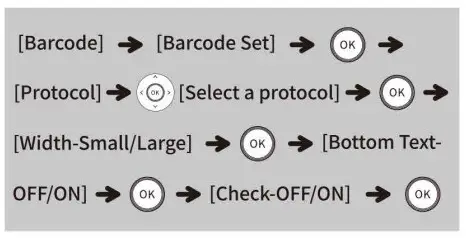
“Check” only appears on the LCD after selecting CODE39,ITF25 or CODABAR.
(2) Barcode Input
When you need to reprint another label with the last barcode you can enter text directly by barcode input 
6.9 Saving label Files
Save up to 9 label files and recall them later for printing, allowing editing and overwriting of stored label files. 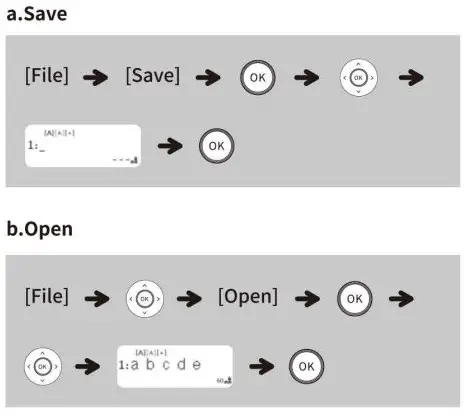
If you try to store a label file when there is already a label file stored to that number, a message “Cover?” will appear. Press[OK key] to replace the previous label file with the new one. Press [Backspace key] to cancel.
6.10 Other printing types
(1) Cable Wrap
You can create a label that can be wrapped around a cable or wire. The input text line is rotated 90°counter clockwise and printed on label whose length is automatically determined by setting the cable diameter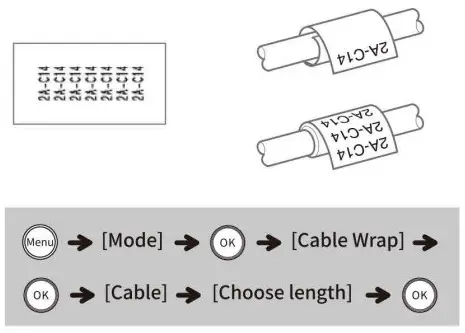
Only Flexible ID label tape can be used to print cable wrap labels
(2) Cable Flag
With this function, a label can be wrapped around a cable or wire with its ends stuck together to form a flag. The input text lines are printed at the both ends of a label. You can select the cable diameter. The label length is automatically adjusted according to the text length. 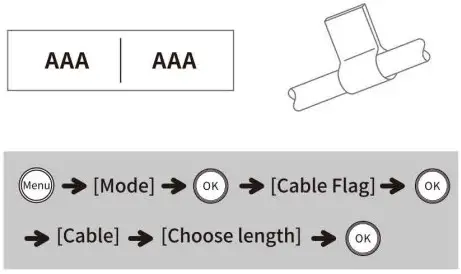
Only Flexible ID label tape can be used to print flag labels to label cable and wires. Use the cable flag function when the diameter of the object is less than 3mm
(3) Faceplate
Labels printed with this function can be used to identify various components or panels. 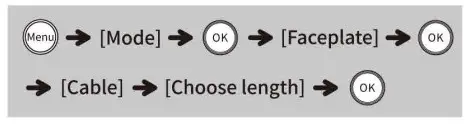
6.11 Barcode
You can print barcodes on labels with this function
| Item | Description |
| Protocol | CODABAR, CODE39, ITF25, CODE128, EAN-13, EAN-8, UPC-A, UPC-E |
| width | Small |
| Large | |
| Bottom Text | OFF |
| ON | |
| OFF | |
| Check Code | ON(only applied to CODE39,ITF25 and CODABAR) |
6.12 Entering accented characters
1.Press an alphabetic character, then press (Accent ) [accented character key], the accent options of that alphabetic character are displayed 
To cancel the current operation, press [BS (Backspace)key]
Cleaning Guide for Label Maker
Use a cotton swab dipped in a small amount of alcohol, and wipe the print head gently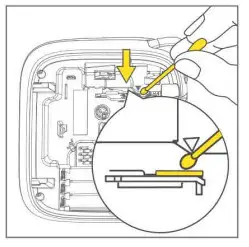
- The print head needs to be cleaned when printing is not clear.
- Make sure the power is turned off and the power cord is unplugged before cleaning the print head
- Wait until the alcohol evaporates and the print head is dry, then turn on the label maker to print and check the resulting print
- Do not scratch the print head with a hard object, otherwise the print head will be damaged and the printing effect may be compromised.
Replacing the Cutter Holder
If the label tape cannot be cut neatly after continuous use, please replace the cutter holder as shown in the following diagram.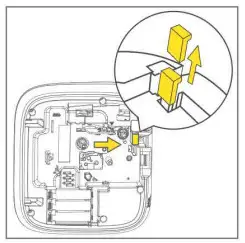

https://downloadapp.qu-in.life/instruction/D1000/
If you need user manual in other languages, please scan the QR code.
Troubleshooting
| Message | Cause | Solution |
| Low Battery! | The batteries are weak | If using AAA alkaline batteries: replace them with new ones |
| Invalid! | An invalid number was entered as the label length, cable diameter or faceplate length | Correct entry |
| Text Limit! | The number of entered characters exceeds the label length | Reduce the text or select [Auto] as the label length |
| No Data! | 1 An attempt was made to print a label file when no data was stored in the memory. 2 [Print key],[Enter key],[OK key], [Preview]was pressed when no text was entered. | Press [BS(Backspace)Key] to return to the edit page and enter text |
| Line Limit! | 1 12m:An attempt was made to enter a 4th line by pressing [Enter key]; 2 9mm:An attempt was made to enter a 3th line by pressing [Enter key]; 3 6mm:An attempt was made to enter a 1th line by pressing [Enter key]; | Reduce lines |
| Text Full! | The maximum number of characters 80 characters for regular text) was of already entered. Reduce text) wat of characters to a maximum of 80 | Reduce entry (reduce bytes please!) |
| Cutter Error! | The cutter lever was used during the printing process | Press [Print Key] and DO NOT TOUCH the cutter lever while printing |
| No Cassette! | There is no cassette in the label maker | 1 Input a cassette 2 Cover the back of the device. |
Additional Troubleshooting
| Problems | Solutions |
| The display stays blank after turning on the device | 1 Check that the batteries are correctly inserted. 2 If the batteries are weak, replace them. 3 lf using the power adapter, make sure the cord is connected correctly and power is turned on |
| When the label is printed out, the margin (space) is too large on both sides of the text | See “Setting Margin” in this user manual and select [Half] or [Narrow] to have smaller margins for labels. |
| The printer does not print, or the printed characters are not formed correctly | 1 Check that the tape cassette has been inserted correctly ©If the tape cassette is empty, replace it. 2 Check that the cassette cover is fully closed. |
| A blank horizontal line appears through the printed label The printer has “frozen up” (i.e. nothing happens when a key is pressed, even though the printer is on) | There may be some dust on the printer head. Remove the tape cassette and use a dry cotton swab to gently wipe the printer head with an up-and-down motion. Or insert a print head cleaning cassette to clean the printer head more easily 1 Replace batteries in case the batteries are weak 2 Restart the printer by pressing the Power key 3 lf the two solutions above do not work, return to your seller |
| The power turns off when trying to print | 1 The batteries may be weak. Replace them. 2 Check that the batteries are correctly inserted. |
| The tape does not feed correctly or the tape gets stuck inside the machine | 1 Check that the end of the tape feeds under the tape guides 2 The cutter lever has been used while printing. DO NOT TOUCH the cutter lever during printing |
Product Warranty Description
Product after-sales service is strictly based on the consumer protection law of the People’s Republic of China and the Product Quality law of the People’s Republic of China.
Services are as below
- The free warranty period is 1 year from the date of purchase (according to the date of the official purchase invoice.
- Within-days from the date of the purchase receipt, the user can choose to return, replace or get free repair service.
Within—days from the date of receipt, the user can choose to replace or repair the product. Service is free of charge. - Free repair service does not include insurance, postage, shipping and other fees, nor does it include door-to-door service.
Non-warranty regulations are as follows
The warranty is void under the following conditions:
- Exceeding the warranty period
- Not presenting the original purchase invoice and the original warranty/maintenance card together, or the warranty card does not match the invoice information.
- Presenting a damaged warranty/maintenance card(e.g. torn or tampered with).
- Altering product information.
- Damage caused by unauthorized repair, disassembling. etc.
- Damage caused by human error.
- Damage caused by natural disasters such as earthquakes, floods, windstorm, lighting strikes, or external disasters such as fires and house collapse.
- Failure or damage caused by harsh conditions (oil, dust, moisture, direct sunlight, etc.) or failure to use or care for the product as written in the instruction manual Please safekeep the warranty/maintenance card properly. The warranty/maintenance card will not be replaced if lost.
Product warranty description takes effect with warranty/maintenance card properly filled in.
Warranty/Maintenance Card
L] Replace
L] Return
| User Information | Name: Gender: Phone: |
| Address: | |
| Product Information | Date of purchase: |
| Product order number: | |
| Product serial number: | |
| Reason for Return ( Replace / Repair /Request Maintenance ) | Problem description: |
![]()


 Label Printer User Guide")


