![]()
![]()
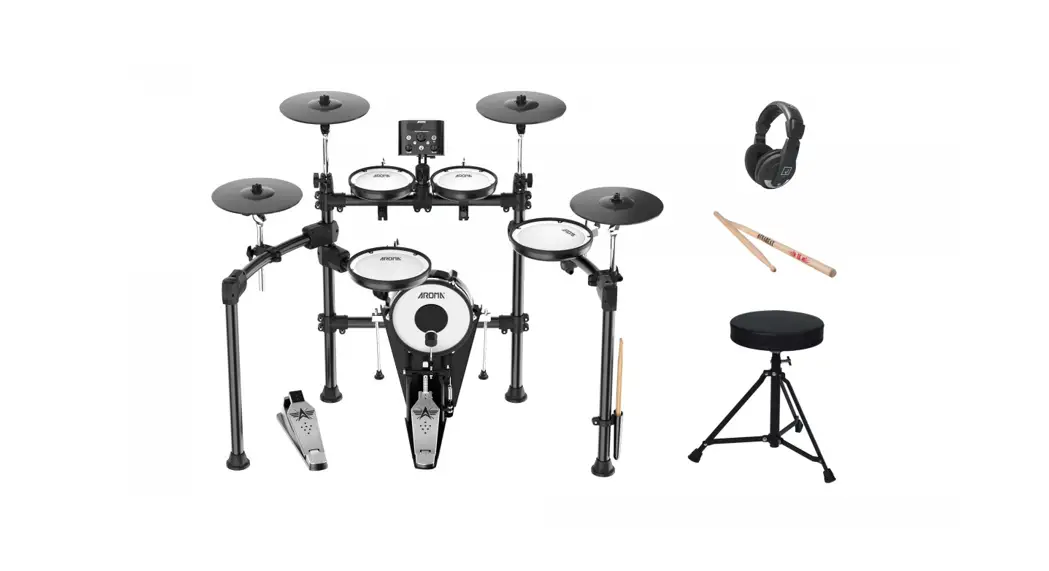
TDX-25 II Electronic Drums
User Manual
Thank you for purchasing Aroma TDX-25 II Electronic Drum. Please follow ((TDX-25 II ASSEMBLY DIRECTORY)) to complete assembling, and then read below manual.
Product Features
Enjoy Playing
Play TDX-25 II with Aroma drum amp ADX-40 or ADX-20 (optional purchase) to have a similar feeling of acoustic drums. TDX-25 II restores the real sound patterns of acoustic drum sets and is easy to adjust the sound level. Also, enjoy playing quietly with headphones.
Updated Mesh Drum Head
All the Tom and Snare drums use new mesh heads for a better experience.
Metronome Inside
10 different metronome tone are optional and tempo \ beat \ rhythm \ and volume are adjustable with light indication.
Simple Operation Interface
Easy to operate the host machine with only 7 buttons, 2 volume knobs, and with LCD screen to show all the operation contents.
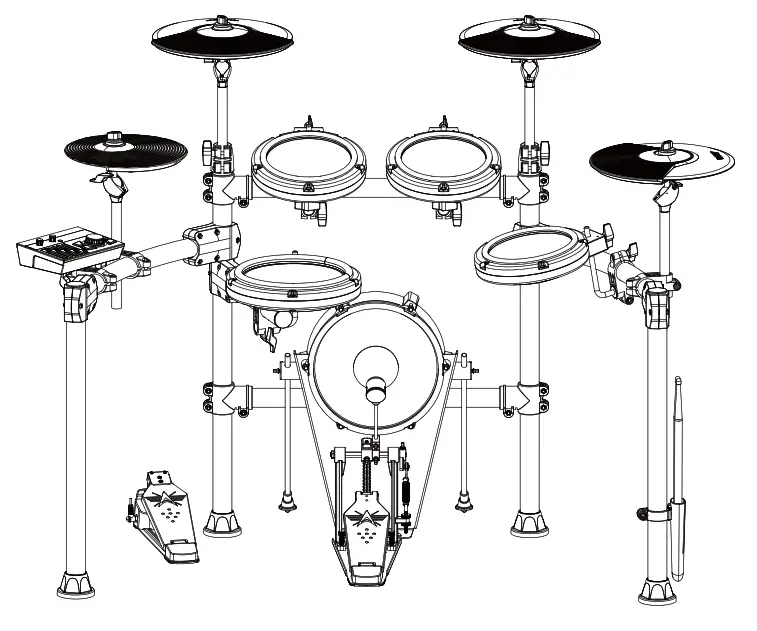
Easy Assembly
Only 8 steps to assembling a TDX-25 II electronic drum kit. Please follow the attached ASSEMBLY DIRECTORY manual to assemble your drum kit.
Drums Introduction
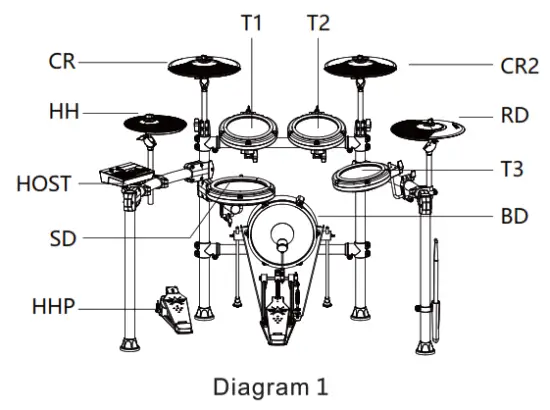
Crash Cymbal
CR, CR2, 11″ diameter, half silicone, double triggers, mute function, positioned left top of drum kit.
Ride Cymbal
RD, 11″ diameter, half silicone, triple triggers, mute function.
Hi-Hat
HH, 10″ diameter, half silicone, single trigger.
Tom Drum 1, Tom Drum 2, Tom Drum 3
Ti, T2. T3. 7″ diameter, single trigger mesh head.
Snare Drum
SD, 8″ diameter, mesh head, double triggers, two sounds of Side Stick, and Head Shot. Feel close to the acoustic drum head and much quieter.
Bass Drum
BD, 10″ diameter, designed with aluminum alloy stomp pedal, double chains link, independent drumstick and drum pad. Different strength makes a different sound level.
Hi-Hat Pedal
HHP made from high-quality aluminum alloy. Play with Hi-Hat to make different sounds.
Remind: Each abbreviation is marked on each drum pad and cymbal and also on each audio cable end. Make sure to match each pad when assembling.
Basic Play Method
This is a brief introduction on how to play the drum kit.
Play with Hi-Hat and Hi-Hat Pedal
Stamp down the Hi-Hat pedal, hit Hi-Hat, make short sounds’tzi tzi …’, refer to Diagram 2. Release the Hi-Hat pedal, hit Hi-Hat, and make a long sound…; refer to Diagram 3. Play with the Hi-Hat pedal alone, to make the different strong or weak sounds of ‘tza, the…’ based on the speed and the strength of each stamp on the Hi-Hat pedal.
Play with Crash Cymbal
Bow Shot ( Diagram 4 ) and Edge Shot ( Diagram 5 ) to make different crash cymbal sounds. To mute the crash cymbal, use fingers to pinch and hold the cymbal edge. A same mute function also works on Ride cymbal. Mute area refers to Diagram 7.
Play with Ride Cymbal
Bow Shot ( Diagram 4 ) and Edge Shot ( Diagram 5 ) make different ride cymbal sounds, also Bell sound (strike the top of ride cymbal refers to Diagram 6).
Play with Bass Drum Pedal
Make different bass drum sounds based on the speed and the strength of each stamp on the bass drum pedal.
Play with Snare Drum
The snare drum has a different sound based on the stick Strength, snare head sound, refer to Diagram 8. Side Stick sound refers to Diagram 9. 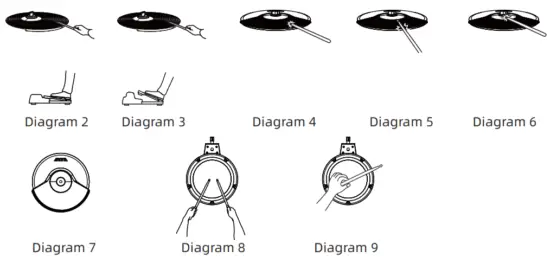
Host Machine Introduction
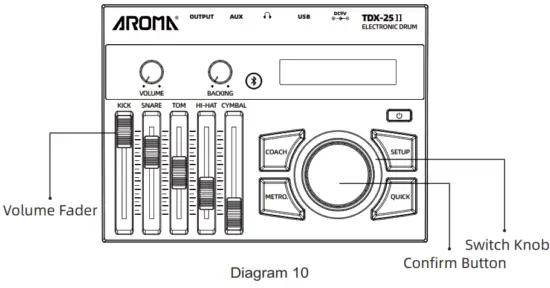
![]() Press to turn On power / Press and hold to turn Off power. ( Set to power off automatically, refer to next page and set ‘AUTO OFF’ to be ’30 MIN”lHOUR’ , or ‘OFF’ ) Switch Knob: Turn the knob clockwise or anti-clockwise to change sound kits. ( Under different modes, the Switch Knob controls different functions, refer to Knob Fu-nction description on next page)
Press to turn On power / Press and hold to turn Off power. ( Set to power off automatically, refer to next page and set ‘AUTO OFF’ to be ’30 MIN”lHOUR’ , or ‘OFF’ ) Switch Knob: Turn the knob clockwise or anti-clockwise to change sound kits. ( Under different modes, the Switch Knob controls different functions, refer to Knob Fu-nction description on next page)
Volume Fader: This can change the volume of each strike pad. KICK stands for BD (Bass Drum), SNARE stands for SD(Snare Drum), TOM stands for all Toms(including T1, T2andT3), HIHAT stands for HH and HHP(HiHat and HiHat pedal), CYMBAL stands for CR1, CR2and RD(crashl,crash2 and ride cymbal)
Confirm Button: Confirm each function chose.
COACH: MIDI Accompaniment to practice fuction on/off
METRO.: Metronome On/ Off
SETUP: Return Button ( Remind: Press and hold the button to save the set. )
QUICK: Button to enter user setup
VOLUME: Control the master volume of the drum kit.
BACKING: Control metronome volume.
“![]() ” : Bluetooth on/off ”
” : Bluetooth on/off ”
OUTPUT” : 6.35mm output
“AUX” : 3.5mm AUX IN
” ![]() ” : 3.5mm stereo headphone socket
” : 3.5mm stereo headphone socket
“USB” : USB MIDI socket
“DC9V” : Power socket ![]()
How To Use
- Power and Audio Cable Connection
Use the attached audio cable to connect the OUTPUT of the host machine to your drum amp or connect your headphone to the earphone port of Host Machine. And then connect the power adapter to the DC9V port of Host Machine. - Turn On/Off Host Machine
Press button to turn On the machine. Press and hold the button to turn Off the machine. The screen shows below.
Power On: (Supplied software is subject to change without prior notice. )
Power Off: - Turn On Drum Amp ( if using a drum amp)
Turn on the drum amp and adjust the drum amp volume level. Hit the drum pad in the same time and adjust Host Machine volume control and the drum amp volume control to make a balance. - Select Drum Kit
The default drum kit is Pop Stage. Turn switch knob clockwise or anti-clockwise to select other drum kits, refers to Diagram 11.
 (Supplied software is subject to change without prior notice. )
All durum kites list:
| K1 Pop Stage | K6 Metal Live | Kll Fast Funk | K16 Latin Jan |
| K2 Pop Studio | K7 Power Metal | K12 Funky Rnb | K17 Electronic |
| K3 Hard Rock | K8 Metal Studio | K13 J-Standards | K18 Cavort |
| K4 Old Rock | K9 70’s Fusion | K14 Cool Jazz | K19 Techno |
| K5 Heavy Metal | K10 Modern | K15 Swing Jazz | K20 Dubstep |
5.Song Select
After power On, press COACH Button, the screen shows ![]() to enter Song play mode. Turn switch knob clockwise or anti-clockwise to choose songs. After selected, press Confirm button, and the button Light flashes. The selected song starts to play.
to enter Song play mode. Turn switch knob clockwise or anti-clockwise to choose songs. After selected, press Confirm button, and the button Light flashes. The selected song starts to play.
| Turn power on | Coach | Coach | ||||
| Press to power On | Turn knob to select songs | 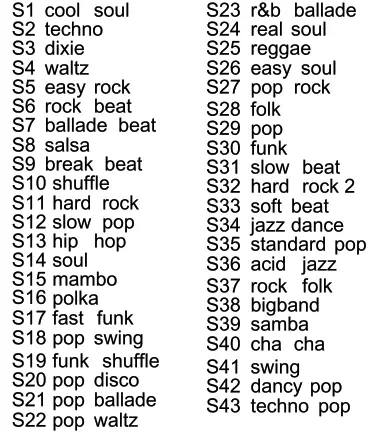 | Play songs | When the count-in beat is over, it starts to play automatically | For other adjustments, press the Setup key | Turn the selection knob to adjust the parameters |
| Bass volume for accompaniment | ||||||
| Press Confirm Button to pause/ resume the accompaniment | Drum volume for accompaniment | |||||
| melodic instrument volume for accompaniment | ||||||
| BPM for accompaniment | ||||||
6. Kit Edit
Step 1: Press “QUICK” to enter kit edit menu. Turn switch knob to select desired parameter to edit including: Pitch, Level, Pan, Rev(Reverb), Velo(Velocity), Sens(Sensitivity), Mask (Scan Mask Time), Note(MIDI note number), Voice. Then press confirm button to enter the parameter.

Remind: The “SETUP” button edits only the current selected drum kit. Menu of all parameters are as below. 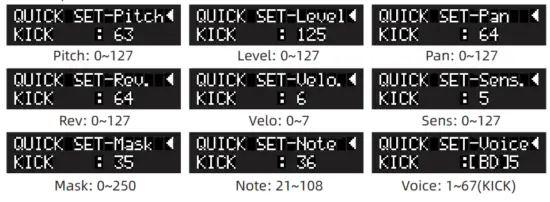
Step 2: After selecting the parameter, strike the desired pad or cymbal. The screen automatically shows the part name which you strike. All the corresponding names are as below.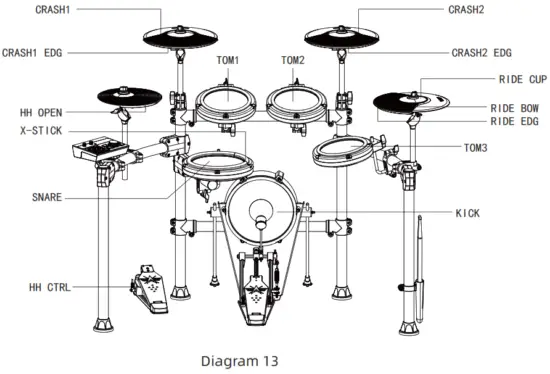
Remind 1. Stamp on the hi-hat pedal and strike the hi-hat cymbal, the screen shows HH CLOSE (hi-hat close).
Step 3: Turn the switch knob to select the desired parameter, which refers to Diagram 14. Press confirm button to confirm and return to Step 1 to edit other parameters. After adjustment, press the “QUICK” button to return to the main menu, and all the settings are automatically saved.
7. System Setting
Press “SETUP” to enter the setup menu, turn switch knob to select KIT SETUP, refers to Diagram 15. Press confirm button to enter kit setup menu. 
Step 1: Turn the switch knob to select the desired parameter to edit including TRIG SCAN, EQ BASS, EQ TREBLE, REV VOL(reverb volume), REV TYPE(reverb type), LOCAL(local sound), MIDI CH(MIDI channel). Then press confirms button to enter the parameter. The menu of all parameters are as below.
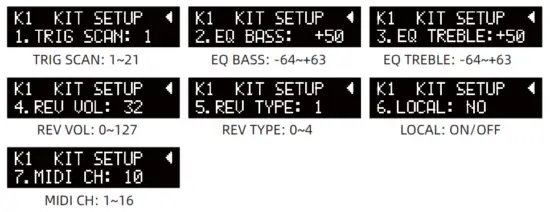 Step 2: Turn switch knob to adjust the parameter, refers to Diagram 16. Press confirm button to confirm and return to Step 1 to edit other parameters.
After adjustment, press “SETUP” button to return to the main menu, and all the settings are automatically saved.

8.Restore Kit Setting
Press “SETUP” to enter the setup menu, then turn switch knob to select KIT RESET. Press confirm button to restore factory settings of the current drum kit. The indicator turns on Red color and then Off, which indicates the setting is restored. Refers to Diagram 17.
9. Auto Power Off
Press “SETUP” to enter the setup menu, then turn switch knob to select AUTO OFF. Press confirm button to enter automatic shutdown menu. Press turn switch knob to select standby time length, press confirm button to save the setting and return to the main menu. Refers to Diagram 18.

10. Factory Reset
Press “SETUP” to enter the setup menu, then turn switch knob to select FACTORY RESET. Press confirm button to restore factory settings of all the drum kits. The indicators turns Red color and then Off, which indicates the setting is restored. Refers to Diagram 19.
 11. Anti-crosstalk Function
When crosstalk occurs, adjusting the corresponding value with this function can effectively solve the crosstalk problem. Press “SETUP” button to enter the settings menu, Turn the selector knob to select XTALK SETUP, refer to diagram 20.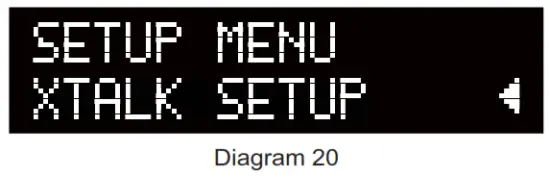
Press confirm button to enter XTALK setting, for example. When the snare drum is struck, the sound of the cymbal appears:
- Automatic recognition of drums or cymbals when struck (strike snare drum “SD”) refer to diagram 21.

- Press the confirm button to switch to the crosstalk drum pad, and press the “COACH” button to select the drum pad or cymbal corresponding to the sound that crosstalk appears (select cymbal “cm ^) refer to diagram 22.

- Turn the selector knob to adjust the parameter. Increase the corresponding value, press the SETUP button to return and automatically save the parameters after finishing the adjustment.


Note: The lamer the value, the more serious the impact. It is best to adjust to no crosstalk, try not to make the value too large.
| Sens | Sensitivity adjustment. The value corresponds to the minimum signal triggered by the pad or cymbal you strike. The smaller the value, the higher the sensitivity. |
| Velo | The force curve, which can be modified to your proper strike force and your habit. 0: LINER; 1: EXP1; 2: EXP2; 3: LOG1; 4: LOG2; 5: SPLINE; 6: LOUD1; 7: LOUD2 |
| Rev | Pad or cymbal reverb effect level. The bigger the value, the greater the reverb level. |
| Pan | Sound image, to adjust sound positions. |
| Level | Pad or cymbal volume level |
| Voice | Pad or cymbal sound, to select a different sound for a certain pad or cymbal. |
| Note | Midi mapping value. Default setting to general Midi mapping (Japan MIDI Standards Committee (JMSC) 1991) |
| Mask | To prevent double triggers. When playing the bass drum, the hammer will rebound and hit the drum again ( make a 2nd sound ). Setting a certain value of mask time will prevent this situation happening. If the value is big, it is hard to play fast. Adjust the value as small as possible. |
| Trig scan | The monitoring time length between each two trigger signal. The bigger the value is, the longer the time. Set it as small as possible. |
| Midi ch | MIDI signal channel, defaulted channel 10. |
| Local | Local is On by default. Sound will be outputed along with MIDI signal when On. Only MIDI signal without sound when Off. |
| Rev type | Reverb effect type 0: room1 1:room2; 2:hall; 3:studio’ 4:stage |
| Rev vol | Reverb effect volume level |
| EQ treble | Volume level of high frequency |
| EQ bass | Volume level of low frequency |
| Kit reset | Reset current drum kit sound to defaulted factory setup |
| Auto off | Automatic shutdown time length when the machine at standby mode. Options of 30 minutes or 1 hour. |
| Factory reset | Reset all changes to defaulted factory setup. |
| X-talk | Crosstalk parameter adjustment, adjust the corresponding crosstalk parameter to effectively solve the crosstalk occurrence |
Metronome Function
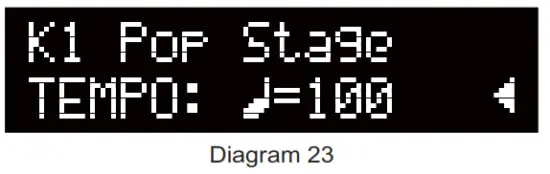
Press the button “METRO.” to enter the metronome. The indicator turns red and flashes. Turn the switch knob to adjust tempo, refers to Diagram 23. Tempo range: 40 – 240BPM. Another press confirms button to suspend the metronome.
 Press the QUICK button to select rhythm, and turn the switch knob to adjust rhythm, refers to Diagram 24. Rhythm options: 1/4, 1/8, 1/8 A, Trip, Trip A, 1/16, 1/16 A, 1/16 B, 1/16 C, 1/16 D, 1/16 E, 6 Tup 1.

Press button “SETUP” to select beat, turn the switch knob to adjust beat, refers to Diagram 25. Beat options: 1 – 8.
Pedals Adjustment
The pedals sensors sensitivity might be affected by circumstances, temperature, etc.. If this happened, please adjust the pedals as below.
- Press Confirm Button and hold firstly, and then in the same time press the” U” button. Tilt that the host machine is ON and the screen shows as Diagram 13, release both buttons.
- Stomp down and hold hi-hat pedal HHP till the screen returns to the initial setup surface
 , which means HHP automatic setup is finished, and then release the HHP peaat.
 - Pedals automatic setup now finished. Enjoy your play.
Bluetooth
Long press the Bluetooth button until bule indicator on, then connect the “TDX-25 II ” with phone. IOS system phone needs to input code”0000″. A beep sound “Di…” will be gendered when the Bluetooth connection succeeds. Remind
- The Bluetooth volume level is preset according to the Android system. Please turn the volume down accordingly if you use a IOS system phone.
- If you need to change the Bluetooth connection of the amp to another phone, please disconnect the previous connection.
USB MIDI
Connect to your synthesizer or personal computer to play your MIDI music.MlDl ( musical instrument digital interface ) format list.
MIDI:
| Function | Transmitted | Recognized | Remarks | |
| Basic Channel | Default Changed | 10 x | 1 -8&10 -16 x | |
| Mode | Default Messages Altered | x x | Mode 3 x | |
| Note Number | True voice | 0 – 127 na—“ | 0 – 127 0 -127 | |
| Velocity | Note ON Note OFF | 0 – 127 x | 0 – 127 0 – 127 | |
| After Touch | Keyss Channelss | x x | x x | |
| Pitch Bend | x | 0 | ||
| Control Change | 0 1 4 5 8 7 10 11 64 65 66 67 71 72 73 74 80 81 90 91 120 121 123 | XXX X X X X X X X X X X X X X X XX X X XX | 0 | Bank Select Modulation Foot Control Parlament° line Data Entry Volume Pan Expression Sustain Pedal Podamento On/Off Sostenuto Pedal Soft Pedal Resonance Release line Attack Time Cut Off Reverb Program Chorus Program Reverb Level Chorus Level All Sound OFF Reset All Controller *1 All Notes OFF *1 |
| Program Change | x | o | ||
| System Exclusive | x | 0 | ||
| System common | Song Position Song Select Tune | x x x | x x x | |
| System Real Trne | Clock Commands | x x | x x | |
| Aux Messages | Local ON/OFF All Notes OFF Active Sense Reset | x x 0 x | x x x x | |
Mode 1 : Omni On, Poly Mode 2 : Omni On, Mono 0 : Ve X : No Mode 3 : Omni Off, Poly Mode 4 : Omni Off. Mono Notes Except 9, 10 Channel
Remind: Product information is subject to change without prior notice.
Specifications
| Drum Kit Contents | Crash cymbal, hi-hat, ride cymbal, tom drum * 3, sanre drum, hi-hat pedal, bass drum pedal | ||
| Drum Sound Kit Quantity | 20 | ||
| Metronome | Tempo | 40- 240 BPM | |
| Beat | 1- 8 | ||
| Control Buttons | Power Button | ||
| Confirm Button / Switch Knob | |||
| SETUP Button | |||
| QUICK Button | |||
| COACH Button | |||
| METRO. Button | |||
| Bluetooth Button | |||
| VOLUME knob | |||
| BACKING knob | |||
| LCD Screen | 32 characters by dot matrix | ||
| Interface | 6.35mm gauge audio port | ||
| 3.5mm earphone port | |||
| 3.5mm aux port | |||
| USB B type MIDI port | |||
| DB25 drums signal cables | |||
| AC/DC adapter port | |||
| Power Voltage | DC9V | ||
| Power Current | 300mA | ||
| Accessories | Electronic drum kit, Assembly Direction, Operation Manual, AC adapter,6.35mm(1/4″ )cable, M6 tool – 1 piece, drum sticks – 1 pair | ||
| Optional Products | Drum Amp | ADX-40(40W), ADX-20(20W) | |
| Drum Rug | diameter: 1.3m | ||
Troubleshooting
| Faults | Check List | Solution |
| No sound / insufficient volume | Is the drum set well connected to your headphone or amp? | Check the connections |
| Is the volume adjusted properly? | Check the volume knob | |
| Is the connection of audio cable correct? | Please check the connection | |
| Is the audio cable broken? | Try another piece of audio cable | |
| Is only one pad or cymbal no sound? | Please contact customer service | |
| Is the volume of some one pad or cymbal too low or high? | Follow Kit Edit steps to adjust the level | |
| Hi-hat pedal or bass drum pedal responses badly | Is the connection correct? | Check the connection |
| Is the pedal occasionally silent? | Follow Pedals Adjustment steps to adjust pedals sensitivity | |
| Are the pedals lack of or over sensitive? | Follow Kit Edit to adjust the pedalssensitivity | |
| Cross talk | Is the drum kit assembled properly? | Check all the joints and fasten the C screws |
| Are DB25 audio cables loose? | Check all the connections of DB25 audio cable heads | |
| Is MIDI signal disordered? | Use TDX-APP or X-Talk and SENS edit to calibrate | |
| USB connection to computer failed | Please restart the drum host machine and try again | |
| Not to Power ON | Is the power turned On? | Use qualified AC/DC power adapter |
| Does the power button function well? | Please contact customer service | |
| Screen display abnormal | Is the screen dark or texts incoherent? | Please contact customer service |
| If you find any other faults not listed here, please contact your customer service. | ||
FCC Warning: This equipment has been tested and found to comply with the limits for a Class B digital device, pursuant to part 15 of the FCC Rules. These limits are designed to provide reasonable protection against harmful interference in a residential installation.This equipment generates, uses and can radiate radio frequency energy and, if not installed and used in accordance with the instructions, may cause harmful interference to radio communications. However, there is no guarantee that interference will not occur in a particular installation. If this equipment does cause harmful interference to radio or television reception, which can be determined by turning the equipment off and on, the user is encouraged to try to correct the interference by one or more of the following measures:
- Reorient or relocate the receiving antenna.
- Increase the separation between the equipment and receiver.
- Connect the equipment into an outlet on a circuit different from that to which there receiver is connected.
- Consult the dealer or an experienced radio/TV technician for help. Caution: Any changes or modifications to this device not explicitly approved by the manufacturer could void your authority to operate this equipment. This device complies with part 15 of the FCC Rules. Operation is subject to the following two conditions: (1) This device may not cause harmful interference, and (2)this device must accept any interference received, including interference that may cause undesired operation. This equipment complies with FCC radiation exposure limits set forth for an uncontrolled environment. This equipment should be installed and operated with a minimum distance 20cm between the radiator & your body.

![]()

http://weixin.qq.com/r/sEjexojEQdU_rcyl9x2i
aromamusic.cn
follow us
Aroma Musice co. Ltd.![]() facebook.com/AromaMusicGear
facebook.com/AromaMusicGear
M [email protected]
Designed and engineered by AROMA MUSIC


