![]() lVZ-1TRX-4K HDMI Over IP Extender with IR
lVZ-1TRX-4K HDMI Over IP Extender with IR
User Manual
 www.viewzusa.com
VZ-1TRX-4K
HDMI OVER IP(CAT 5/5e/6/6a/7) Extender with IR, HDCP 2.2
EXTENDER USER MANUAL
lVZ-1TRX-4K HDMI Over IP Extender with IR
Please read this manual thoroughly before use, and keep it handy for future reference.
SAFETY INSTRUCTION
Important Safety Instruction
Mark Indication and Substance ![]()
![]() This symbol i s intended to alert the user to the presence of uninsulated & dangerous voltage within the monitor’s enclosure that may be of sufficient magnitude to constitute a risk of electric shock to persons.
This symbol i s intended to alert the user to the presence of uninsulated & dangerous voltage within the monitor’s enclosure that may be of sufficient magnitude to constitute a risk of electric shock to persons. This symbol i s intended to alert the user to the presence of important operating and maintenance (servicing) instructions in the literature accompanying the monitor.
![]() Warning
Warning
- Read all warnings.
- Do not expose this unit to rain, heavy moisture, or liquid
- Donot repair the device or open the enclosure without professional guidance to avoid electric shocks. Doing so may void your warranty
- Keep the product in a well-ventilated location to avoid damage from overheating
- Turn off the power and make sure the environment is safe before installation
- Do not plug the HDMI cables and IR cables in/out when the device is in use to avoid cable damage. Make sure they are plugged into the correct ports
- Use the included DC 5V power adapter only. Make sure the specification matches if using 3rd-party DC power adapters.
- Plug the included DC 5V power supply into Transmitter or Receiver. Do not need to plug both Transmitter & Receiver
![]() Nominal Operating Temperature & Humidity
Nominal Operating Temperature & Humidity
- Operating Temperature : -4°F ~ 104°F / -20°C ~ 60°C
- Operating Humidity : 0 ~ 90% RH
INSTALLATION
Installation Tools
The following tools may be required depending on your installation.
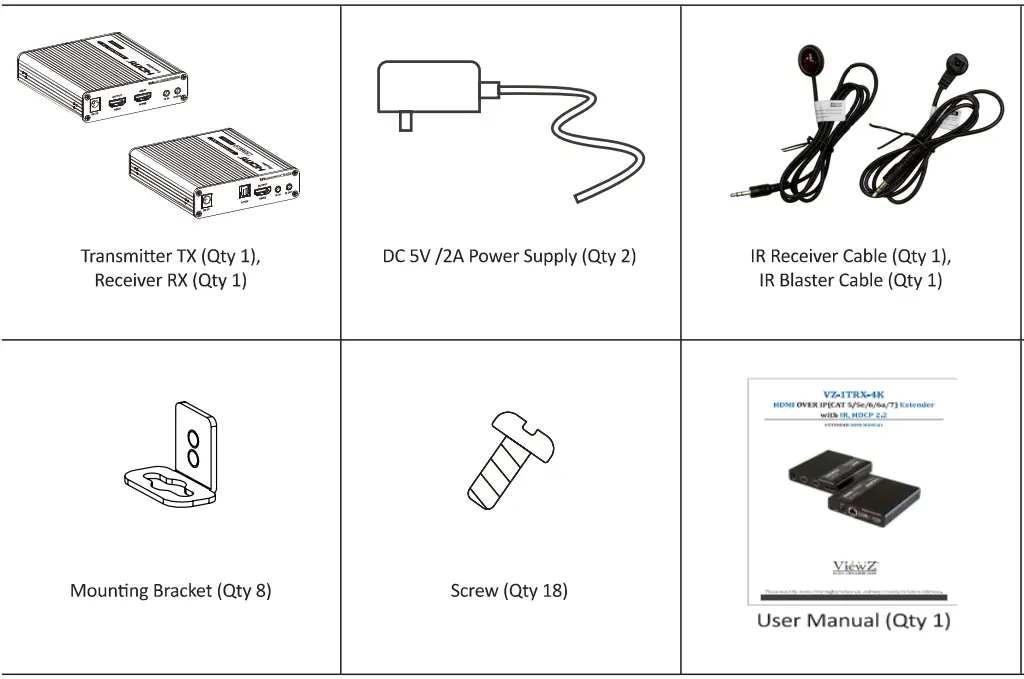
Assembly Components – provided
Your ViewZ monitor is shipped with all proper installation hardware and components. If there are parts missing and/or damaged, please stop the installation and contact ViewZ USA at (888)-998-4399.
CONNECT EXTERNAL EQUIPMENTS
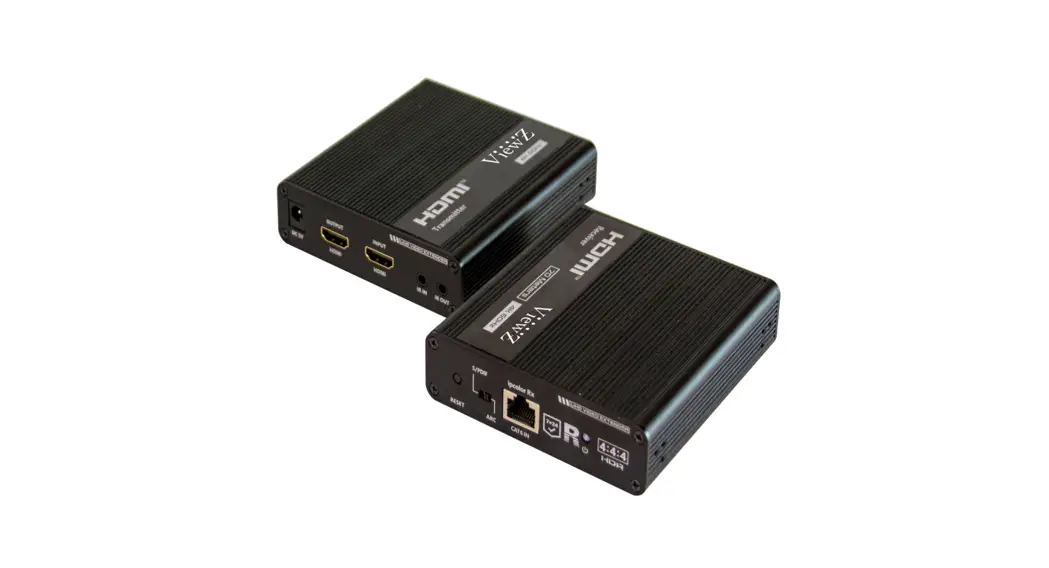
Interface Input Ports – Transmitter (TX)
The following image is the description of interface input & output ports of 1TRX-4K transmitter extender.
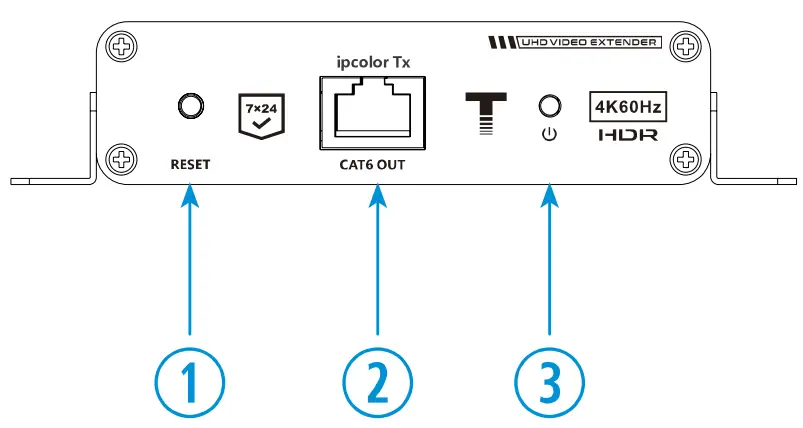
 Reset – Press to restart the device
- RJ 45 Signal Output – Use a CAT 5/5e/6/6a/7 cable
- Power Signal Indicator
- Flashing Light – No HDMI signal, but power is on
- Solid B l u e – When the transmitter get the HDMI signal, transmitter will display solid blue light.
- DC5V/2A – Connect t o the provided power adapter

- HDMI Out – Connect to the monitor
- HDMI I n – Connect to the HDMI source device
- IR In – Connect to the I R receiver (which provided)
- IR Out – Connect t o the I R blaster (which provided)
 Reset – Press to restart the device
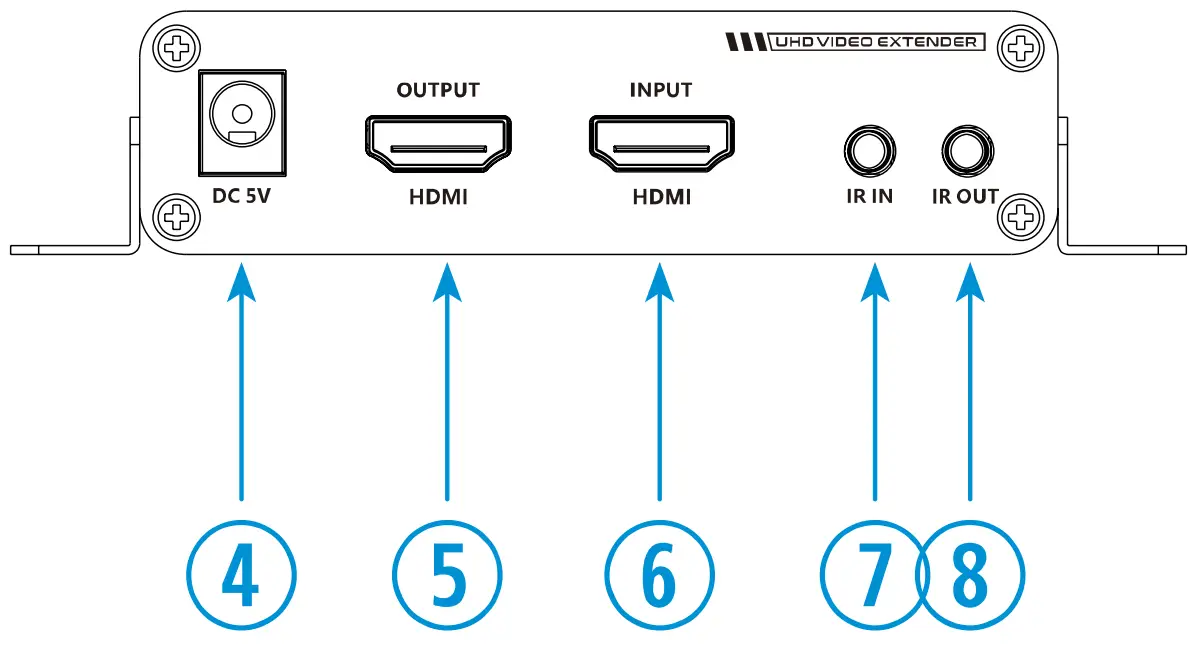
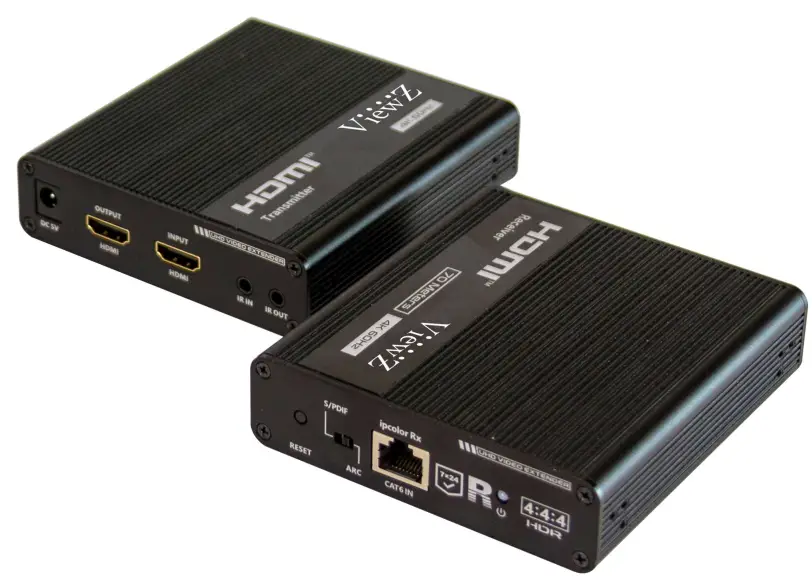
Interface Input Ports – Receiver ( R X )
The following image is the description of interface input & output ports of 1TRX-4K receiver extender.
 Reset – Press to restart the device
- Audio Switch – Choose to decode audio from HDMI or ARC output from fiber optic interface
- RJ45 S i g n a l Input – Use a CAT 5/5e/6/6a/7 cable
- Power S i g n a l Indicator
- Flashing Light – No HDMI signal, but power is on
- Solid Blue – When the transmitter get the HDMI signal, transmitter will display solid blue light.

- DC5V/2A- Connect to the provided power adapter
- S/PDIF Out – Connect to the digital audio signal
- HDMI Out – Connect t o the monitor
- IR In – Connect to the I R receiver (which provided)
- IR Out – Connect t o the I R blaster (which provided)
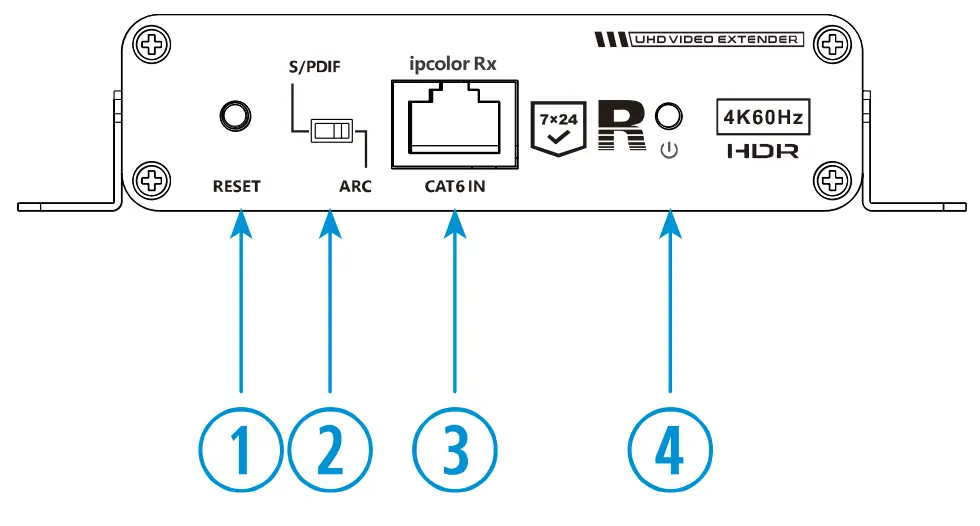 Reset – Press to restart the device
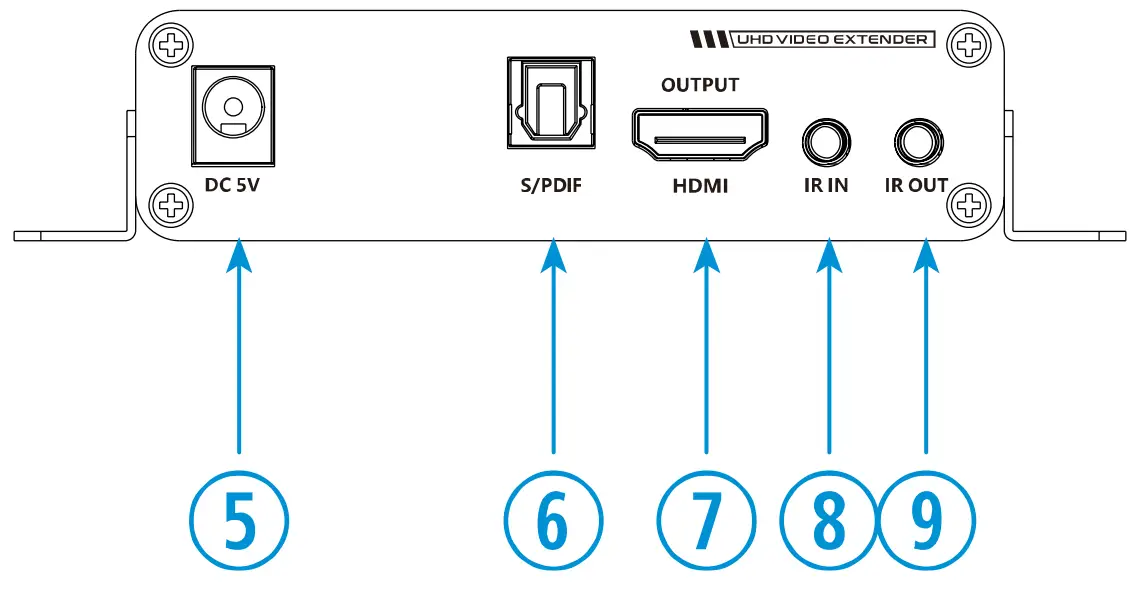
![]() Warning
Warning
You just need to put the included DC 5V/2A power adapter into Receiver.
Installation Process
The following image is the description of connection of VZ-1TRX-4K.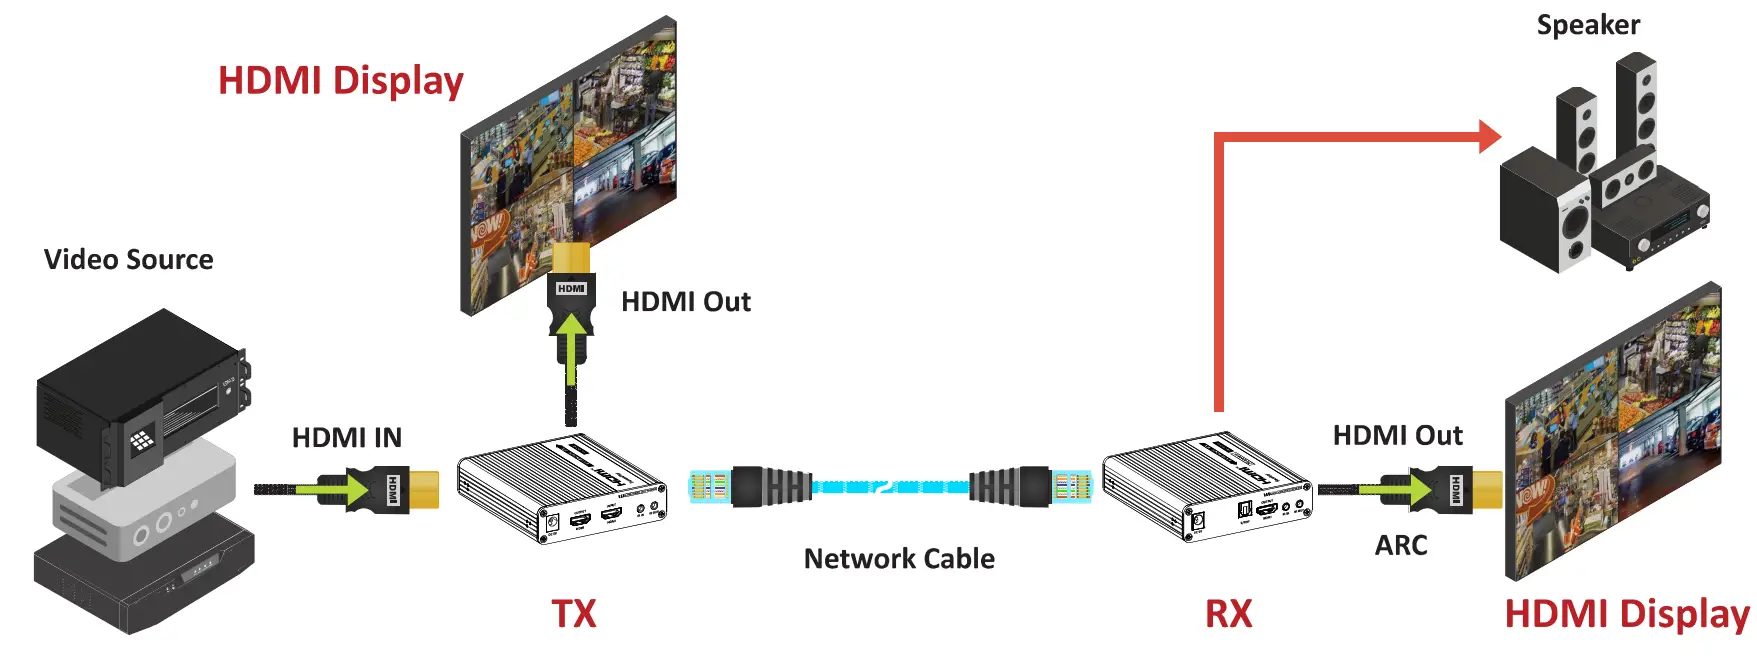
- Turn off all devices including your HDMI source and HDMI display.
- Connect your HDMI source to the Transmitter’s HDMI Input port with a HDMI cable (HDMI cable not included).
Optional: Connect the IR Blaster Extension Cable to the Transmitter’s I R output port. Face the (IR Blaster) eye towards your HDMI source’s IR window. This connection is needed if you want to control your HDMI source from the remote location. - Plug your CAT 5/5e/6/6a/7 cable between the Transmitter’s RJ 45 Output and Receiver’s RJ45 Input.
- Connect your monitor to the Receiver’s HDMI output port with a HDMI cable (HDMI cable not included).
Optional: Connect the IR Receiver Extension Cable to the Receiver’s IR input port. This connection i s needed if you want to control your HDMI source from the remote location. - Plug the provided power adapters into the Transmitter’s and Receiver’s power jacks (DC 5V), then plug both power adapters into a reliable power source.
- Turn on all connected devices.
- The HDMI extender is ready for use.
IR Installation Process
- IR blaster extension cable should plug into the IR OUT port o f the transmitter (TX) and receiver (RX). IR Receriver extension cable should plug into the I R IN port of the transmitter (TX) and receiver (RX).
- The emitter of the I R blaster extension cable should be closed to the I R receiving panel of the source device.
- Face the receiving head of the IR receiver extension cable t o the user for convenient remote control.
SPECIFICATION
| Model No. | VZ-1TRX-4K |
| Resolution | 480i / 480p / 720p / 1080i / 1080p /3840×2160 @59.94/60 Hz 576i / 576p / 720p / 1080 / 1080p / 3840×2160 @50 Hz, 3840×2160 / 4096×2160 @30Hz | 3840×2160 / 4096×2160 @23.98/25 Hz |
| HDCP™ Version | HDCP 2.2 |
| HDMI Compliance | HDMI 2.0a |
| IPColor Technology | Support |
| Audio Format | LPCM / DTS-H D / DTS / Dolby Digital 5.1ch |
| Network Cable | U T P & STP over Cat 5 /5e/6/6a/7 |
| In / Out TDMS Signal | 0.7 ~ 1.2 Vp-p (TDMS) |
| I n / Out DDC Signal | 5 V p – p ( T T L ) |
| In/Out HDMI Cable Length | <8 m (AWG 24) |
| Transmission Distance | CAT 6 / 6a / 7 – up to 230ft / 70m |
| I R Signal | 20 ~ 60 kHz |
| Net Weight | TX – 0.46 Ibs (0.210 k g ) / RX – 0.46 Ibs (0.210 kg) |
| Gross Weight | 1.85 lbs (0.83 kg ) |
| Operating Temperature | 4~ 140°F / -20 ~ 60°C |
| Storage Temperature | -22 ~ 158°F / -30~ 70°C |
| Operating Humidity | 0~ 90% RH |
| Electrical Ratings | 5V DC, 2A ( 1 0 0 ~ 240 VAC, 50/60 Hz) |
| Power Consumption | Tx & Rx s4W |
| Safety & EMC Certification | CE / FCC / ROHS |
| INTERFACE | Transmitter TX – Power Input (DC 5V) x1, RJ45 Out x1, HDMI In x1, HDMI Out x1 I R In x1, I R Out x1 Receiver RX – Power Input (DC 5V) x1, RJ45 Out x1, $/PDIF Out x1, HDMI Out x1 I R In x1, I R Out x1 |
| Accessories | Power Adapter x1, Transmitter TX x1, Receiver RX x1, User’s Manual x1, Mount Ear Kit x1, IR Blaster Extension Cable x1, IR Receiver Extension Cable x 1 |
| Protection Level | 1a Contact discharge level 3, 1b Air discharge level 3 implementation of the standard : IEC61000-4-2 |
TROUBLESHOOTING GUIDE
– Check the following before calling for service.
– If the same problems continue after checking, contact the reseller you purchased the monitor from.
| At start | We recommend that you test with different input sources when you have trouble with the current input source. If symptom persists, follow the instructions below. After following the instructions below, please contact us at1-888-99-VIEWZ. |
| No image or Noise on the screen | – Make sure the cable is correctly plugged into the outlet – Make sure the power cable is correctly plugged into the transmitter & receiver – Make sure the cable is correctly connected between monitor & receiver (RX) – Check brightness and see if brightness is set to ‘D’ – Check video source – Press the Receiver’s reset button to reset the unit. – Use the shorter network cable. |
| Receiver’s Link LED is flashing | 1) Make sure the network cable follows the IEEE-568B wiring standard. 2 ) Check the Transmitter (TX) correctly connected HDMI input. 3 ) Reset both TX & RX and reconnect. |
| The extender is not working properly | 1) Please check the cable lengths: HDMI cables: Up to 5m, Network cables ( C A T 6/6a/7): Up to 230ft (70m), Network cables ( C A T 5/5e): Up to 131ft (40m) 2 ) Press the reset button on the TX/RX and reconnect. |
| RX Link LED is on but there is no image | 1) Press RX reset button to reset the unit. 2 ) Make sure the HDMI cable is firmly connected to the monitor. 3 ) Make sure your HDMI monitor is set to the correct HDMI input. 4) Use the high quality network cable. |
Disclamer
ViewZ USA intends to make this manual accurate and complete. However, ViewZ USA makes no claim that the information contained herein covers all details, conditions or variations, nor does it provide for every possible contingency i n connection with the installation or use of this monitor. The information contained in this document is subject to change without notice or obligation of any kind. ViewZ USA makes no representation of warranty, expressed or implied, regarding the information contained herein. ViewZ USA assumes no responsibility for accuracy, completeness or sufficiency of the information contained in this document.
Contact Us
![]() NORTH AMERICA
NORTH AMERICA
177 W. Orangethorpe Ave.
Placentia, CA 92870
USA and Canada
Phone: 1-888-998-4399
Fax: 1-714-996-1138
Other Locations
Phone: (001) 888-998-4399
Fax: (001) 714-996-1138
www.viewzusa.com
THANK YOU FOR CHOOSING VIEWZ


 With Ir Control User Manual")


 User Manual")

