 defibtech DDU-100 Semi-Automatic External Defibrillator
QUICK USE INSTRUCTIONS
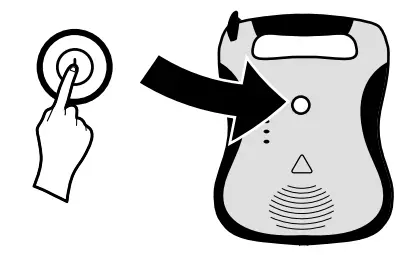
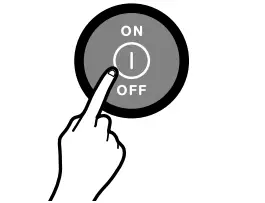
- PRESS “ON” BUTTON

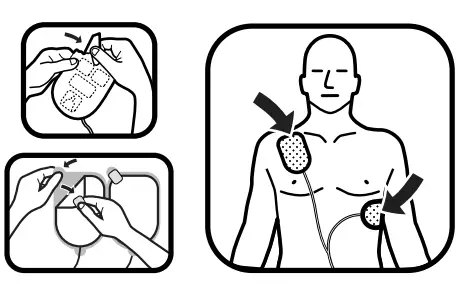
- APPLY PADS

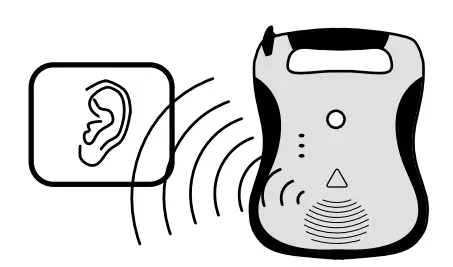
- FOLLOW AED INSTRUCTIONS

WHEN TO USE
INDICATIONS
- Lifeline/ReviveR DDU-100 and Lifeline/ReviveR AUTO DDU-120 Automated External Defi brillators (AEDs) are indicated for use on victims of sudden cardiac arrest (SCA) who are:
- Unconscious and unresponsive
- Not breathing or not breathing normally Lifeline/ReviveR DDU-100 and Lifeline/ReviveR AUTO DDU-120 AEDs may be used with Defi btech adult defi brillation pads (model number DDP-
- 100). For patients under 8 years old, or weighing less than 55 lbs (25 kg), use Defi btech child/infant defi brillation pads (model number DDP-200P), if available.
CONTRAINDICATIONS
Lifeline/ReviveR DDU-100 and Lifeline/ReviveR AUTO DDU-120 Automated External Defi brillators (AEDs) should not be used if the victim is responsive or conscious
IMPORTANT
- Do not delay therapy to determine exact age or weight. If pediatric pads are not available, apply adult pads in the position as shown for a child/infant and use the AED.• Defi btech DDU-100 Series AED and/or defi brillation training as required by local, state, provincial, or national regulations.
- Any additional training as required by the authorizing physician.
- Thorough knowledge and understanding of the material presented in the User
- Manual (available for viewing/download at www.defibtech.com
DIAGRAM OF COMPONENTS
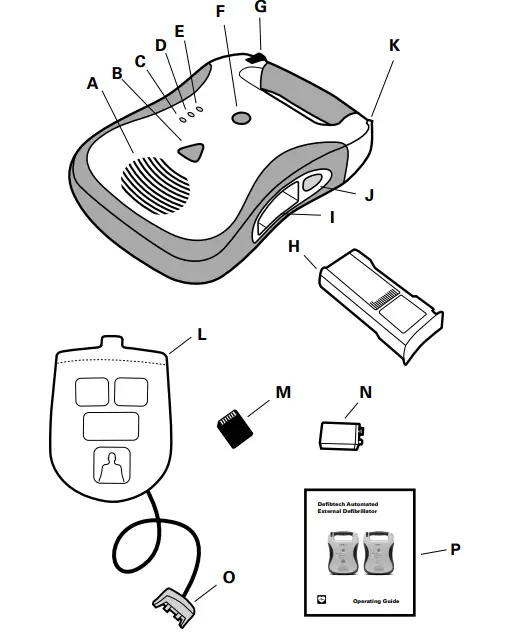
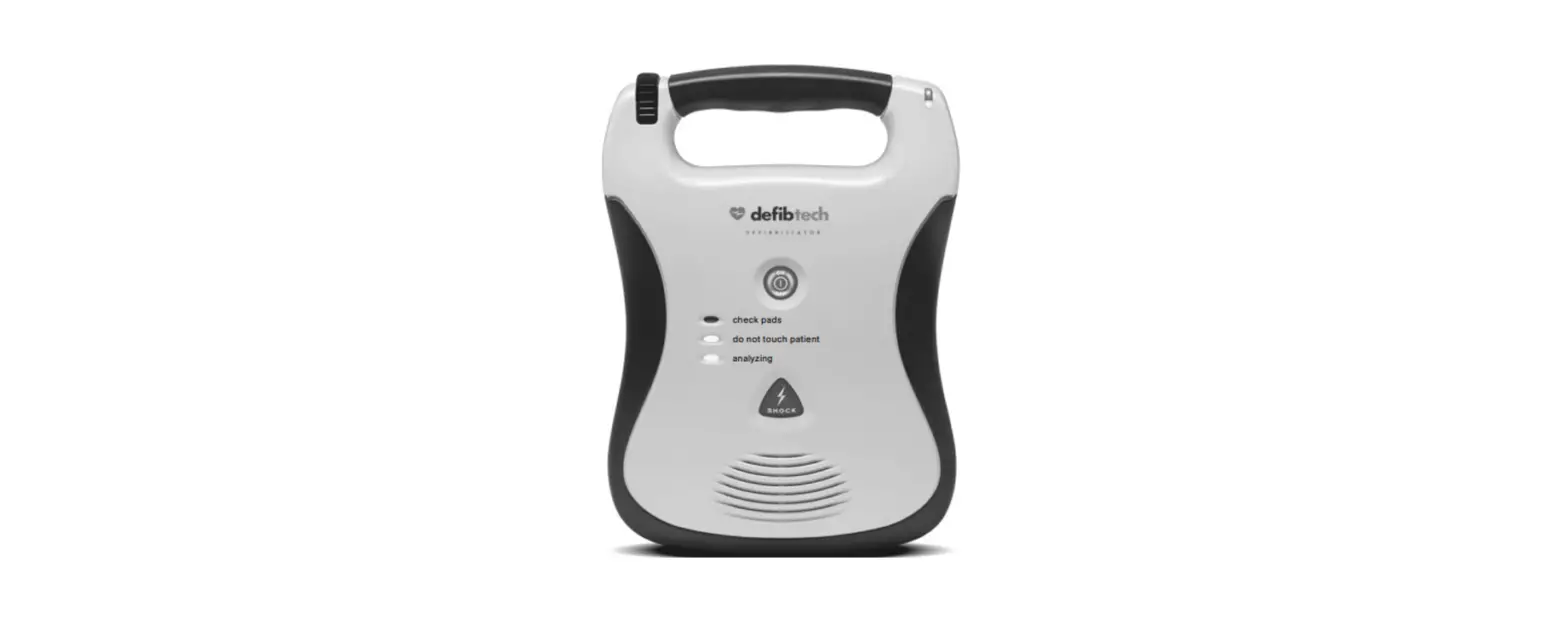
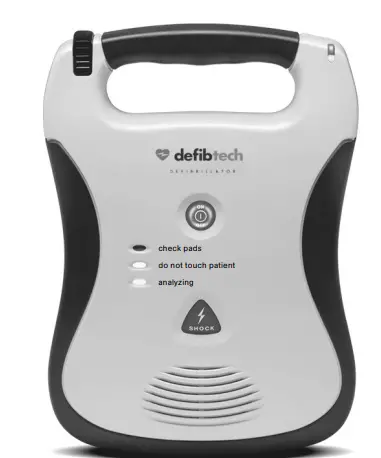
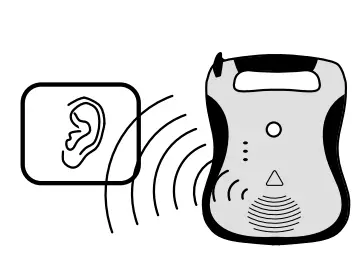
- A. Speaker. The speaker projects the voice prompts when the AED is on. The speaker also emits a “beep” when the unit is in standby mode and has detected a condition that requires operator attention.
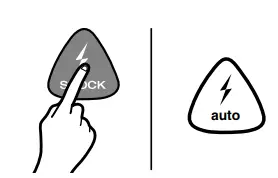
- B. SHOCK button † (DDU-100 ONLY). This button will fl ash when a shock is recommended – push this button to deliver the shock to the patient. This button is disabled at all other times. IMPORTANT: On the fully-automatic DDU-120, a SHOCK Required Indicator which fl ashes when a shock is recommended and the unit has charged and is to deliver a shock is in the SHOCK button location. Do not touch the patient while this indicator is fl ashing.
- C. “analyzing” LED (Light Emitting Diode). This green LED fl ashes when the AED is analyzing the patient’s ECG rhythm.
- D. “do not touch patient” LED. This red LED fl ashes when the AED detects motion or other interference that prevents analysis of the signal or when the user should not be touching or moving the patient.
- E. “check pads” LED. This red LED fl ashes when the AED detects that the pad connection to the patient is poor or pads are not applied.
- F. ON/OFF button. Push button to turn the AED on. Push again to disarm and turn the AED off.
- G. Pads connector port. Insert Patient Pads Connector (item O) into this port to connect pads to the AED.
- H. Battery pack. The battery pack provides a replaceable main power source for the AED.
- I. Battery pack opening. Insert the battery pack fi rmly into this opening until the latch clicks into place.
- J. Battery pack eject button. This button releases the battery pack from the AED. To remove the battery pack, push the button until the battery pack is partially ejected from the unit.
- K. Active Status Indicator (ASI). The ASI indicates the current status of the AED. This indicator fl ashes green to indicate the unit has passed its last self-test and is ready for use. It fl ashes red to indicate unit needs attention from the user or needs servicing.
- L. Patient pads. The defi brillation pads that are placed on the patient. The pads should be stored in the pad storage area on the back of the unit.
- M. Defi btech Data Card (DDC). This optional plug-in card provides enhanced storage capabilities to the AED.
- N. Active Status Indicator (ASI) battery. This 9V lithium battery provides power to the Active Status Indicator (ASI). It is inserted into a compartment in the battery pack.
- O. Patient pads connector. Insert into Pads Connector Port (item G) to connect pads to the AED.
- P. Operating Guide. Quick reference information for the DDU-100 and DDU-120 AED. (The full DDU-100 Series AED User Manual can be found at www.defibtech.com
SETTING UP THE AED
- CONNECT THE PADS TO THE AED
- Ensure that the pads package has not expired. Expired pads must not be used. For more information,

- Ensure that the pads package has not expired. Expired pads must not be used. For more information,
- INSTALL THE LITHIUM 9V ASI BATTERY INTO THE BATTERY PACK
- Ensure that the lithium 9V battery has not expired.

- Ensure that the lithium 9V battery has not expired.
- INSTALL THE BATTERY PACK INTO THE AED
- Ensure that the battery pack has not expired. Expired battery packs must not be used.
- When the battery pack is installed, the AED will turn on and run a battery pack test. Wait for the test to complete and for the unit to turn off

- CHECK THE STATUS
- When the AED is off, the Active Status Indicator (ASI) should fl ash green. If the ASI fl ashes red, is solid red, or if there is no fl ashing light, the unit requires service

- When the AED is off, the Active Status Indicator (ASI) should fl ash green. If the ASI fl ashes red, is solid red, or if there is no fl ashing light, the unit requires service
- READ THE USER MANUAL
- Comprehensive information about the DDU-100 Series AED can be found in the User Manual at www.defibtech.com

- Comprehensive information about the DDU-100 Series AED can be found in the User Manual at www.defibtech.com
USING THE AED
- TURN AED ON
- Press ON/OFF button to turn AED on.
- Follow the voice prompt instructions.

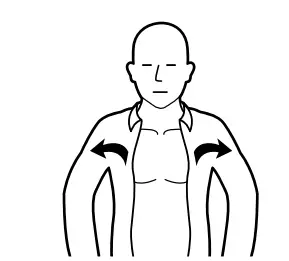
- PREPARE THE PATIENT
- Remove clothing from patient’s chest.
- If necessary, dry chest and remove excess chest hair.

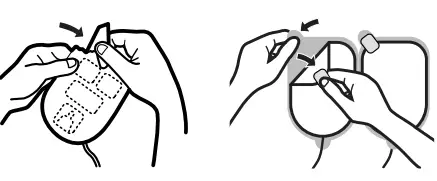
- PREPARE PADS
- Tear open pads package
- Peel adhesive pads from blue liner

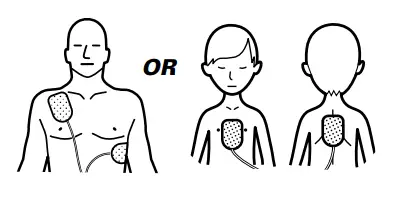
- PLACE PADS
- Apply pads to patient’s bare chest.

- Apply pads to patient’s bare chest.
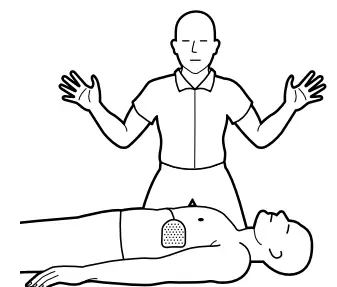
- STAND CLEAR
- When instructed, do not touch the patient.

- When instructed, do not touch the patient.
- IF INSTRUCTED, PRESS SHOCK BUTTON
- If instructed, press “SHOCK” button.

- If instructed, press “SHOCK” button.
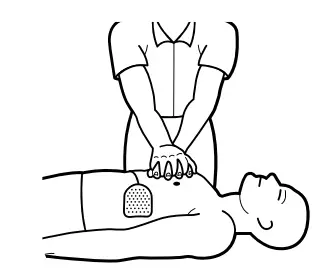
- PERFORM CPR
- Follow instructions to perform CPR, if needed

- Follow instructions to perform CPR, if needed
- CONTINUE TO FOLLOW INSTRUCTIONS
- Continue to follow the voice prompt instructions.

- Continue to follow the voice prompt instructions.
THE DEFIBRILLATION PADS
HOW TO CONNECT THE PADS
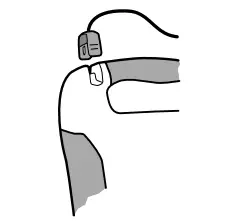
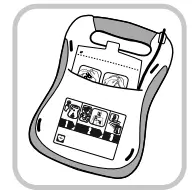
Insert the connector end of the defi brillation pad cable into the pads connec- tor socket on the top-left corner of the DDU-100 Series AED as shown at left. Insert the pads connector fi rmly until it is fully seated in the unit. The connector will only fi t in one way – if the connector does not fi t, rotate the connector before trying again. The connected pads package should then be stored in the pad storage area on the back of the DDU-100 Series AED (see diagram at right).
After connecting the pads connector to the unit, push the pads package, rounded end fi rst, with the pictures on the package facing out, into the pad storage area. When the pads package is fully inserted, press the pad cable into the groove in the back of the unit to hold the cable in place and tuck any excess cable behind the pads package.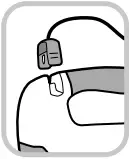
WHICH PADS TO USE
For adults and children 8 years or older or over 55 pounds (25 kg), use adult pads For infants and children under 8 years or less than 55 pounds (25 kg), use child/ infant pads (NOTE: Child/infant pads can be identifi ed by their blue connector and blue pads package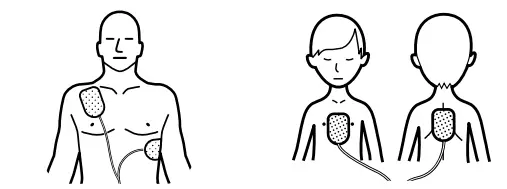
WHEN TO REPLACE THE PADS
The Defi btech defi brillation pads are intended for one-time use only. The pads must be replaced after each use or if the package has been damaged. It is important to check the expiration date of the pads. The expiration date is printed on the outside of the sealed package. Do not use pads past their expiration date. Discard expired pads. Use only Defi btech defi brillation pads.
NSTALLING THE ACTIVE STATUS INDICATOR 9V BATTERY
To meet battery pack specifi cations (see pages 24-25), a lithium 9V battery should be installed into the battery pack. NOTE: While DDU-100 Series AEDs will operate rescue and standby functions with a battery pack that does not contain a 9V battery, battery pack standby life will be reduced. The 9V battery is installed into the battery pack in the 9V battery compartment.
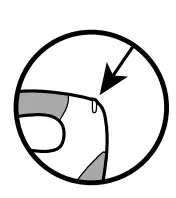
To install, remove the cover covering the 9V battery compartment by pushing on it sideways. The cover will slide and detach from the battery pack. Insert the 9V battery into the 9V battery compartment so that the contacts on the battery touch the contacts in the battery pack. Replace the 9V battery compartment door by placing it in the almost closed position and then sliding it closed. Only a fresh 9V lithium battery should be used as a replacement.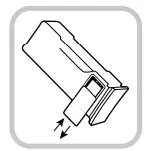
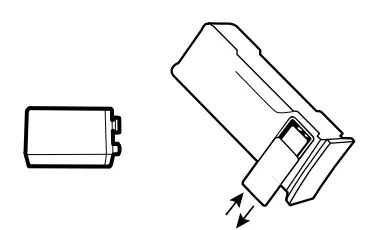
INSTALLING AND REMOVING THE BATTERY PACK
The lithium battery pack provides power to the DDU-100 Series AED. Before inserting the battery pack into the AED, the 9V lithium battery should be installed in the battery pack itself as described in the previous section. Do not install the battery pack after the expiration date printed on the label. The battery pack is non-rechargeable. To insert the battery pack into the AED, orient the battery pack so that the label faces up. Make certain that the battery opening in the side of the AED is clean and clear of any foreign objects.
Insert the battery pack into the opening in the side of the AED. Slide the battery pack all the way in until the latch clicks. If it does not slide all the way in, it is most likely inserted upside down. Once fully inserted, the battery pack surface should be fl ush with the side of the AED.
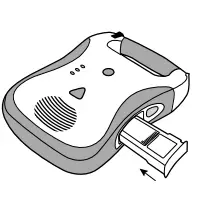
To remove the battery pack, push the battery eject button on the side of the AED. After the battery pack is partially ejected, pull the battery pack out. Within moments of insertion, the AED will turn on and run a battery pack insertion self-test. The AED will announce “Battery OK” after successful completion of the test. The unit will automatically shut off after the test is run.
Afterwards, the Active Status Indicator on the top corner of the AED will periodically fl ash. If the indicator fl ashes green, the AED and battery pack are functioning properly; if this does not happen, there is a problem. Refer to page 17 for more details on the meaning of the indicator.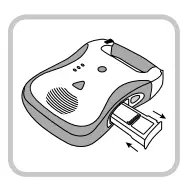
THE DEFIBTECH DATA CARD (optional)
INSTALLING AND REMOVING THE DEFIBTECH DATA CARD (DDC CARD)
Each time the AED is used, an event fi le is created on the Defi btech Data Card (if installed). If the unit was used to treat a patient, the DDC in the unit should be removed and provided to the patient’s
care provider. A new DDC should be installed before the next use. To remove the DDC, fi rst remove the battery pack by pressing the battery pack eject button on the side of the unit. The DDC card is located in a slot directly above the battery pack opening in the unit.
To remove the DDC card, press the DDC in all the way and then release. The DDC will be partially ejected and can be removed by pulling it the rest of the way out. To install a new DDC, insert the DDC, label side up, in the thin slot on the top of the opening for the battery pack.
The card should click into place and be fl ush with the surface of the slot. If the card does not push in all the way, it may have been inserted upside down. In that case, remove the card, fl ip it over and try inserting it again. Note: A DDC card is not required for the AED to operate. Even if a DDC card is not installed, relevant event information will still be recorded internally. The AED will still operate properly even after a “replace data card”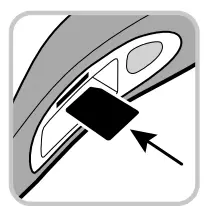
ACTIVE STATUS INDICATOR (ASI)
Once a fully-functional battery pack with a non-discharged 9V battery is installed in the AED, an LED indicator located in the corner of the unit actively indicates unit status. If the unit is fully operational, the Active Status Indicator (“ASI”) will blink green and if the unit needs attention, the ASI will blink red. When the ASI blinks red, the unit will also “beep” periodically to call attention
to itself.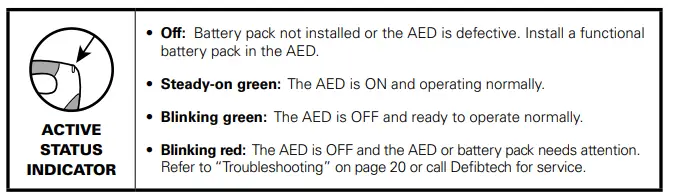
SELF-TESTS
Power-on self-tests are performed every time the unit is turned on to test the basic operation of the unit. The unit also performs daily, weekly, monthly and quarterly self-tests automatically to
check the integrity of the unit’s hardware and software. Manually-initiated self-tests may be run at any time by the user to test the AED’s systems, including the charging and shocking functions (the shock is internally dissipated and no voltage will be present at the pads).
Note: Every time the manually initiated self-test is run, the unit does an internal shock test. This test reduces the capacity of the battery pack by one shock. To perform a manual self-test, begin with the unit powered off. Press and hold the ON/OFF button until the unit announces that it is performing a self-test – this should take approximately 5 seconds. Once you hear the announcement, release the ON/OFF button and follow the AED’s spoken instructions until the test is complete. The unit will run a series of internal tests, including charge and shock tests. The manually initiated self-test can be aborted by pressing the ON/OFF button again to turn the unit off. When the self-test is complete, the unit will announce its status and power off.
- If the self-test passes: The unit will announce: “AED OK” and power off. The unit may then be immediately used by pressing the ON/OFF button again.
- If the self-test fails: The unit will announce the symptom. Refer to the “Troubleshooting” section on page 20.
MAINTENANCE
ROUTINE MAINTENANCE
The DDU-100 Series AED is designed to be very low maintenance. Simple maintenance tasks are recommended to be performed regularly to ensure its readiness (see sample maintenance table below). Different maintenance intervals may be appropriate depending on the environment where the AED is deployed, and ultimately the maintenance program is at the discretion of the emergency response program’s medical director.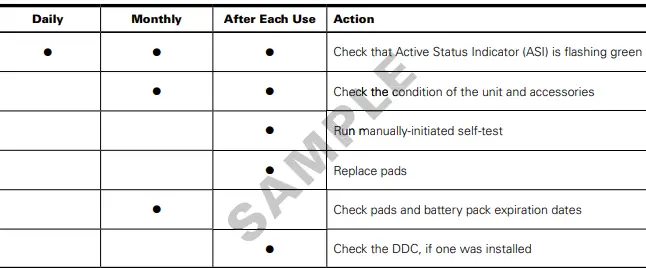
CHECKING THE CONDITION OF THE UNIT AND ACCESSORIES
Inspect the unit for cracks or other signs of damage on the case, as well as dirt or contamination, especially in the areas around the connector socket and battery pack opening. If any cracks or other signs of damage are observed, remove the unit from service and contact an authorized service center. If any dirt or contamination is observed, refer to the “Cleaning” section of the full User Manual (available at www.defibtech.com).
It is important that the patient pads and the battery packs not be used past their expiration dates. The expiration date of the pad package is printed on the outside of the sealed package. The expiration date of the battery pack is printed on the label on the pack. The battery pack should be removed and replaced by this date; when the battery pack is used up, the unit will indicate “battery low” or “replace battery now” and the Active Status Indicator will fl ash red. Once an accessory is past its expiration date, it should be replaced immediately.
Follow the instructions in the “Installing and Removing the Battery Pack” and “How to Connect the Pads” sections of this guide to replace the part with an unexpired part. Patient pads should be discarded. Battery packs should be appropriately recycled.
CLEANING
- Periodically clean the AED of any dirt or contaminants on the case and connector socket.
- The following are important guidelines to be adhered to when cleaning the device:
- The battery pack should be installed when cleaning the AED.
- Do not immerse the AED in fl uids or allow fl uids to enter the unit. Use a soft cloth to wipe the case clean.
- Do not use abrasive materials or strong solvents such as acetone or acetone-based cleaning agents. The following cleaning agents are recommended for cleaning the AED case and the connector socket:
- Soapy water
- Ammonia based cleaners
- Hydrogen peroxide
- Isopropyl alcohol (70 percent solution)
- Chlorine bleach (30 ml/liter water)
- Ensure that the connector socket is completely dry before reinstalling the pads cable. After cleaning the device and before returning it to service, always turn the unit on for a few seconds, which will cause the unit to run a standard power-on self-test.
- Please note that none of the items provided with the DDU-100 Series AED (including the AED itself) are sterile or require sterilization.
- The following table lists the common causes for problems, the possible cause, and the possible corrective actions.
- Refer to the User Manual (available at www.defibtech.com) for detailed explanations on how to implement the corrective actions.
- To have the unit report what the root cause of the problem is, power the AED on and then power it off by pressing the ON/OFF button for approximately two seconds.
- While powering off, the unit should issue a voice prompt that details the cause of the problem.
- Use the chart below to determine the appropriate corrective action based upon what prompt was spoken by the unit
- If the unit continues to be non-functional, call Defi btech for service (refer to the “Contacts” section on
TROUBLESHOOTING
| Symptom | Possible Cause | Corrective Action |
|
Unit will not turn on | Battery pack not inserted | Insert battery pack |
| Battery pack depleted or needs servicing | Replace battery pack or call for service | |
| Unit needs servicing | Call for service | |
| Unit immediately turns off | Battery pack depleted | Replace battery pack |
| Unit needs servicing | Call for service | |
|
ASI flashes red and/or unit makes periodic “beep” sound |
Unit may need servicing | Power unit on and then power off by pressing ON/OFF button for approximately two seconds; note problem indicated by voice prompt and, if necessary, call for service |
| Battery pack non-functional | Replace battery pack | |
| Defibrillation pads are not pre- connected to unit | Connect defibrillation pads to unit | |
| ASI does not flash at all while the unit is in standby (powered off) | Battery pack not inserted | Insert battery pack |
| Battery pack is low or needs servicing | Replace battery pack or call for service | |
| Unit needs servicing | Call for service | |
| “Power on test failed, service code ‘xxx’” prompts | Unit needs servicing | Record code number and call for service |
| “Battery test failed, service code ‘xxx’“ prompts | Battery pack needs servicing | Record code number and replace with new battery pack |
| “Service required” prompt | Unit needs servicing | Call for service |
| “Replace battery now” prompt | Battery pack capacity is critically low | Unit may not deliver a shock, replace battery pack immediately |
| “Battery low” prompt | Battery pack capacity is getting low | Replace battery pack as soon as possible |
| Symptom | Possible Cause | Corrective Action |
| “Unknown battery type” prompt | Battery pack not recommended for use with unit (see top of page 15). | Replace installed battery pack with recommended battery pack |
| “Pads missing” prompt | Pads not connected | Make sure pads connector is oriented correctly and fully inserted into unit |
| “Plug in pads connector” prompt | Pads connector not plugged in | Plug in pads connector |
| Pads connector broken | Replace pads | |
| Unit’s connector broken | Call for service | |
| “Apply pads to patient’s bare chest as shown” prompt | Pads not connected to patient | Place pads on patient |
| Pads not making good connection to patient | Check pad connection to patient | |
| Pads or pad cable damaged | Replace pads | |
|
“Poor pad contact to patient”, “Press pads firmly”, “Replace pads”, “Non-rescue pads” or “Warning” prompt | Dry pads | Replace pads |
| Partial pad connection | Check that pads are placed securely on patient | |
| Pads touching | Separate pads and place correctly on patient | |
| Non-rescue pads (e.g. trainer pads) connected while in AED (rescue) mode | Replace non-rescue pads with rescue pads | |
| “Check pads” prompt | Pads touching | Separate pads and place correctly on patient |
| “Stop motion” prompt | Patient motion has been detected | Stop patient motion |
| “Stop interference” prompt | External interference has been detected | Stop external interference |
| “Analyzing interrupted” prompt | Motion or interference detected | Stop motion or interference |
|
“Shock cancelled” prompt | Patient’s ECG rhythm changed | No action necessary |
| Shock button not pushed within 30 seconds (DDU-100 ONLY) | Push shock button within 30 seconds (DDU-100 ONLY) | |
| Low battery – insufficient to charge | Replace battery pack | |
| Hardware failure | Run manually initiated Self-Test, return unit for servicing | |
| Bad pad to patient connection | Check that pads are placed securely on patient | |
| Dry pads | Replace pads | |
| “Replace data card” prompt | DDC card is full | Replace DDC card with a card that is not full |
| DDC has failed | Replace DDC card |
WARNINGS AND CAUTIONS
- Do not sterilize the DDU-100 Series AED or its accessories.
- Use only Defi btech disposable self-adhesive defi brillation pads, battery packs, and other accessories supplied by Defi btech or its authorized distributors. Substitution of non-Defi btech approved accessories may cause the device to perform improperly.
- Do not open sealed pads package until pads are to be used. The packaging should be opened only immediately prior to use, otherwise the pads may dry out and become non-functional.
- Do not touch the patient during defi brillation. Defi brillation current can cause operator or bystander injury.
- Do not allow pads to touch metal objects or equipment in contact with the patient. Do not touch equipment connected to the patient during defi brillation. Disconnect all non-defi brillator proof equipment from the patient before defi brillation to prevent electrical shock hazard and potential damage to that equipment.
- Do not shock with defi brillation pads touching each other. Do not shock with gel surface exposed.
- Do not allow defi brillation pads to touch each other, or to touch other ECG electrodes, lead wires, dressings, transdermal patches, etc. Such contact can cause electrical arcing and patient skin burns during defi brillation and may divert defi brillating energy away from the heart.
- The defi brillation pads are intended for one-time use only and must be discarded after use. Reuse can lead to potential cross infection, improper performance of the device, inadequate delivery of therapy, and/or injury to the patient or operator.
- Avoid contact between parts of the patient’s body and conductive fl uids such as water, gel, blood or saline, and metal objects, which may provide unwanted pathways for defi brillating current.
- Aggressive or prolonged CPR to a patient with defi brillation pads attached can cause damage to the pads. Replace the defi brillation pads if they become damaged during use.
- Possible Radio Frequency (RF) interference from RF devices such as cellular phones and two-way radios can cause improper AED operation. Normally using a cell phone near the AED should not cause a problem; however, a distance of 2 meters (6 feet) between RF devices and the DDU-100 Series AED is recommended.
- CPR during analysis can cause incorrect or delayed diagnosis by the patient analysis system.
- Do not place adult defi brillation pads in the anterior-posterior (front-back) position. A shock or no shock decision may be inappropriately advised. The DDU-100 Series AED requires that the adult defi brillation pads be placed in the anterior- anterior (front-front) position.
- Some very low amplitude or low frequency VF rhythms may not be interpreted as shockable. Some very low amplitude or low frequency VT rhythms may not be interpreted as shockable.
- Handling or transporting the patient during ECG analysis can cause incorrect or delayed diagnosis, especially if very low amplitude or low frequency rhythms are present. If the patient is being transported, stop vehicle before beginning ECG analysis.
- In patients with cardiac pacemakers, the DDU-100 Series AED may have reduced sensitivity and not detect all shockable rhythms. If you know the patient has an implanted pacemaker, do not place electrodes directly over an implanted device.
- During defi brillation, air pockets between the skin and defi brillation pads can cause patient skin burns. To help prevent air pockets, make sure self-adhesive defi brillation pads completely adhere to the skin. Do not use dried out or expired defi brillation pads.
- Defi brillation may cause skin burns around the defi brillation pads area.
- User-initiated and automatic self-tests are designed to assess the DDU-100 Series AED’s readiness for use. However, no degree of testing can assure performance or detect abuse, damage, or a defect that occurred after the most recent test is completed.
- Use of damaged equipment or accessories may cause the device to perform improperly and/or result in injury to the patient or operator.
- In the event the voice prompts cannot be heard for any reason (e.g. noisy environment), follow the LEDs on the front of the AED to complete the rescue.
- It may be possible for the AED to not detect a shockable rhythm, not deliver a shock to a shockable rhythm or not deliver the intended energy during defi brillation.
- It may be possible that the AED recommends a shock for a non-shockable rhythm, and if a shock is delivered, VF or cardiac arrest may occur.
- Even if defi brillation occurs, the sudden cardiac arrest event may not result in survival.
- Defi brillation may cause myocardial damage or post-shock dysfunction.
- Therapy cannot be delivered while an AED software update is in process.
- Do not turn off the AED or remove the battery pack or the update data card until an AED software update process is complete as these actions may render the AED incapable of delivering therapy. If any of these interruptions occur, restart the update procedure from the beginning.