![]() ITL2.4GMD Wireless 2.4 Ghz Led Wall Dimmer
ITL2.4GMD Wireless 2.4 Ghz Led Wall Dimmer
User Manual
![]() ITL2.4GMD
ITL2.4GMD
SPECIFICATIONS
| Working temperature: -20 ~ 60°C | Working voltage: AC90 265V (50/60Hz) |
| Dimension: L 86* W 86*H32 mm | RF frequency: 2.4GHz |
| Net weight: 120 g | RF distance: 20m |
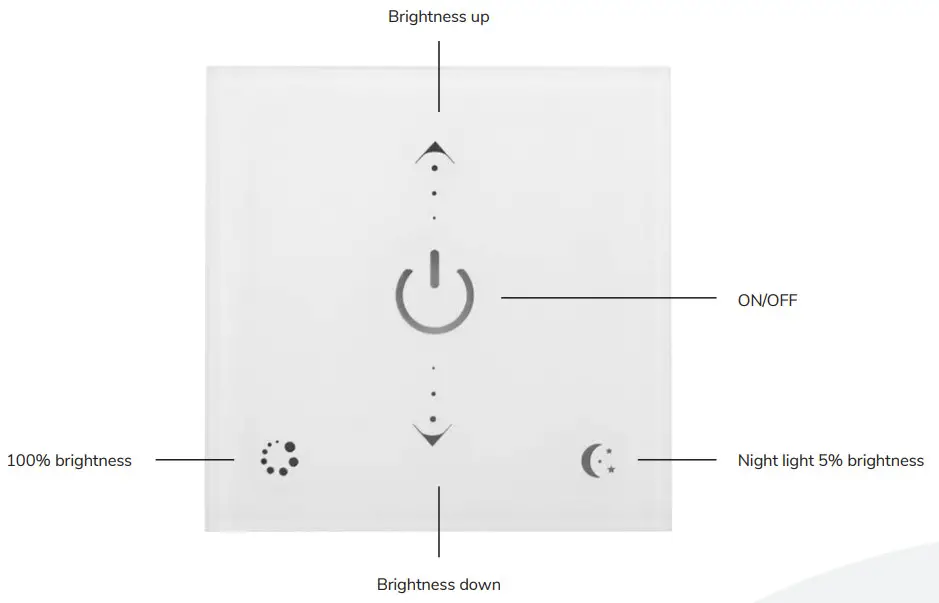
CONTROL METHOD, TOUCH SCREEN
| NAME OF KEY | INSTRUCTION | REMARKS |
| ON/OFF | ON/OFF at any time | |
| Brightness up | Increase the brightness. From darkest to brigh- test long press the button for 5 seconds. | Long press for fast adjustment |
| Brightness down | Decrease the brightness. From brightest to darkest long press the button for 5 seconds. | Long press for fast adjustment |
| Night light | 5% brightness | |
| 100% brightness | Full light output |
RF CODE
The number of drivers and remote controls in one system is unlimited. 2.4G Smart system has one unique RF code for communication. Each driver and each remote control can remember only one RF code, recorded in the first programming. New RF code ca n be recorded after clearing the old code.
Code clearing: This ensures everything on the device is reset back to the factory settings. This will ensure that the driver can be controlled by any compatible remote control, or paired to a new one.
Attention: For this you will need the remote that comes with the driver. This is the “key” to unlock the driver. The “Code clearing” step will NOT workwith the Wall Dimmer.
| STEP | INSTRUCTIONS | |
| 1 | Connect the power to the driver and power it on. | You have 1 minute after powering the driver on. to finish the next steps. This ensures no accidental inputs or reprogramming after installation. |
| 2 | Press and hold the -Set” button for 2 seconds > Let go of the “Serbutton > Press and hold the OFF button “0′ for 5 seconds. | The lights will flash after succesfuly clearing the code. After the lights have flashed you are able to use all compatible remotes. |
Code Matching: This ensures only the desired remote control will be able to controle the driver.
Attention: This step does not require the remote that comes with the driver. You will only need to have the desired remote control and have done the“Code clearing” step.
| STEP | OPERATION | INSTRUCTIONS |
| 1 | Disconnect the power to the receiver > Wait 5 seconds > Reconnect the power to the receiver. | Remember that for the following steps to work you need to have done the “Code Clearing” step. If you have multiple drivers, only power the one you wish to pair. |
| 2 | On the wall panel, press and hold the “Night Light Key | The lights and the Wall panel wil now start to flash. This means pairing is succesful. |
| 3 | Press the POWER-button after the wall panel starts blinking to end pairing mode. | You will now leave pairing mode, which stops the blinking. This will also happen automatically after 60 seconds. |
Code learning operation between remote controls: Used to unify system code values or copy a new remote control.
Since each remote control has its own unique RF code at the time of delivery, when there are multiple remote controls in one system, one of them must be selected as a main, and other remote controls should copy its RF code.
- Main remote control: Press and hold “Night light key” key for 5 seconds. The indicator of the remote control will flash quickly, means it enters the pairing code transmission status.
- New remote control: Press and hold “ON/OFF” key for 5 seconds, indicator will flash means it enters learning code status.
- Indicator of the new remote control flash 3 times after successful code learning.
Remote control RF code learning from drivers
- Turn off the power supply of the controllers.
- Press and hold “ON/OFF” key for 5 seconds until indicator of wall panel is flashing.
- Turn on the power supply of the controllers. Indicator of the remote control flashes 3 times after successful code learning.
Note:
The distance from controllers to remote controls should be less than 2 meters.
INSTALLATION INSTRUCTIONS
INTENDED USE/APPLICATION
Product designed for the use in households and for other similar general applications.
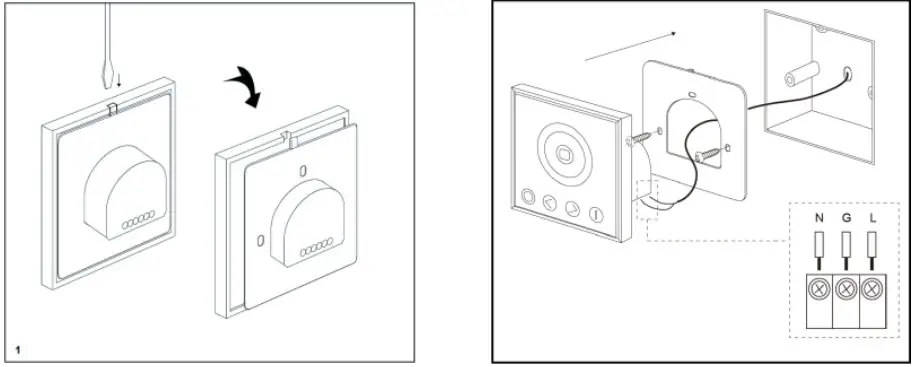
MOUNTING
Technical changes reserved. Read the manual before mounting. Mounting should be performed by an appropriately qualified person. Any activities to be done with disconnected power supply. Exercise particular caution. Product has a protective contact/terminal. Failure to connect the protective lead may lead to electric shock.
Mounting diagram: see pictures. Check for proper mechanical fastening and connection to electrical power prior to first use. The product can be connected to a supply network which meets energy quality standards as prescribed by law. To maintain the proper IP protection level, the right diameter of the power cable should be selected for the cable gland used in the product.
FUNCTIONAL CHARACTERISTICS
The product can only be used indoors
USAGE GUIDELINES / MAINTENANCE
Any maintenance work must be performed when the power supply is cut off and the product has cooled down. Clean only with soft and dry cloths. Do not use chemical detergents. Do not cover the product. Ensure free air access. Product may heat up to a higher temperature. Product can only be supplied by rated voltage or voltage within the range provided. It’s forbidden to use the product with damaged protective cover. Product must not be used in unfavourable conditions, e.g. dust, water, moisture, vibrations, explosive air atmosphere, fumes, or chemical fumes, etc. Nondemountable product.
Not suitable
for independent repairs.
ENVIRONMENTAL PROTECTION
Keep your environment clean. Segregation of post-packaging waste is recommended.
This labelling indicates the requirement to selectively collect waste electronic and electrical equipment. Products labelled in this way must not be disposed of in the same way as other waste under the threat of a fine. These products may be harmful to the natural environment and health, and require a special form of recycling/neutralising. Products labelled in this way should be returned to a collection facility for waste electrical and electronic goods. Information on collection centres is provided by local authorities or sellers of such goods. Used items can also be returned to the seller when new product is purchased, in quantity no larger than the purchased item of the same type. The above rules regard the EU area. In the case of other countries, regulations in force in a given country must be applied. Contacting the distributor of our products in a given area is recommended.
COMMENTS / GUIDELINES
Failure to follow these instructions may result in e.g. fire, burns, electrical shock, physical injury and other material and non-material damage. For more information about Hoftronic products visit www.hoftronic.com. Hoftronic shall not be responsible for any damage resulting from the failure to follow these instructions. Hoftronic reserves the right to make changes in the manual – the current version can be downloaded at www.hoftronic.com.
DECLARATION OF CONFORMITY
DOCUMENTATION
This product has been manufactured and supplied in compliance with all relevant regulations and directives applicable to all member states of the European Union.
The product complies with all applicable regulations and rules in the country of sale.
Formal documentation such as the declaration of conformity, the safety data sheet and the product test report is available upon request.
CE DECLARATION
The product complies with the following
directives:
LVD: 2014/35/EU
EMC: 2014/30/EU
RoHS: 2011/65/EU
The complete Declaration of Conformity Document (DOC) is available upon request.
Imported by
HOF Trading B.V.
Fahrenheitstraat 11, 6003 DC Weert , The Netherlands
Made in P.R.C.
www.hoftronic.com


