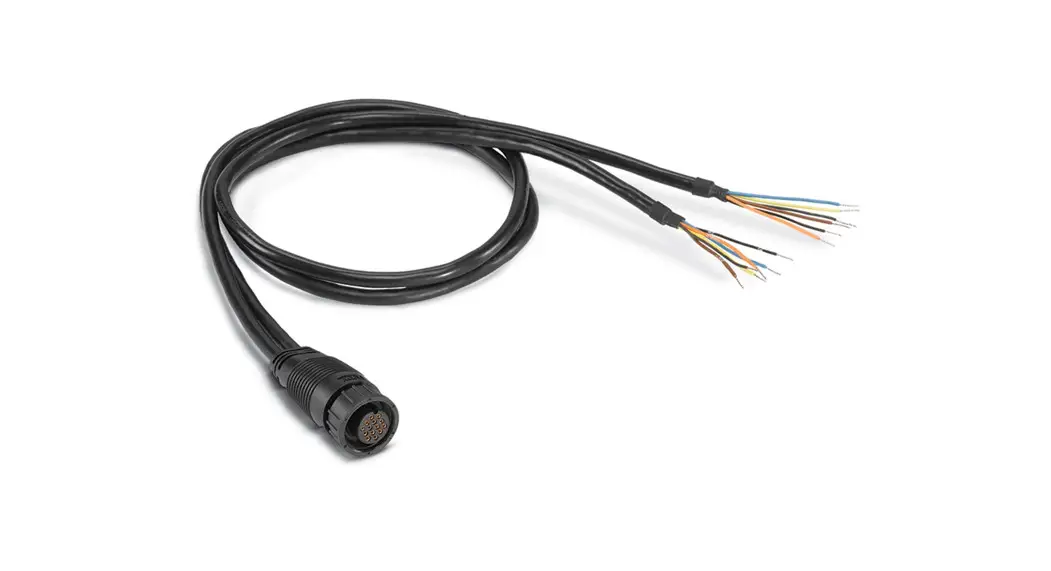
![]() Dual NMEA Y-CABLE Splitter Cable
Dual NMEA Y-CABLE Splitter Cable
Installation Guide
OVERVIEW
Use the Dual NMEA Y-Cable to connect two NMEA 0183 accessories to a SOLIX® or ONIX® control head. We encourage you to read this guide completely before you start the installation so you may understand the installation requirements.
Customer Service: Contact Humminbird Customer Service at 1-800-633-1468 or visit our Web site at humminbird.com.![]() NOTE: A separate power source is required for each attached accessory.
NOTE: A separate power source is required for each attached accessory.![]() NOTE: Product specifications and features are subject to change without notice.
NOTE: Product specifications and features are subject to change without notice.
Connecting the NMEA 0183 Accessories to the Y-Cable
Each accessory should include a NMEA 0183 data cable with bare wires for connecting to the Humminbird Y-Cable. Refer to the accessory’s user manual for information about the data cable.
- Turn off the power for the SOLIX or ONIX control head and each accessory.
 WARNING! Turn off power for all related equipment before you start the installation.
 - Use the accessory manual to locate the following wires on the Accessory Data Cable: transmit A(+), transmit B(–), receive A(+), receive B(–), ground, and drain.
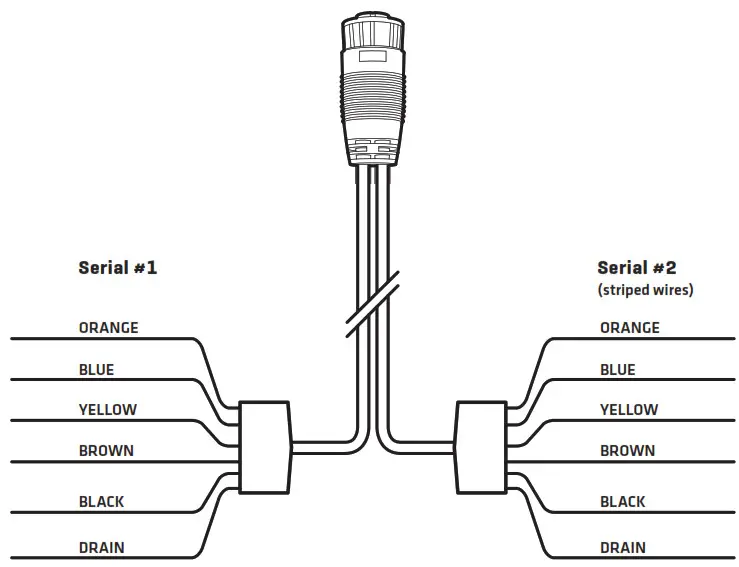
- Choose one set of bare wires on the Y-Cable (Serial #1 or Serial #2).

- Connect the Y-Cable wires to the Accessory Data Cable wires as shown in the following table. Tape or apply heat-shrink insulation to each connection to prevent shorting the wiring.
RS-422 Dual NMEA Y-Cable (NMEA 0183) RS-422 Accessory Data Cable (NMEA 0183) Orange: Transmit A(+) Receive A(+) Blue: Transmit B(–) Receive B(–) Yellow: Receive A(+) Transmit A(+) Brown: Receive B(–) Transmit B(–) Black: Ground Ground Bare: Drain Drain  NOTE: Whether connecting to Serial #1 (solid wires) or Serial #2 (striped wires), the connection information is the same for each set.
If the accessory data cable has a different set of wires, you may use the following optional wiring chart:RS-422 Dual NMEA Y-Cable (NMEA 0183) RS-232 Accessory Data Cable (NMEA 0183) Orange: Transmit A(+) Receive A(+) Blue: Transmit B(–) Ground Yellow: Receive A(+) Transmit A(+) Brown: Receive B(–) Ground Black: Ground Ground Bare: Drain Ground - If the Accessory Data Cable does not include a drain wire, tape or apply heat-shrink insulation to the Y-Cable drain wire.
- Repeat Steps 2 through 5 for the second accessory.
Routing the Cable
- Route the Y-Cable to the control head.
- Insert the Y-Cable connector into the NMEA 0183 port on the control head. The ports are labeled, and the connector is keyed to prevent incorrect installation.
- Hand tighten the screw nut to secure the connection.
- Follow the instructions in the accessory manuals to connect each accessory to a power source.
Setting the Baud Rate
The baud rate on the SOLIX and ONIX NMEA 0183 ports defaults to Auto. To select a specific baud rate, use the following instructions.
- From the Home screen, select Settings.
- Select Network > NMEA 0183 (1) or NMEA 0183 (2) > Baud Rate.
- Select a Baud Rate. Tap, or press the ENTER key, to confirm the selection.
Connecting the Dual NMEA Y-Cable to the NMEA 0183 Port (magnified view)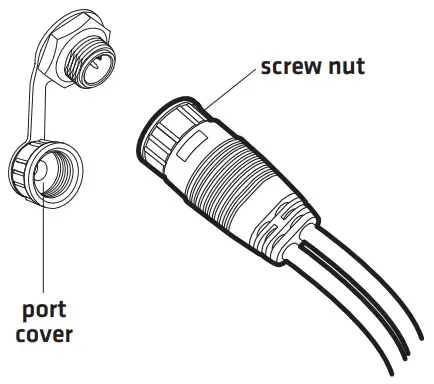
![]() © 2018 Johnson Outdoors Marine Electronics, Inc. All rights reserved.
© 2018 Johnson Outdoors Marine Electronics, Inc. All rights reserved.
532138-2_A


