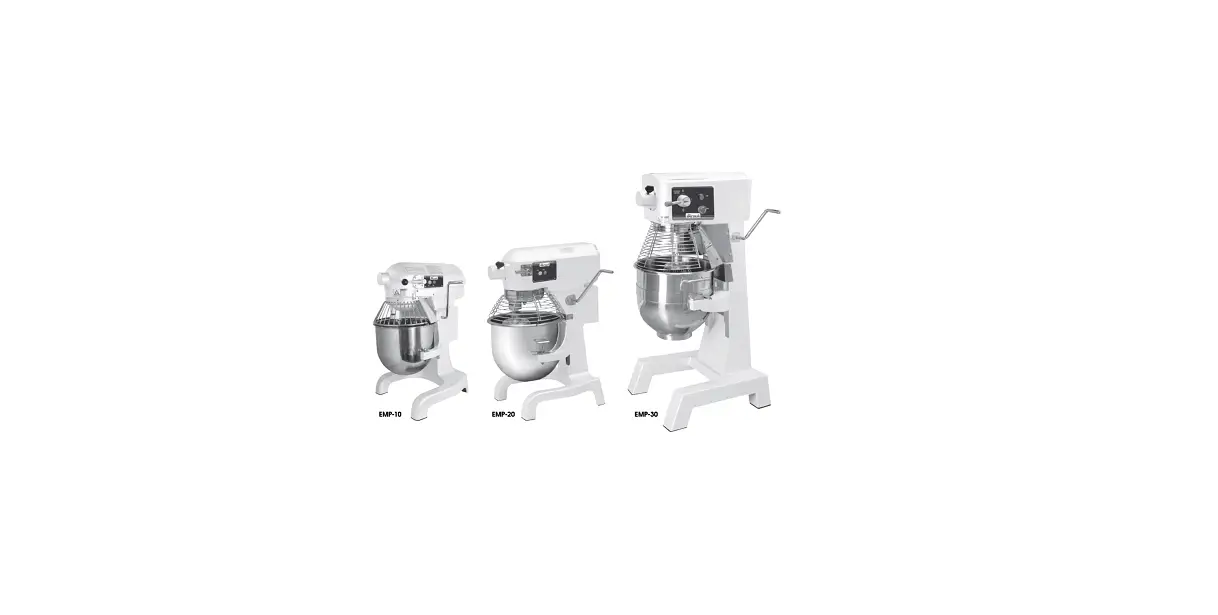
winco EMP-10 Commercial Planetary Mixers
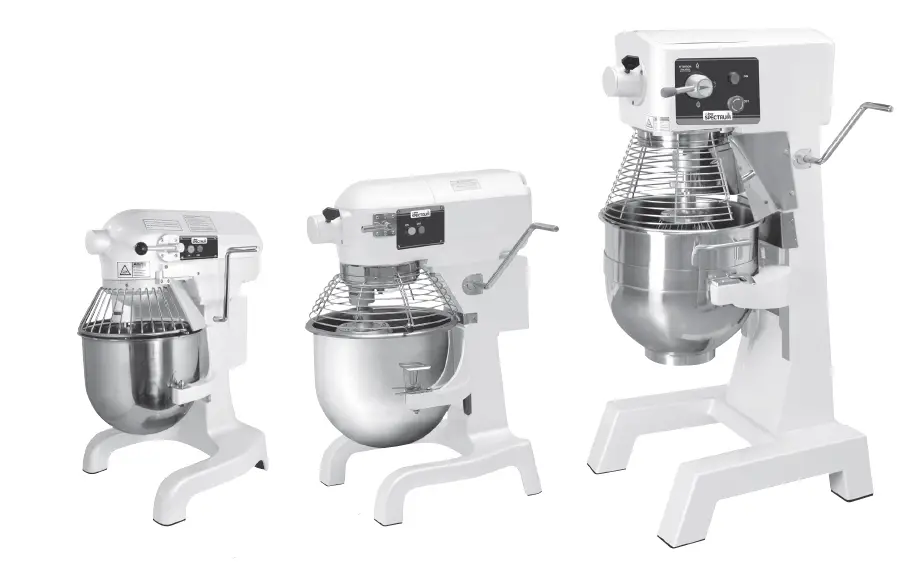
Electric Planetary Mixer
| Model | Voltage | Frequency | Power | Amperage | Plug Type | Overall Dimensions Width x Depth x Height | Weight |
| EMP-10 | 110V | 50/60Hz | 750W 1HP | 7A | NEMA 5-15P | 15-1/8″ x 18″ x 24-1/8″ (383 x 456 x 612mm) | 99.2 lbs 45 kgs |
| EMP-20 | 110V | 50/60Hz | 1100W 1.5HP | 10A | NEMA 5-15P | 19-7/8″ x 21-11/16″ x 29-3/4″ (505 x 550 x 735mm) | 233.7 lbs 106 kgs |
| EMP-30 | 110V | 50/60Hz | 1500W 2HP | 14A | NEMA 5-15P | 23-13/16″ x 24-1/2″ x 44-13/16″ (605 x 620 x 1138mm) | 392.4 lbs 178 kgs |
BEFORE OPERATING ANY EQUIPMENT, READ AND FAMILIARIZE YOURSELF WITH THESE USE AND SAFETY INSTRUCTIONS
Congratulations on your purchase of this SPECTRUM commercial equipment. When used as intended, and with proper care and maintenance, you are sure to experience years of reliable operation from this equipment. To ensure best results, it is important that you read and follow the instructions in this manual carefully. It is important to keep these instructions in a safe place for future reference.
Important For Future Reference
Please complete this information and retain this manual for the life of the equipment. For Warranty Service and/or parts, this information is required.
Model Number
Serial Number
Date Purchased
WARNING: IMPROPER INSTALLATION, ADJUSTMENT, ALTERATION, SERVICE OR MAINTENANCE CAN CAUSE PROPERTY DAMAGE, INJURY, OR DEATH. READ THE INSTALLATION, OPERATION, AND MAINTENANCE INSTRUCTIONS THOROUGHLY BEFORE INSTALLING OR SERVICING THIS EQUIPMENT.
CAUTION: THESE MODELS ARE DESIGNED, BUILT, AND SOLD FOR COMMERCIAL USE ONLY. IF THESE MODELS ARE POSITIONED SO THE GENERAL PUBLIC CAN USE THE EQUIPMENT, MAKE SURE THAT CAUTION SIGNS, WARNINGS, AND OPERATING INSTRUCTIONS ARE CLEARLY POSTED NEAR EACH UNIT SO THAT ANYONE USING THE EQUIPMENT WILL USE IT CORRECTLY AND NOT INJURE THEMSELVES OR HARM THE EQUIPMENT.
WARNING: A FACTORY AUTHORIZED SERVICE PROVIDER SHOULD HANDLE ALL MAINTENANCE AND REPAIR. BEFORE DOING ANY MAINTENANCE OR REPAIR, FOLLOW SERVICE SET UP ARRANGEMENT ON PAGE 11.
Introduction
Congratulations on the purchase of your SPECTRUM™ Commercial Equipment. Please take time to carefully read through this manual to ensure the machine is operated and maintained properly, to ensure the best possible performance from the product for many years.
SPECTRUM will not accept liability for the following if:
- The instructions in this manual have not been followed correctly.
- Non-authorized personnel have tampered with the machine.
- Non-original spare parts are used.
- The machine has not been handled and cleaned correctly.
- There is any use damage to the unit.
Immediately Inspect for Shipping Damage
All containers should be examined for damage before and during unloading. The freight carrier has assumed responsibility for its safe transit and delivery. If equipment is received damaged, either apparent or concealed, a claim must be made with the delivering carrier.
- A. Apparent damage or loss must be noted on the freight bill
at the time of delivery. It must then be signed by the carrier representative (Driver). If this is not done, the carrier may refuse the claim. The carrier can supply the necessary forms. - B. If concealed damage or loss is not apparent until after equipment is uncrated, a request for inspection must be made to the carrier within 15 days. The carrier should arrange an inspection. Be certain to keep all contents and packaging material.
Package Contents
All units come with an Operating Instruction Manual and the following:
- SPECTRUM™ Commercial Planetary Mixer
- Mixing Bowl
- Spiral Dough Hook
- Flat Beater
- Whisk (Wire Whip)
SPECTRUM prides itself on quality and service, ensuring that at the time of packing, all products are supplied fully functional and free of damage. Should you find any damage as a result of freight, please contact your SPECTRUM dealer immediately.
Unpacking the Equipment
DISPOSE OF ALL PACKAGING MATERIALS IN AN ENVIRONMENTALLY RESPONSIBLE MANNER.
- Remove all packing materials and tape, as well as any protective plastic and cardboard, from the unit.
- Clean any glue residue left over from the plastic or tape.
- Place the unit in the desired position and height.
Installation and start-up must be performed by a qualified installer who has thoroughly read, understands and follows these instructions.
Please keep this manual in a safe place for future use!
NOTE
Please remember that this manual and the warning labels do not replace the need to be alert, to properly train and supervise operators, and to use common sense when using this equipment.
Installation
These instructions should be followed at all times. Failure to follow these instructions could result in injury to yourself and others.
TO REDUCE RISK OF INJURY OR DAMAGE TO THE UNIT:
- Read this manual thoroughly before installation and operation.
DO NOT proceed with installation and operation if you have any questions or do not understand anything in this manual. Contact your representative or the manufacturer first.
WARNING
Fire Hazard.
Correct installation precautions, procedures and regulations must be followed. Operation and safety training is necessary for all users of this equipment.
The equipment must be installed by qualified personnel only. Correct installation precautions, procedures and regulations must be followed in order to reduce the risk of fire. Hood and fire suppression systems must be maintained per manufacturer’s guidelines. Only qualified and trained personnel are to use this equipment. - Remove the SPECTRUM™ Commercial Planetary Mixer from the packaging. Be certain that all protective plastics and residues are thoroughly cleaned from its surface.
- Place the Planetary Mixer on a firm level surface. Install rubber feet or bolt mixer to counter or stand. Local standards and regulations should be consulted in order to abide by standards set in relation to positioning, spacing, and ventilation. SPECTRUM recommends that you allow no less than 4” for a ventilation gap around the perimeter of this unit. Common sense should be used when choosing position and operation of this product.
CAUTION
Do not position or operate near combustible materials/flammable objects.
WARNING
Electrical Shock Hazard
Keep water and other liquids from entering the inside of the unit. Liquid inside the unit could cause an electrical shock.
Do not spray water or cleaning products. Liquid could contact the electrical components and cause a short circuit or an electrical shock. Do not use unit if power cord is damaged or has been modified. - The installation of the unit must conform to the NATIONAL ELECTRIC CODE, ALL LOCAL ELECTRIC CODES AND ORDINANCES, AND ALL THE LOCAL ELECTRICAL COMPANY RULES AND REGULATIONS. Additionally, we recommend a 4″ spacing surrounding the unit in order to provide adequate ventilation.
- Proper connections and power supply are essential for efficient performance. Supply the appropriate power and connect to source; the Planetary Mixer is now ready to turn on and operate. (For power supply please see technical specification on page 1). Fournir l’alimentation secteur appropriée et brancher l’appareil à la source d’alimentation ; votre Grille-pain à Convoyeur est maintenant prête à être allumée et à fonctionner. (Pour l’alimentation, veuillez voir la fiche technique, page 1).
- The units are wired to be used with a 110V, NEMA 5-15R receptacle on a dedicated circuit.
Proper Grounding · Mise à la terre correcte
This machine is provided with a three-pronged grounding plug. The outlet to which this plug
is connected must be properly grounded. If the receptacle is not the proper grounding type, contact an electrician. DO NOT, under any circumstances, cut
or remove the third ground prong from the power cord or use any adapter plug.
Mixer Parts

- A. Attachment Retaining Screw
- B. Speed Control
- C. Planetary Shaft
- D. Mixing Agitator Attachment
- E. Bowl
- F. On/Off Switches
- G. Reset Switch
- H. Bowl Lift Lever
- I. Bowl Safety Guard
- J. Bowl Slides
Operation
INSTALLATION OF MIXER AGITATOR ATTACHMENT:
- Place the stirring shaft in Mixer and rotate in clockwise direction.
STARTING & CHANGING SPEED:
- Pull the gear speed control handle to position 1 before starting, push the ON power switch.
- Changing Speed: To change speed, push the OFF power switch first, and then pull the speed control handle to the new position (2 or 3).
WARNING
Never change speeds while mixer is running. Failure to do so will damage the gears or other parts and WILL void the warranty.Gear Speed Product Type 1 (Low) Heavy: mixing pizza, bread, donut doughs, etc. 2 (Medium) Medium: 2nd stage mixing for donut doughs, etc. 3 (High) Light: whipping cream, egg whites, meringue .
- Shutting down: When the operation is complete, push the OFF power switch first, then pull the gear change hand lever to position 1.
- Rotate the bowl lift hand lever to the lowest point
- Rotate bowl guard to the left until fully open
ADDING MIXING INGREDIENTS:
WARNING
Overloading or not following the capacity chart will damage the mixer and void the warranty. Refer to Capacity Chart section.
- Add the appropriate mixing ingredients into the bowl.
- Rotate bowl lift lever up until bowl lock into position.
- Rotate bowl guard to the right until it locks into position.
ROTATION SPEED PARAMETERS:
| Model | Speed of Stirring Shaft (r/min) | ||
| 1 (low) | 2 (medium) | 3 (high) | |
| EMP-10 | 108 | 195 | 355 |
| EMP-20 w/hub | 108 | 195 | 355 |
| EMP-30 w/hub | 91 | 166 | 282 |
Accessories and Functions
- Whisk (Wire Whip): Used for stirring of liquid material, such as cream and egg. Recommended speed: mid or high speed.
- Flat Beater: Stirring of paste, powder and fragmental material, such as stuffing and cake dough.
Recommended speed: start with low speed, end with mid speed. - Spiral Dough Hook: Stirring of sticky material, such as dough. Recommended speed: low speed.
WARNING
If the equipment fails to function, please make sure that it is serviced by professional person or please turn to special service point.
Mixer will NOT START unless:
- Unit is plugged into power supply
- Bowl is secure in up position
- Bowl safety guard is closed
NOTES
Please remember that this manual and the warning labels do not replace the need to be alert, to properly train and supervise operators, and to use common sense when using this equipment.
Don’t put your hands into the stirring barrel during operation. Power supply should be disconnected before the mixer attachment is going to be installed.
Don’t operate the mixer beyond the time limit to prevent reduction of its service life.
Mixer Capacity Chart
The following maximum capacities are intended as a guideline only. Varying factors such as the type of flour, water temperature and other conditions may require batch to be reduced.
| PLANETARY MIXERS | |||||
| Product | Agitator | Speed | EMP-10 | EMP-20 | EMP-30 |
| Pizza Dough – Thin (40% AR) | Dough Hook | 1st only | 5 lbs (2.3 kg) | 9 lbs (4.0 kg) | 16 lbs (7.3 kg) |
| Pizza Dough – Medium (50% AR) | Dough Hook | 1st only | 5 lbs (2.3 kg) | 10 lbs (4.5 kg) | 25 lbs (11.3 kg) |
| Pizza Dough – Thick (60% AR) | Dough Hook | 1st only | 10 lbs (4.5 kg) | 20 lbs (9.0 kg) | 40 lbs (18.1 kg) |
| Heavy Bread Dough (55% AR) | Dough Hook | 1st only | 7.5 lbs (3.4 kg) | 15 lbs (6.8 kg) | 30 lbs (13.6 kg) |
| Bread & Roll Dough (60% AR) | Dough Hook | 1st only | 12.5 lbs (5.7 kg) | 25 lbs (11.3 kg) | 45 lbs (20.4 kg) |
| Raised Donut Dough (65% AR) | Dough Hook | 1st and 2nd | 4.5 lbs 2.0 kg) | 9 lbs (4.0 kg) | 15 lbs (6.8 kg) |
| Pasta – Basic | Dough Hook | All Speeds | 3 lbs (1.3 kg) | 5 lbs (2.3 kg) | 8 lbs (3.6 kg) |
| Pie Dough | Flat Beater | All Speeds | 10 lbs (4.5 kg) | 18 lbs (8.1 kg) | 27 lbs (12.3 kg) |
| Cake | Flat Beater | All Speeds | 10 lbs (4.5 kg) | 20 lbs (9.0 kg) | 30 lbs (13.6 kg) |
| Mashed Potatoes | Flat Beater | All Speeds | 8 lbs (3.6 kg) | 16 lbs (7.3 kg) | 24 lbs (10.9 kg) |
| Waffle or Pancake Batter | Flat Beater | All Speeds | 5 qts (4.7 lts) | 8 qts (7.5 lts) | 12 qts (11.4 lts) |
| Whipped Cream | Wire Whip | All Speeds | 2 qts 1.9 lts) | 4 qts (3.8 lts) | 6 qts (5.7 lts) |
| Egg Whites | Wire Whip | All Speeds | 1 pts (.47 lts) | 1 qts (.95 lts) | 1.5 qts (1.4 lts) |
| Meringue (Qty of Water) | Wire Whip | All Speeds | .75 pts (.35 lts) | 1.5 pts (.75 lts) | 1 qts (.95 lts)*-/ |
NOTES:
- Mixer capacity depends on the moisture content of the dough. When mixing dough, check the Absorption Ratio percentage (AR%) Absorption Ratio % (AR%) = Water Weight divided by Flour Weight.
- The capacities listed above are based on flour at room temperature and 70°F (21°C) water temperature.
- If high gluten flour is used, reduce batch by 10%
- If using chilled flour, water below 70°F (21°C) or ice, reduce batch by 10%
- Do not use 2nd speed with mixtures below 50% AR
- Do not use hub attachments while mixing
How To Use Attachment Hub #12 (EMP-20 & EMP-30 Only)
WARNING
- Never put your hand into the feed chute when using a mixer attachment.
- DO NOT attempt to mix ingredients in bowl while using the hub.
Mixer must be OFF before installing attachment. Do NOT use hub attachments while mixing. 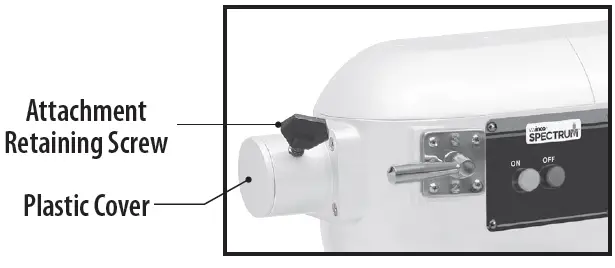
- Loosen and remove attachment hub thumbscrew.
- Remove plastic cover from attachment hub.
- Lubricate attachment shaft with a food quality grease or mineral oil.
- Insert attachment shaft into hub making sure to line up the alignment pin with hub hole.
- Tighten thumbscrew back into hub and securely tighten it.
- Select the appropriate speed setting by lifting or lowering speed control lever. Recommended speed while using attachments:
- Vegetable Slicer: 1 or 2
- Cheese Shredder/Grater: 1 or 2
- Meat Grinder: 1 only
NOTE: MAKE SURE BOWL IS UP AND BOWL GUARD IS CLOSED. MIXER WILL NOT START IF BOWL AND BOWL GUARD ARE NOT IN THE PROPER OPERATING POSITION.
- Press the ON button to start mixer and hub attachment.
- Press the OFF button to stop mixer and hub attachment
- To change the speed while using mixer attachments:
- a. Press OFF button, then wait for the agitator to come to a complete stop.
- b. Change speed by adjusting speed control lever to new position.
- c. Press ON button to restart mixer and hub attachment
WARNING
Always STOP mixer BEFORE changing speeds! Failure to do so can damage the gears or other parts and WILL void the warranty!
Cleaning, Care & Maintenance
To maintain the appearance and increase the service life, clean your unit daily. The SPECTRUM™ Commercial Planetary Mixer should be cleaned after each day’s operation; however, the unit may require more frequent cleaning, depending on the volume of production.
- Switch power off and disconnect from the outlet before cleaning.
- Mix/dilute cleaning detergent and sanitizer solution in separate containers per the manufactures instructions.
- Hand-wash using mild soap and water; rinse, dry and sanitize:
After each use:
- Agitators
- Bowl (bowl can also be washed in the dishwasher)
- Bowl Guard
- Rear Splash Guard
- Planetary Shaft (add a light coating of mineral oil to planetary shaft after cleaning)
Daily:
- Bowl Cradle (add a light coating of mineral oil to cradle slides after cleaning)
- Exterior
- Hub Interior (clean damp cloth, dry, sanitize)
WARNING
Do not use a water hose or pressure washer to clean mixer
Recommended Maintenance
- Bowl Slides – Apply a light coating of mineral oil to the bowl slides as needed or when bowl becomes difficult to lift and lower.
- Planetary Shaft – Apply a light coating of mineral oil to the planetary shaft daily. Do not leave agitator connected to shaft, remove for cleaning after every use.
- Gear transmission cavity and shaft bearing are greased at factory. Inspect every 6 months and lubricated as needed.
Safety Precautions
Before installing and operating this equipment be sure everyone involved in its operation are fully trained and aware of all precautions.
Accidents and problems can result from a failure to follow fundamental safety precautions.
- A WINCO® Approved Recommended Qualified Service Technician should carry out repairs if necessary. Do not remove any components or service panels on this product.
- Before cleaning, switch off power and disconnect power cord from the outlet.
- If the power cord is damaged, it must be replaced by a WINCO® Approved Recommended Qualified Service Technician in order to avoid a hazard.
- WARNING
Electrical Shock Hazard - Keep water and other liquids from entering the inside of the unit. Liquid inside the unit could cause an electrical shock.
- Do not spray water or cleaning products. Liquid could contact the electrical components and cause a short circuit or an electrical shock. Do not use unit if power cord is damaged or has been modified.
Troubleshooting
If your SPECTRUM™ Commercial Planetary Mixer does not operate, please check the following before placing a service call:
| ISSUE | MIGHT BE CAUSED BY | RECOMMENDED SOLUTION |
|
Mixer will not operate | Bowl guard not in closed position. | Rotate guard to the right until fully closed |
| Bowl not raised. | Raise bowl to highest position. | |
| Power not connected properly. | Check all power connections. Plug into a live socket. (Do not use extension cord) | |
| Building circuit breaker is off. | Check breaker box. | |
| Internal overload tripped. | Reset internal overload breaker on rear of unit | |
| Gear not engaged. | Switch gear fully into position. (Mixer will not operate if the speed control lever is in between positions) | |
| Mixer stops during mixing cycle | Internal overload tripped. | Reset internal overload breaker on rear of unit |
| Overloads | Reduce product load and restart | |
| The speed of mixing is too high or using wrong agitator | Select correct agitator and speed setting | |
| Mixer is noisy | Mixer is not installed on level surface. | Adjust surface or relocate mixer |
| The agitator or bowl are deformed | Replace or change agitator or bowl | |
| Abnormal noise and high temperature from gearbox | Insufficient lubrication | Add or replace gearbox grease |
| Oil leaking | Seal ring are worn | Replace seal rings |
Service and Repair
THIS EQUIPMENT MUST ONLY BE SERVICED BY AN AUTHORIZED AGENT.
NOTE
Parts protected by the manufacturer or its agent are not to be adjusted by the installer unless the installer is an authorized service agent. If you have any questions or problems DO NOT send unit to WINCO® without first contacting our customer service department.
See “Limited Warranty” section on page 18 for details.
Electrical Circuit Diagram
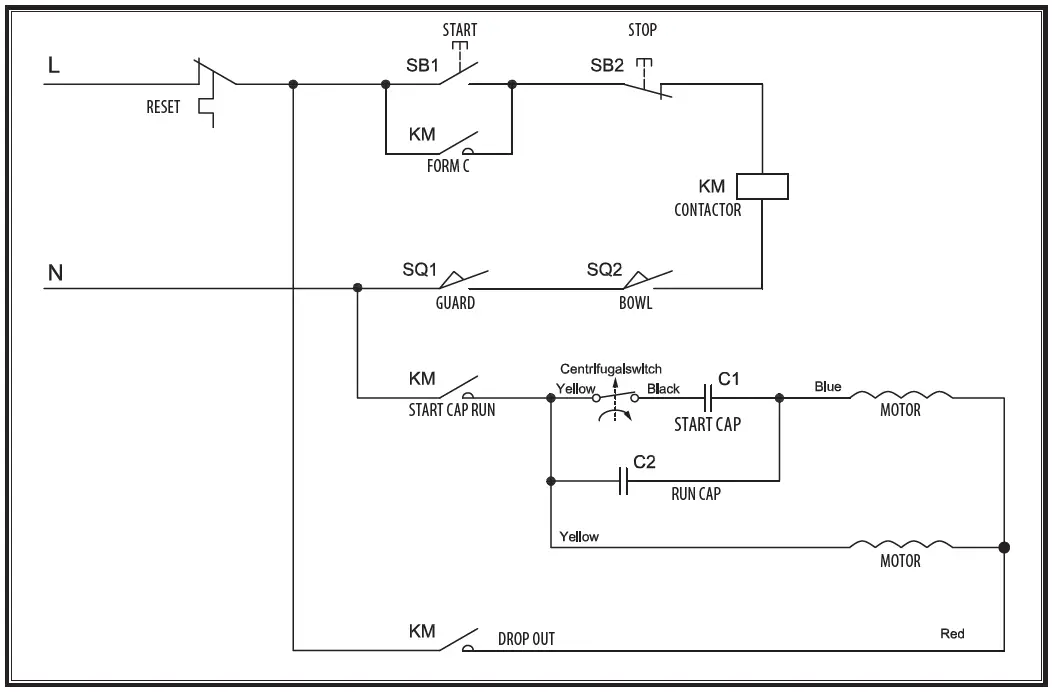
These circuit diagrams have been provided to assist qualified electricians; Only SPECTRUM™ service agents, or qualified electricians should carry out repairs, if repair is required.
Do not remove any components or service panels on this product.
Exploded View & Parts List
MODEL: EMP-10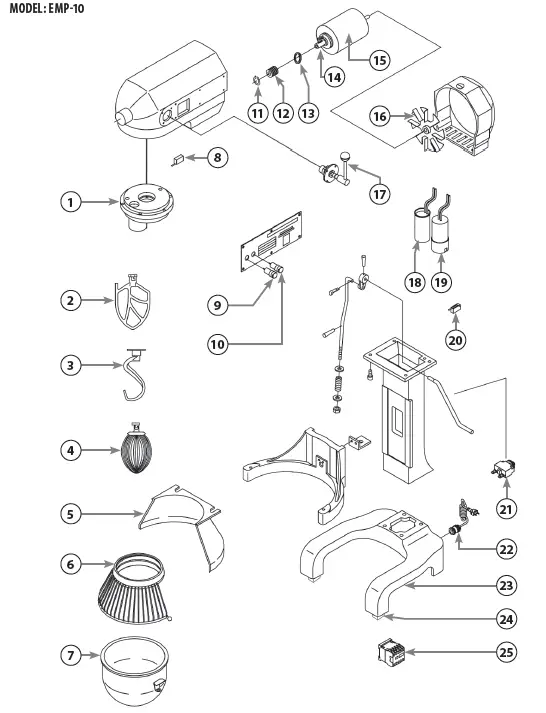
Parts List
| No. | Description | Part # |
| 1 | Planetary Gear Box | EMP-P1 |
| 2 | Flat Beater | EMP-P2 |
| 3 | Spiral Dough Hook | EMP-P3 |
| 4 | Whisk (Wire Whip) | EMP-P4 |
| 5 | Back Shield | EMP-P5 |
| 6 | Safety Guard | EMP-P6 |
| 7 | Mixing Bowl | EMP-P7 |
| 8 | Safety Guard Lock Switch | EMP-P8 |
| 9 | Green Start Push Button | EMP-P9 |
| 10 | Red Stop Push Button | EMP-P10 |
| 11 | Snap Ring | EMP-P11 |
| 12 | Helical Gear | EMP-P12 |
| 13 | Oil Seal | EMP-P13 |
| 14 | Way Key | EMP-P14 |
| 15 | Motor | EMP-P15 |
| 16 | Fan | EMP-P16 |
| 17 | Gear Shift Handle | EMP-P17 |
| 18 | Start Capacitor | EMP-P18 |
| 19 | Run Capacitor | EMP-P19 |
| 20 | Bowl Locking Switch | EMP-P20 |
| 21 | Overload Reset Switch | EMP-P21 |
| 22 | Power Cord | EMP-P22 |
| 23 | Mixer Stand | EMP-P23 |
| 24 | Rubber Feet | EMP-P24 |
| 25 | Contactor | EMP-P25 |
| Not Shown | Centrifugal Switch | EMP-P26 |
Please contact factory for special order parts not listed.
MODEL: EMP-20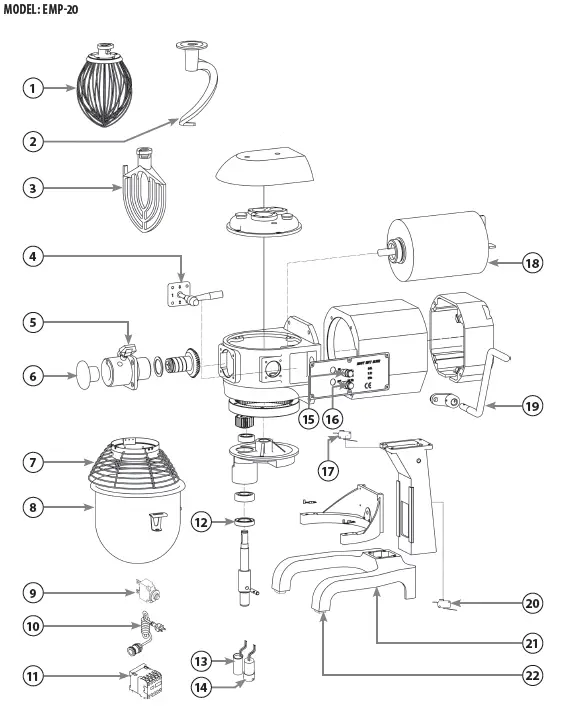 Parts List
| No. | Description | Part # |
| 1 | Whisk (Wire Whip) | EMP-P27 |
| 2 | Spiral Dough Hook | EMP-P28 |
| 3 | Flat Beater | EMP-P29 |
| 4 | Speed Shifter | EMP-P30 |
| 5 | Attachment Retaining Screw | EMP-P31 |
| 6 | Attachment Hub Plug | EMP-P32 |
| 7 | Safety Guard | EMP-P33 |
| 8 | Bowl Assembly | EMP-P34 |
| 9 | Overload Reset Switch | EMP-P35 |
| 10 | Power Cord | EMP-P36 |
| 11 | Contactor | EMP-P37 |
| 12 | Oil Seal | EMP-P38 |
| 13 | Start Capacitor | EMP-P39 |
| 14 | Run Capacitor | EMP-P40 |
| 15 | Red Stop Push Button | EMP-P41 |
| 16 | Green Start Push Button | EMP-P42 |
| 17 | Safety Guard Lock Switch | EMP-P43 |
| 18 | Motor | EMP-P44 |
| 19 | Handle-shifter | EMP-P45 |
| 20 | Bowl Locking Switch | EMP-P46 |
| 21 | Mixer Stand | EMP-P47 |
| 22 | Rubber Feet | EMP-P48 |
| Not Shown | Centrifugal Switch | EMP-P49 |
Please contact factory for special order parts not listed.
MODEL: EMP-30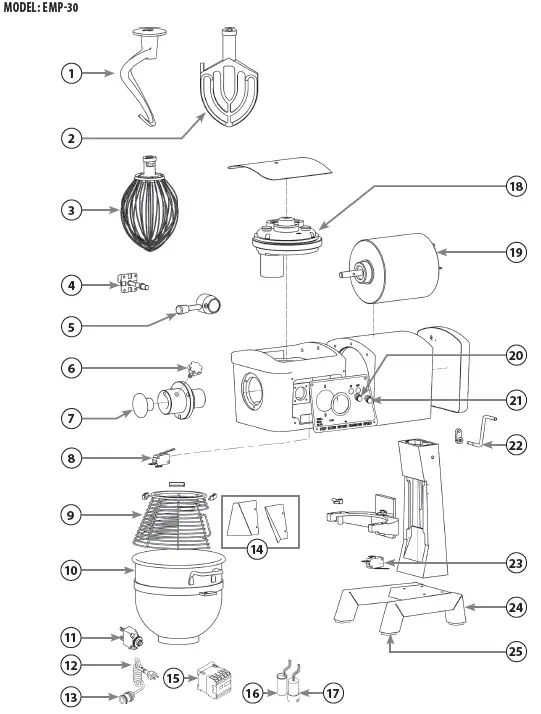 Parts List
| No. | Description | Part # |
| 1 | Spiral Dough Hook | EMP-P50 |
| 2 | Flat Beater | EMP-P51 |
| 3 | Whisk (Wire Whip) | EMP-P52 |
| 4 | Speed Shifter | EMP-P53 |
| 5 | Speed Handle | EMP-P54 |
| 6 | Attachment Retaining Screw | EMP-P55 |
| 7 | Plug Attachment Hub | EMP-P32 |
| 8 | Safety Guard Lock Switch | EMP-P56 |
| 9 | Safety Guard | EMP-P57 |
| 10 | Mixing Bowl | EMP-P58 |
| 11 | Overload Safety Switch | EMP-P59 |
| 12 | Power Cord | EMP-P60 |
| 13 | Power Supply with Waterproof Connectors | EMP-P61 |
| 14 | Guards | EMP-P62 |
| 15 | Contactor | EMP-P63 |
| 16 | Start Capacitor | EMP-P64 |
| 17 | Run Capacitor | EMP-P65 |
| 18 | Planetary Gear Box | EMP-P66 |
| 19 | Motor | EMP-P67 |
| 20 | Green Start Push Button | EMP-P68 |
| 21 | Red Stop Push Button | EMP-P41 |
| 22 | Handle-Shifter | EMP-P69 |
| 23 | Bowl Locking Switch | EMP-P70 |
| 24 | Mixer Stand | EMP-P71 |
| 25 | Rubber Feet | EMP-P72 |
| Not Shown | Centrifugal Switch | EMP-P73 |
Limited Warranty
WINCO® warrants to the original purchaser of new equipment that said equipment, when installed in accordance with our instructions within North America and subjected to normal use, is free from defects in material or workmanship for a period of 1 year. The labor warranty is one year from original installation or 18 months from actual factory shipment date, whichever date occurs first.
THIS WARRANTY IS IN LIEU OF ALL OTHER WARRANTIES, WHETHER EXPRESSED OR IMPLIED. WINCO EXPRESSLY DISCLAIMS ANY IMPLIED WARRANTY OF MERCHANTABILITY OR EXPRESSED OR IMPLIED WARRANTY OF FITNESS FOR A PARTICULAR PURPOSE.
WINCO’S OBLIGATION AND LIABILITY UNDER THIS WARRANTY IS EXPRESSLY LIMITED TO REPAIRING AND REPLACING EQUIPMENT THAT PROVES TO BE DEFECTIVE IN MATERIAL OR WORKMANSHIP WITHIN THE APPLICABLE WARRANTY PERIOD.
IN NO EVENT SHALL WINCO BE LIABLE FOR INCIDENTAL OR CONSEQUENTIAL DAMAGES TO BUYER OR ANY THIRD PARTY, INCLUDING, WITHOUT LIMITATION, LOSS OF PROPERTY, PERSONAL INJURY, LOSS OF BUSINESS OR PROFITS OR OTHER ECONOMIC LOSSES, OR STATUTORY OR EXEMPLARY DAMAGES, WHETHER IN NEGLIGENCE, WARRANTY, STRICT LIABILITY, OR OTHERWISE.
This warranty is given only to the first purchaser from a retail dealer. No warranty is given to subsequent transferees.
Warranty does not cover product failures caused by: failure to maintain, neglect, abuse, damage due to excess water, fire, normal wear, improper set up and use. Periodic maintenance is not covered.
This warranty is not in force until such time as a properly completed and digitally signed Installation/Warranty Registration has been received by WINCO within 30 days from the date of installation.
WARRANTY SERVICE
To initiate warranty service contact: [email protected] or call: 973-295-3899
DO NOT send unit to WINCO® without first contacting our customer service department. Please provide or have the following information available:
- Model & Serial Number (located on the silver identification tag, on side or rear of unit)
- Date of Purchase
- Purchase Dealer
- Operator / Installation Contact Information
- Business Name & Business Address
- Contact Name & Contact Telephone Number
REGISTER ONLINE AT:
http://www.wincous.com
Proof of purchase is required to extend warranty more than 1 year from date of shipment from the factory.
THE FOREGOING WARRANTY PROVISIONS ARE A COMPLETE AND EXCLUSIVE STATEMENT BETWEEN THE BUYER AND SELLER. WINCO® NEITHER ASSUMES NOR AUTHORIZES ANY PERSONS TO ASSUME FOR IT ANY OTHER OBLIGATION OR LIABILITY IN CONNECTION WITH SAID EQUIPMENT.
Examples of items not covered under warranty, but not limited to just these items:
- Natural disasters (ie: earthquakes, tornadoes, hurricanes, etc.), fire, water damage, burglary, accident, theft.
- Freight damage.
- Improper installation or alteration of equipment.
- Use of generic or after-market parts.
- Repairs made by anyone other than a WINCO® designated service provider.
- Lubrication.
- Expendable wear parts, adjustable feet, blown fuses, lamps, etc.
- Normal product maintenance.
- Misuse or abuse.
- Normal wear and tear items such as light bulbs, fuses, and exterior finishes.
Warranty voided if:
- Product is altered by user
- Serial number plate is removed
- Product is installed in a prison or any correctional facility.
Models: EMP-10, EMP-20 and EMP-30 www.wincous.com


