![]() LASER SHOW SYSTEM
LASER SHOW SYSTEM
PROFESSIONAL ANIMATION SERIES
MODEL FOS 10W RGB
USER GUIDE
SAFETY NOTES
ANIMATION LASER SHOW SYSTEM SAFETY NOTES
DO NOT OVERDRIVE THE SCANNERS. WHEN USING MAX SPEED KEEP THE ANGLE SMALL. FOR MAX ANGLE DO NOT EXCEED 40000PPS ON THE ILDA SOFTWARE SETTING.
Class 3B and 4 Laser Lighting Effect User Safety Guide
Important Warnings
Class 4 Lasers have the potential to harm eyesight if viewed directly in the face, and in many instances, this may be the case even if viewed over longer distances of several tens of meters. Therefore before using the laser product you should familiarise yourself with its operation, and also the safety aspects that need to be considered.
Laser lighting effects are quite safe to watch if installed and used correctly, and being aware of a few basic factors will help you to achieve this. This guide has been prepared to help provide a basic background to the key safety aspects and is based on current UK health and safety guidance on the use of lasers for public displays.
Installation and Operation Notes
- The laser should only be installed and operated by those that are aware of how to operate a laser, and what the various controls perform.
- The laser should be mounted in a suitable and secure position in the venue so that once in the position it is unlikely to be affected by unintended movement.
- Prior to the installation and operation of the laser, the paths of the beams and effects should be considered, particularly with respect to how they will touch the audience. If direct audience scanning is desired then the laser energy in the effects needs to be considered to decide if the effects are safe for direct viewing.
Introduction
Laser lighting products are used to create some of the most vivid and striking visual effects, and are often noted for how they seem to produce solid shapes that cut through the air and pick up highly defined swirling smoke patterns. The light that is used to create these stunning effects is different from normal light and therefore several precautions need to be taken when using lasers to ensure that the lighting effects are safe and enjoyable to view. The optical power output from the kind of lasers used for lighting displays can be harmful if not properly set up or misused. But when used following the recommended health and safety guidelines, laser lighting effects are no more harmful than looking at any conventional lighting effect.
Although this guide covers the main points to consider when using laser effects, users are advised to familiarise themselves with other guidance, particularly that issued by the Health and Safety Executive, HS(G)95 The Radiation Safety Of Lasers Used For Display Purposes.
A laser product that emits more than 5mW of light and less than 500mW can be classified as a Class 3B laser product
A laser product that emits more than 500mW of light and can be classified as a Class 4 laser product Class 3B and 4 are safe if used responsibly and in accordance with the relevant guidance issued by the Health and Safety Executive.
Class 4 laser devices may cause fires and burn the skin if exposed directly.
In the simplest terms, generally keeping the beams and effects above the audience will not present a hazard to those viewing the show or effects. When you start to aim the laser effects down into the audience area is when it becomes harder to tell if the effects could cause harm. With a Class 3B and 4 laser lighting effect, the problem can arise if the beams or effects actually hit someone’s face. If in doubt, keep the effects above the audience.
Class 3B and 4 laser devices can be harmful to eyesight if viewed directly. i.e. that is, the beam or effect strikes the face of a person directly. The actual injury that a Class 3B and 4 laser can cause depends upon a number of factors, including how long the laser beam enters the eye for, the intensity of light, and what part of the eye it actually gets focused onto. The most susceptible part of the eye to receive damage from a laser is the internal back wall of the eyeball, known as the retina. It is this part of the eye that receives the light signals that are sent to the brain. All light entering the eye gets focused onto the retina.
There are no specific “laser laws” or any “laser licenses” that anybody needs in order to own or operate a laser for light show use. However, there is specific guidance issued by the Health and Safety Executive in the form of a document called HS(G)95 The Radiation Safety of Lasers Used for Display Purposes. HS(G)95 outlines a number of detailed points to consider when using lasers for light show purposes.
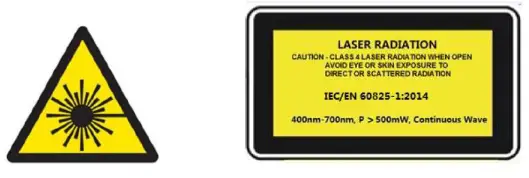
Class 3B and 4 laser products are required to have several specific safety features as part of their design.
These features are laid out in the British Standard on Laser Product Safety BS/EN 60825-1 and are a requirement of the product meeting CE approvals. The important ones are listed below:
1) Laser Safety Warning Labels 2) Emissions Indicator 3) Remote Interlock Connector
Audience Scanning
Audience Scanning is the term commonly used to describe when laser effects are being directly aimed at the viewing audience. This creates a very dramatic looking effect, as people can touch the light, and look down smoky tunnels. But because the laser light can touch or scan past people’s faces, it also carries a risk that it could cause damage to people’s eyesight, if they are overexposed to the laser light.
The amount of laser light that a person can be exposed to without it causing harm to eyesight is known as the Maximum Permissible Exposure or MPE. These levels are defined in the British Laser Safety Standard BS/EN 60826-1. When people are exposed to laser light that is above the MPE, it poses a risk of causing eye damage. This could be of concern when the laser effects are viewed directly in the face or there is a chance that they could be.
Knowing what the MPE and exposure level are for a given laser effect is quite a complex and involved process to establish. For it is dependent on a whole number of conditions and variables that need to be taken into account. The laser safety standard BS/EN 60825-1 contains the data required to calculate the safe levels, but it is not straightforward to interpret. Laser Safety Calculation Software has been developed to help ease the task of establishing laser effects exposure.
The BS/EN60825-1 Laser Safety Standard recommends that all establishments that use, or businesses that work with Class 3B laser products, should appoint a Laser Safety Officer (LSO). The Laser Safety Officer should be aware of the safety issues when using lasers and is responsible for overseeing how the laser is used. In smaller businesses, the LSO will probably also be the installer, operator, owner, etc.
The worst-case effect to look at directly is a static single beam because all the light energy is concentrated into one point.
General instructions
Unpacking:
Thank you for purchasing this product. Please read the user guide for safety and operations information before using the product. Keep this manual for future reference. This product can create perfect laser programs and effects since it has passed a series of strict tests before delivery. Please check the attachments listed on the page after opening the carton. In the event of carton damage or attachment missing in transit, please contact your dealer or our after-sales service department.
Attachments:
- Laser Light: 1PC
- Power Cable: 1PC
- User Guide: 1PC
Notice:
- Do not expose the human eye directly to the laser beam.
- Do not turn on and off the unit frequently.
- Before using this unit make sure the power supply is ground.
- This unit is intended for indoor use only and should be prevented from water, moisture, and shaking. The working temperature of this unit is -30~40℃, do not use this continuously for over 6 hours, otherwise, it shortens the lifetime of the unit.
- Use cleaning tissue to remove the dust absorbed on the external lenses periodically to optimize light output.
- Do not remove or break the warranty label, otherwise, it voids the warranty.
- Always replace with the exact same type fuse, replacement with anything other than the specified fuse can cause fire or electric shock and damage your unit, and will void your manufactures warranty.

Features
- Full pure diode laser with more stable performance and longer working life. Diode solid-state (DSS) laser is that when power is on, the diode will have laser output directly.
It can work properly between -30°C and 40 °C. - Made of analog laser modulation. Users can dimmer the laser brightness linearly to make the laser light more colorful.
- Use precise 2D dichro for RGB alignment. The users can do the RGB realignment even with their fingers. No special equipment and no skilled workers are needed.
- Graphics & Effects: Beam show and animated graphics show patterns.
- TF Card: 8GB, for storage build-in program and downloading program.
- Safety intelligent: PC control mode will shut off the laser automatically without a trigger signal. The scanner failure protection will shut off the laser signal and the. the shutter will block the laser output automatically, so as to avoid the single beam coming out.
- Applicable for all kinds of large-scale outdoor performances, and outdoor lighting projects.
Technical Specification
- Voltage: AC90~250V/AC, 50HZ/60HZ
- Rated Power: 150W
- Waterproof Level: IP51
- Work Environment: outdoor and indoor, -30 °C –40 °C
- Scanner: 40KPPS High-speed optical scanner, ±30° big angle scanning
- Laser: RGB analog modulate, 30KHZ frequency Red laser, 3W, wavelength 638nm Green laser, 3W, wavelength 525nm Blue laser, 4W, wavelength 450nm
- Beam Diameter<6mm, Divergence<1.5mrad
- Working Modes: ILDA mode (PC Control), DMX512 (18 CH), CF PRG(CF card program), CF ILD(CF card program), DMX512 (18 CH), SOLD(Sound Active) Mode, AUTO Mode, Outdoor Mode
- Play Program Format: .ild laser show document
- Safety Configure: Security protection, Laser key switch, laser remote interlock, SFS Control(scanner fail safety control ON/OFF), flying rings bolt
- Interface: 3 pins XLR jack for DMX, DB25 interface for PC control
- Machine dimension: 350(L)*240(W)*195(H)mm
- Machine Weight: 13Kg
Machine Pictures
The following pictures are for your reference only, the specific kind prevails.
Front Panel Picture
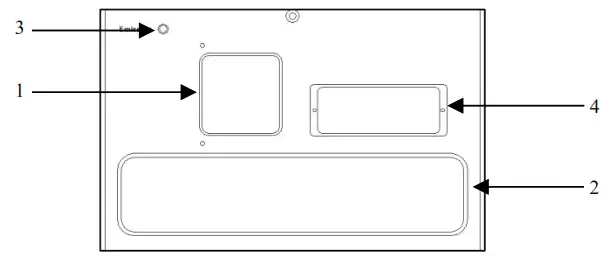
- Laser aperture
- Fan air outlet
- Laser indicator: White indicator light, the laser output is allowed when turned on, please operate carefully; the laser output is not allowed when turned off.
- Alignment adjusting window: If the RGB light is offset, please open this window with the attached screwdriver tool, and you can directly adjust the RGB light closing.
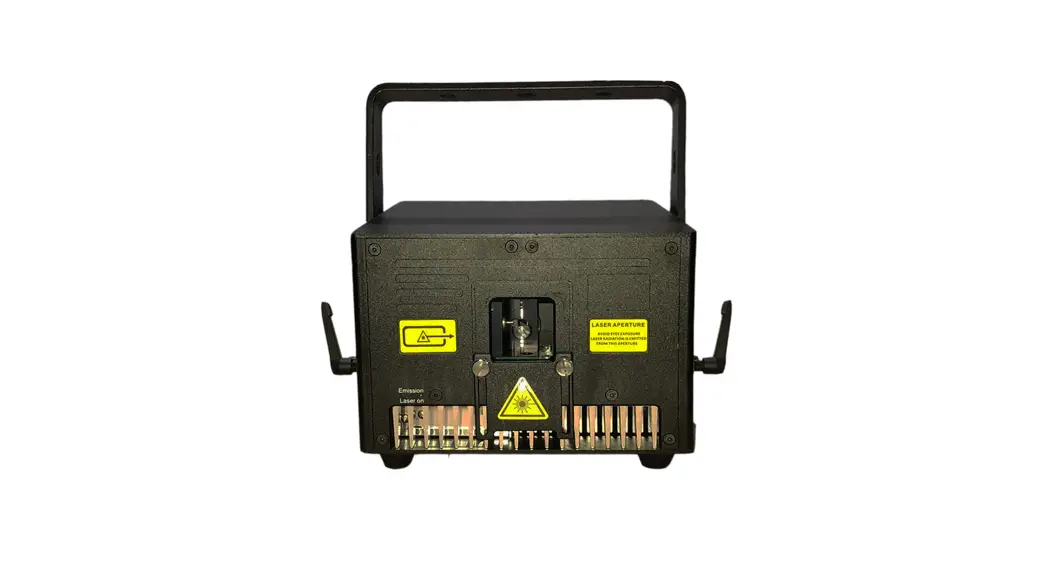
Rear Panel Picture
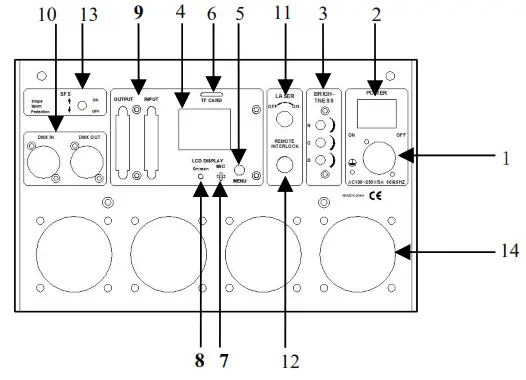
- POWER CON Power Input Socket: AC100~250V,50/60HZ
- POWER Switch
- BRIGHTNESS: RGB brightness adjusting knob,0~100% adjustment
- LCD DISPLAY: LCD display, displaying current operation information
- MENU: Menu reuse keys, rotation to make choices, keys to confirm or exit functions
- CF CARD: CF memory card, store laser program, and store the largess program to make laser software and other data
- MIC: Sound-control microphone with SOUND mode recognition sound rhythm signal
- Emission: Signal indicator light, signal flashing in DMX mode, other conditions for power indication
- ILDA In and Out Interface with DB25: Use laser software control(such as QuickShow from Pangolin). When connect to the hardware of laser software, it turns to ILDA mode automatically.
- DMX IN/OUT: Connect the input and output of DMX signal with 3 pins XLR jack
- Key Lock: ON and OFF laser. When at the ON position, laser ON, at the OFF position, laser OFF.
- Remote Interlock: Laser remote control interface to control laser ON and OFF. Connection to laser ON, Disconnection to laser OFF. Cooperating with key lock, when all ON then have laser output. When emergency can shut off the laser quickly.
- SFS: SFS control, scanner fail safety control ON/OFF. If turned OFF, a single point of laser will appear if the scanner fails. If turned ON, if there is a single point, automatically turn off the laser
- FAN: Radiator fan *4PCS
Manu Setting
| Manu | Sub Item | Default Setting | Remarks |
| DMX Address | 001/……/511 | 001 | DMX address |
| Show Mode | Auto/Sound/ILD/ PRG/Outdoor/TEST | Auto | Built-In Program Mode |
| Sound Sense | 000/……/100 | 080 | Sound sensitivity |
| CF File | CF/SD card folder setting. Double click the exit menu to select the required PRG or ILD files in the main interface. | ||
| Size | 010/……/100 | 100 | Pattern size setting |
| Phasic | X+ Y+/X- Y+/ X+ Y-/ X- Y- | X- Y+ | XY Phasic setting of only built-In program mode valid |
| Speed | 08/……/40 | 30 | Scanner speed setting |
| DMX State | Show/Black | Show | SHOW: No DMX signal is received, the built-in operation mode is run BLACK: If the signal is not received, the light is black. |
| Slave Mode | Master/Slave | Master | Master/Slave mode |
| X Phasic | Positive/Reverse | Positive | X Phasic setting of all modes valid |
| Y Phasic | Positive/Reverse | Positive | Y Phasic setting of all modes valid |
| Color Mode | RGB/White | RGB | Color setting |
Function & Setting
1) RRG: CF PRG mode(playlist mode), play PRG file. The LCD shows the current playlist name, rotates the button to change the playlist, and presses the button to change the current folder.
2) ILD: CF ILD mode, play single ILDA file (extension name is . ILD, case insensitive) repeatedly. The LCD shows the current playing ILDA file name, rotate the button to change the ILDA file; press the button to change the current folder.
3) SOUND: play built-in music programs, and rotate the button to change the sonic rhythm.
4) AUTO: play built-in auto programs.
5) Outdoor: play built-in auto programs for outdoor places.
6) DMX: the LCD shows the current mode and DMX address.
7). SETTING: set color, speed, size, music sensitivity, phase, and direction of X and Y separately.
In PRG and ILD Mode, read the contents inside the CF card. Users can edit their own programs and then save them to a CF card. Also, there are many programs built inside the control board. Users can display those programs in AUTO, SOUND, and DMX mode.
Attention
- The system just supports a short file name, the file name (including folder name), most 8-bit file names, and 3 extension names, file name, and extension name formed by letter, number, and underline. The file name can’t be over 8 and no Chinese words, otherwise, the system can’t identify it.
- CF cards can’t mix another file, most support 20 folders, and every folder can save a maximum of 255 files and 10 PRG files.
- Program table: user can use notepad to edit the program list, the extension name is.PRG. Program table formed by play file name, play speed, play times, ISHOW identify code “i” (if use ISHOW software make old file), middle using “i” separate. Edit item, for example, one program formed by File1. ild, File2.ild, File3.ild. File1.ild play speed is 30K, replay 3 times; file2. ild play speed is 35K, play one time, and file 2 is made by ISHOW software; file3. ild play speed is 30K, play 4 times. Then prg1.prg contents as below:
File1.ild,30,3,0
File2.ild,35,1,1,i
File3.ild,30,4,2
When creating one folder, need to create the same PRG file under the folder, and put all the files that need to play in the folder into the PRG file. For example, under the aurora folder, create the aurora.pkg file. After adding the ILDA file, need to add the file to prg file, so that we can find the file quickly and play the file as per the speed you set.
DMX Operation
The system has two channel versions for customers to choose from.
- 18 Channel Versions(V10 software version)
Channel Function Value Description CH1 Mode Select 000–009 Laser off 010–049 Outdoor mode, CH2~CH18 invalid 050–099 Auto mode, CH2~CH18 invalid 100–149 Sound Active mode, CH2~CH18 invalid 150–199 TF PRG mode, CH15 invalid 200–249 TF ILD mode, CH15 invalid 250–255 DMX Manual mode, CH2~CH18 valid CH2 Pattern Page /Folder Select 000–255 DMX Manual Mode PRG/ILD Mode Pattern page select, every 10 values one page Folder selection, numerical assignment CH3 Pattern /File Select 000–255 DMX Manual Mode PRG/ILD Mode Pattern select, every 5 values one pattern File select, numeric equal assignment CH4 Strobe 000–010 No strobe 011–255 Auto strobe, the bigger the number, the faster the speed. CH5 Color Select 000–016 Built-in color of the pattern (White) 017–033 Red 034–050 Green 051–067 Blue 068–084 Yellow 085–101 Purple 102–118 Cyan 119–135 White, red, green, blue, 4 color section 136–152 Blue, yellow, purple, cyan, 4 color section 153–169 W, R, G, B, Y, P, C, 7 color section 170–186 White, red, green, blue, 4 color flow 187–203 Blue, yellow, purple, cyan, 4 color flow 204–220 Blue, yellow, purple, cyan, 4 color flow 221–237 color subsection by inflection 238–255 White color CH6 X Move 000–125 Adjust the position by manual 126–155 Move circle from right to left automatically 156–185 Move circle from left to right automatically 186–225 Move circle from left to right automatically 226–245 Auto jumping left and right 246–255 Audio jumping left and right CH7 Y Move 000–125 Adjust the position by manual 126–155 Move circle from down to up automatically 156–185 Move circle from up to down automatically 186–225 Move circle from up to down automatically 226-245 Auto jumping up and down 246–255 Audio jumping up and down CH8 Zoom(+/-) 000–010 No change 011–087 Adjust size by manual 088–150 Zoom + 151–200 Zoom – 201–255 Zoom (+/-) circle CH9 Rolling X 000 No change 001–128 Manual rotation 129–255 Auto rotation CH10
Rolling Y
000–000 No change 001–128 Manual rotation 129–255 Auto rotation CH11 Rolling Center 000–000 No change 001–128 Manual rotation 129–192 Auto clockwise rotation 193–255 Auto counterclockwise rotation 000–010 No change CH12 Drawing 011–074 Manual drawing 075–104 Auto drawing + 105–144 Auto drawing – 145–184 Auto drawing circle 185–224 End to end drawing circle + 225–255 End to end drawing circle – CH13
X Wave
000–009 No wave 010–069 Small wave 070–129 Medium wave 130–189 Big wave 190–255 Biggest wave CH14 Y Wave 000–009 No wave 010–069 Small wave 070–129 Medium wave 130–189 Big wave 190–255 Biggest wave CH15
Display Mode
000–063 Normal display 064–127 Light dot display 128–191 Segment display 192–255 Dot display CH16 Red Dimmer 000–255 Dimmer laser output power from 100% to 0% CH17 Green Dimmer 000–255 Dimmer laser output power from 100% to 0% CH18 Blue Dimmer 000–255 Dimmer laser output power from 100% to 0% - 25 Channel Versions(V20 software version)
Channel Function Value Description CH1 RGB Dimmer 000–255 RGB dimmer from 0% to 100% CH2 Mode Select 000–049 DMX Manual mode, CH1~CH25 valid 050–099 TF ILD mode, CH25 invalid 100–149 TF PRG mode, CH4, and CH25 invalid 150–199 Auto mode, CH1/CH4/CH6 valid 200–249 Outdoor mode, CH1/CH4/CH6 valid 250–255 Sound Active mode, CH1/CH4/CH6 valid CH3 Pattern Page /Folder Select 000–255 DMX Manual Mode PRG/ILD Mode Pattern page select, every 10 value one page Folder selection, numeric equal assignment CH4 Pattern /File Select /Speed 000–255 DMX Manual Mode Pattern select, every 5 values one pattern PROG /ILD Mode File select, numeric equal assignment Auto /Outdoor /Sound Play speed: 0~10: Default speed, 11~255: Speed up CH5 Stobe 000–010 No strobe 011–255 Auto strobe, Speed up CH6 Color Mode 000–009 Built-in color of the pattern, no dimming 010–018 The built-in color of the pattern can dim 020–029 Red 030–039 Green 040–049 Blue 050–059 Yellow 060–069 Purple 070–079 Cyan 080–109 R&W, The larger the value, the more segments 110–139 G&W, The larger the value, the more segments 140–169 B&W, The larger the value, the more segments 170–179 W, R, G, B, 4 color section 180–189 B, Y, P, C, 4 color section 190–199 W, R, G, B, Y, P, 6 color section 200–209 W, R, G, B, 4 color flow 210–219 B, Y, P, C, 4 color flow 220–229 B, Y, P, C, 4 color flow 230–239 Color subsection by inflection 240–255 White color CH7 Red Dimmer 000–255 Dimmer laser output power from 0% to 100% CH8 Green Dimmer 000–255 Dimmer laser output power from 0% to 100% CH9 Blue Dimmer 000–255 Dimmer laser output power from 0% to 100% CH10 X Position 000–255 Coarse, black on the outside CH11 X Position 000–255 Fine-tuning CH12 Y Position 000–255 Coarse, black on the outside CH13 Y Position 000–255 Fine-tuning CH14 Zoom 000–255 Adjust XY size CH15 Size Y 000–255 Adjust Y size CH16 Size X 000–255 Adjust X size CH17 Rotation 000–255 0~360°rotation CH18 Drawing 000–255 Drawing from 100% to 0% CH19 X Move 000–001 No moving 002–100 From left to right automatically move 101–185 From right to left automatically move 186-200 Left and right circulate move 201–245 Left and right circulate jump 246–255 Left and right circulate jump by sound active CH20 Y Move 000–001 No moving 002–100 From down to up automatically move 101–185 From up to down automatically move 186-200 Up and down circulate move 201–245 Up and down circulate jump 246–255 Up and down circulate jump by sound active CH21 Zoom(+/-) 000–010 No change 011–127 Adjust size by manual 128–146 Zoom – 147–148 Zoom + 149-160 Fast zoom – 161–255 Zoom (+/-) circulate CH22 Rotation 000–002 No change 003–128 Automatic counterclockwise rotation, speed up 129–130 No change 131–255 Automatic clockwise rotation, speed up CH23 X Wave 000–010 No wave 011–069 Small wave 070–129 Medium wave 130–189 Big wave 190–255 Biggest wave CH24 Y Wave 000–010 No wave 011–069 Small wave 070–129 Medium wave 130–189 Big wave 190–255 Biggest wave CH25 Display Mode 000–063 Normal display 064–127 Light dot display 128–191 Segment display 192–255 Dot display
![]()


