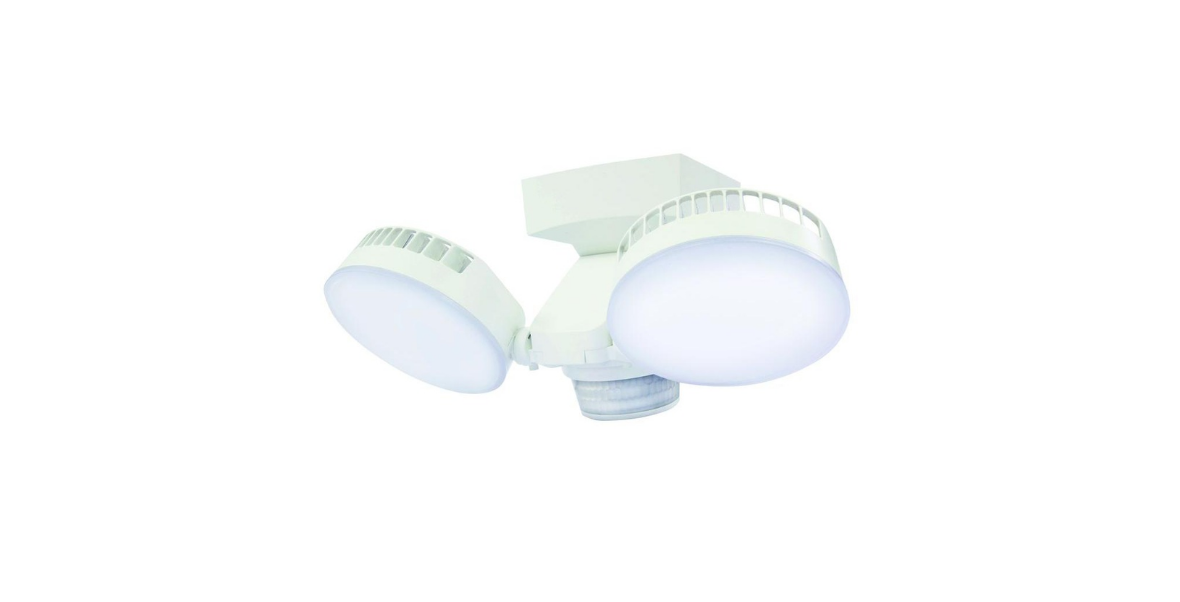
 Defiant HD-2703-WH MOTION SECURITY LIGHT User Manual
THANK YOU
We appreciate the trust and confidence you have placed in Defiant through the purchase of this motion security light. We strive to continually create quality products designed to enhance your home. Visit us online to see our full line of products available for your home improvement needs. Thank you for choosing Defiant!
Safety Information
PRECAUTIONS
Please read and understand this entire manual before attempting to assemble, install, or operate this light fixture. The light fixture requires 120 volts AC. Some codes require installation by a qualified electrician. This light fixture is intended for use with the enclosed gasket and with a junction box marked for use in wet locations. For proper operation, this light fixture should be:
- Installed outdoors on a wall, or under an eave.
- Installed 7 ft. (2.1m) above the ground (if the light fixture is mounted higher than recommended, aiming the sensor down will reduce the coverage area).
NOTICE:
Do not wire this light fixture to a dimmer switch or timer.
WARNING:
Turn the power off at the circuit breaker or fuse. Place tape over the circuit breaker switch and verify power is off at the light fixture.
WARNING:
“THIS PRODUCT MUST BE INSTALLED IN ACCORDANCE WITH THE APPLICABLE INSTALLATION CODE BY A PERSON FAMILIAR WITH THE CONSTRUCTION AND OPERATION OF THE PRODUCT AND THE HAZARDS INVOLVED”
WARNING:
This device complies with Part 15 of the FCC Rules.
Operation is subject to the following two conditions:
- this device may not cause harmful interference, and
- this device must accept any interference received, including interference that may cause undesired operation.
WARNING:
Changes or modifications not expressly approved by the party responsible for compliance could void the user’s authority to operate the equipment.
CAUTION:
Burn hazard. Allow the light fixture and the bulb to cool before touching.
CAUTION:
Do not cut any wires with factory-installed wire connectors or remove the wire connectors.
WARNING:
This equipment has been tested and found to comply with limits for a Class B digital device, pursuant to Part 15 of the FCC Rules. These limits are designed to provide reasonable protection against harmful interference in a residential installation. This equipment generates, uses, and can radiate radio frequency energy and, if not installed and used in accordance with the instructions, may cause harmful interference to radio communications. However, there is no guarantee that interference will not occur in a particular installation. If this equipment does cause harmful interference to radio or television reception, which can be determined by turning the equipment off and on, the user is encouraged to try to correct the interference by one or more of the following measures:
- Reorient or relocate the receiving antenna.
- Increase the separation between the equipment and the receiver.
- Connect the equipment to an outlet on a circuit different from that to which the receiver is connected.
- Consult the dealer or an experienced radio/TV technician for help.
Warranty
5-YEAR WARRANTY
Contact the Customer Service Team at 1-866-308-3976 or visit www.homedepot.com.
Specifications
- Detection Range Up to 70 ft. (21m) – Varies with surrounding temperature
- Sensing angle Up to 270°
- Time delay 1, 5, or 10 minutes
- HI-LO timer OFF, Dusk-to-Dawn, Seasonally adjusted timer mode
- Operating modes Auto, Manual, Eco, Smart
Pre-Installation
PLANNING INSTALLATION
Before installing the light fixture, ensure that all parts are present (see Hardware Included on page 4). If any part is missing or damaged, do not attempt to assemble, install, or operate this light fixture. Estimated installation time: 30 minutes
TOOLS REQUIRED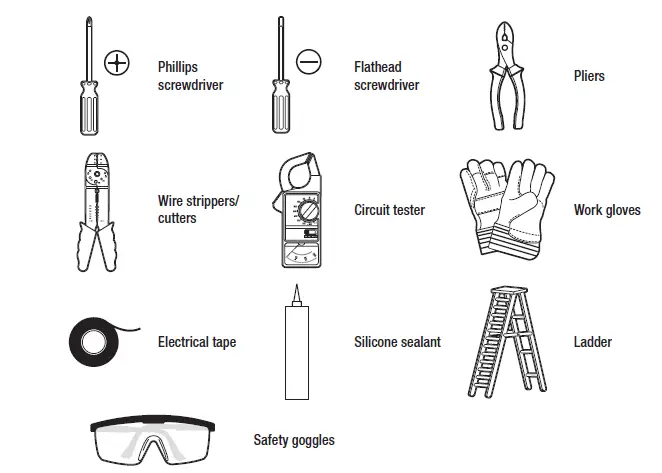
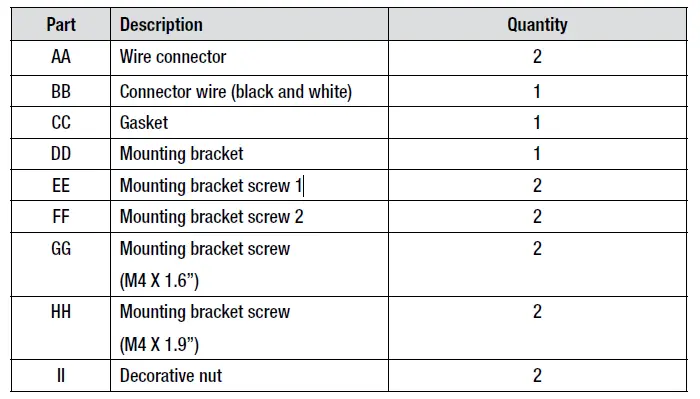
HARDWARE INCLUDED
NOTE: Hardware showed not to scale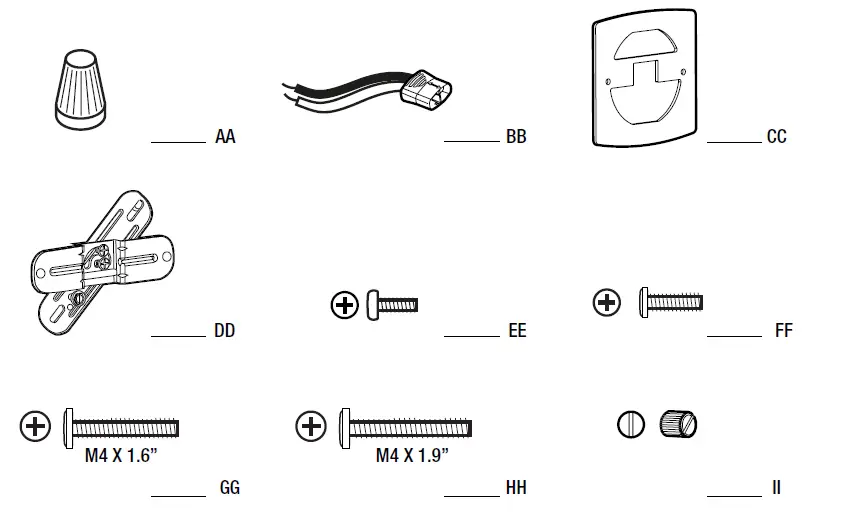
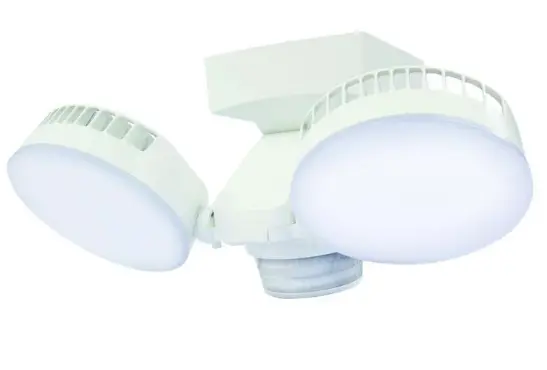
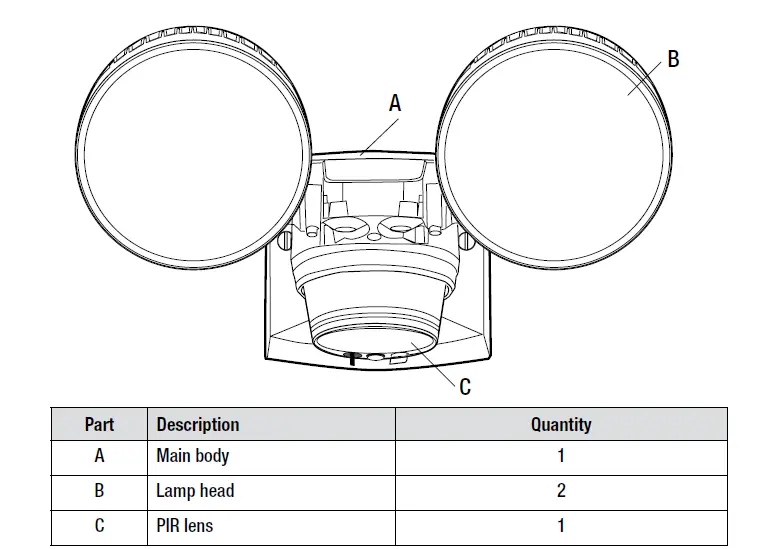
PACKAGE CONTENTS
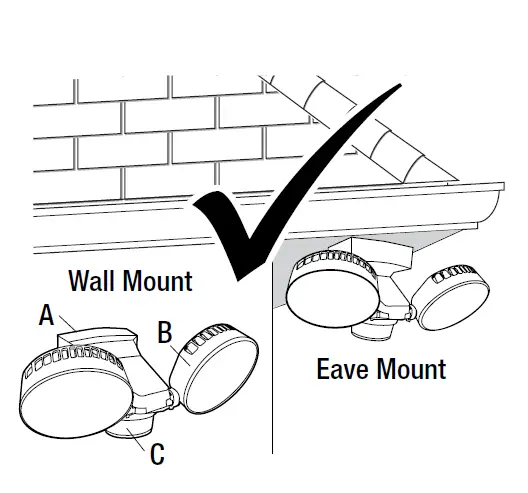
MOUNTING LOCATIONS
- Determine the mounting location – a wall or under an eave.
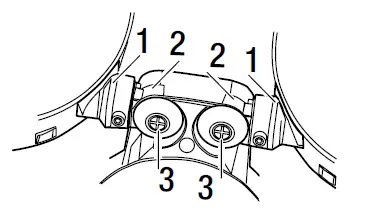
- Position lamp head (B) in the general direction of the desired light coverage and tighten the screws (3) if needed.

- Rotate the body up to change from wall mount to eave mount as per drawing below.


Installation
Installing the Mounting Bracket
WARNING:
Turn the power off at the circuit breaker or fuse. Place tape over the circuit breaker switch and verify power is off at the light fixture.
- Remove the existing light fixture.
- Thread the shorter of the two sets of long mounting bracket screws (GG) all the way through the outer mounting bracket from the back, so the threads come out through the front.
- Install the mounting bracket to the junction box by using the screws (EE or FF) and going through the slots of the rear mounting bracket.
- Select the screws (EE or FF) that best fit the holes of your junction box, or if necessary, reuse the original screws.

Attaching the Gasket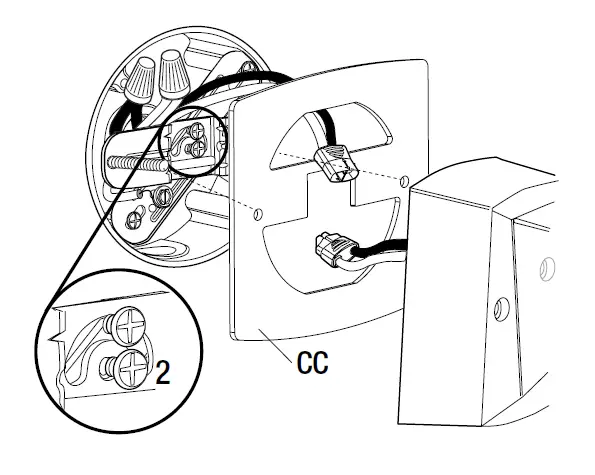
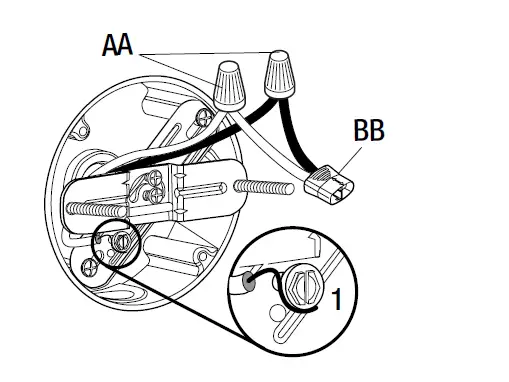
- Insert the wires with connector into the junction box.
- Attach the gasket (CC) to the mounting bracket. See final gasket position in the diagram in section 4 for your reference.
- Tighten the mounting bracket screws (2).
Mounting the Light Fixture
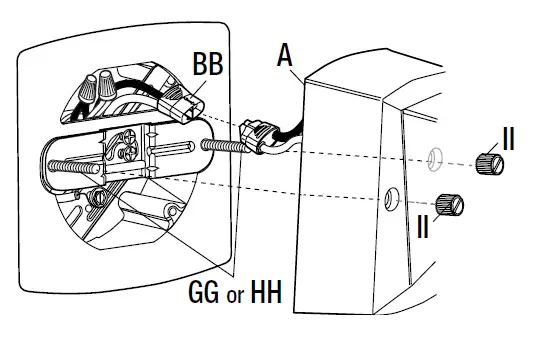
- Plug the connector (BB) into the connector on the back of the fixture (A).
- Align the main body (A) to the mounting bracket screws (GG) and slide the light fixture over the screws. Firmly push the light fixture against the junction box, so the mounting bracket screws come out through the holes on the front of the light fixture.
- Attach decorative nuts to the mounting bracket screws and tighten.
NOTE:
Make sure all the wires are inside the junction box before attaching the main body (A) to the junction box.
Note:
If the mounting bracket screws (GG) are not long enough to allow the decorative nuts (II) to be threaded on them, then you will need to replace the shorter set of screws (GG) with the longer set of screws (HH). This is usually due to the junction box being recessed into the wall. If the longer mounting bracket screws are necessary, remove the fixture from the screws, unplug the connector wire, remove the mounting bracket and replace the mounting bracket screws with the longer screws. Repeat the installation steps starting with section 1.
Caulking Around the Light Fixture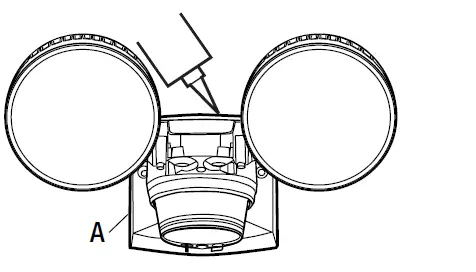
- Caulk around the edge of the main body (A) and the mounting surface with silicone sealant (not included).
Operation
Lamp Adjustment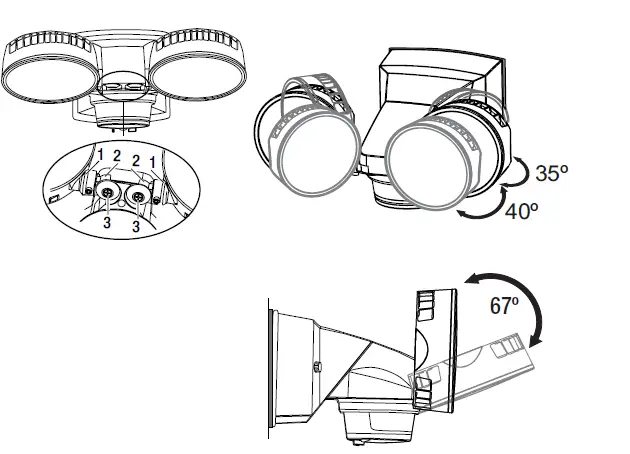
- Turn the power on at the circuit breaker or fuse and turn on the wall switch.
- Hinge (1) can tilt the lamps up. Hinge (2) can pan the lights in and out.
- Tighten screws (3) if loose.
NOTE:
Do not rotate the bulb holders more than 180° from the factory setting.
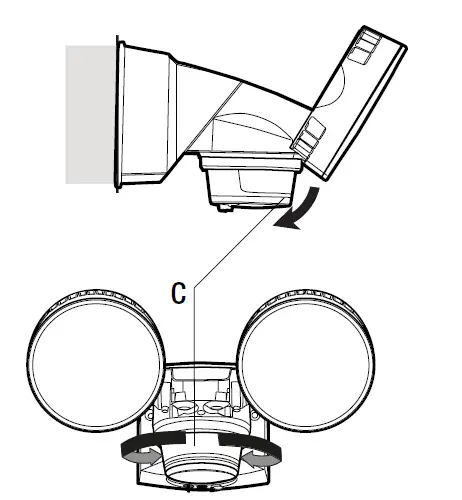
Sensor Head Adjustment
- Rotate the motion sensor (C) so the controls face toward the ground.
- The sensor can be tilted up and down, as well as rotated left and right.

Adjusting the Motion Sensor Detection Zone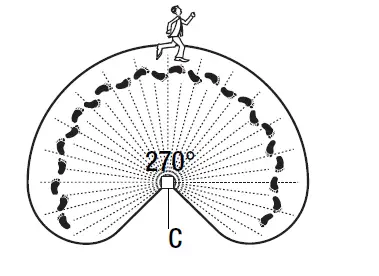
- Turn on the circuit breaker or fuse and the light switch.
- Perform a “walk test”. Walk in an arc across the front of the motion sensor (C).
- Watch the light. The light will come on indicating motion has been detected.
- Stop, wait for the light to turn off, and then begin walking again.
- Continue this process until the detection zone has been established.
- Adjust the sensor up, down, or side to side to change the motion sensor (C) detection zone.
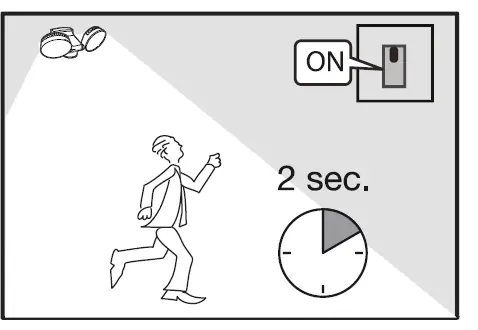
Setting the Sensor for Testing
- Turn on power. Conduct a walk test to adjust the sensor coverage area. Sensor will be in TEST mode automatically for 2 minutes. Lights will come on for approximately 2-3 seconds in TEST mode.
- Sensor stays in TEST mode until it no longer senses motion for more than 2 minutes, then it will revert to the AUTO sensing mode.

Adjusting the HI/LO Light Level
- HI level security lighting and LO level accent lighting.
- HI-LO feature is off. Works with motion sensor after dark at 100% brightness.
- (Dusk to Dawn Mode): At Dusk, lights will turn On at 30% of normal brightness and then will dim to 15% in the middle of the night hours. The middle of the night is calculated automatically by the sensor. At Dawn, lights will turn Off automatically.
- (Timer Mode): Seasonally Adjusted Timer: At Dusk, lights turn On at 30% and then shut Off in the middle of the night hours (calculated automatically by the sensor).


Adjust the Dusk Learn
If desired, you can set the level of darkness at which the sensor becomes active and at which the Hi-Lo feature comes on in the “Lo” accent mode.
- Press once: To learn the current level of brightness and set this as your new “Dusk” level.
- Press twice within 5 seconds: Back to factory default setting (+/- 5 lux)
- Press and hold the button more than 5 seconds: The unit will enter or exit the permanent TEST mode (Store fixture test mode).
- Lamp flashes 3 times = Store test mode
- Lamp flashes 1 time = Back to normal function


Adjusting the Time
If desired, you can set the level of darkness at which the sensor becomes active and at which the Hi-Lo feature comes on in the “Lo” accent mode.
- Motion sensor lighting is set to minimize power usage. Lights turn on with motion for 10 seconds and continue to stay on as long as motion is detected. Lights will dim to warn that lights will be shutting off soon. SMART mode:
- Sensor learns from your behavior to automatically adjust the time.
For example, after multiple detections in a short period, motion sensor automatically extends to the maximum time. - 1 min, 5 min, or 10 min. Lights stay for the time set, after motion is no longer detected.
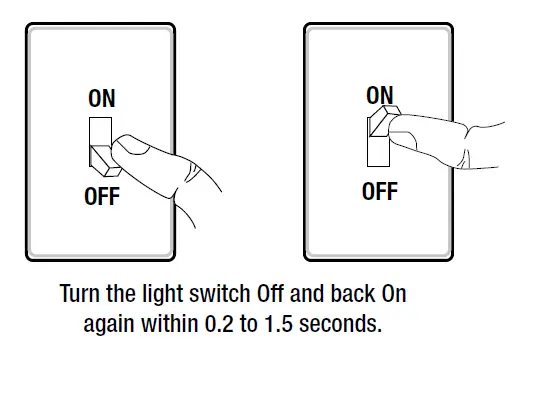
Using Manual Override Mode
Manual mode overrides the motion sensor (C) and “ON-TIMES” control so the lights will operate in “ON” mode at full brightness. This feature only works at night for 6 hours. The motion sensor (C) will reset to motion sensing mode. Manual mode can be toggled on and off using a wall switch.
- To manually turn the lights “ON”, turn the light switch OFF and back ON again between 0.2 seconds to 1.5 seconds.
- To cancel the manual override mode, turn the light switch OFF and back ON again between 0.2 seconds to 1.5 seconds.
- NOTE:
If the power to the light fixture is off for more than 5 seconds, allow the motion sensor to warm up prior to switching to manual mode.
Care and Cleaning
- To prolong the original appearance, clean with clear water and soft, damp cloth only.
- Do not use paints, solvents, or other chemicals on this light fixture. They could cause a premature deterioration of the finish. This is not a defect in the finish and will not be covered by the warranty.
- Do not spray with a hose or power washer.
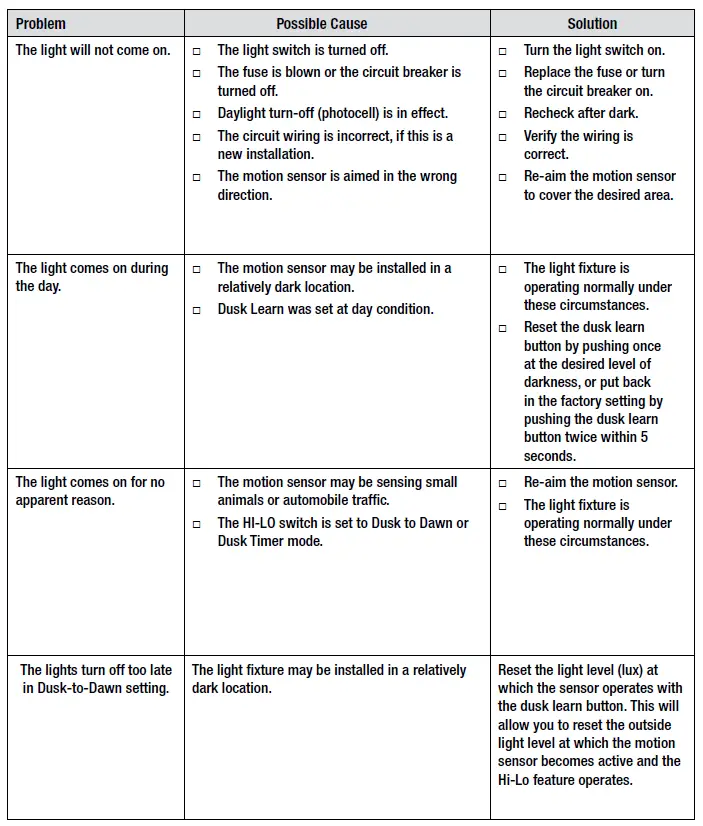
Troubleshooting
Troubleshooting (continued)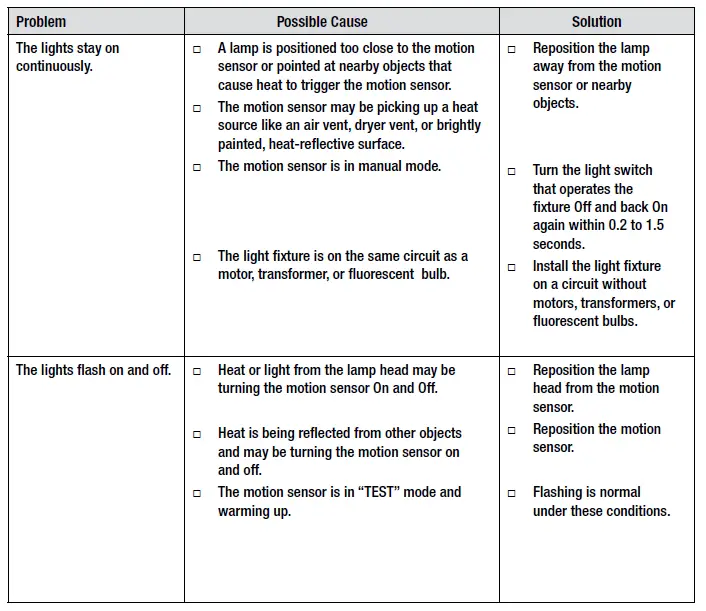
Questions, problems, missing parts? Before returning to the store, call Defiant Customer Service 8 a.m. – 7 p.m., EST, Monday-Friday, 9 a.m. – 6 p.m., EST, Saturday 1-866-308-3976 HOMEDEPOT.COM Retain this manual for future use.


