![]() USER MANUAL
USER MANUAL
TYPE OF MODEL:
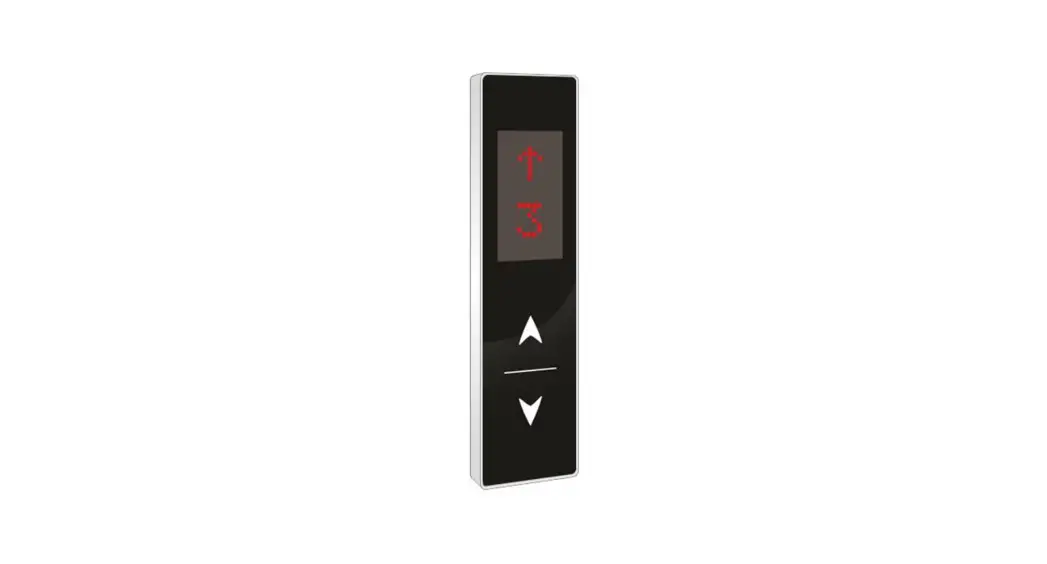
- PARALLEL LOP 75×275 DOT TOUCH- 24V
- PARALLEL LOP 75×275 DOT TOUCH – 12V

![]() PLEASE CHECK THE ONLINE PROCEDURE FOR CUSTOMIZATION OF LOGO
PLEASE CHECK THE ONLINE PROCEDURE FOR CUSTOMIZATION OF LOGO![]() COMPATIBLE FOR ARKEL PARA CONTROL PANEL
COMPATIBLE FOR ARKEL PARA CONTROL PANEL![]() BEAUTIFUL SLIM DESIGN WITH SS FRAME AND STUNNING SHINY ACYLIC FASCIA
BEAUTIFUL SLIM DESIGN WITH SS FRAME AND STUNNING SHINY ACYLIC FASCIA
Note: This document is common for various models. Kindly verify the model you procured. Read the document as per the model you procured.
FEATURES/ SPECIFICATIONS:
- Mount Type- Wall Mount
- Fascia- Black/White Color
- Input Supply- 12/24V
- Parallel Interface
- Support- Up to G+7 Floors
- Display Type- RED Dot Matrix
- Buttons – Capacitive Touch
- Size (W*H*T)-75x275x18MM
- Reliable
- Easy to use
- Durable
CONNECTION DETAILS:
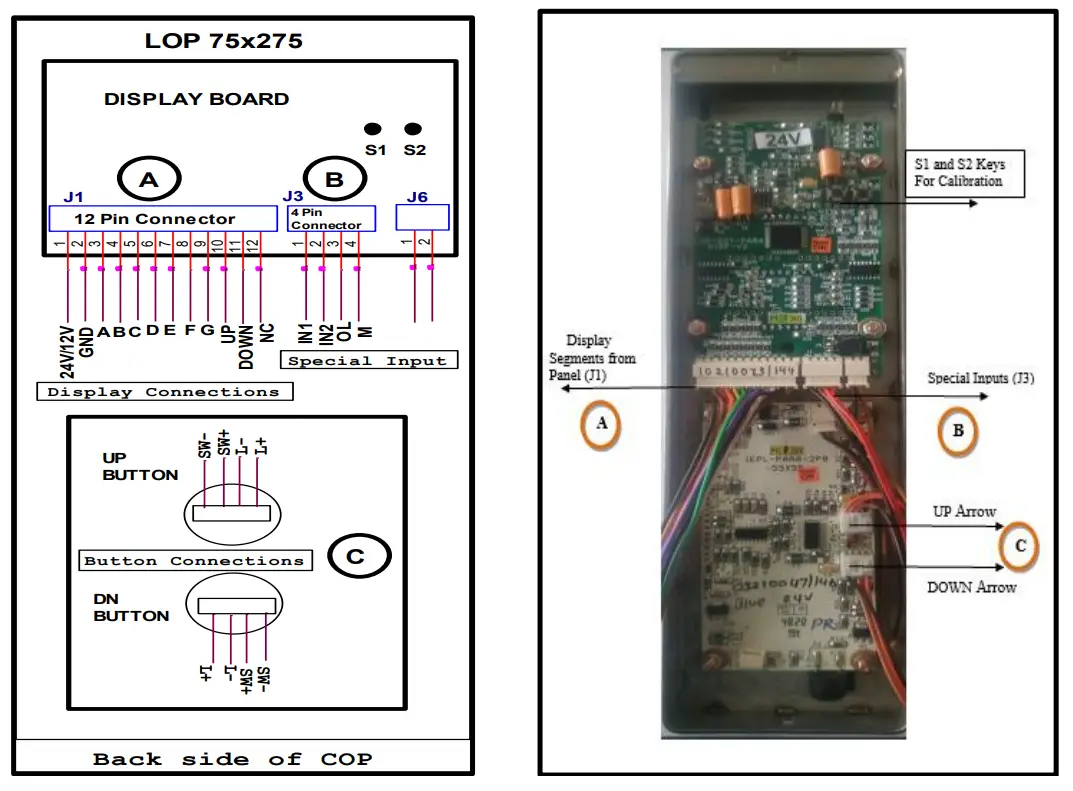
Note: For connection details refer below page.
A DISPLAY CONNECTION DETAILS:
| Sr. No. | Wire Color | Connection Details (J1) (12 Pin Relimate Connector) |
| 1 | BLACK | 12V |
| 2 | BROWN | GND |
| 3 | RED | A |
| 4 | ORANGE | B |
| 5 | YELLOW | C |
| 6 | GREEN | D |
| 7 | BLUE | E |
| 8 | VIOLET | F |
| 9 | GRAY | G |
| 10 | WHITE | UP (ARROW) |
| 11 | BLACK | DOWN (ARROW) |
| 12 | BROWN | NC (No Connection) |
B SPECIAL INPUT CONNECTION DETAILS:
| Sr. No. | Wire Color | Connection Details (J3) (4 Pin Relimate Connector) |
| 1 | BLACK | IN1 (To Display digits 10 to 19) |
| 2 | BROWN | IN2 (To Display digits 20 to 23) |
| 3 | RED | OL (For Overload) |
| 4 | ORANGE | M (For Maintenance) |
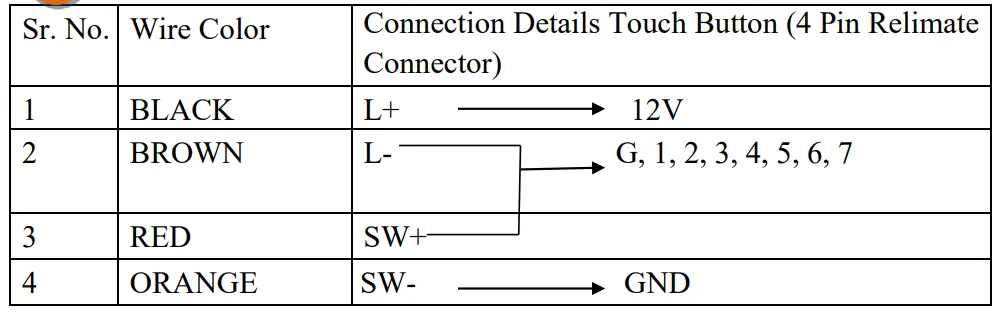
C TOUCH BUTTON CONNECTION DETAILS:
INSTALLATION STEPS:
Note: Installation and Commissioning of the LOP is to be done by Authorized, Trained technician of Elevator Company.
Following are the steps to be taken for the installation of this panel.
- Remove the back plate of LOP
- Mount the back plate of LOP on the wall
- Do the connections as per below Connection Diagram
- Fix the LOP on back plate
- Do the calibration as per process given in calibration process
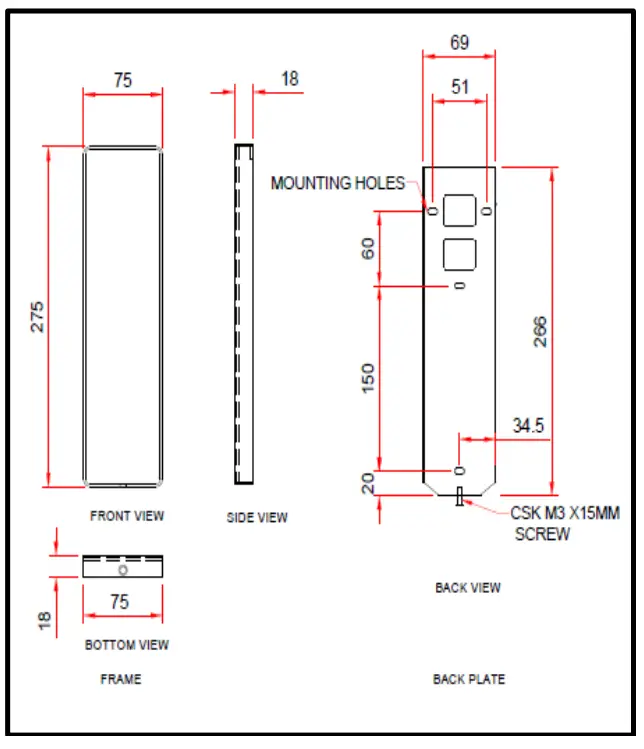
MOUNTING DETAILS:
CALIBRATION PROCESS:
- Give segment which is set to for floor.
- Press S1 and S2 both keys then display shows ‘- – ‘then release both the keys.
- When’- -‘ symbol stop blinking, press S1 and S2 for increment & decrement.
- After pressing S1 & S2 keys for increment and decrement it shows digits Which we have to set.
- After showing display which is we have to set, then release the key after sometime.
- Display will blink and shows – – means calibration is saved & it will display Saved floor.
- Repeat same procedure for next floor calibration.
CALIBRATION RESET PROCESS:
- If we want to display only normal 7 segment, then no need to calibrate.
- Short the pin No. 1 & 2 of J4 berg strip for 10 second.
- After completion of 10 second display is shows ‘FR’ it means process is Completed and program is in normal 7 segment mode.
- Give 7 segments to the connector J1, display will show floor.
![]()


