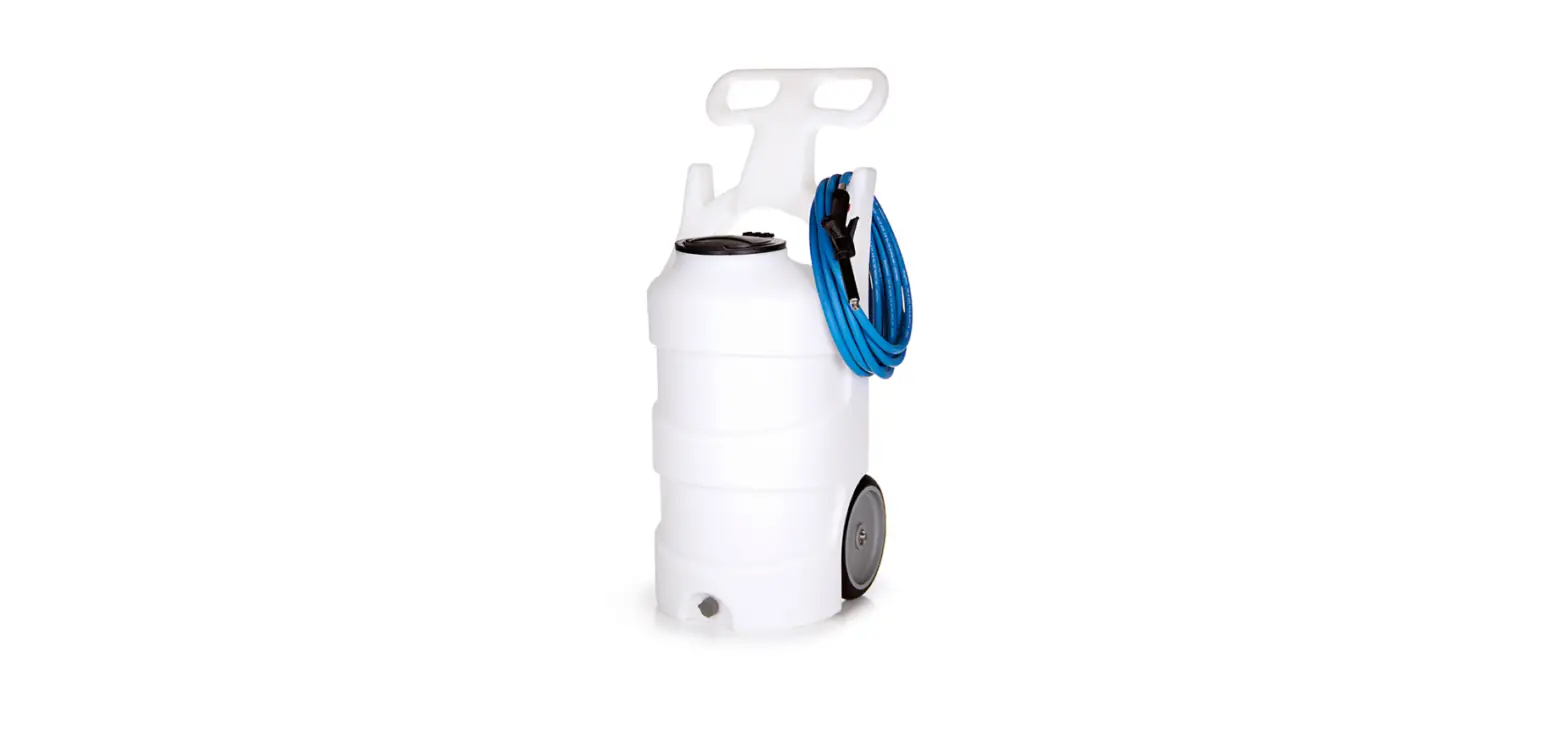

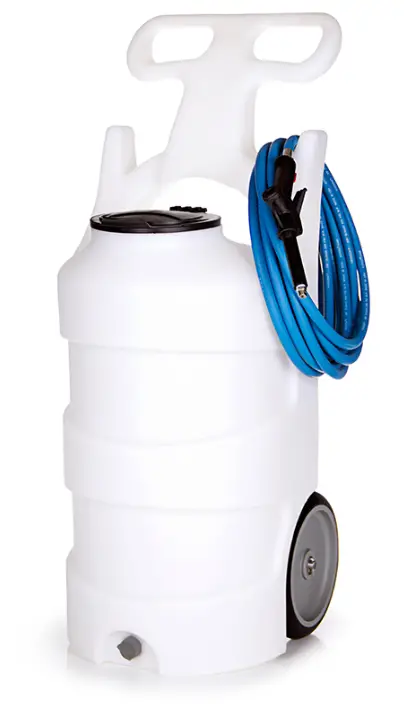
FOAMit FI-10N-B 10 Gallon Battery-Powered Portable Foam Equipment
Instructions
READ ALL INSTRUCTIONS BEFORE OPERATING EQUIPMENT
WARNING Read this manual completely and understand the machine before operating or servicing it.
- Read all instructions before installing or operating unit.
- Always wear appropriate personal protective equipment (PPE) when operating or servicing unit.
- Always follow all chemical safety precautions and handling instructions provided by the chemical manufacturer and Material Safety Data Sheet (MSDS).
- Never use unit if it is damaged or leaking.
- Always disconnect the battery before servicing the unit.
- Do not use unit if the battery box cover is not in place. Contact with chemicals can damage the battery.
- Avoid excessive use of discharge trigger or ball valve. Repetitive triggering in short bursts can cause overheating. Apply foam evenly without constant starting and stopping.
- Avoid foam or spray coming into contact with the unit. Contact with chemicals can damage the battery and other electrical components.
- Never point the discharge wand at yourself, another person, or any object you do not want covered in chemical.
- Always depressurize unit after use (as described in the After Use Instructions). Always store unit depressurized, with the discharge trigger gun or ball valve in the closed position.
- Do not exceed a fluid temperature of 100˚F (37˚C).
- Always flush the unit with fresh water for 5 minutes when switching from an alkaline to an acid or an acid to an alkaline.
- To prevent premature battery failure, do not store battery in a depleted state for long periods of time. Do not recharge battery until it has been used to power the unit for a minimum of 30 minutes of use.
PROTECT THE ENVIRONMENT
Please dispose of packaging materials, old machine components, and hazardous fluids in an environmentally safe way according to local waste disposal regulations.
Always remember to recycle.
Note: Specifications and parts are subject to change without notice.
Specifications
- Hose ……………………. 12 feet reinforced hose, 3/8 inch I.D. (3.66 meters reinforced hose, 3/8 inch I.D.)
- Tank Capacity …………………………………… 12.5 gallons (47.3 liters)
- Foam Output ………………………………… 4 to 5 gallons/minute (15 to 18.93 liters/minute)
- Foaming Distance ………………….. 5 to 6 feet (1.52 to 1.83 meters)
- Liquid Temperature …………………….. 40˚F to 100˚F (4.4˚C to 37˚C)
- Operating Voltage …………………………………………………….. 12 VDC
A fully charged battery will power the unit for approximately 45 minutes of continuous use. A fully discharged battery will take approximately 8 hours of charging to regain full charge.
Dimensions
- Length ………………………………… 18 in (45 cm) approximately
- Width …………………………………. 14 in (36 cm) approximately
- Height …………………………………. 42 in (106 cm) approximately
- Weight, including discharge hose and wand: (Empty) ………………………….. 65 lbs (29.4 kg) approximately
Requirements:
Chemical Requirements: Follow all instructions from chemical manufacturer and Material Safety Data Sheet (MSDS).
Air Operated Double Diaphragm Pump Models Offered: P56: Polypropylene body with Santoprene diaphragm
P56V: Polypropylene body with Viton diaphragm
P56K: Polypropylene body with Kalrez diaphragm
Acceptable Products: Alkaline cleaners, Caustic cleaners, Sanitizers, and Acids
- D-Limonene may only be used with Kalrez pump
- Chlorine may only be used with Viton or Kalrez pump
DO NOT USE: All hydrocarbons
READ ALL INSTRUCTIONS BEFORE OPERATING EQUIPMENT
Operation Instructions
- Follow all instructions from the chemical manufacturer. Fill the tank with water and the advised percentage of chemical concentrate.
- Press the power button (PBS-12V) to turn the unit ON.
- Point the discharge wand in a safe direction and squeeze the trigger gun (PSG12) or open the ball valve (HV60) to activate the unit.
- Adjust the needle valve handle (NV1032HNDL) to regulate the wetness or dryness of the foam by following the steps below:
- Close needle valve (NV18) completely by turning handle (NV1032HNDL) in clockwise direction until it stops.
- Open needle valve (NV18) by turning handle (NV1032HNDL) in counter-clockwise direction 3 complete turns.
- Continue to open needle valve (NV18) by turning handle (NV1032HNDL) counter-clockwise in ¼ turn increments, allowing 30 seconds between adjustments, until desired consistency of foam is achieved.
After Use Instructions:
- Flush the unit with fresh water for 5 minutes.
- Press the power button (PBS-12V) to turn the unit OFF, and squeeze the discharge trigger gun (PSG12) or open the discharge ball valve (HV60) to relieve any pressure remaining in the system.
- Release the discharge trigger gun (PSG12) or close the discharge ball valve (HV60) after all pressure has been relieved from the system. Store the unit with the discharge trigger gun or ball valve in the closed position.
Maintenance Instructions:
To keep your foam unit operating properly, periodically perform the following maintenance procedures:
Note: Before performing any maintenance, ensure that the unit has been turned OFF and depressurized according to the “After Use Instructions” above.
- Inspect the air pump (P56/P56K/P56V) for wear and leaks.
- Inspect all hoses for leaks or excessive wear. Make sure all hose clamps are in good condition and properly secured.
- Check the suction line and screen (STR34) for debris or blockages, and clean as needed.
Battery Instructions
To monitor battery power level:
When the power button (PBS-12V) is in the ON position, the power button light will illuminate to indicate the battery power level:
- A continuous red light means that the battery has sufficient charge to power the unit.
- A blinking red light means that the battery is drained and must be recharged.
To charge battery:
- Verify the power button (PBS-12V) is in the OFF position.
- Plug NOCO Genius charger into AC power outlet.
- Verify the charger is in 12V AGM mode (indicated when the 12V AGM LED is lit). If the charger is in a different mode, push the MODE button to toggle to 12V AGM mode. Note: On its first use, the charger will be in standard 12V mode. For later uses, the charger remembers the last mode used.
- Charging will begin manually.
- When battery is fully charged, unplug the charger cord. Use the cord bracket to store the cord while the unit is in use.
NOCO Genius Charging Status Indicator Lights:
- Red 25% LED – The 25% Charge LED will slowly pulse “on” and “off” when the battery is less than 25% charged.
- Red 50% LED – The 50% Charge LED will slowly pulse “on” and “off” when the battery is 25% – 50% charged
- Amber 75% LED – The 75% Charge LED will slowly pulse “on” and “off” when the battery is 50% – 75% charged
- Green 100% LED – The 100% Charge LED will slowly pulse“on” and “off”, when the battery is less than 100% fully charged. When the battery is fully charged, the
- Green LED will be solid, and the 25%, 50% and 75% Charge LEDs will turn “off”.
- Maintenance Green LED – During Optimization, the 100% Charge LED will pulse “on” and “off” slowly. Once the battery is fully optimized the 100% Charge LED will turn solid green. The charger can be left connected to the battery indefinitely
Note: For more information on charging the battery, see NOCO Genius instructions. To prevent battery failure, do not store battery in a depleted state for long periods of time. Do not recharge battery until it has been used to power the unit for a minimum of 30 minutes of use.
READ ALL INSTRUCTIONS BEFORE OPERATING EQUIPMENT
| TROUBLESHOOTING GUIDE | ||
| PROBLEM | CAUSE | SOLUTION |
|
Foam too wet or too dry | Adjust the needle valve handle (NV1032HNDL) to regulate the wetness or dryness of the foam by following the steps below: a. Close needle valve (NV18) completely by turning handle (NV1032HNDL) in clockwise direction until it stops. b. Open needle valve (NV18) by turning handle (NV1032HNDL) in counter-clockwise direction 3 complete turns. c. Continue to open needle valve (NV18) by turning handle (NV1032HNDL) counter-clockwise in ¼ turn increments, allowing 30 seconds between adjustments, until desired consistency of foam is achieved. | |
|
Sporadic wet foam | • Improper mixture of cleaning solution | • Make sure the chemical is a foaming chemical |
| • Make sure the chemical solution is mixed at an appropriate concentration to produce foam | ||
| • Discharge hose kinked | • Straighten, repair or replace hose (H38B-H) | |
| • Wadding clogged | • Replace wadding (WAAD-.75) | |
| • Wadding next to spray tip | • Replace tubing (H38CP) between tip and trigger | |
|
Constant wet foam | • Wadding clogged | • Repair or replace wadding (WAAD-75) |
| • Air check valve may be plugged or backwards | • Replace or reverse check valve (CV18-K) | |
| • Air compressor not cycling | • Replace air compressor (AC12V-14HP) | |
| Sporadic dry foam | • The strainer may be plugged | • Clean the strainer (STR34) |
| • Pump may be cycling improperly | • Replace the pump (P56/P56K/P56V) | |
| Only air discharges from foam wand | • Pump not cycling | • Replace pump (P56/P56K/P56V) |
| • Problem with intake hose | • Check intake hose and strainer and repair as needed | |
| Unit leaks from behind the plate | • Fittings, clamps, or tubing not secured properly | • Find leak and replace or repair parts as necessary |
| • Pump leaks from chemical attack | • Replace pump (P56/P56K/P56V) | |
| Power light will not turn on | • Blown fuse | • Replace fuse (FU25-TD) |
| • Battery leads are backwards | • Connect leads to correct terminals | |
| Power switch light will not stop blinking | • Depleted battery | • Completely recharge battery |
| • Bad battery | • Replace battery (BSLA-12V17) | |
| • Bad control relay | • Replace control relay (LVRC-12V) | |
| Battery will not completely charge | • Bad battery | • Replace battery (BSLA-12V17) |
| • Bad charger | • Replace charger (BC12V-NC40OB) | |
|
Battery discharges too quickly | • Battery was stored in depleted state for long periods of time | • Replace battery (BSLA-12V17) |
| • Battery has reached life expectancy | • Replace battery (BSLA-12V17) | |
| • Battery was charged and run for short periods of time (not allowed to fully charge or discharge) | • Replace battery (BSLA-12V17) | |
READ ALL INSTRUCTIONS BEFORE OPERATING EQUIPMENT
TANK ASSEMBLY
ITEM NUMBER: TANK-10N-A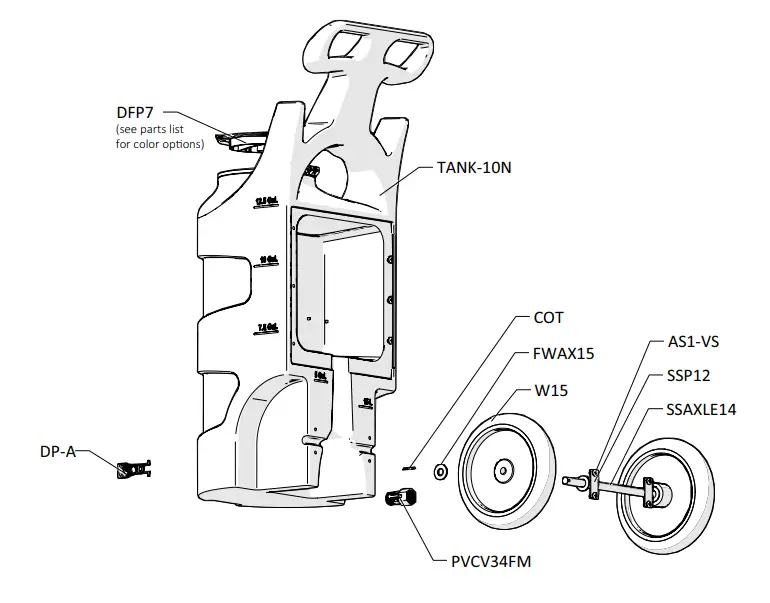
BACK PLATE
Inside View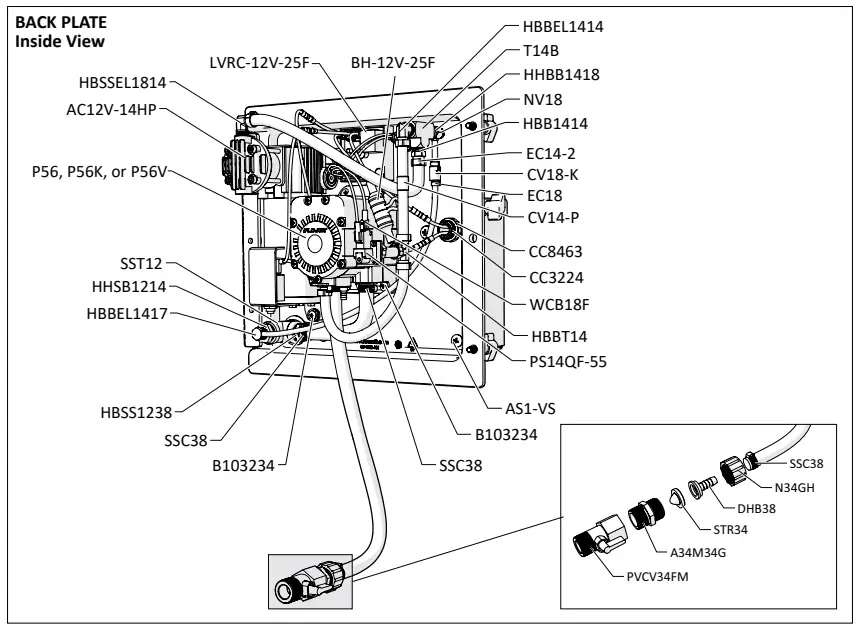
Outside View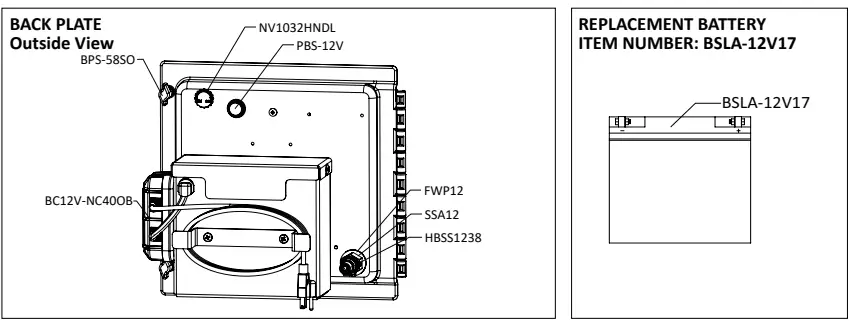
| ITEM NUMBER | DESCRIPTION |
| 2WPL | 2 WIRE 14 GAUGE RED/BLACK 18 inch |
| A34M34G | 3/4 GHT X 3/4 MPT ADAPTOR |
| AC12V-14HP | BARE COMPRESSOR DC 12V 1/4HP |
| AS1-VS | 1/4-20 X 1/2 PHIL TRUSS MACH SCREW 19-8 W/516 ORANGE VIBRASEAL PATCH |
| B10321 | 10-32 X 1 PHIL TRUSS MACH SCR 18-8 |
| B103234 | 10-32 X 3/4 PHIL TRUSS MACH SCR 18-8 |
| B8X58 | 8-15 X 5/8 inch PHIL FLAT TY-A 316 S.S. |
| BB-17 | STAINLESS STEEL BATTERY BOX for BSLA12V-17 |
| BBC-17 | STAINLESS STEEL COVER FOR BATTERY BOX for BLSA12V-17 |
| BC12V-NC40OB | 5.0 AMP 12V BATTERY CHARGER-ON BOARD-WATERPROOF |
| BCVR1 | 10-32 X 1/2 PHIL PAN HEAD SS |
| BH-12V-25F | BATTERY HARNESS -12 VOLT-25 AMP FUSE |
| BPS | PANEL BLACK SCREW |
| BPS-58SO | Back Panel Screw – 5/8 inch with Stand Off |
| BPS-SSR | 1/4 INCH PUSHNUT BOLT RETAINER STAINLESS STEEL |
| BSLA-12V17 | 12 VOLT 20 AH SEALED LEAD ACID BATTERY-BATTERY LEADS NOT INCLUDED-FOR ONBOARD CHARGING UNITS |
| CC3224 | LTC BLACK 1/2 NPT |
| CC8463 | 1/2in NPT BLACK LOCKNUT |
| COT | 1/8 X 1 COTTER PIN 18-8 S/S |
| CV14-P | CHECK VALVE – 1/4 inch BARBS – 695 SERIES POLYPROPYLENE – 1LB SPRING BUNA SEALS |
| CV18-K | CHECK VALVE – 1/8in BARBS – KYNAR BODY – S.S. BALL AND SPRING |
| DFP7 | 7 INCH HINGED CAP ASSEMBLY – INCLUDES BLACK CAP, LID FLANGE AND HINGE PIN |
| DFP7-C | 7 INCH FILL CAP POLYPRO BLACK |
| DFP7-F | 7 INCH TANK LID FLANGE POLYPRO |
| DFP7-PIN | HINGE PIN FOR DFP7-C & DFP7-C |
| DFP7-C-BL | 7 INCH FILL CAP POLYPRO BLUE PANTONE |
| DFP7-C-GN | 7 INCH FILL CAP POLYPRO GREEN PANTONE |
| DFP7-C-RD | 7 INCH FILL CAP POLYPRO RED PANTONE |
| DFP7-C-YL | 7 INCH FILL CAP POLYPRO YELLOW PANTONE |
| DHB38 | 3/4 FLAT SEAT 3/8 HOSE BARB |
| DP-A | DRAIN PLUG ASSEMBLY FOR TANK-10N TANK-20N |
| DP | FRONT DRAIN PLUG FOR PORTABLE UNIT POLYPRO |
| DP-G | FKM SQUARE CUT DRAIN PLUG GASKET |
| EC14-2 | OETIKER CLAMP 13.8 |
| EC18 | OETIKER CLAMP – 11.3 |
| F38SS | STAINLESS 3/8 INCH FERRULE |
| FW14 | 1/4 X 5/8 OD FLAT WASHER 18-8 PLN |
| FWAX15 | FLAT AXLE WASHER |
| FWP12 | 7/8 ID X 1.5 OD X 0.05 THK SSFW |
| H38B-H | 3/8 inch BLUE HOSE – GOODYEAR HORIZON |
| H38CP | 3/8IN OD POLYETHYLENE TUBING – NATURAL |
| HBB103217 | 10-32 B4 HOSE BARB |
| HBB1414 | BRASS 1/4 X 1/4 HOSE BARB |
| HBBEL1414 | 1/4 MPT X 1/4 HOSE BARB BRASS 90 DEG |
| HBBEL1417 | 1/4in L BARBED FITTING – NICKEL PLATED |
| HBBT14 | 1/4 INCH BARB TEE BRASS |
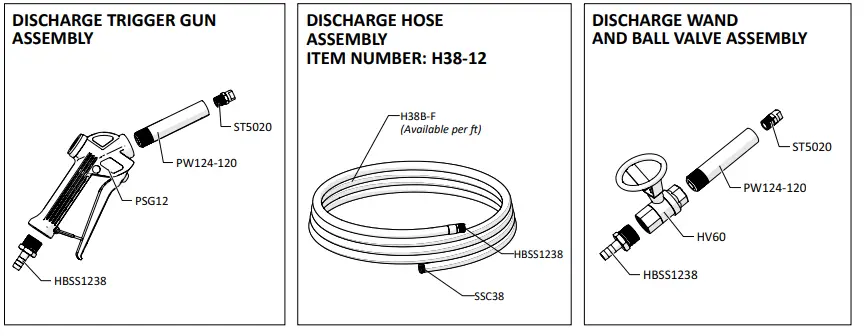
| HBSS1238 | STAINLESS HOSE BARB 1/2mpt X 3/8 barb Tariff 8479.90.9496 |
| HBSSEL1814 | 304 STAINLESS ELBOW 1/8 INCH NPT X 1/4 INCH HOSE BARB |
| HHBB1418 | HEX HEAD BRASS BUSHING 1/4in X 1/8in |
| HHSB1214 | HEX HEAD S.S. REDUCER BUSH ING 1/2 X 1/4 |
| HV60 | 1/2in STAINLESS BALL VALVE – w/ WELDED NUT |
| LVRC-12V-25F | LOW VOLTAGE RELAY CONTROLLER-12V-25 AMP FUSE |
| N34GH | 3/4 GARD HSE SWIVEL NUT |
| NV18-A | NEEDLE VALVE ASSEMBLY – VALVE, HANDLE, SET SCREW |
| NV18 | NEEDLE VALVE-1/8 IN MPT-10-32F-VALVE ONLY-NO SETS NO HANDLE |
| NV1032HNDL | BLACK HANDLE FOR NEEDLE VALVE |
| NV1032SETS | SET SCREW FOR NEEDLE VALVE |
| P56 | 5700 PUMP WITH SANTOPRENE SEALS – INCLUDES HOSE BARBS, AIR FITTING, AND AIR PORT |
| P56K | 5700 PUMP WITH KALREZ SEALS – INCLUDES HOSE BARBS, AIR FITTING, AND AIR PORT |
| P56V | 5700 PUMP WITH VITON SEALS – INCLUDES HOSE BARBS, AIR FITTING, AND AIR PORT |
| PBS-12V | Push button switch with 12 volt led light |
| PLPF-B | BLANK PORTABLE FOAMER PLATE WITH HINGE W/O HOLES |
| PLPF-PIN | 302 STAINLESS PORTABLE PLATE HINGE PIN |
| PS14QF-55 | PRESSURE SWITCH – 1/4 QUICK FIT – 55 PSI |
| PSG12 | Assembly with o-rings included/1/2in POLY SPRAY GUN W/ GRAY HNDL. & 316SS |
| PSGORV | PSG12 VITON O RING |
| PVCV34FM | PVC VALVE 3/4in FPT X 3/4in MPT |
| PW124-120 | 1/2in BLACK POLY PRO X 4in – SCH.120 – 1/2in MPTOE & 1/4in FPTOE |
| S142058-VS | 1/4-20 X 5/8 PHIL TRUSS MACHINE SCREW 18-8 W/#516 VIBRASEAL ORANGE PATCH |
| SSA12 | STAINLESS MALE/FEMALE S.S. ADAPTOR 1/2in X 1/2in |
| SSAXLE14 | 14 ½” long with the 5/8” diameter bar & 2 through holes with countersinks beveled ends |
| SSC38 | WORM GEAR CLAMP, S/S (.25-.63) |
| SSP12 | STAINLESS STEEL AXLE PLATE – 2.5 inch X 1 inch – 2 HOLE |
| SST12 | 1/2in FPT 304 S.S. TEE |
| ST5020 | VEEJET NOZZLE, BRASS 5020 |
| STR34 | 1in SEAL/STRAINER FOR 3/4 GH FITTINGS |
| T14B | FEMALE BRASS TEE 1/4in |
| TANK-10N | 10 GALLON NATURAL TANK |
| W15 | NONMARKING WHEEL FOR PORTABLE UNITS |
| WAAD-.75 | WADDING FOR PUMP-UP FOAMER – 3/4in DIA. |
| WAAD-1X3 | BROWN WADDING- 1″ BY 3″ DIE CUT |
| WCB18F | 22-18 AWG – 1/8 FEM INSULATED CONNECTOR |


