![]()
User Manual Book
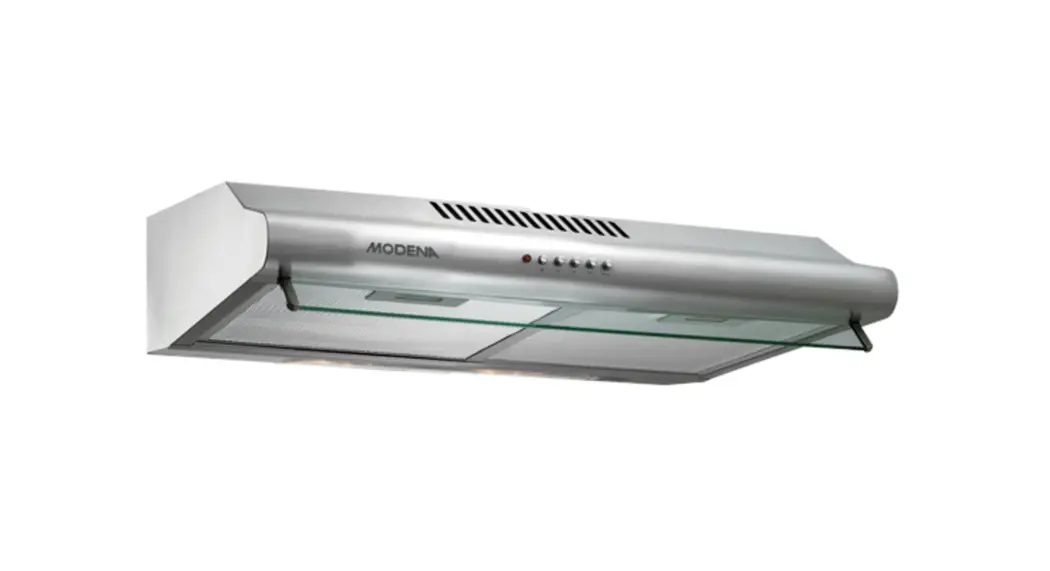
Slim Hood
Fresco Series
SX 9502 V, SX 9502 S, SX 6501 V
SX 6501 S, SX 9512 L, SX 7511 L
SX 9412 L, SX 9412 S/SX 7412 L, SX 7412 S
Forte Series
SX 9122 L, SX 9002 S, SX 7121 L,
SX 6001 S
This guidebook explains everything you need to know about your new product. Please contact our Customer Care should you need further assistance through www.modena.com
PART 1: SAFETY WARNINGS
- Do not allow children to operate the unit.
- This exhaust hood is designed for home use only, not suitable for the environmental condition, bake shop, barbecue, and other commercial purposes.
- The exhaust hood should be cleaned periodically so that its power is maintained.
- Clean the exhaust hood according to the instructions contained in this book and keeps it away from the danger of being burnt.
- No direct grilling on a gas stove.
- Keep your kitchen remains good circulation.
- Before connecting the unit to a power source, make sure the power cord is in good shape. If there is damage to the power cord, the replacement must be performed by qualified personnel or contact the MODENA Service Center for replacement process.
- The room should have good ventilation during the use of exhaust hood on gas stoves or other fuels.
- The exhaust hood waste pipe should be separated with an air-duct.
- Regulations regarding the air exhaust must be met.
- The unit is not intended to be used by persons (including children) with a physical, sensory, or mental disability, or lack of experience and knowledge unless they have been given supervision or instructions concerning the use of the appliance by the person who is responsible for their safety.
- Children should be supervised to ensure that they are not playing with the unit.
- Do not strike a fire under the sucker of the exhaust hood.
- The exhaust hood is not aimed to be installed on top of the stove that had more than four burners.
Electrical Shock Hazards
- Connect the unit only to a grounded power socket correctly. If you are in doubt, ask advice from an experienced technician who is suitably qualified.
- The failure to follow these instructions may cause electric shock, fire, or other hazards that are fatal.
PART 2: NAME OF PARTS
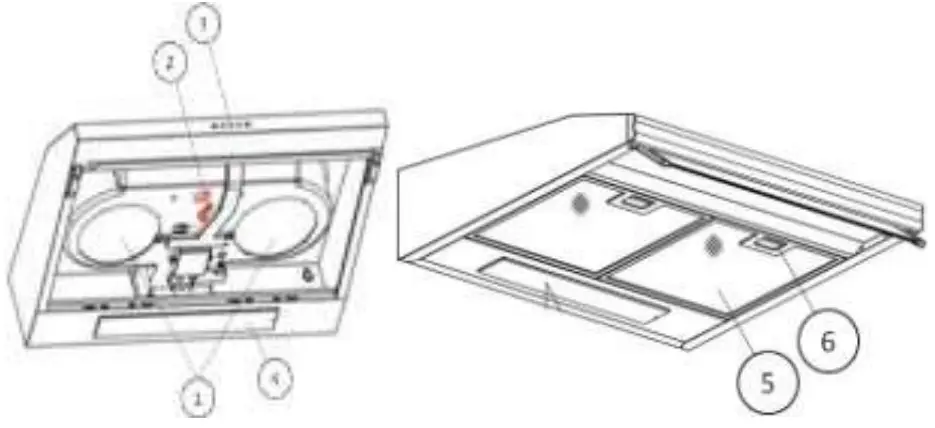
SX 6501 S, SX 6501 V, SX 9502 S, and SX 9502 V
- Carbon Filter
- Directional Knob
- Grid
- Aluminum Filter
- Lamp
- Control Panel
- Air Flow Direction Glass
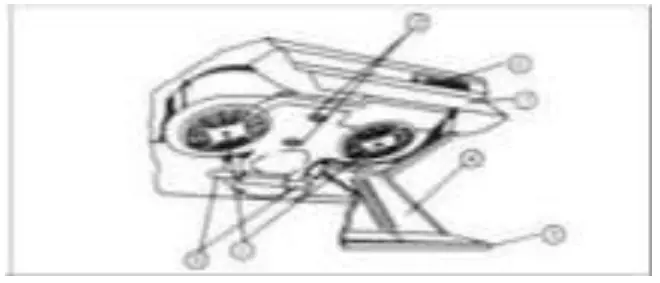
SX 9512 L,SX 7511 L, SX 9412 L, SX 9412 S,SX 7412 L, & SX 7412 S
- Carbon Filter
- Direction knob
- Control Panel
- Lamp
- Aluminum Filter
- Filter locker
* Image is a general overview and is not necessarily the same as the product you receive
PART 3: INSTALLATION
Exhaust hood is equipment which sucks smoke and cooking fragrance. With a vent hood, your kitchen will be free from oil particles that may produce bad odor.
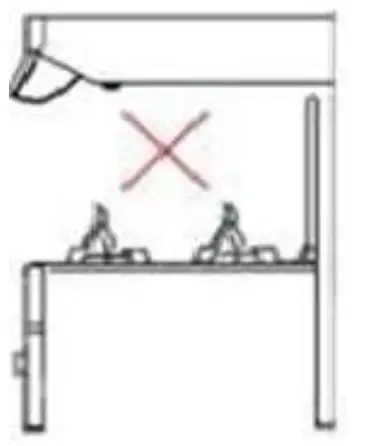
- Check the strength of wall on which the exhaust hood is to be installed. Make sure the wall can sustain the weight / load of the vent hood.
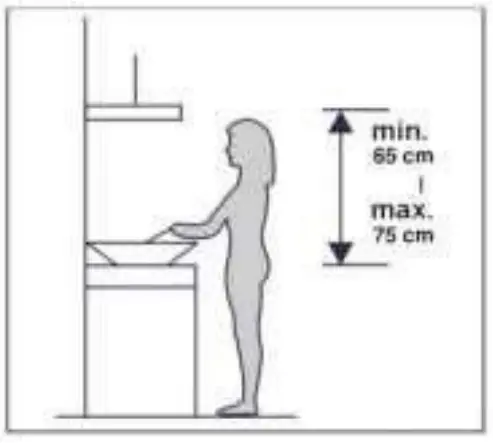
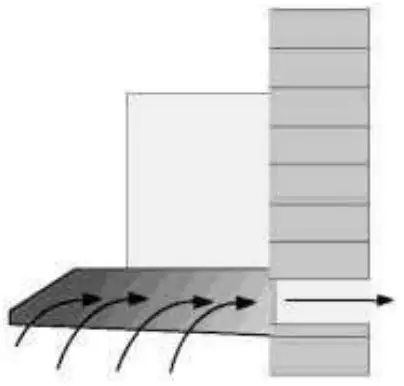
- The exhaust hood should be installed precisely over the stove at a vertical distance of 65 – 75 cm from the stove surface.
Installing the Exhaust Hood on the Wall
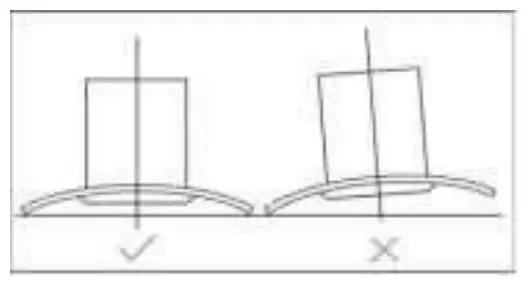
Exhaust hood must be installed perpendicularly to prevent the oil from flowing to one side and dripping out of the vent hood.
Preparations to Be Made Before Installing the Exhaust Hood
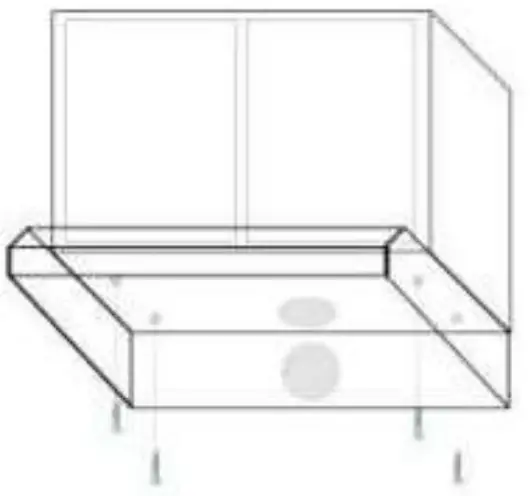
- Remove the exhaust hood from its packaging and put it on an even place (eg. Tables).
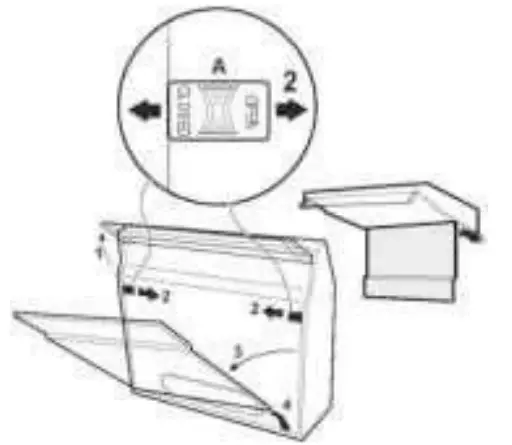
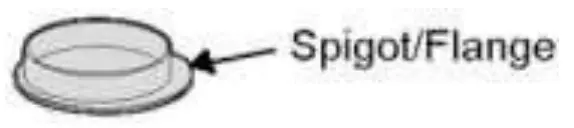
- Open the grid by sliding the right and left grid locker (A) and then pull it. Remove the spigot / flange (pipe connector) and the hole cover from the plastic bag.


- Turn the air directing knob to the following position:
a. Exterior symbol for ducting / exhaust system
b. Interior symbol for recirculation system - Cover the grid
- The exhaust hood has two holes on it: Hole D and Hole E (look at the picture). To install the spigot/flange and hole cover, follow these instructions:

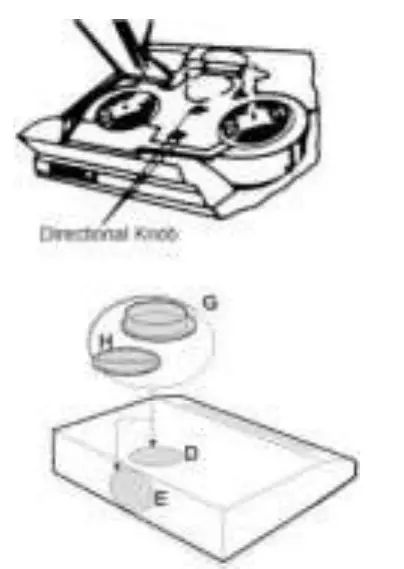
- For ducting / exhaust system:
Install the spigot / flange G on one of the air holes, either D or E. Holes which do not have spigot / flange shall be covered with Hole Cover H. - For recirculation system: Both air holes D and E shall be covered with the available plastic Hole Cover.
Instalation of Exhaust Hood
Exhaust hood can be installed on the concrete (brick) wall or the bottom part of the kitchen set.
Installing on concrete (brick) wall
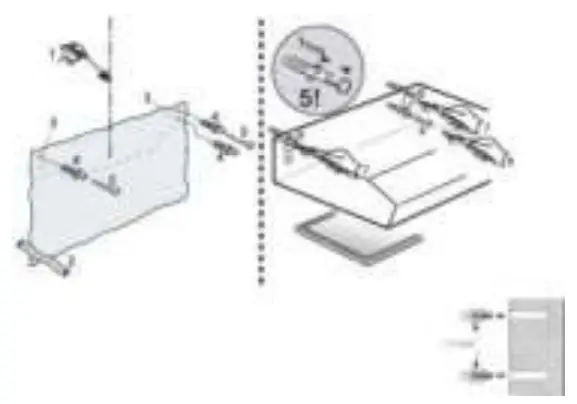
- Draw a centerline on the wall where the exhaust hood is to be installed (1).
- Post a template for drilling on the wall
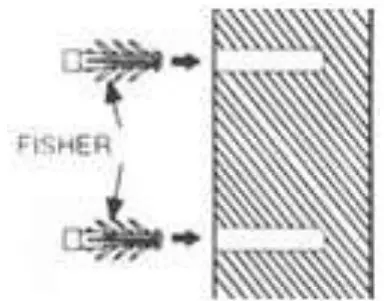
(2). If no template is available, attach the exhaust hood on the wall and mark the spot on the wall where a hole is to be made. - Create holes on the four marks with a 6 mm diameter drill bit or fisher size
(3), and then insert the fisher to the four holes (4). ATTENTION:
Before drilling, make sure that there is no cable installation, water pipe and installation inside the wall. - Install the screw on both upper holes and set aside 1 cm between the head of the screw and the wall surface (5).
- Install the exhaust hood on the screwed wall by suspending the vent hood on the screw (6).

- When the exhaust hood is positioned correctly on the wall, tighten both screws on the upper part (7).
- To reinforce the exhaust hood handle on the wall, install the screws on both holes on the bottom part (8) and tighten them (9).
- Close the grid
- Connect the exhaust system with the spigot / flange if the exhaust hood is to be operated as a ducting / exhaust system.
 ATTENTION:
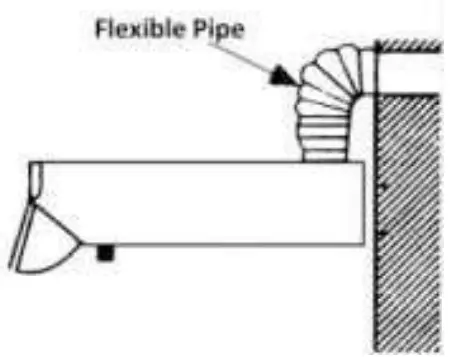
Installation on the bottom part of the kitchen set
- Put the exhaust hood on the bottom part of the kitchen set in accordance with the planned position.
- Mark the bottom part of the kitchen set for flexible pipe hole and then creates a hole if the exhaust hood is to be operated with ducting / exhaust system.
- Install the exhaust hood with 4 screws on the prepared position.
- To reinforce the exhaust hood handle on the kitchen set, install the screws on other holes on the upper part and tighten them.
- Connect the exhaust system with the spigot / flange if the exhaust hood is to be operated as a ducting / exhaust system.
Operating Procedure
MODENA Exhaust Hood has 2 (two) work methods as follows:
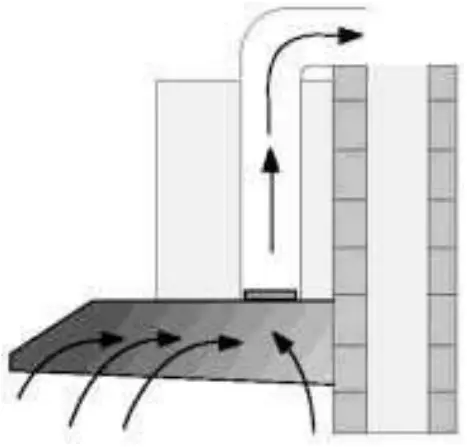
Ducting / Exhaust System:
- In this mode, the exhaust hood operates by sucking the smoke / cooking odor and then discharging it out of the vent.
- A heat / fire-resistant ducting system is required to discharge smoke / odor out of the vent.

- To connect the exhaust hood with the discharge duct, use “spigot/flange” is designed with a diameter of 100 or 125 mm.
Several things which require attention in installing the ducting system exhaust hood:
- Carbon filter must be removed because the cooking odor will be sucked and immediately discharged out of the room.
- The suction force will be diminished if the exhaust system is too long and there are too many elbows.
- Do not connect the exhaust system with a chimney or an air duct or hot steam duct.
- If the exhaust hood is to be installed in a multi-storied building or an apartment, consult with the person in charge of the building / apartment prior to installing the exhaust system.
- Exhaust hood with ducting system should be used in an open-air room with good air circulation.

Recirculating system:
In this version, the exhaust hood sucks the smoke / cooking odor and filters it through an aluminum filter and carbon filter. The filtered smoke is then re-circulated into the room. This system is used if the premise renders it impossible to install a ducting system.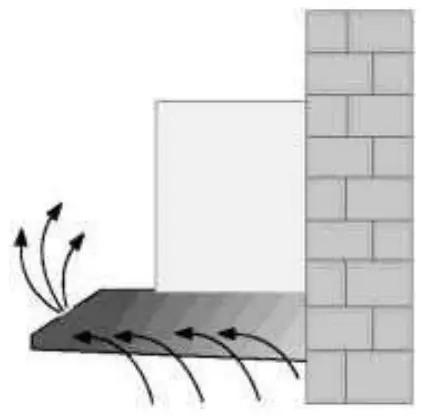 Several things which must be ensured when installing a exhaust hood with recirculation system:
- Both carbon filter and aluminum filter must be used.
- The position of both filters must be correct.
- Holes where air duct is discharged found in the front cabinet of the exhaust hood cannot be closed.
Electricity Connection
MODENA Exhaust Hood is designed for 220 volt electricity input, single phase with 50 Hz of frequency. This appliance uses a double-insulated power cord (2 parallel cords) and should not be connected to a grounding wire.
ATTENTION:
Overall installation should be performed by a competent person in the field of electrical or able to do the installation. If you will do the installation yourself, it is recommended that at first consult to the Service Center Modena. Details of the method and frequency of cleaning listed in the “Installation and Maintenance”
To separate the equipment from the power source should not attract a wired connection, but the pull of the base / head power cable.
PART 4: HOW TO USE
- Connect the power cord with an electrical outlet.
- Slide or press the motor speed regulator button and light switch to turn vent hood on or off as shown in the following picture.
NOTES:
Adjust the motor speed of the vent hood according to the thickness of smoke/ steam generated by the cooking process.
Push Button
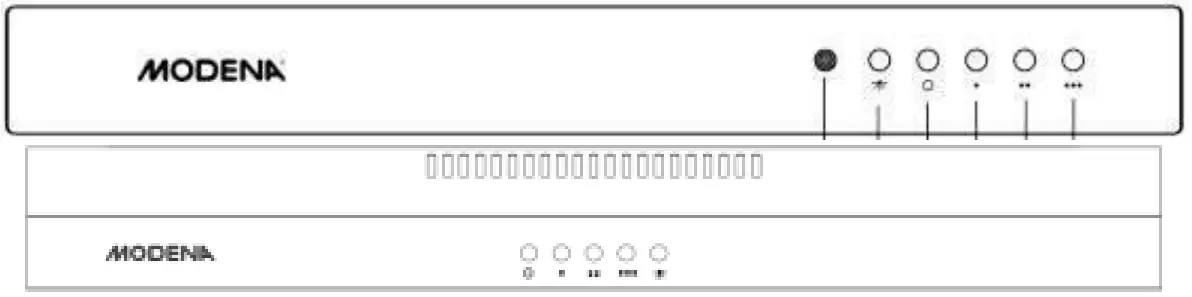
![]() Indicator lamp
Indicator lamp![]() Button used for turning lamp on / off
Button used for turning lamp on / off![]() Button for turning off the exhaust hood
Button for turning off the exhaust hood![]() Motor speed button – LOW
Motor speed button – LOW![]() Motor speed button – MEDIUM
Motor speed button – MEDIUM![]() Motor speed button – HIGH
Motor speed button – HIGH
Slide Button

Symbol![]() To turn on/off the light
To turn on/off the light
0 To turn off the motor
1 LOW motor speed
2 MEDIUM motor speed
3 HIGH motor speed
SX 9512 L and SX 7511 L
Push Button
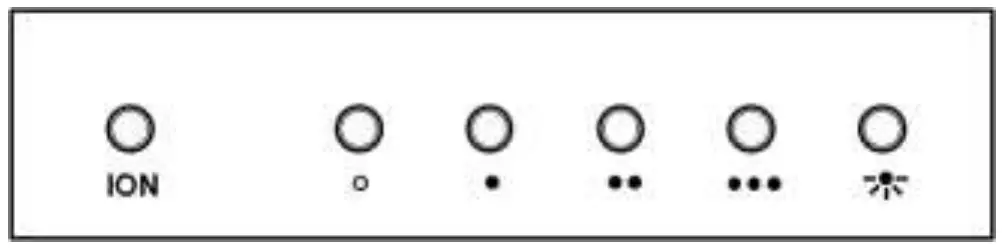
![]() To turn off the hood
To turn off the hood![]() Use motor at low speed
Use motor at low speed![]() Use motor at medium speed
Use motor at medium speed![]() Use motor at high speed
Use motor at high speed![]() To turn off/on the light
To turn off/on the light
ION Will be activated when operating the hood motor
CAUTION:
- Avoid direct contact of an active stove with the exhaust hood.
- Adjust the motor’s speed of the exhaust hood according to the thickness of smoke / steam generated in the cooking process.
- To get the best filtering result, turn off the exhaust hood 20 – 30 minutes after finished cooking.
PART 5: MAINTENANCE
MODENA Exhaust Hood is specifically designed for long-term usage and does not require complicated maintenance. However, there are several things you can do to maintain its quality as follows:
Cleaning the Cabinet:
To clean the surface of exhaust hood cabinet from sticky oil particles, use cloth /sponge and soap water and dry it. The cabinet should be cleaned after each cooking session.
Cleaning the Filter:
Smoke / steam from cooking and oil particles generated by the cooking procedure will be immediately absorbed by the filter and therefore must be cleaned regularly.
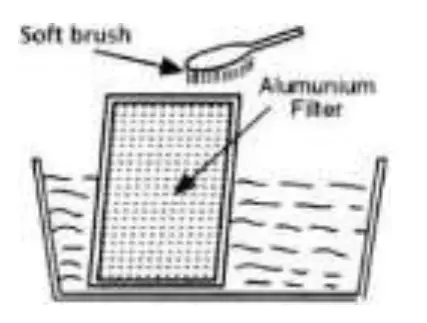
Aluminum Filter and Metal Filter
- For routine usage, clean the aluminum filter once every 10 – 15 days by soaking the filter in a basin filled with soap water for 1 hour (look at picture) and use a soft brush to scrub it and then dry the filter thoroughly before returning it to its proper position.
- Aluminum filter can be cleaned using a dishwasher.
- Avoid bending the filter during wash.
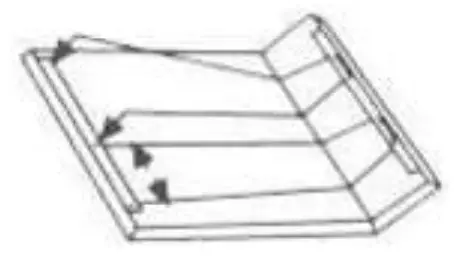
Follow these instructions to remove the metal filter:
- Remove the power cord from the electrical outlet.
- Open the exhaust hood grid.
- Remove the filter pin wire from its position and lift the filter
- Install the clean filter to its original position.
Carbon Filter:
Carbon filter must be replaced with a new one at least once every 4 months or when the carbon filter is no longer capable of absorbing the cooking odor.
1. Remove the power cord from the electrical outlet.
2. Open the exhaust hood grid.
3. Rotate the carbon filter counterclockwise and remove the carbon filter
4. Install the new carbon filter by putting it in position and rotating it clockwise.
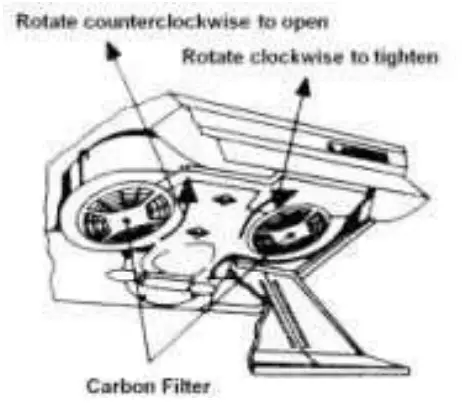
ATTENTION:
Carbon filter cannot be washed and must be replaced with a new one in accordance with the above description.
There is a risk of fire if cleaning is not in accordance with the instructions. Condition of carbon filter that have oiling can ease the fire ,if there is negligence usage
PART 6: TROUBLESHOOTING
Consult the following troubleshooting before contacting our Service Center regarding your exhaust hood:
| Problem | Possible Cause | Recommended Actions |
| Exhaust hood is not working | •Power cord is not yet connected to the electrical socket. •Electrical socket does not have any electricity | •Connect the power cord to the electrical socket. •Connect the power cord to a properly functioning electrical socket |
| Deteriorating of Suction Power | •Dirty aluminum filter •Dirty carbon filter | •Clean the aluminum filter, dry it and place it back on the exhaust hood. •Replace the carbon filter with a new one. |
| Motor fan is notfunctioning | • Motor coil is broken | • Contact MODENA Service Center |
| Motor stops working after a while | • Safety thermal regulator is active | • The vent hood is installed too close to the stove. • Air circulation is not optimal. • Contact MODENA Service Center. |
PART 7: PRECAUTION
- Make sure the hood is turned on after a while to allow the air around the cooking area to circulate properly and make sure the hood is turned off after this process..
- Periodically inspect the filter and oil reservoir. Make sure that the filter is in clean and good condition and make sure the oil reservoir is not exceeding the specified limit.
- If you smell burnt / burnt smell from the hood, immediately turn off the hood and contact the MODENA Service Center.
- Perform a routine service on your stove every 3 (three) months, because if there are problems / problems with your exhaust hood, it can be immediately identified and repaired. Contact MODENA Service Center
PART 8: SPECIFICATION
| TYPE | SX 9502 V | SX 6501 5 | SX 6501 V |
| Hood type | Slim | Slim | Slim |
| Cabinet’s color | Silver (V) | Stainless (5) | Silver (V) |
| Cabinet Material | Metal | Stainless | Metal |
| Front panel’s color | Silver (V) | Stainless (5) | Silver (V) |
| Motor | 2 | 1 | 1 |
| Lamp | 2 | 1 | 1 |
| Control panel | Push Button | Push Button | Push Button |
| Ionizer | Yes | Yes | Yes |
| Filter type | Carbon Filter + Cassette Aluminum Filter | Carbon Filter + Cassette Aluminum Filter | Carbon Filter + Cassette Aluminum Filter |
| Motor Power | 2 x 125 W | 125 W | 125 W |
| Lamp Power | 2 x 40 W | 1 x 40 W | 1 x 40 W |
| Dimension (L x W x H mm) | 900 x 495 x 150 | 600 x 496 x 150 | 600 x 495 x 150 |
| TYPE | SX 9512 L | SX 7511 L | SX 9502 S |
| Hood type | Slim | Slim | Slim |
| Cabinet’s color | Black | Black | Stainless (S) |
| Cabinet Material | Metal | Metal | Stainless |
| Front panel’s color | Black | Black | Stainless (S) |
| Motor | 2 | 1 | 2 |
| Lamp | 2 bulb | 2 bulb | 2 |
| Control panel | Push Button | Push Button | Push Button |
| Ionizer | Yes | Yes | Yes |
| Filter type | Aluminum + Carbon + Vit. C filter | Aluminum + Carbon + Vit. C filter | Filter Karbon +Cassette Aluminium |
| Motor Power | 2 x 100 W | 100 W | 2 x 125 W |
| Lamp Power | 2 x 40 W | 2 x 40 W | 2 x 40 W |
| Dimension (L x W x H mm) | 900 x 500 x 150 | 700 x 500 x 150 | 900 x 495 x 150 |
| TYPE | SX 9412 L | SX 9412 S | SX 7412 L | SX 7412 S |
| Hood type | Slim | Slim | Slim | Slim |
| Cabinet’s color | Black | Stainless | Black | Stainless |
| Cabinet Material | Metal | Stainless | Metal | Stainless |
| Front panel’s color | Black | Stainless | Black | Stainless |
| Motor | 2 | 2 | 2 | 2 |
| Lamp | Led | Led | Led | Led |
| Control panel | Push Button | Push Button | Push Button | Push Button |
| Ionizer | No | No | No | No |
| Filter type | Filter Karbon +Aluminium Cassette Filter | Filter Karbon +Aluminium Cassette Filter | Filter Karbon +Aluminium Cassette Filter | Filter Karbon +Aluminium Cassette Filter |
| Motor Power | 2 X 80W | 2 X 80 W | 2 X 80 W | 2 X 80 W |
| Lamp Power | 1 X 2 W Led | 1 X 2 W Led | 1 X 2 W Led | 1 X 2 W Led |
| Dimension (L x W x H mm) | 900 X 480 X 100 | 900 X 480 X 100 | 700 X 480 X 100 | 700 X 480 X 100 |
![]()
PT MODENA INDONESIA
Jl. Industri Raya I Blok D-8,
Jatiuwung, Tangerang 15135


