
BEOK TOL-48 Heating Thermostat User Guide
Welcome
Thank you for your trust and support. By adopting higher-end technology and more perfect technology, your new thermostat will provide you with the right temperature environment every day in the future, making your life more comfortable and your living environment more stylish and beautiful. For detailed instructions on the installation and use of this thermostat, please read this manual carefully. Please contact a professional to install the thermostat for you and install and use the product to the extent permitted by law.
Application
Intelligent digital temperature controller is a floor heating system suitable for room temperature control and household temperature control. It controls the operating state of the floor heating equipment by comparing the ambient temperature with the set temperature, which improves comfort and achieves energy saving. This digital temperature controller adopts micro computer control technology and is equipped with full-screen display touch buttons, which is elegant in design and easy to use. The thermostat has manual automatic,programmable and state memory functions.
Product packaging
Thermostat host—————–1 PC
Qualification certificate——- 1 PC
Sensing line (optional)——– 1 PC
Manual—————– 1 PC
Screw——————- 2 PCS
Product Model
WP Plumbing 3A
EP Electric Heating 16A
WPB linkage, gas boiler 3A
User Notes
- Please read this manual carefully. Improper operation may damage the product or cause dangerous conditions.
- The installation personnel must be well-trained and experienced service technicians.
- After installation, please read this manual carefully and operate the product according to the instructions.
Caution: Risk of electric shock or equipment damage
Wiring Diagram
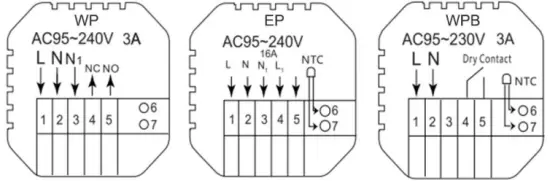
Note: WP for water heating; EP for electric heating; WPB for gas boiler
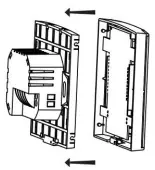
Installation procedure
This product is installed with a standard 86 control switch (in compliance with European regulations)
- Remove the mounting plate in this direction

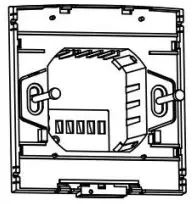
- Fix the mounting plate to cassette with a screw

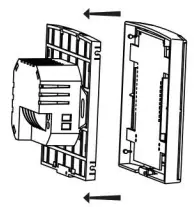
- After installation, buckle the product in this direction

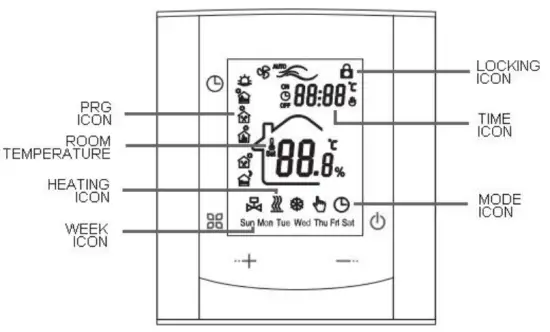
Description of display &Icon
Operating Instruction
- Power on/off: press
 to turn on/off the thermostat.
 - Press the key to switch between manual and automatic modes.
- In the automatic mode, press or to adjust the temperature to enter the automatic temporary mode. This mode runs for only one session.
- Press
 key to enter the clock setting, press key to switch Settings Item, press and keys to adjust the value of each parameter.
 - Press and for 5 seconds to add or cancel the child lock.
Time programming instructions
Press ![]() and hold the key to enter the programming setting, short press the
and hold the key to enter the programming setting, short press the ![]() key to switch the option, press the key
key to switch the option, press the key![]() or
or ![]() key to adjust each option parameter, and press the
key to adjust each option parameter, and press the![]() key to exit and save.
key to exit and save.
| KEY | OPTION | ICON | TIME | ADJUST | DEFAULT | ADJUST | |
|
| workday | 1 | 06:00 |
| 20℃ | ||
| 2 | 08:00 | 15℃ | |||||
| 3 | 11:30 | 15℃ | |||||
| 4 | 12:30 | 15℃ | |||||
| 5 | 17:00 | 22℃ | |||||
| 6 | 22:00 | 15℃ | |||||
| Holiday | 1 | 08:00 | 22℃ | ||||
| 2 | 23:00 | 15℃ | |||||
Advanced options
When POWER OFF, press the ![]() key and the
key and the ![]() key for 5 seconds to enter the advanced option setting.
key for 5 seconds to enter the advanced option setting.
Press ![]() to enter the next option, press
to enter the next option, press ![]() and
and ![]() to adjust, and press
to adjust, and press ![]() to exit the height Level option.
to exit the height Level option.
| 1 | Temperature compensation | The default value of the calibration room temperature is -2 ℃. Press the up and down keys to adjust. The adjustable range is 9.9 °C to -9.9 ℃. |
| 2 | Sensor selection | The temperature sensor is selected as IN by default. Press the up and down keys to adjust as IN respectively, indicating that the internal. |
| 3 | Modify the temperature limit | The default temperature limit value is 35 ℃. Press the up and down keys to adjust the range from 5 ℃ to 60 ℃. |
| 4 | Temperature difference start | The default temperature difference is set to 1 ℃. Press the up and down keys to adjust the range to 1-10 degrees. |
| 5 | Antifreeze fundion | Set the default anti-freeze function to OFF, display OFF, press the up key to tum on anti-freeze and display ON |
| 6 | Holiday option and turn off weekly programming | Set the default rest day as double OFF. Press the up and down keys to adjust it to double OFF (1-5), single OFF (1-6), no OFF (1 -7) and tum off week programming (OFF). |
| 7 | Primary and secondary reverse selection | Set the default main and auxiliary reversal to 0. Press the up and down keys to adjust 0 to tum off the main and auxiliary reversal. 01 means auxiliary reverse, 02 means auxiliary reverse, 03 means main and auxiliary reverse, shutdown and antifreeze is not on, stop output |
| 8 | Passive linkage output delay time | Set the default passive linkage delay time to 0. Press the up and down keys to adjust the range of 0-5 minutes. |
| 9 | Set upper temperature limit | The default value of the set temperature upper limit is 60 ℃, and the adjustment range is 35-95 ℃ by pressing the up and down keys. |
| 10 | Restore Fartory Defaults | Set to restore the factory default setting to display “-”, Press the up button to adjust the display “—”, press the enter button to restore the factory settings |


