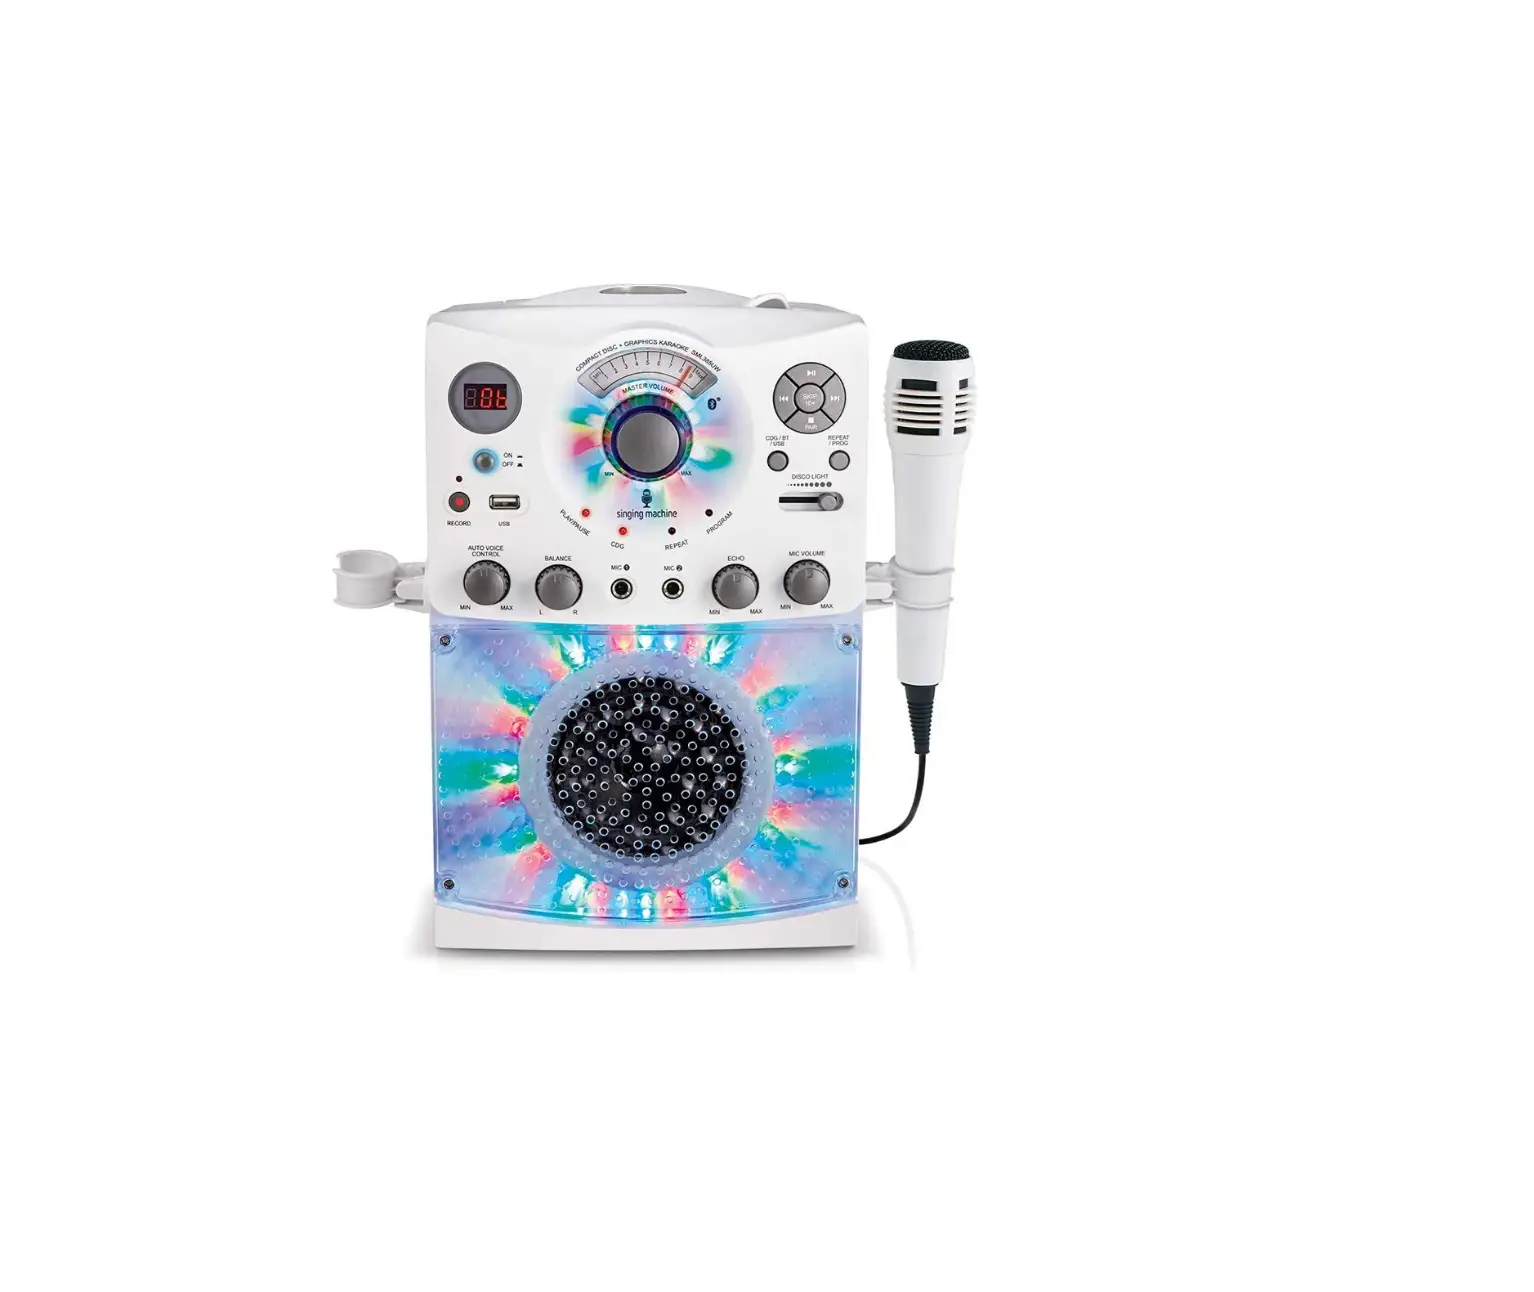
 Singing Machine SML385UW Bluetooth Karaoke System
 Singing Machine SML385UW Bluetooth Karaoke System
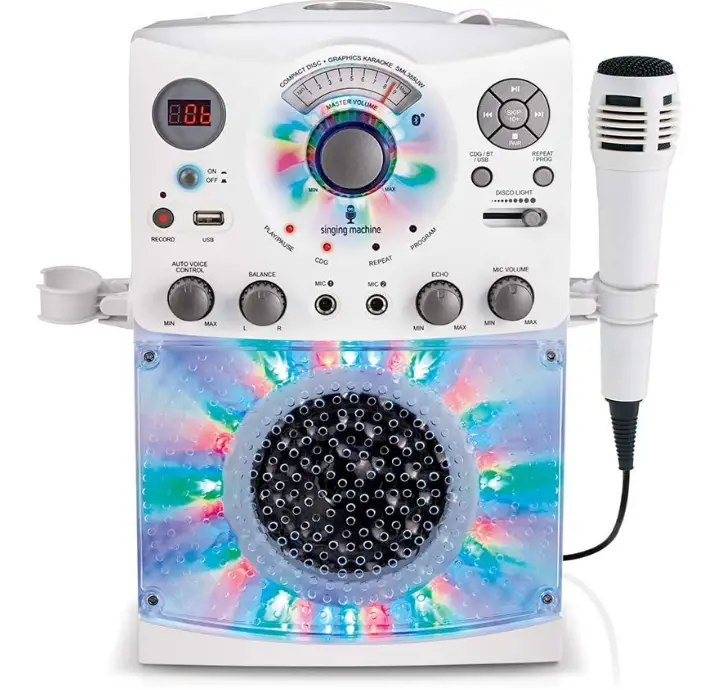
With the SML385UW Singing Machine Bluetooth Karaoke system’s top-loading CD player that supports CD + Graphics and music CDs, you may host a dance party. Use any Bluetooth-enabled device to wirelessly stream digital audio, or connect a USB drive to listen to your favorite music or record a performance! High-fidelity LED disco lights create the ideal party atmosphere.
INCLUDED
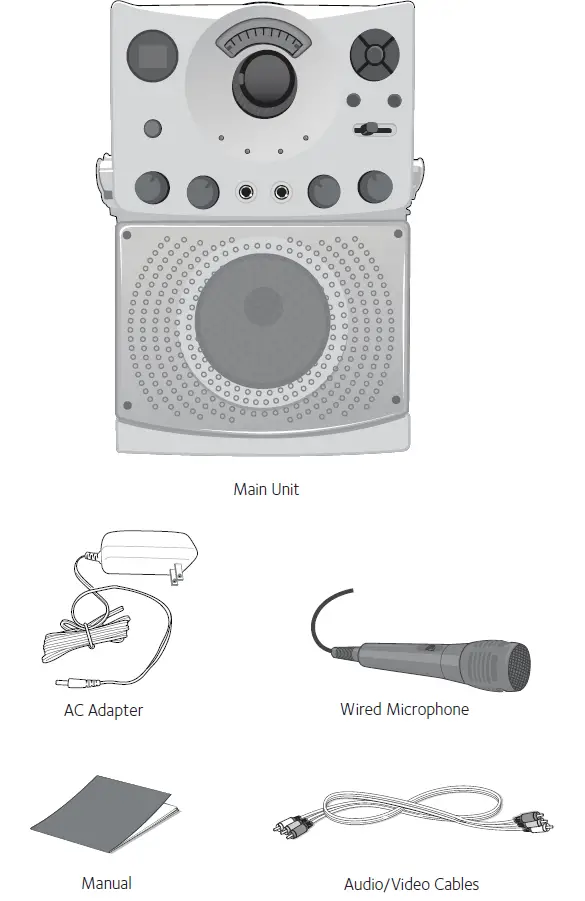
Please make sure that the following items are included.
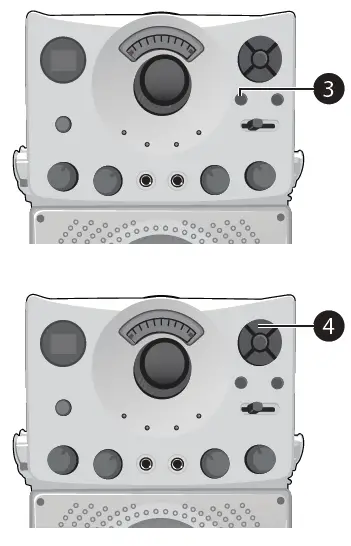
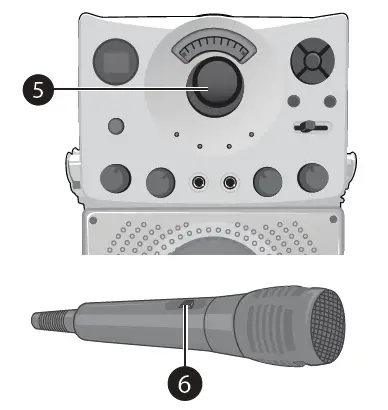
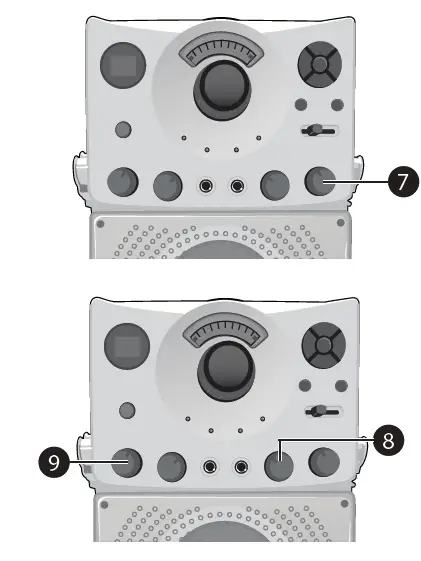
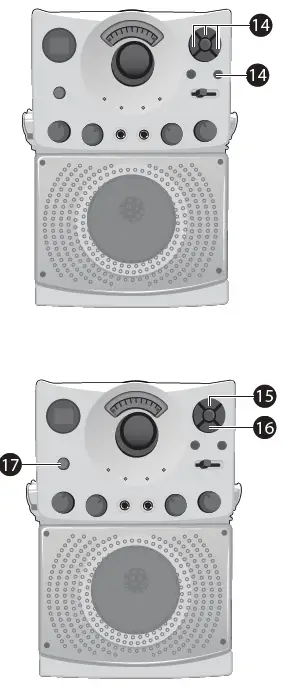
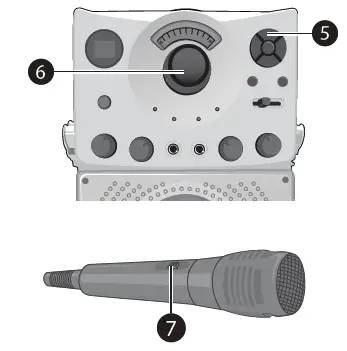
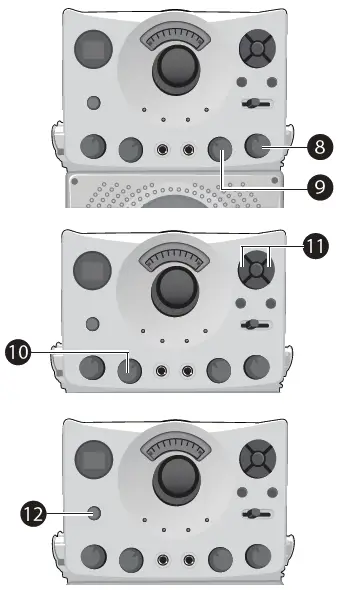
LOCATION OF CONTROLS (TOP/FRONT)
FRONT VIEW
- LED Display
- CD Door
- Master Volume Display
- Master Volume Indicator
- CDG/BT Button
- Skip Button
- Play/Pause Button
- Skip Button
- Disco Light
- MASTER VOLUME Control
- ON/OFF LED
- Power ON/OFF Button
- PLAY/PAUSE LED
- CDG LED
- Mic Holder
- AUTO VOICE CONTROL
- BALANCE Control
- MIC 1 Jack
- RANDOM Button
- Stop/Pair Button
- REPEAT/PROGRAM Button
- DISCO LIGHT Slide Switch
- PROGRAM LED
- REPEAT LED
- Mic Holder
- MIC VOLUME Control
- ECHO Control
- MIC 2 Jack
- Disco Lights
- Speaker
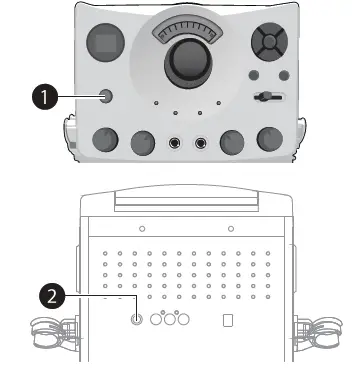
LOCATION OF CONTROLS (REAR)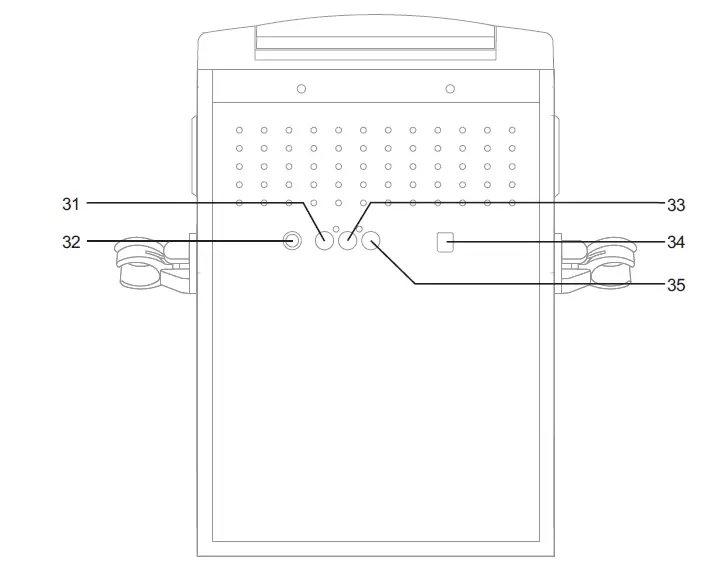
REAR VIEW
- VIDEO OUT Jack
- LINE IN Jack
- AUDIO OUT Jack (R)
- DC IN Jack (5.8V)
- AUDIO OUT Jack (L)
CONNECTION
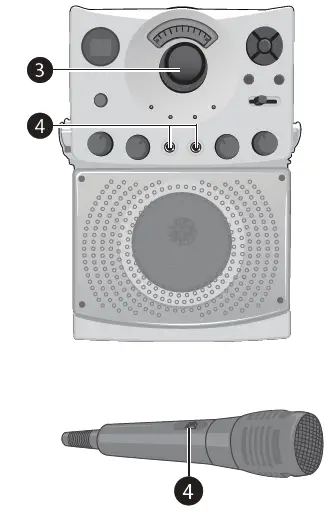
CONNECTING THE MICROPHONE(S)
MICROPHONES:
Connect a microphone into MIC jack 1 as well as MIC jack 2 v (when desired).
NOTE: Do not drop or tap the Mic as damage to the Mic or speakers may occur. Do not twirl the microphone cord as it will cause damage to the encased wiring.
CONNECTING THE UNIT TO A TV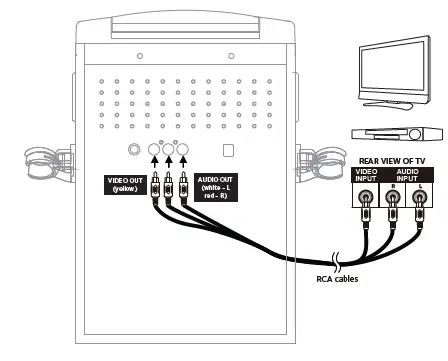
To output the video, lyrics and audio to your TV, perform the following steps:
- Connect the RCA video cable (Yellow) to the VIDEO OUT jack and the audio cables (White and Red) to the AUDIO OUT jacks located on the back of the Singing Machine.
- Connect the opposite end of the RCA video cable (Yellow) to the VIDEO IN jack and the audio cables (White and Red) to the AUDIO IN on your TV.
NOTES:
- This unit can be used with or without a TV, but it is highly recommended to use a TV in order to utilize all the features.
- Also refer to the TV’s User Guide.
- To see the lyrics on the screen, you must use a CD+G disc.
CONNECTING TO AC POWER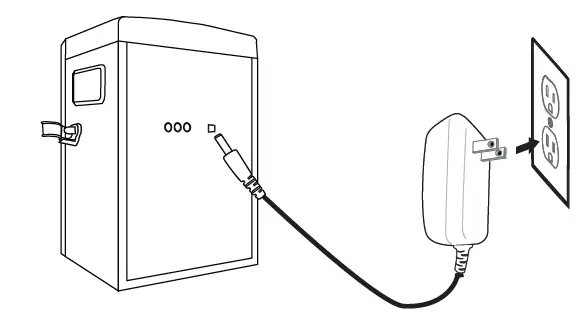
CONNECTING TO LINE IN JACK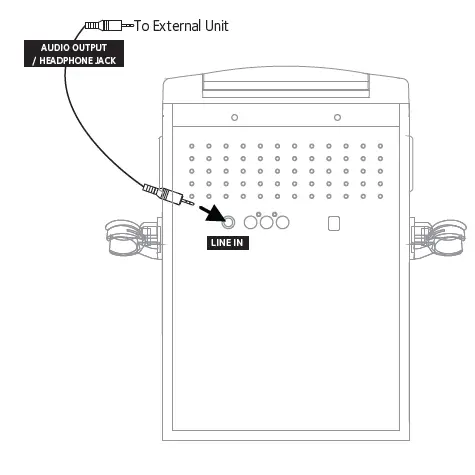
DISCO LIGHTS
To illuminate the disco light and get your desired lighting effect, slide the DISCO LIGHT slide switch from the OFF position to your desired level.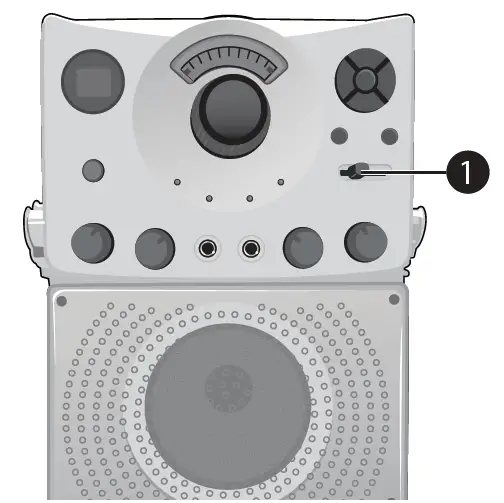
OPERATION
PLAYING A CD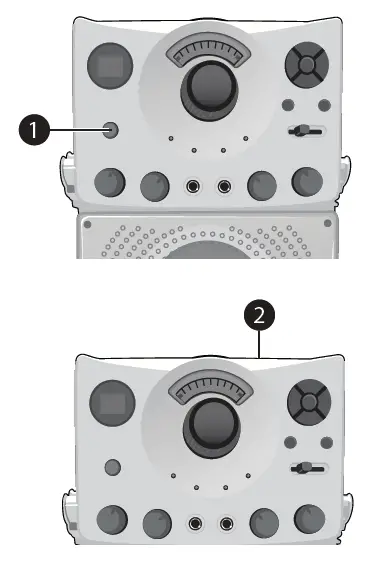
- Connect the unit as described previously; if using a CD+G, it is recommended to connect to a TV (see page 5). Press the power ON/ OFF button to turn the unit on.
- Lift open the CD door and insert a CD or a CD+G by gently pressing it on the center spindle. Then close the CD door.
NOTE:
What is a CD+G?
A CD+G (CD + Graphics) is the standard format for most karaoke discs that will display the words on the screen.
- Never place anything other than a CD in the compartment, as foreign objects can damage the unit.
- If no disc is inserted, “No” will appear on the display.
- If connected to a TV and/or other audio source, adjust the volume of the external unit using its own volume control.

- Repeatedly press the CDG/BT button to select the CDG/CD mode; “–” will appear when searching the disc and then the total number of tracks will appear. When a CDG disc is inserted, the CDG indicator will light.
- Press the Play/Pause button to start playback; if listening to a CD+G file, the image and lyrics will appear on the TV screen (if connected) and the PLAY/PAUSE Indicator will light.

- Adjust the volume to a comfortable level using the MASTER VOLUME control.
- Connect microphone(s) as shown on page 5, and slide the ON/OFF switch on the microphone to the ON position.
- Adjust the MIC VOLUME control as desired. Increasing this control will increase the volume of both microphones.
- Rotate the ECHO control to add an echo effect to your voice. Rotate towards MAX to increase the echo effect.

- AUTO VOICE CONTROL can be activated by rotating the AUTO VOICE CONTROL. The higher this control is set to, the more the vocals on the multiplex recording will be muted when the singer starts to sing through the microphone. When the singer stops singing, the recorded vocals on the multiplex recording will resume to normal.
- Rotate the BALANCE control clockwise to hear the music and recorded vocals from a multiplex recording or counterclockwise to hear the music only from a multiplex recording.
NOTE: To use the BALANCE control, a CD+G disc must be used, otherwise it will operate as a standard Balance control.
- SKIP: Advance or go back one track by pressing the Skip Back/Skip Forward buttons.
- REPEAT: During playback, press the REPEAT/PROGRAM button once to repeatedly play the selected song; the Repeat indicator will blink. Press the REPEAT/PROGRAM button a second time to repeatedly play the whole CD; the Repeat indicator will light solid. Press it again to cancel Repeat function, the REPEAT/PROGRAM indicator turns off.

- RANDOM: During playback, press the RANDOM button to randomly go to another track.
- PROGRAM: You can program up to 20 tracks on any disc for playback in any desired order. While in the Stop mode, press the REPEAT/ PROGRAM button; the Program indicator will blink and “00” will appear. Select the first track using the Skip Back /Skip Forward buttons. Press the REPEAT/ PROGRAM button again to confirm the entry. After selecting the desired tracks the display will show 01, 02, etc. recognizing the tracks selected have been programmed and the program indicator will illuminate solid red. Repeat to set up to 20 tracks into memory. When done, press the Play/Pause button to start playback.

NOTE:
Press the Stop/Pair button TWICE to stop and clear the program. - PAUSE: During playback, if you wish to pause the disc momentarily, press the Play/Pause button; the PLAY/PAUSE indicator will blink. Press again to resume normal playback.
- Press the Stop/Pair button to stop playback.
- Press the power ON/OFF button to turn the unit off.


USING A BLUETOOTH DEVICE

- Connect the unit as described previously. Press the power ON/OFF button to turn the unit on.
- Repeatedly press the CDG/BT button to select the Bluetooth; “BT” will blink in the display as the unit automatically searches for and pairs a previously paired Bluetooth device (if previously paired). If no previously paired devices are present, connect as shown in the next step.
NOTE: You can also press the Stop/Pair button to disconnect any paired devices in order to pair another device. - Turn on your device’s Bluetooth option in settings to search for a discoverable device with a Bluetooth signal. Select “Singing Machine” from the device results on the Bluetooth menu.
NOTE: Also refer to the user manual of your Bluetooth device for detailed instructions. - “BT” will light solid in the display.
NOTES:
If your Bluetooth prompts you for a passcode during the pairing process, please enter “0000” to connect.
On some Bluetooth devices, once pairing is complete, select your Bluetooth device as “Use as Audio Device” or similar.
If connection is lost after successful pairing, check to make sure the distance between speaker and Bluetooth-enabled device does not exceed 30 feet/10 meters.
Nothing will appear on the connected TV when using the Bluetooth mode.
- To control your Bluetooth device from this unit, press the Play/Pause button to start playback. Press the Play/ Pause button during playback to pause the song.
- Adjust the volume to a comfortable level using the MASTER VOLUME control on this unit as well as the volume on your Bluetooth device.
- Connect microphone(s) as shown on page 5, and slide the ON/OFF switch on the microphone to the ON position.
- Adjust the MIC VOLUME control as desired. Increasing this control will increase the volume of both microphones.
- Rotate the ECHO control to add an echo effect to your voice. Rotate towards MAX to increase the echo effect.
- Adjust the balance between the speakers using the BALANCE control.

- SKIP: Advance or go back one track by pressing the Skip Back/Skip Forward buttons.
- Press the power ON/OFF button to turn the unit off.
USING THE LINE IN JACK
- Connect the unit as described previously (see page 6). Press the power ON/OFF button to turn the unit on.
- Connect the external unit to the LINE IN Jack on the back of this unit. Connecting an external unit will allow the audio to be played through your Singing Machine. LINE IN function is automatically selected once the audio cable is plugged in.
NOTES:
It is highly recommended to set the volume on the auxiliary unit to 1/3 or lower to avoid distortion.
Skipping files/tracks is not possible on this unit when using an external device. - Adjust the volume using the MASTER VOLUME control on this unit or your external device’s volume control.

- Connect microphone(s) as shown on page 5. Slide the ON/OFF switch on the microphone to the ON position.
- Adjust the MIC VOLUME control as desired. Increasing this control will increase the volume of both microphones.
- Rotate the ECHO control to add an echo effect to your voice. Rotate towards MAX to increase the echo effect.

- Adjust the balance between the speakers using the BALANCE control.
- Press the power ON/OFF button to turn the unit off.
TROUBLESHOOTING GUIDE
Should this unit exhibit a problem, check the following before seeking service:
NO POWER
- Power is not on; press the power ON/OFF button to turn power on.
- Confirm that the AC adapter is connected securely to the back of the unit.
- Connect the unit to a different outlet.
NO SOUND – GENERAL
- Master Volume is set to minimum; raise volume.
- Correct Function was not selected; select using the CDG/BT button.
- If using an external device, raise the volume.
- Check if the LINE IN jack is still connected by a cable.
NO SOUND – IF CONNECTED TO A TV
- Volume on the TV is muted or too low.
- Correct source (usually AV) was not selected on the TV’s menu.
LYRICS DO NOT APPEAR ON THE TV SCREEN
- If connected to a TV, Video plug is not connected properly; see page 5.
- If connected to a TV, select the correct source on the TV (usually AV).
- The file/track being played is not a track recording with lyrics. These are the only files that allow you to view the lyrics on the TV screen.
- Nothing will appear on the TV screen when using LINE IN or Bluetooth.
NO SOUND FROM THE MICROPHONE
- Make sure the microphone is firmly connected to the MIC 1 or MIC 2 jack.
- Make sure the ON/OFF switch on the microphone is set to the ON position.
- Make sure the MIC VOLUME setting is not set too low.
- MASTER VOLUME is set to minimum; raise volume.
- Adjust The Echo control past the mid-point on the Singing Machine.
THE BLUETOOTH DEVICE CANNOT BE PAIRED OR CONNECTED WITH THE UNIT
- You have not activated the Bluetooth function of your device; see page 11 or refer to the Bluetooth device user’s manual.
- The system is not in pairing mode; press the Stop/Pair button to restart pairing.
THE MUSIC IS NOT AVAILABLE ON THE UNIT AFTER SUCCESSFULLY CONNECTING THE BLUETOOTH
- Ensure your Bluetooth device can support the A2DP Bluetooth profile.
- The volume on the external Bluetooth device is set to low or muted; raise as desired.
SPECIFICATIONS
AUDIO
- OUTPUT POWER (MAXIMUM): 3.5 Watts (RMS)
- OUTPUT IMPEDANCE: 3 Ohms
CD PLAYER SECTION
- FREQUENCY RESPONSE: 100Hz – 20kHz
- SIGNAL-TO-NOISE RATIO: 50dB
- NUMBER OF PROGRAMS: 20 Step Random Access Programming
- SAMPLING SYSTEM: 8 Times Over Sampling
BLUETOOTH
- BLUETOOTH VERSION: V2.1+RDA
- WORKING DISTANCE: Up to 30 feet/10 meters measured in open space
- AUX IN SECTION: 3.5 mm Stereo Headphone Jack
- MICROPHONE: 74db 600 Ohm Impedance with 6.3 mm Dynamic Microphone
- POWER SECTION: DC 5.8V 1.5A
- POWER CONSUMPTION: 8.7 W
- DIMENSIONS (HXWXD): 13.2 x 10.5 x 9.3 inches / 33.6 x 26.6 x 23.5 cm
- WEIGHT: 5.3 lbs. / 2.4 kgs
Specifications are subject to change without notice.
FAQs
Item shows lyrics on an iPad. it states that you can hook it to a tv using RCA cables. how does it connect to iPad to show lyrics?
you can search and play pretty much any song with the lyrics on YouTube and have the music play straight from your tv/surround sound. Then you can just use the karaoke machine for the microphone/singing.
can u attach an iPhone to it? and how do I attach to external speakers
The Singing Machine comes with s-video and audio cables that you can attach to your Television inputs or attach the audio cables to your audio system inputs to listen to external speakers. To attach an iPhone to the machine you will need to purchase an Apple iPhone TTY adapter ($19.00 from Apple online store or Mac Superstore), and a 3.5mm male to male audio cable. I purchased a 6 ft cable from our local Radio Shack, or go online to www.cablestogo.com ($4.99). You plug the 3.5mm cable to your Apple iPhone TTY adapter, then plug the adapter to the microphone input on the front of the machine. The other end of the 3.5mm cable plugs into your iPhone headphone jack.
Can the Singing Machine be used without being hooked up to a T.V.?
yes, but you can’t read the words. it must be connected to the tv if you want to read along. be warned though, this is not very good quality. we sent back our first because the volume control knob didn’t work, and are having the same problem with the 2nd machine. we are past the 30 day return so are stuck with it.
Can I put any kind of music cd in it? I’m buying the one that comes with a Frozen cd, or does it play the Frozen cd only?
It plays all CD’s, however for Karaoke you will want to purchase CD+G discs. These are special for Karaoke machines. The Frozen CD you refer to is just one of many CD+G discs that they make for kids (and adults)!
Can you hook up two microphones to this machine?
Yes, You can hook up two microphones. I purchased this for my twin girls for their 9th birthday party and they had a blast with their friends! It is a great little machine!
Will this work for Android devices as well?
It seems to connect well with Android as well as iPhones if you are asking about blue tooth connection.
Does this come with a power cord?
Yes, it does.
Will this machine play regular CD’s as well?
yes it sure dose play CD, but you may have to raise your voice over it when the CD is playing. it’s one great machine we have purchased two of them in the past, they still work great.
Will any microphone work with this machine, or do you need a specific microphone?
It comes with a microphone, but it has an extra plug for a second microphone. I haven’t tried a different one, but any microphone with a plug should work.
can u play regular cd in this player
Yes it play CDs as well as CD-Gs. The *G just states that the player can display graphics like words. Since it’s a karaoke machine it’ll display the words to the song as long as it’s a CD-G disc.
does this machine need batteries
It plugs into the electric. You can also then plug it through your tv and see words for songs when you input a karaoke cd.
does this play iPod
I bought an additional cord to plug in the back to use with an iPod. The cord was super cheap.
What is the difference between USB and non USB versions, as far as function ability goes?
Not exactly sure, but I assume the USB would allow you to hook up your phone or other device for music. YouTube has a ton of karaoke songs and you could use your phone to look up song and then use the USB connector from your phone to the machine.
Just received this… no sound comes out at volume 1 or 2… is this normal for this machine or did I get a defective unit?
Most potentiometers (volume controls) require more than the 1 or 2 setting on the dial to output sound. This shouldn’t be a problem.
Can this machine work with batteries if I take it camping and don’t have access to electricity?
AYou don’t need batteries. Just plug it into a special Stanley or other product that fits into your cigarette outlet and allows for 3 prong plugin or USB plugin. https://www.staples.com/STANLEY-120W-Power-Inverter-120-VAC-1-Outlet/product_1196419


