
![]() Recessed ceiling luminaire for indoor use
Recessed ceiling luminaire for indoor use
50 717.1
50 717.1 Recessed Ceiling Luminaire for Indoor Use
 Instructions for use
Application
Recessed ceiling luminaire · indoor luminaire with hand-blown opal glass, satin matt and aluminium alloy housing.
For installation into ceilings with a shallow depth in interior areas.
Product description
Recessed ceiling luminaire »ACCENTA« Die-cast aluminium housing Hand-blown opal glass, satin matt, with screw neck Ceiling trim ring made of metal, Colour white Recessed opening ø 68 mm Required installation depth 60 mm Fixing is achieved by using 2 adjustable wedge-shaped claws External LED power supply unit 220-240 V ![]() 0/50-60 Hz DC 176-280 V DALI controllable A basic isolation exists between power cable and control line Safety class II
0/50-60 Hz DC 176-280 V DALI controllable A basic isolation exists between power cable and control line Safety class II ![]()
![]() – Safety mark
– Safety mark![]() – Conformity mark
– Conformity mark
Weight: 0.38 kg
This product contains light sources of energy efficiency class(es) D
Safety
The installation and operation of this luminaire are subject to national safety regulations.
Installation and commissioning may only be carried out by a qualified electrician.
The manufacturer accepts no liability for damage caused by improper use or installation.
If subsequent modifications are made to the luminaire, the person responsible for these modifications shall be considered the manufacturer.
Overvoltage protection
The electronic components installed in the luminaire are protected against overvoltage in accordance with DIN EN 61547.
To achieve an additional protection against e. g. transients, etc. we recommend separate overvoltage protection components.
You can find them on our website at www.bega.com.
Lamp
| Module connected wattage | 5.8 W |
| Luminaire connected wattage | 7.7 W |
| Rated temperature | ta = 25 °C |
| Ambient temperature | ta max = 40 °C |
50 717.1 K27
| Module designation | LED-0922/930 |
| Colour temperature | 3000 K |
| Colour rendering index | CRI > 90 |
| Module luminous flux | 920 lm |
| Luminaire luminous flux | 632 lm |
| Luminaire luminous efficiency | 82,1 lm / W |
50 717.1 K3
| Module designation | LED-0922/930 |
| Colour temperature | 3000 K |
| Colour rendering index | CRI > 90 |
| Module luminous flux | 940 lm |
| Luminaire luminous flux | 650 lm |
| Luminaire luminous efficiency | 84,4 lm / W |
Installation
LED are high-quality electronic components!
Please avoid touching the light output opening of the LED directly during installation or relamping.
The recessed opening will be covered by the frame of the luminaire.
Fixing of the luminaire is achieved by using 2 adjustable wedge-shaped claws.
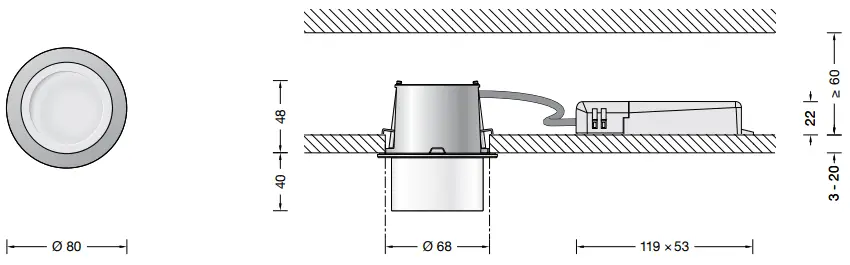
Installation into false ceilings
A recessed opening of ø 68 mm is necessary to accept the luminaire housing. Free space depth min. 60 mm (see sketch).
The claws catch the panel from the reverse side. If minimum thickness of the panel is less than 3 mm it must be reinforced from the reverse side. Maximum thickness of the panel must be no more than 20 mm.
The electrical connection must be made on site in the appropriate safety class on the LED power supply unit connecting cable. A distribution box must be used.
Ensure the correct assignment of the connecting cable. Establish the mains connection on the brown (L) and blue (N) wires.
The connection of the control cables is achieved by means of the both leads marked with – DALI.
In case these leads are not used the luminaire will be operated at full light output.
Push external LED-power supply unit and luminaire housing into ceiling cut-out.
Luminaire housing and external LEDpower supply unit must not be installed in heat-insulating material.
Hand-tight screws of claw fasteners evenly.
Lead enclosed ceiling frame ring over the screw-neck of the glass and push it down the gasket.
Make sure that gasket is positioned correctly.
Insert glass with frame ring by turning it clockwise into luminaire housing.
Cleaning · Maintenance
Clean luminaire regularly with solvent-free cleansers from dirt.
Defective glass must be replaced.
Replacement of the LED module
The designation of the LED module is noted on a label in the luminaire.
The light colour and light output of BEGA eplacement modules correspond to those of the modules originally fitted. The module can be replaced by qualified persons using standard tools.
Disconnect from main supply.
Unscrew glass with ceiling frame ring from luminaire housing by turning it counterclockwise.
Please follow the installation instructions for the LED module.
Check gasket.
Screw in glass with ceiling frame ring by turning it clockwise beyond the stop.
Defective glass must be replaced.
Spares
| Spare glass | 11 003 011 40R G |
| LED power supply unit | DEV-0434/350 |
| LED module 2700 K | LED-0922/927 |
| LED module 3000 K | LED-0922/930 |
| Trim ring | 72 009 561 L |
| Gasket | 83 001 412 |
BEGA Gantenbrink-Leuchten KG
Postfach 31 60
58689 Menden
[email protected]
www.bega.com![]()


