YDLIDAR EAI LEO ROS Teaching Robot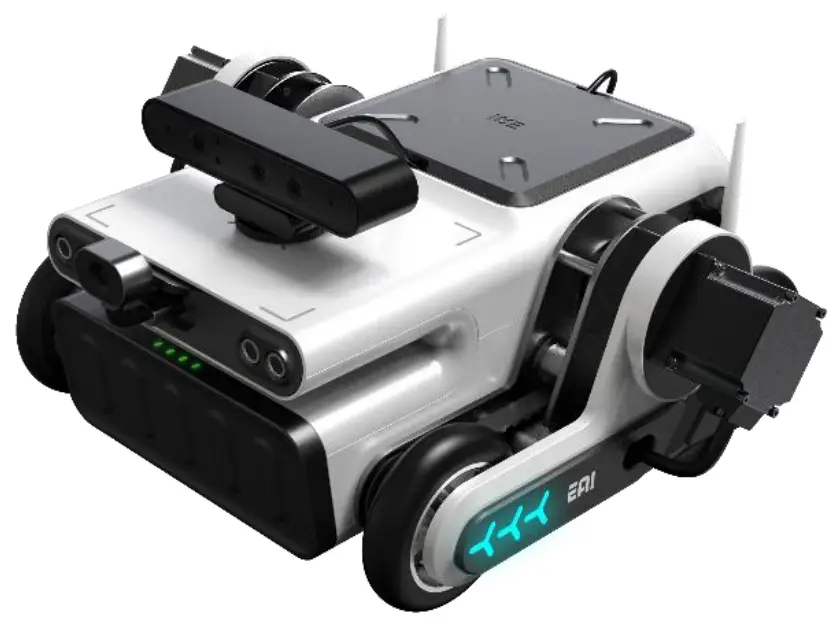
Disclaimer
To the maximum extent permitted by law, the products described in this manual are provided “as is”. If the products are not used or stored in accordance with this manual, there may be defects, errors or malfunctions on them. EAI Yuedeng Technology does not provide any form of express or implied warranties, including but not limited to the warranties of merchantability, quality satisfaction, fitness for a particular purpose, non-infringement of third-party rights, etc., nor does it compensate for any special, incidental, accidental or indirect damages resulting from the use of this manual or the use of our products.
Important safety notes
- Children must be monitored by others when they are using the device, and the device should be turned off in time when the operation is completed.
- Please prevent the trolley from getting wet by water or other liquid, and prevent the internal electronic short circuit.
- During the operation of the trolley, please do not put your hands into the wheel set and be careful of injuries.
- Control the operation of the trolley and please be careful not to bump into any thing else
Symbol notation
Description: Glossary or reference
Note: Important notes
Warnings: Important warnings
Resource list
![]() Enter
Enter
www.eaibot.cn
Support and download center
Download center
Leo acquires the related resources
![]() Software
Software
- RosStudio: ROSrobot integrated development environment (IDE) uses the visualized windows to operate ROS trolley, analyze ROS architecture, compile source code, configure parameters, debug compilation and carry out one-click deployment, etc.
- RosCore: Android APP. Including map building, navigation, map editing, task editing and other functions.
![]() Documents
Documents
《EAI RosStudio Operation Manual》
《EAI RosStudio Installation Guide》
《EAI RosCore APP User Manual》
《EAI LEO Driver Node Instruction》: STM32 Drive Protocol document.
![]() Application development materials
Application development materials
Android SDK development source code package.
《RosCore Android SDK Usage document》
Operation method
![]() Android Mobile APP
Android Mobile APP
Usage reference: 《EAI RosCore APP User Manual》
![]() RosStudio
RosStudio
Usage reference: 《RosStudio Operation Manual》, 《EAI RosStudio Installation Guide》
Algorithm development and parameter optimization are supported.
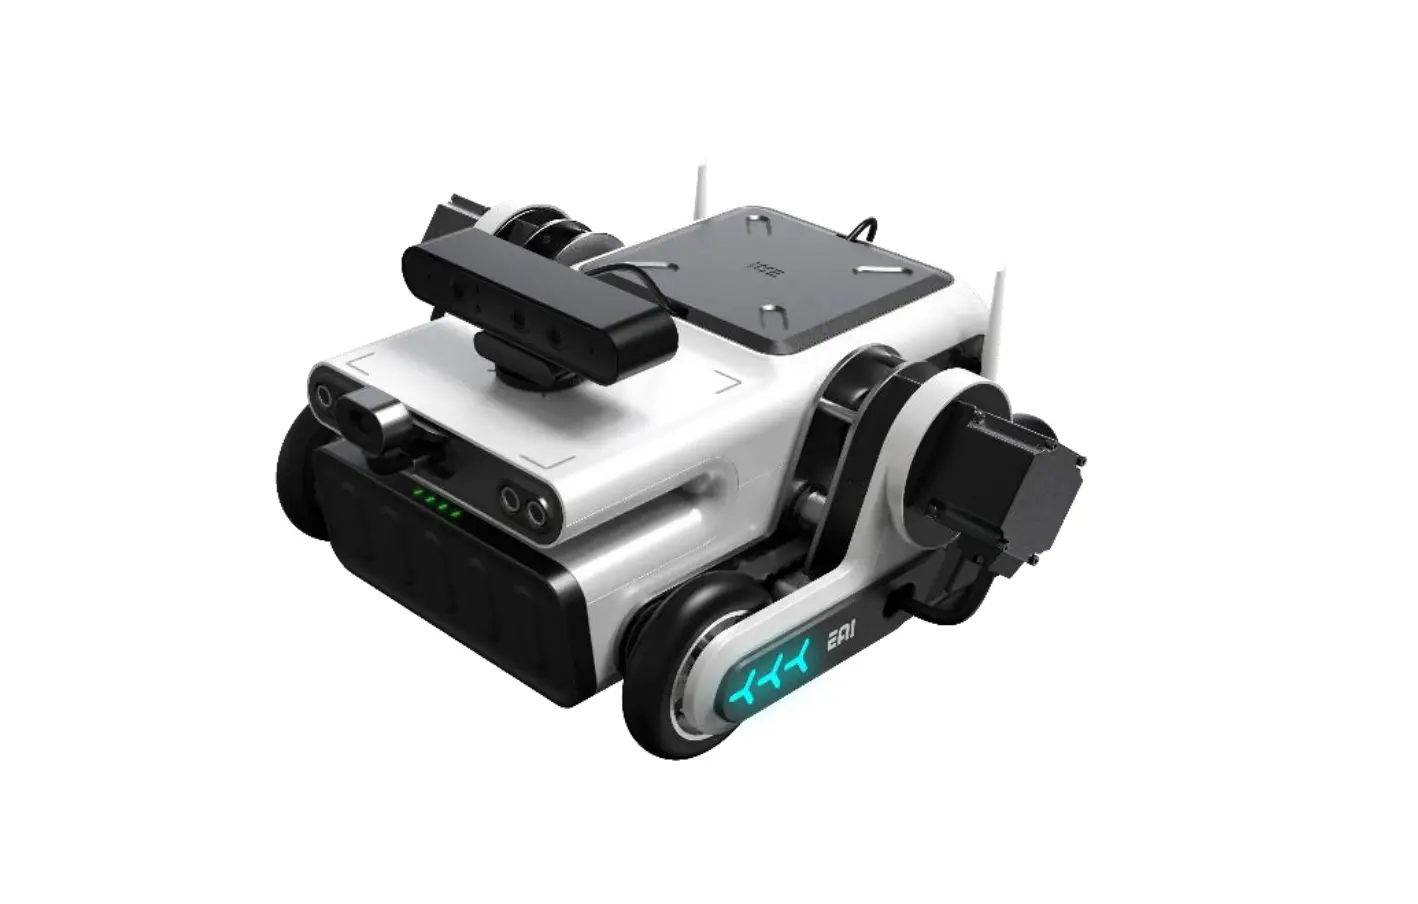
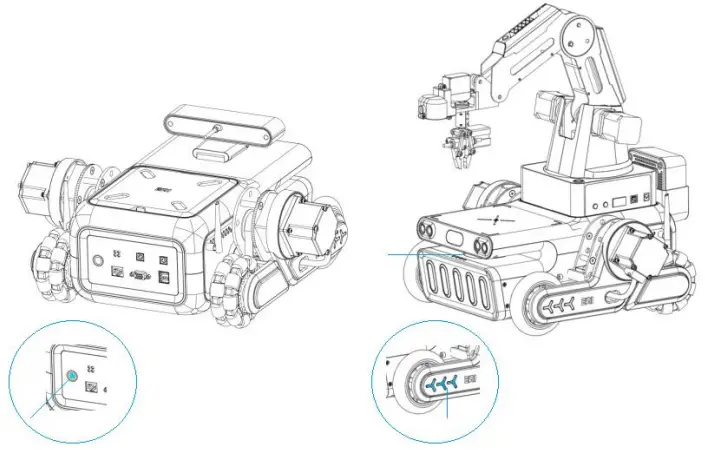
Appearance
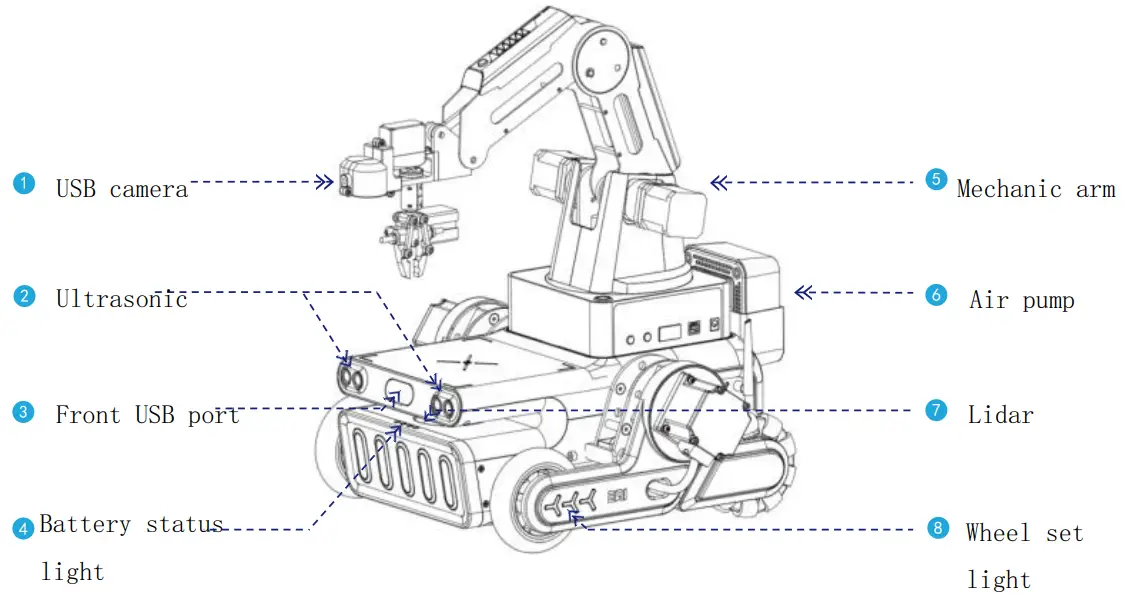
Indicator description
| wheel set light | All lights are blinking | The machine is in the standby status |
| Keeping stream blinking | The machine is in the motion status | |
| Stream blinking | The machine is in the normal charging status | |
| Only one light is blinking | The machine is in the charging error status | |
| Battery status light | Describe how much power is left |
Technical Specification
Dimension Parameters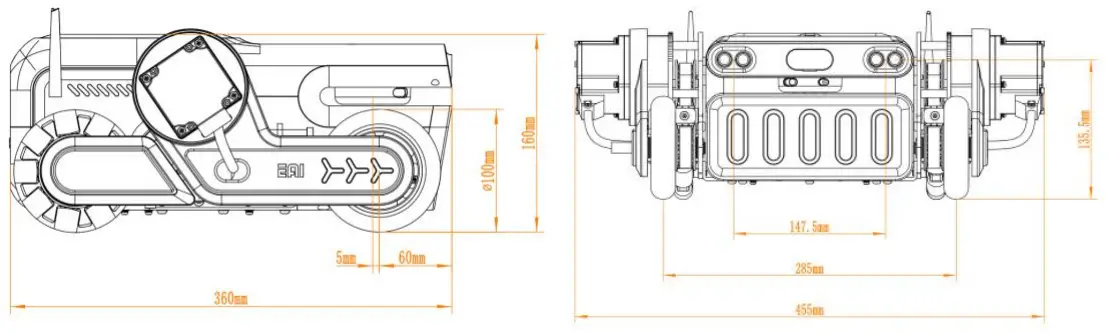
Technical Data
| Overall structure | |
| Drive methods | Differential control |
| Drive wheel | 4 inch rubber wheel |
| Main structural materials | Sheet metal, ABS |
| Dead weight | About 10kg |
| Processor performance | |
| Processor | INTEL I5 |
| Internal memory | DDR3 4G |
| Memory | 128G SSD(Solid state disk) |
| Sensor parameters | |
| Lidar | EAI G1 high-precision lidar |
| Motor | Brushless DC motor |
| Obstacle avoidance sensor | Ultrasonic module*2 |
| IMU module | MEMS gyroscope, 3-axis accelerometer |
|
RGB camera | *1 installed in front(Optional), *1 mounted by hanging via mechanic arm (Optional) |
| Depth RGB-D camera | *1(Optional) |
| Mechanic arm | DOBOT magician mechanic arm (Optional) |
| Battery and battery life | |
| Battery type | Power lithium battery |
| Battery capacity | 11.2Ah/24V |
| Charging time | About 4.5 hours |
| Charging voltage | 29.4V |
| Battery life | About 8 hours |
| Motion capability | |
| Climbing capability | 12° |
| Vertical obstacle crossing ability | 18mm |
| Motion speed | 1m/s |
| Control method | |
| APP control | Support |
| RosStudio IDE control | Support |
| Remote login SSH control | Support |
| Remote controller control | Support |
| Working environment | |
| Charging temperature | 0~45ºC |
| Discharging temperature | -10~60ºC |
| Working moisture | 30%~70% |
| Port | |
| Power port | 12V |
| Hardware port | LAN*1, WAN*1, VGA*1 USB3.0*2、USB2.0*1 |
| Openness | |
| All algorithms are open source | Support |
| Android secondary development DEMO | Support |
 Step 1: Start LEO
Press LEO power switch. After the blue lights located on both sides are illuminated and wait for 1~2 minutes until the ladar keeps running, LEO is ready.
 Step 2: Connect LEO
After a mobile/tablet connects LEO’s wifi(Some Android9.0+ mobiles/tablets connect to wifi and then a prompt will ask if using the network or not. Please select yes), please run RosCore App. After logging in, the connection is successful if the power on the main interface is displayed normally
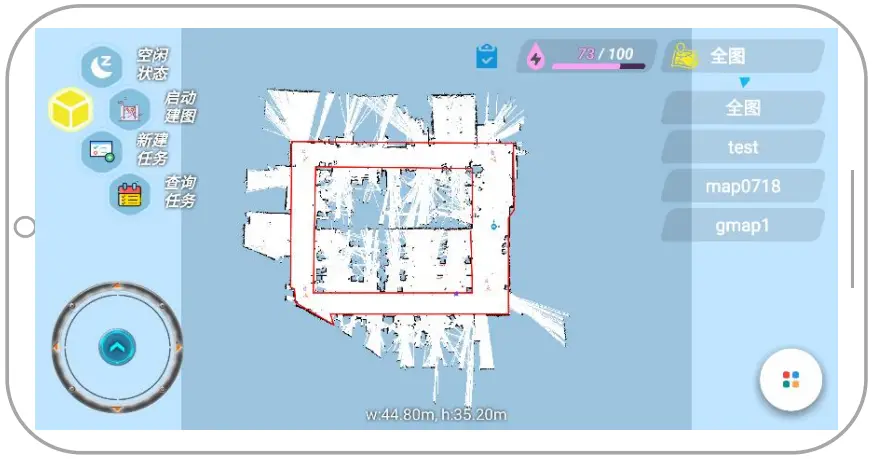
 Step 3: Slam map building
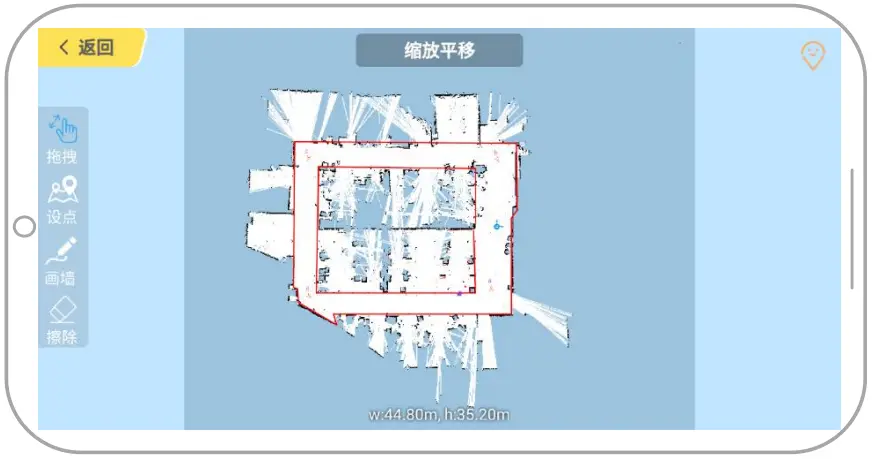
Click the main interface of RosCore to build the map and use the remote control at the lower left to control LEO to walk around the area to be mapped. After the map image is basically displayed, click Save Map in the menu button in the lower right corner and wait a few seconds, the map is saved. Step 4: Create a task
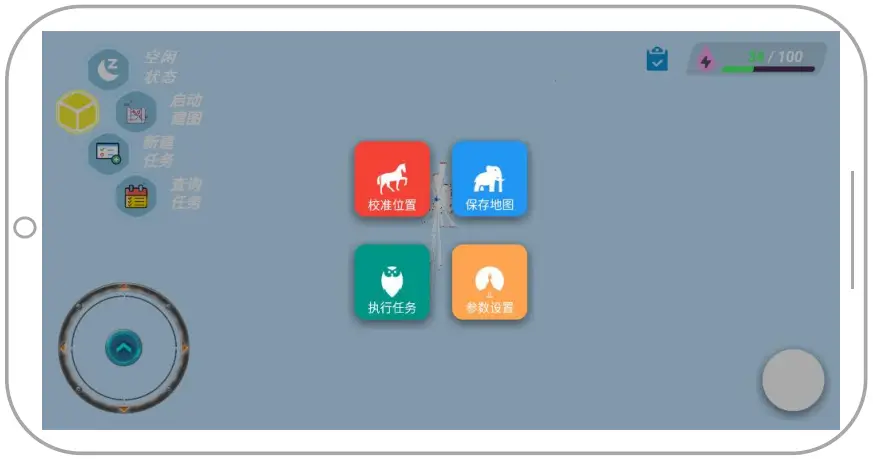
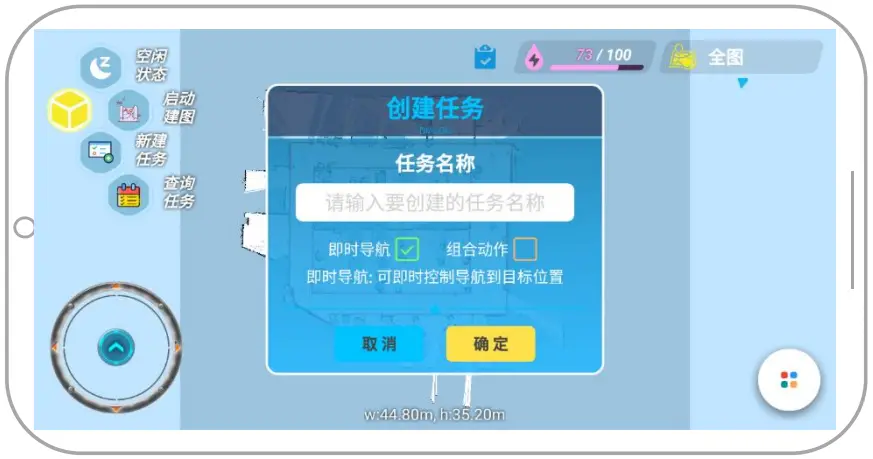
In the main interface of RosCore, click the map list at the upper right corner and select a previously created map to calibrate the location, add some target points, and create a corresponding navigation task. Step 5: Slam navigation
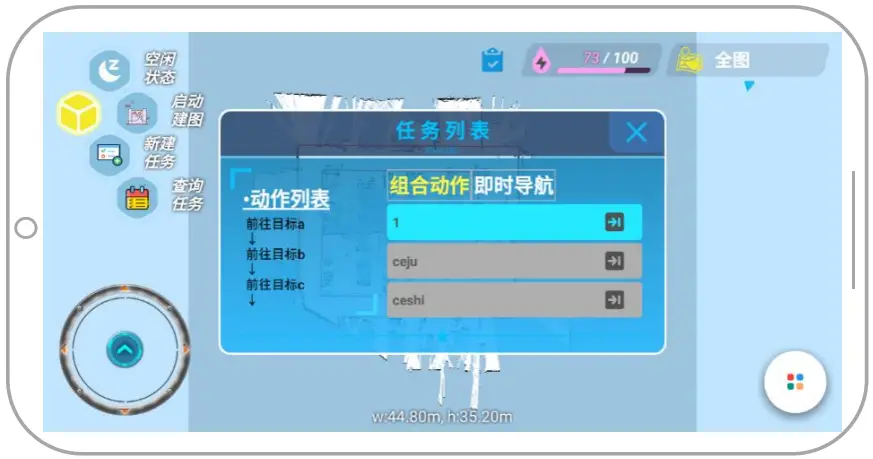
Click query task in the main interface of RosCore, and then click the executing task of the corresponding task. The navigation task will start to execute in a loop.
Quick start 2 – RosStudio
- Step 1: Run RosStudio
After RosStudio software is installed, run the command: ./RosStudio.sh in the home directory ( ~/RosStudio) of the program. This software is successfully installed if the main interface can be entered after startup, as shown below:
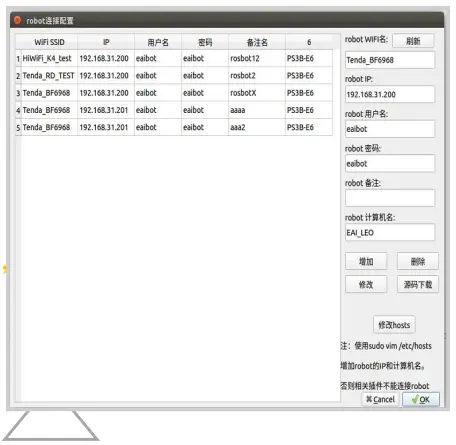
- Step 2: Configure to connect LEO robot
Firstly make sure ROSrobot is turned on. Then connect PC’s WIFI to this ROS robot. Click Ros Winodws main interface’s icon to enter the robot’s connection configuration interface. The robot’s connection configuration interface is shown below. Then, click “Add” after entering the robot configuration information. In the end, click “Source code download” to download the source code from the LEO robot to this computer. Note 1: Remarks can only be unique Note 2: LEO robot’s default name is EAI_LEO. Note 3: When adding LE Orobot’s configuration information, it needs to input the local root account password.
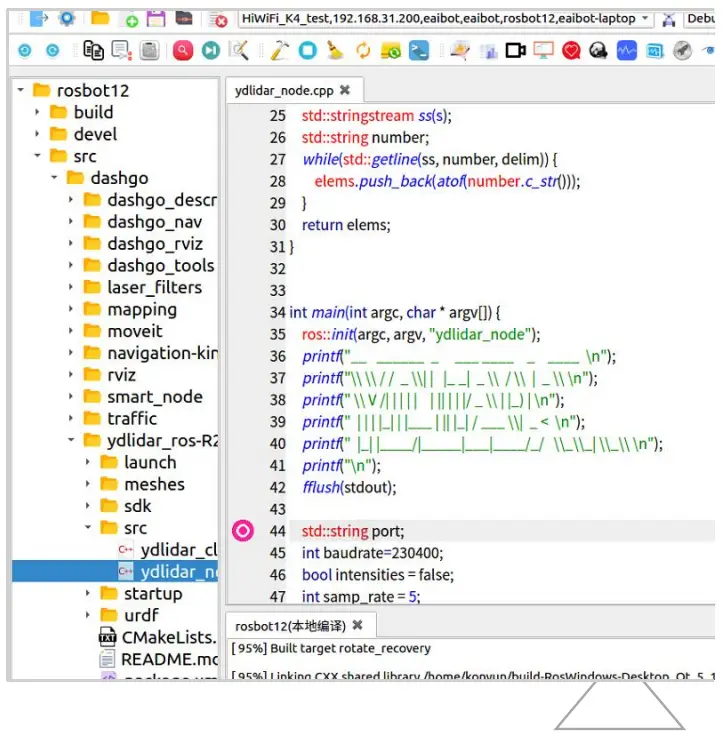
 Step 3: Compiling and deploying
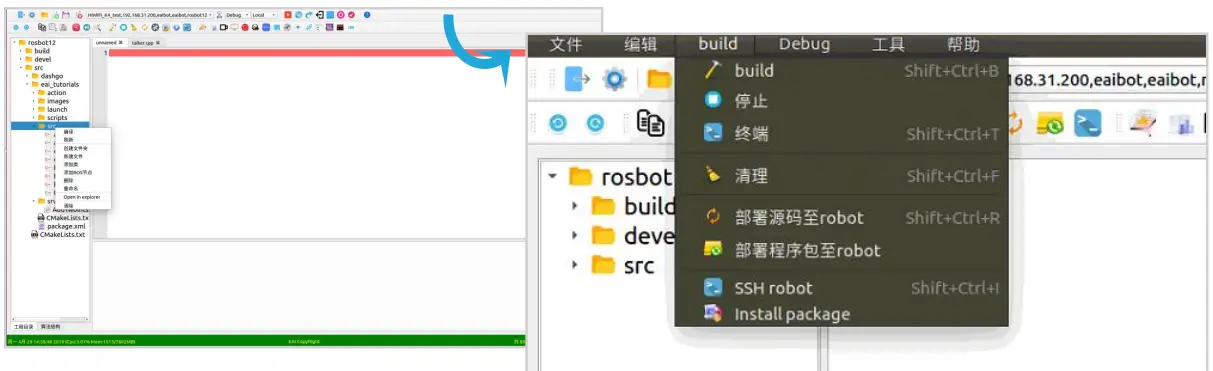
After downloading the source code, the project of the source code is displayed on the left, the source code editing area on the upper right, and the information output area on the lower right, as shown below.
Click the “build” function in the build menu to start compiling the project.
(Compiling parameter switch: Debug / Release is for optional. The executable programs generated by the Debug mode contains the gdb debugging information. There is none in the Release mode. Local / Remote is for optional. Local refers to the host and Remote refers to the currently selected robot.)
The executable program package compiled on the host can be deployed to the target robot by clicking the “Deploy Program Package to Robot” function in the build menu.
- Step 4: Debug program
After compiling successfully, open the program to be debugged and set a breakpoint at the program entry. Click the “Start debugging” function in the Debug menu to enter the debug mode. Note1: Ros Studio uses GDB for debugging. If debugging is required, you must choose the Debug mode to compile the source code
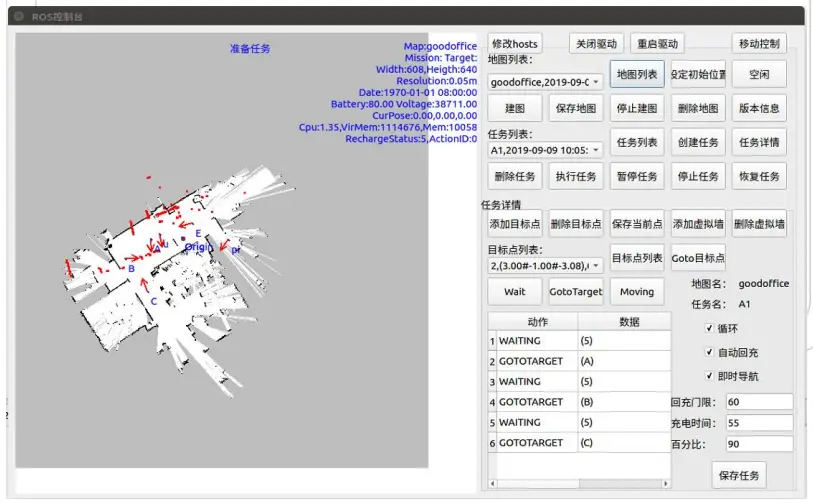
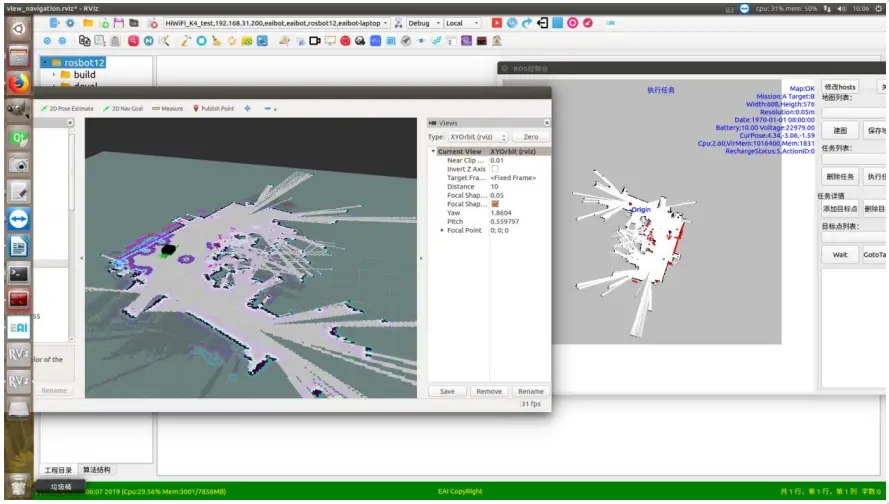
- Step 5: ROS console and plugin
The main functions of the ROS console are: controlling ROS robot’s movement, building maps, navigating, executing tasks (navigating to the target point),and drive control.
The console is used to control the robot to load the map, view the laser data,and view the robot internal algorithm’s running process in real time.
The various situations of the target robot can be viewed by combining plug in sunder the tools menu.


After sales terms
Warranty
- The warranty period of this product is one year from the date of receiving the goods. When signing for the receipt of goods, please confirm the integrity of the packaging. The company will not be held responsible for the problems caused by transportation.
- After unpacking, please check the goods according to the shipping list. If the goods are damaged or incomplete, please contact the local agent, call the customer service hotline (+86-075586953040) or contact us by email ([email protected]) at the first time.
- If within seven days after a user purchasing the goods (counting from the date of receiving the goods, the seventh day included), a non-human performance failure of the products or accessories occurs. Please contact the customer for confirmation. If the product problem cannot be resolved, you can apply for repair or replacement of the product, and the seller will bear the postage; other wise, it will be deemed invalid.
![]() Note: The replacement or return freight that meets the above conditions shall be borne by the local agent (the freight in the mainland is borne by Yuedeng Technology). If the destination tariff is required to be paid due to the policies of various countries, the customer shall bear it.
Note: The replacement or return freight that meets the above conditions shall be borne by the local agent (the freight in the mainland is borne by Yuedeng Technology). If the destination tariff is required to be paid due to the policies of various countries, the customer shall bear it.
Free Maintenance
During the warranty period and being in line with the free maintenance terms, free maintenance services are provided to customers in case that the product has a non human performance failure
The implementation of free maintenance services must meet the following conditions:
- The products that are normally used within the specified product warranty period since being purchased and have non-human performance failures.
- There are no unauthorized repair, modification, disassembly or installation and other non-human performance faults.
- The valid proof of purchase, invoice and invoice number are provided.
The following situations are not the cases of free product maintenance: - Damage caused by unauthorized repair, modification, disassembly, unpacking, etc.
- Damage caused by reliability and compatibility issues when used with third-party components not certified by the company.
Paid Maintenance
- If the failure of the product is caused by the user or other force majeure factors and the parts can be replaced by the user, the user will be provided with a quotation for the parts according to after-sales maintenance charge standard of Shenzhen Yuedeng Technology Co., Ltd. If the user accepts the quotation, the spare parts can be directly sent to the user after paying the relevant expenses, and the replacement guidance shall be provided.
- If the faulty product needs to be sent back to the agency for maintenance, the technician shall judge whether the product fault can be repaired and solved, and shall inform the user of the relevant maintenance cost in advance; if the user accepts the quotation, after paying the relevant cost, the product shall be repaired, tested and sent back, and the round-trip freight shall be borne by the user.
The following situations fall into the scope of paid maintenance services: - Exceeding the valid warranty period of the product
- All the cases that do not belong to free maintenance (Refer to the cases that do not belong to free maintenance in normal free maintenance for details)
FCC WARNING:
Note: This equipment has been tested and found to comply with the limits for a Class B digital device, pursuant to part 15 of the FCC Rules.
- This device may not cause harmful interference, and
- this device must accept any interference received, including interference that may cause undesired operation.
These limits are designed to provide reasonable protection against harmful interference in a residential installation. This equipment generates uses and can radiate radiofrequency energy and, if not installed and used in accordance with the instructions, may cause harmful interference to radio communications. However, there is no guarantee that interference will not occur in a particular installation. If this equipment does cause harmful interference to radio or television reception, which can be determined by turning the equipment off and on, the user is encouraged to try to correct the interference by one or more of the following measures:
- Reorient or relocate the receiving antenna.
- Increase the separation between the equipment and receiver.
- Connect the equipment into an outlet on a circuit different from that to which the receiver is connected.
- Consult the dealer or an experienced radio/TV technician for help.
Warning: changes or modifications not expressly approved by the party responsible for compliance could void the user’s authority to operate the equipment
To maintain compliance with FCC’s RF Exposure guidelines, This equipment should be installed and operated with minimum distance between 20cm the radiator your body:
Use only the supplied antenna
CUSTOMER SERVICE
Shenzhen Yuedeng Technology Co., Ltd
[email protected]
F Area, 2nd floor, Phase II, Galaxy incubator, Bantian street, Longgang district, Shenzhen
For more information, please visit www.eaibot.com.