
Courtesy of: DiscountCarStereo.com
Serving the internet community since 1995 WITH CD CHANGER
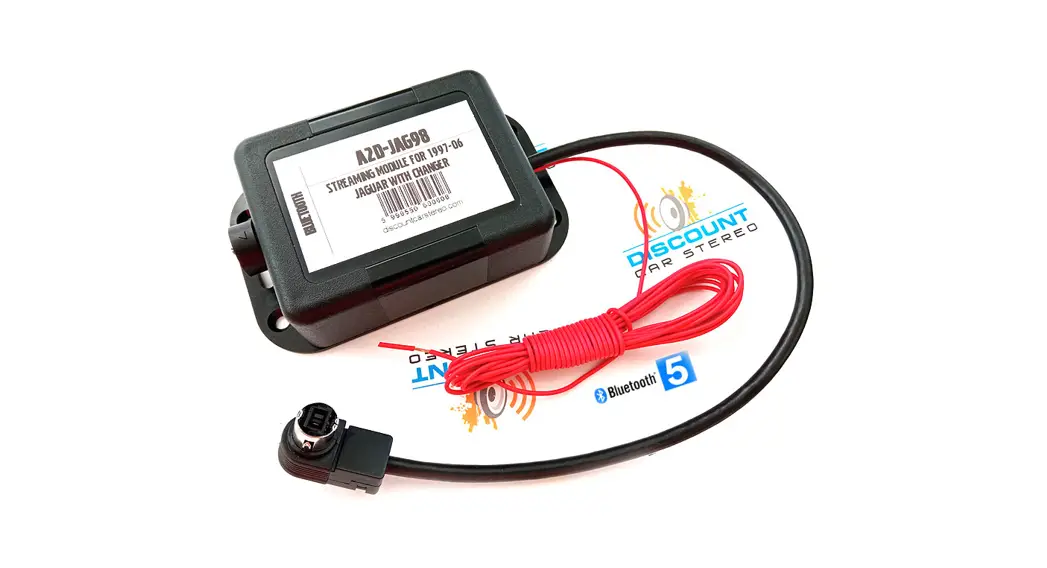
AZD-AMV1 QUICK START MUSIC STREAMING MODULE
INSTALLATION GUIDE FOR 2001.07 ASTON MARTIN VANQUISH
Created August 27, 2019 Revised: August 19, 2022
PRODUCT SAFETY & DISCLAIMER
READ ALL INSTRUCTIONS CAREFULLY BEFORE INSTALLING, FAILURE TO DO SO MAY CAUSE PERSONAL INJURY OR DAMAGE TO PRODUCT AND/OR PROPERTY
- This installation guide is provided as a GENERAL installation guide, some vehicles vary and may require additional steps. We do not accept responsibility for third-party labor charges or modifications. Exercise due diligence when installing this product.
- We do not accept any responsibility for vehicle damage or personal injury resulting from the installation of this product.
- Careless installation and operation can result in equipment damage
Requirements: Functioning cd auto changer in the trunk
Introduction
Portable audio products are everywhere, reflecting demand from active people all over the world to take their music on the road. The A2D-AVM1 provides a Bluetooth Music streaming option for any A2DP-enabled Smartphone or Tablet and allows users to stream music apps including turn-by-turn directions, audiobooks, Apple music, and more directly into the audio system via the CD changer port. This module now supports Bluetooth 5.0 + APX™ codec which ensures higher quality audio over Bluetooth. The required CD changer remains connected and operational. The A2D-AVM1 does not support hands-free calls.
Frequently Asked questions at the end of this guide for more details. Installation – to CD plug in trunk or hatch
Warning: For the A2D-AMV1 to work, the vehicle must have a fully functional CD changer. CD changer remains connected and operational.
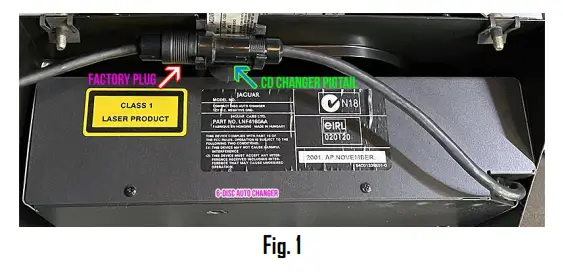
Locate cd changer in the trunk
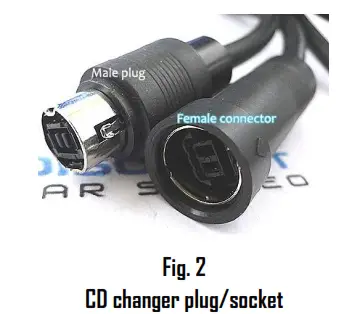
- At the rear of the CD changer, locate a short black pigtail cable (CD changer has a single cable) See Fig. 2

- Disconnect CD changer from plug (do not twist)

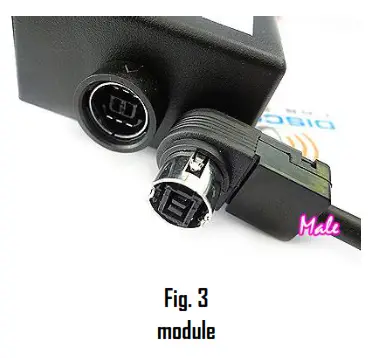
- Insert factory male plug (See Fig. 2) to the module socket (See Fig. 3) by aligning arrow marks on both, then push inwards to connect (do now twist)
 Warning: Module male right-angle plug does not have arrow marking. To connect, althe ign imaginary mark shown in Fig. 4 with mark on the CD changer socket (See Fig. 2), Ignoring this warning may damage both plug and connector.
 Warning: Module male right-angle plug does not have arrow marking. To connect, althe ign imaginary mark shown in Fig. 4 with mark on the CD changer socket (See Fig. 2), Ignoring this warning may damage both plug and connector.
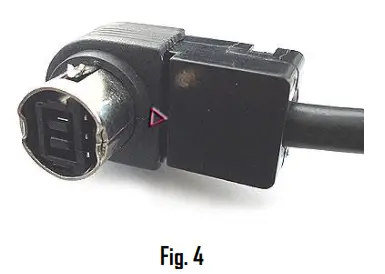
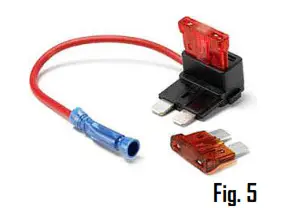
Use included add-a-fuse circuit to tap accessory supply from fuse box(see Fig 5)8. Crimp module accessory wire to blue butt connector, remove fuse (e.g., F1) from fuse box, place F1 fuse (5A) into add-a fuse open slot, then insert adda-fuse circuit blade
to vacant F1slot in the fuse box.
Accessory power is available from the trunk fuse box (See Fig.6) F1, F3, F5 etc. Please start the engine, turn the radio on, press the CD button and test for engine noise prior to finalizing install. Secure the module and proceed to next section
V 12 Vanquish
ELECTRICAL Fuseboxes
Fuse Listings (continued) Boot Fusebox – 22 wayNumber Rating Purpose F1 SA Switched – Security and Locking Module (Reverse Lamp Feed) F2 SA Switched – Exhaust Bypass Vac Valve Solenoid F3 SA Switched – Boot Fusebox Relays 1, 2 & 4 Coils, Telephone, . Tyre Pressure Monitor F4 20A Switched- Cylinders 7-12 Fuel Pump F5 5A FinSwitched – OBDII Diagnostic Connector F6 5A LH & RH Stop Lamps F7 20A 1-6 Fuel Pump – Ignition switched supply F8 SA High Mounted Stop Lamp & Brake signal to PTECs, TCU & ABS F9 SA Radio Telephone F10 10A Security & Locking Module – Battery supply Fl 1 10A Aux Switched – Accessory Sockets – Fascia and boot F12 – Not Used F13 OA Aux Switched Telephone F14 – Not Used F15 10A Fog lamps F16 – Not Used F17 125A I Heated Rear Window Fl 8 r307 In-Car Entertainment – Power Amplifier Battery we F19 WC 17171 Tail Lamps, LH & RH Number Plate Lamps F20 30A Gearbox Hydraulic Pump F2I 5A LH Tail Lamps, LH & RH Rear Side Markers F22 …. – Not Used Fig6
Pairing
The pairing process varies among devices but basic steps are the same. This process is done upon initial install and will not have to be repeated.
- Turn Ignition and Radio “ON”
Green LED inside module peephole will flash (pairing mode)—some clicking may also be heard (this is normal) - On the A2DP device: Go to Settings, Wireless & Networks, Bluetooth Settings
- Select Bluetooth and turn on.
- Go to Bluetooth settings
- Tap Scan (Search) for devices.
- Wait for below Bluetooth device name (see Fig. 7) to appear then tap to select. Green LED inside module peephole will glow steady (paired)

Now discoverable as “King Solomon’s iPhone”.
MY DEVICES DisCarSt ![]() Connected Fig. 7
Connected Fig. 7
Operation
- Turn ignition to accessory position and radio ON.
- Press “CD” button.

- Launch audio device streaming application.
- Set the audio device’s initial volume to 50%, then raise the radio volume control button to set the playback level. If distorted, lower the audio device volume.
Warning: Playlist and Track selection is *NOT* possible from the radio. You must use Smartphone built-in controls to access music files
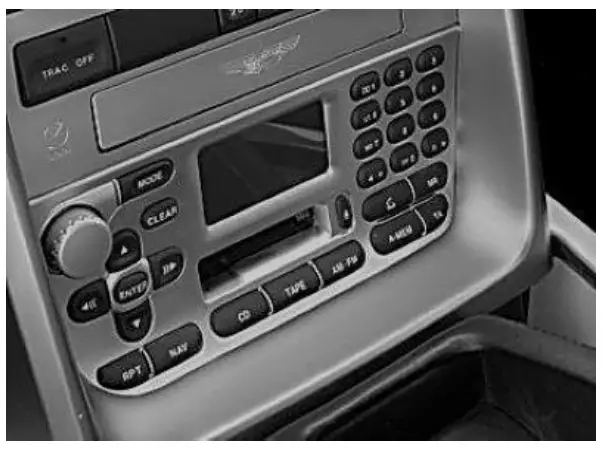
To play CDs
a. Press the “CD” button on the radio
b. Disable Bluetooth on an audio device (e.g., Smartphone) CD playback resumes.
Control CD changer from radio buttons as customary.
2. To resume streaming:
Re-enable Bluetooth on the audio device.
Note: Streaming has priority and remains until the device is no longer paired. CD changer playback is only possible when not paired or the device is out of range. If the correct operation is confirmed go ahead and reinstall the rack and panels.
Optional – Smart remote control
The optional smart remote control is not required for the module to operate; however, instead of fumbling with smartphones to change tracks, etc., use remote control functions and keep your eyes on the road. The Remote does not operate radio functions.
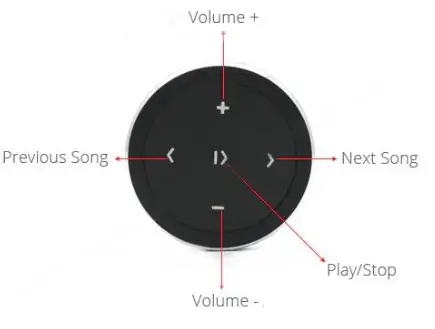
Operate the following smartphone functions:
- Control music wirelessly
- Activate VR commands (Google play only)
- Track up/down
- Volume up/down
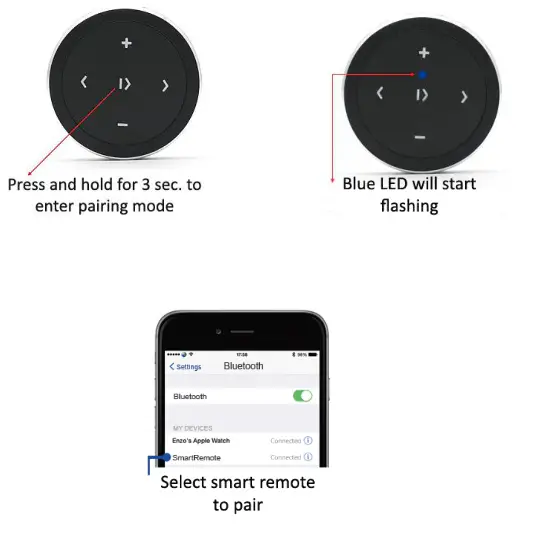
Pairing wireless remote: Smart remote operation: Use smart remote to perform the following functions on any iOS7.0 and higher or Android 4.4 and higher.
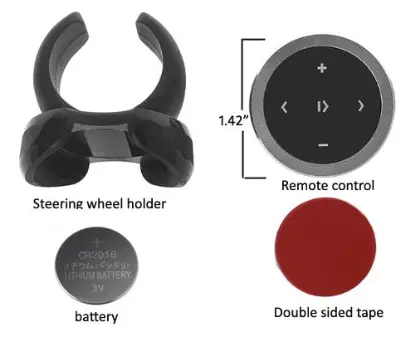
Package Contents:
Frequently ask questions & troubleshooting
– YES; pairing multiple devices is possible, however only one device can
connect at a time. Disconnect the first device to allow pairing to another device.
– In order to listen to CDs, disable Bluetooth on the audio devices.
– Without starting a debate, the answer to this question will be limited to your own experience. APTX is very good, we like the sound through our loaner vehicle speakers. The sound is just different not necessarily better or worse if you have good speakers.
– NO; the A2D-AMV1 module connects to the CD changer plug in the trunk.
– The A2D-AMV1 is specific to the following Jaguar vehicles:
2001-07 Aston Martin Vanquish with CD changer in the trunk.
– NO. The A2D-AMV1 supports music streaming. Not for hands-free calls
– Go to device settings and disable touch sounds.
– Ensure the module has not already paired with another device. Cycle ignition or disable/enable Bluetooth on the audio device.
– This may be possible on some devices but not so on recent iPhones: Make sure the module is powered on and connected.
– Go to Phone settings and tap Bluetooth.
– Tap  next to DISCARST, then tap Name
– Enter a new name (e.g. Jaguar-BT etc.) tap Done on the keyboard, then tap
– The custom name given now appears in the Bluetooth settings of your device.
– If playback is distorted it’s likely because the audio device volume setting is too
high. To fix, turn the radio volume up to a comfortable level, then the lower volume on the device until it no longer distorts.
– NO. Song/track information not displayed on Vanquish radio screen. Users must use an audio device display and built-in control buttons for music selection and display.
Disclaimer
- This product has no affiliation with Aston Martin
- We’re not liable for misuse of this product.
- Professional installation recommended
For help email [email protected]
© 1995-Aug-22 Discount Car Stereo, Inc. All rights reserved. Information in this document is subject to change without notice. Other products and companies referred to herein are trademarks or registered trademarks of their respective companies or mark holders.


