
ACR
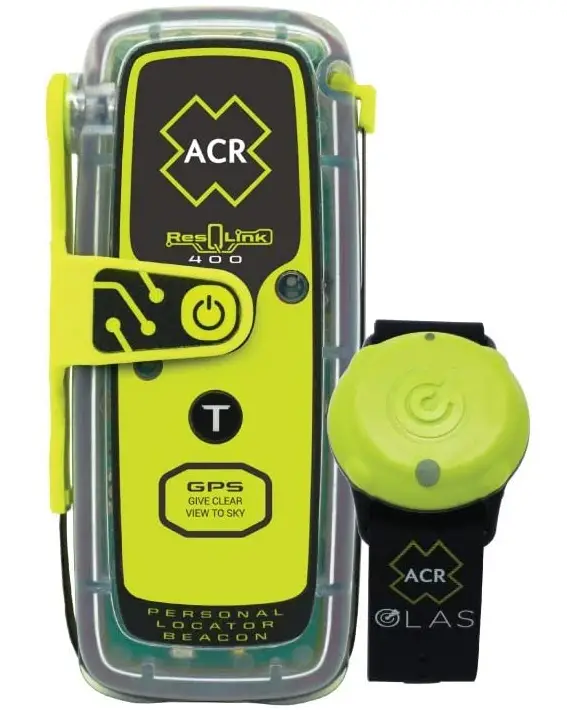
ACR 2350 OLAS TAG KIT
Introduction
Enjoy every adventure without fear. Whether on land, at sea, or in the air, you can rely on the ResQLink Personal Locator Beacon’s military-grade durability and satellite accuracy to put rescue in your hands. When you deploy the antenna and turn on the ResQLink 400, the beacon will automatically guide rescuers to within 100 meters or less of your location while taking care of the rest for you.
You can be sure that the ACR OLAS (Overboard Location Alert System) Tag’s powerful tracking and notification features enable an incredibly quick response to a man overboard (MOB) scenario thanks to its inclusion in this crucial kit. The Tag is a wearable crew tracker that establishes a virtual tether between the user and all synced smartphones or tablets loaded with the free ACR OLAS app using smartphone-connected crew management and location alerts.
ANATOMY OF YOUR BEACON
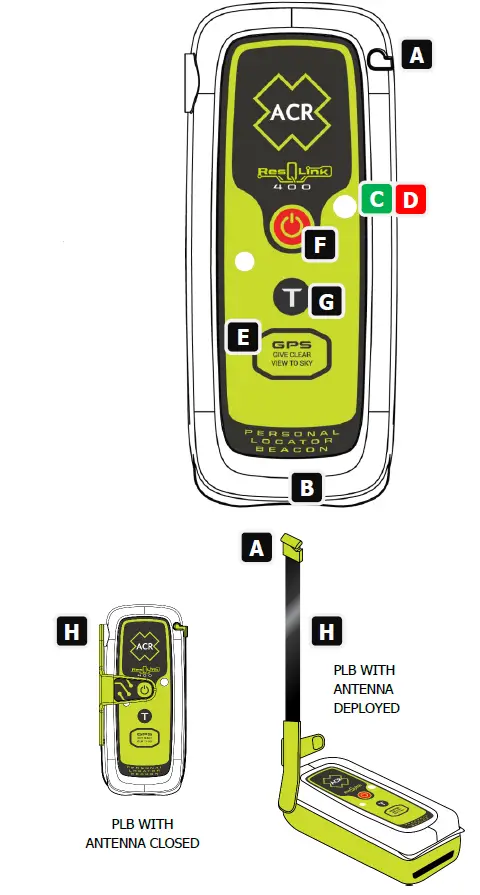
- Antenna Latch – Latch unlocks antenna from the beacon body. When unclipped, the antenna can be deployed to uncover ON/OFF button.
- Strobe Light – Activates when the beacon is turned on. Facilitates rescue during low-light emergencies.
- Green LED light – Visual indicator of beacon activity.
- Red LED light – Visual indicator of beacon activity.
- GPS Receiver – Location of GPS receiver, give clear view to sky and do not obstruct.
- ON/OFF button – Activates the beacon when pressed for 2 seconds. Once activated, pressing the on/off button for 2 seconds again turns the beacon off. (Button is not accessible until antenna is deployed).
- TEST button– Activate Self-test or GPS test.
- Antenna – Wraps around product and protects ON/OFF button.
WARNING: This transmitter is authorized for use only during situations of grave and imminent danger. Deliberate misuse may incur a severe penalty.
ACTIVATING YOUR BEACON
OVERVIEW
Personal Locator Beacons are designed to be manually activated. They are only to be activated when all other means of self-rescue have been exhausted. When properly registered as required, the activation of the beacon tells Search and Rescue who you are, where you are, and that you are facing a life-threatening situation. Note: Beacon should be activated in open space with clear view of the sky (e.g., Not under any sort of cover or canopy)
HOW TO ACTIVATE YOUR BEACON
To activate your beacon in a distress situation, follow these steps:
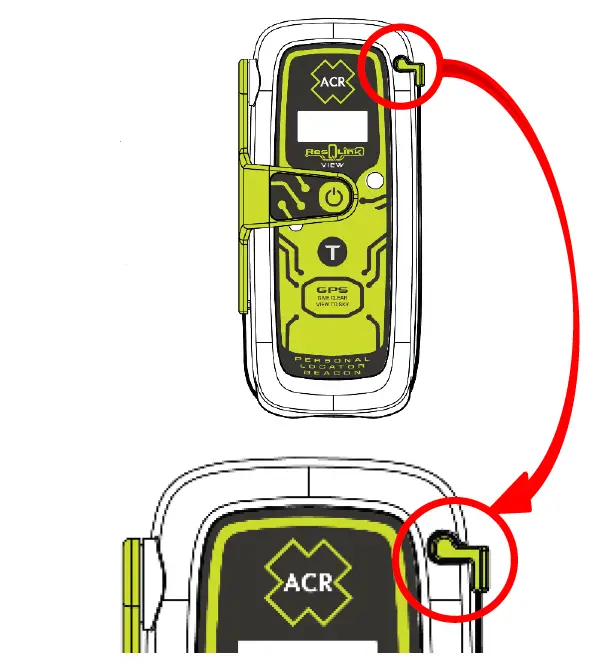
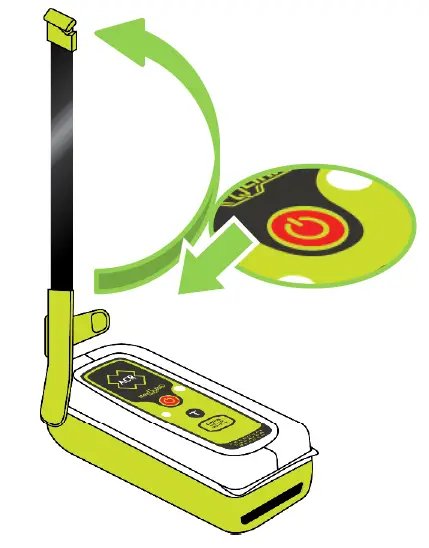
- Unclip the antenna latch from the case and rotate antenna 90 degrees into the upright position. (ON/OFF button will be exposed on face of beacon once antenna is in upright position)
- Depress the ON/OFF button for 2 seconds. When activated:
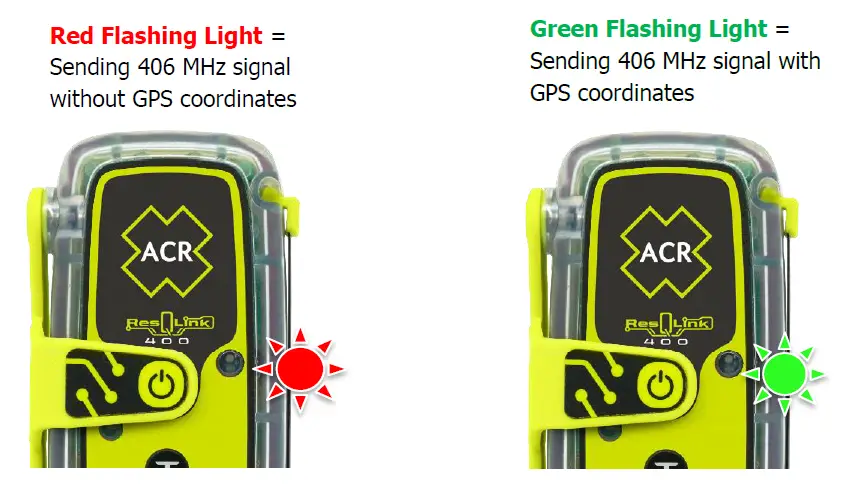
The strobe light will flash twice and the red LED will flash once to let you know the beacon has been activated. The strobe light and Infrared (IR) strobe light will both then continue to flash once approximately every 10 seconds for the entire time the beacon is activated (Note: The IR strobe is not visible to the naked eye). The red LED will flash approximately once every 5 seconds prior to the beacon acquiring your GPS coordinates.
Once the beacon acquires your GPS coordinates, the flashing red light will be replaced by a flashing green light which will flash approximately once every 5 seconds.
When the red light is replaced by the green light, this indicates that your beacon has successfully acquired your GPS coordinates and is transmitting them along with your 406 MHz distress signal.
ACTIVATION WITH GPS
When your unit is activated, the GPS receiver will turn on, search to find your Latitude (LAT) / Longitude (LON), and incorporate it into your 406 MHz signal.
For the first 6 hours after beacon activation, the internal GPS will start up every 30 minutes, search to find your LAT/LON, and incorporate it into your next 406 MHz signal. If for any reason the internal GPS cannot update your LAT/LON, your last position will be used for the next four hours – at that time, the green LED will stop blinking and the red LED will flash once every 5 seconds until new GPS data is obtained. Between 6 hours and the end of operating life (minimum of 24 hours), a GPS location update is attempted every 60 minutes.
GPS RECEIVER ORIENTATION
When activated, it is critical that you do not cover the beacon with any body part, water, clothing, etc. The GPS receiver is located under the bottom portion of the case where it is outlined with the text “GPS, Give Clear View to Sky”.
To ensure optimum performance of the GPS receiver, the beacon needs to have an unobstructed view of the sky. PLB will not work submerged in water. Water will shield and inhibit the GPS receiver and may cause difficulties obtaining your GPS coordinates. Avoid leaning over the beacon to view blinking LEDs (or blinking LEDs and/or the screen on the PLB- 425 model) as you may shield GPS reception.
PROPER POSITIONING AND HANDLING DURING ACTIVATION
Do not cover the GPS receiver with your hand and make sure you have a clear view of the sky to ensure GPS is acquired.
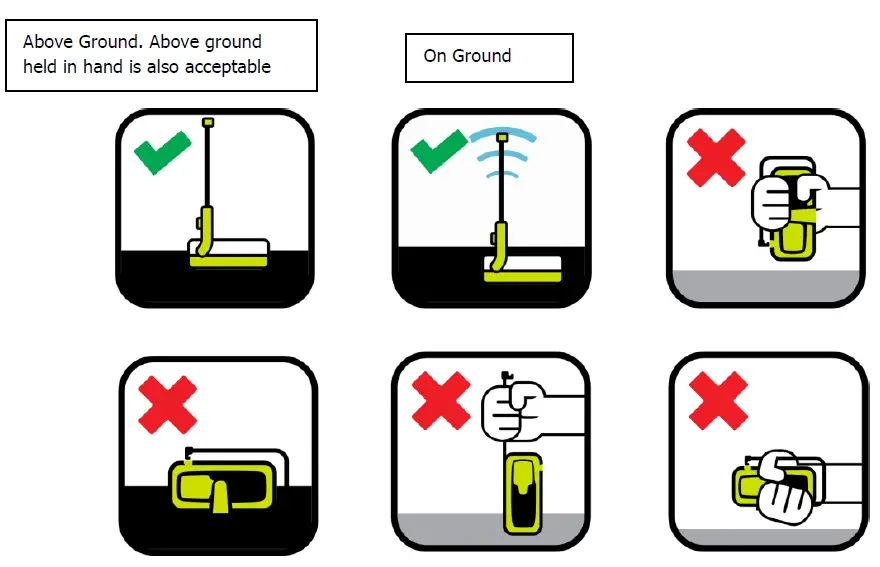
INTENDED OPERATIONAL ENVIRONMENTS:
Make sure the antenna is pointing towards the sky, out of the water. PLB will not work submerged in water. While the unit is waterproof, it must be above the water’s surface to function properly.
Intended operational environments include on ground, above ground, and held in hand. In all cases, the beacon must be facing skyward with the antenna perpendicular.
TURNING YOUR BEACON OFF
To deactivate your beacon, depress the ON/OFF button for 2 seconds. You will see 2 fast green LED flashes and all blinking LED lights will stop (and the screen will turn off on the PLB-425 model), signifying that the beacon is no longer sending your distress message.
NOTE: Leave beacon on until rescued. Turning the beacon off will prolong or prevent rescue. Repeated activations could be viewed as a hoax.
POST RESCUE FOLLOW UP
Hopefully you are never put in the situation where you have to activate your beacon to be rescued, however, should you activate your beacon in an emergency that requires Search and Rescue (SAR) assistance, please contact ACR Electronics, Inc. in the days that follow.
It is important for us to learn the nature of your emergency and how the beacon performed so that we can continue to build the world’s best lifesaving equipment.
Real life activations and how people use our beacons in these situations plays a major role in designing and manufacturing our products. We also like to share these rescues with others in an effort to promote proper use of Personal Locator Beacons.
You can learn more about our Post Rescue Follow Ups by visiting the Survivor Club section of our website.
TESTING YOUR BEACON
Your beacon has the ability to perform 2 different tests to ensure that the beacon is working perfectly. The first is a basic self-test which checks the beacon’s design performance and sends a self-test message transmitted with default location data. The second is a GPS/GNSS self-test that turns the GPS receiver on, acquires your position and then transmits this data in a 406 MHz self-test satellite burst (GPS and GNSS are used interchangeably to describe the GPS/GNSS Test).
NOTE: Self-test should only be performed in the first 5 minutes of any hour.
BASIC SELF-TEST (NO GPS DATA)
During a self-test, your beacon will send a 406 MHz signal coded as a self-test to the satellite system and will also momentarily activate the 121.5 MHz homing signal.
The beacon has enough excess battery life to perform 60 self-tests over the 5-year life of the battery.
TO PERFORM A BASIC SELF-TEST
- Unclip the antenna latch from the case and rotate antenna 90 degrees into the upright position. (ON/OFF button will be exposed on face of beacon once antenna is in upright position)
- Depress the Test button between 2 to 5 seconds.
- A quick flash of the green LED is an indicator that Self-Test was initiated. This will always be the first LED flash in the self-test sequence.
A green LED will flash to show the start of the Self-Test and will be followed by 3 green LED flashes (total of 4) and a strobe, indicating a successful Self-Test. The third green LED flash is an indication that 406 MHz and 121.5 MHz RF was transmitted. The PLB-425 will show this light sequence and will also flash a message on the screen saying “Self-Test Pass” at the end of the self-test.
Any red LED flash observed in the above sequence indicates that the beacon has failed self-test. Repeat the self-test. If the failure persists, contact ACR Electronics, Inc. or an authorized Battery Replacement Center (BRC) for servicing of your beacon. The PLB-425 will flash a message saying “Self-Test Fail” at the end of a failed self-test.
ACR strongly recommends performing the self-test once per month, or at least two weeks prior to a trip, allowing enough time for service should your beacon require it. Do not exceed the self-test limit to ensure confidence in the operation of the PLB for greater than 24 hours.
LOW BATTERY INDICATOR DURING SELF-TEST
If the total ON time of the beacon exceeds 2 hours, there will be 3 green LED flashes followed by 2 red LED flashes. In addition to the LED indicators, the display on the PLB-425 will indicate a “Self-Test Fail” and will show a low battery warning. While the beacon may still operate normally in a distress situation, ACR strongly recommends you have your battery replaced to ensure that you will have at least 24 hours of battery power in an emergency.
TESTING YOUR BEACON
GPS SELF-TEST (GNSS SELF-TEST)
The GPS receiver is located under the bottom front portion of the case (indicated by “GPS Give Clear View to Sky”). It is imperative that the receiver is not obstructed during the GPS self-test or during activation to ensure that the GPS receiver is acquiring your latitude (LAT) and longitude (LON) position. This test must be performed outside with a clear view of the sky.
This beacon has enough excess battery life to perform 20 GPS self-tests over the 5-year life of the battery. Once this GPS testing feature reaches 20 tests, the feature will be disabled by internal software.
TO PERFORM A GPS SELF-TEST:
- Unclip the antenna latch from the case and rotate antenna 90 degrees into the upright position. (ON/OFF button will be exposed on face of beacon once antenna is in upright position).
- Depress the “Test” button between 5 and 10 seconds.
A green LED will flash to show the start of the GPS test and will be followed by 3 quick green LED flashes. Subsequent red LED flashes will occur approximately every 5 seconds until GPS has been acquired by the beacon. Once valid GPS data has been obtained, a green LED flash and a strobe, indicates a successful GPS self-test. As long as the beacon is unable to acquire GPS coordinates, the beacon will continue flashing the red LED for no longer than 110 seconds and then terminate GPS self-test, indicating a failed GPS self-test. In case of a failed GPS self-test, repeat GPS self- test and if failure persists, return the beacon to ACR Electronics, Inc. for service. The PLB-400 and PLB-425 will both display the same LED sequences but the PLB-425 will also display the following 3 things on the screen to show a passed GPS Test: GPS Coordinates, “GPS Test Pass,” and the total number of GPS tests remaining that the beacon is able to run. In the event of a failed GPS Test, the PLB-425 will display the following on the screen: “GPS Test Fail” followed by the total number of GPS tests remaining that the beacon is able to run.
The maximum number of GPS tests allowed is 20. If the user tries to perform another GPS test after the maximum of 20 has been reached, there will be a green LED flash, followed by 3 quick green LED flashes, followed by 3 red LED flashes and the beacon will then turn off (in addition to the 3 red LED flashes, the PLB-425 will display a message on the screen indicating that the GPS Test Limit has been reached). Additionally, if the total ON time of the beacon exceeds 2 hours, the beacon will not allow any more GPS tests to run.
FALSE ALARMS
PREVENTING FALSE ALERTS
A false alert is any activation of the beacon, intentional or otherwise, that does not result from a situation of grave and imminent danger. Be sure to do the following to help minimize false alerts:
REGISTER YOUR BEACON
This does not reduce false alerts; however, when the beacon is properly registered, the situation can usually be resolved with a phone call.
KEEP TRACK OF YOUR BEACON
When not in your possession, be careful with whom you leave your beacon. Make sure they know how to use it, and that they understand the ramifications of causing a false alert. A lot of false alerts are generated by curious individuals. If you notice the beacon is flashing the red or green LED and strobing periodically on its own, this likely means it has accidentally been activated and needs to be shut off and reported.
NOTE: If you report a false alert and the authorities have not received the signal, do not be concerned. This may mean that you were able to deactivate the beacon before the signal was transmitted.
BEACON MAINTENANCE
ROUTINE MAINTENANCE
Carefully inspect the beacon case for any visible cracks. Cracks may admit moisture, which could falsely activate the beacon or otherwise cause a malfunction. Any cracks observed should be immediately referred to ACR for evaluation by calling +1 (954) 862-2110. ACR Technical Support can also be reached by sending an email to: [email protected].
After checking the beacon for cracks, it may be wiped down with a clean, damp cloth. Do not use any type of cleaner on your beacon.
BATTERY REPLACEMENT
Replace the battery no later than the battery expiration date specified on the beacon, or after emergency use. At each inspection, check the time remaining until replacement is required. The battery should be replaced if the beacon has been activated for any use other than the self- test/GPS test. Always refer battery replacements and other beacon service to a factory authorized Battery Replacement Center (ACR part number for the PLB-400/PLB-425 battery replacement kit is 1105).
NOTE: There are no user serviceable items inside the beacon. DO NOT OPEN THE BEACON. Opening the beacon will void the warranty.
For the nearest location of a Battery Replacement Center, visit our website and utilize the Dealer Locator feature located in the Support section of the site.
BEACON TRANSPORT
This beacon contains 1 lithium metal battery pack that is less than 0.8 grams. The beacon is not classified as HAZMAT for transportation. Prior to shipping the beacon for service, alert your carriers about the batteries contained in this equipment to make sure they properly label your package. Call ACR’s Technical Service department at +1 (954) 862-2110 for proper shipping instructions or visit the ACR website for an MSDS.
- Always pack your PLB in a stout cardboard carton. ACR advises that you keep the original packaging in case of return for service
- For surface transport the PLB may be shipped ‘excepted’ under special provision 188
- For air transport the PLB should be shipped as category UN3091 and packed under IATA packing instruction 970 section II.
CHANGING OWNERSHIP OR CONTACT INFORMATION
As the owner of the beacon, it is your responsibility to advise the national authority of any change in your registration information. If you are transferring the beacon to a new owner, you are required to inform the national authority. You can do this by using their online database or by letter, fax or telephone and informing the authority of the name and address of the new owner.
The new owner of the beacon is required to provide the national authority with all of the information requested on the registration form. This obligation transfers to all subsequent owners.
LOST OR STOLEN PLBS
- If your PLB is lost or stolen, do the following immediately:
- Report to your local authorities that the PLB has been lost or stolen.
- Contact your National Authority with the following information:
- Police department name
- Police department phone number
- Police case number
If your PLB were to be activated, the information you provided will be forwarded to the appropriate search and rescue authorities who will ensure that your PLB gets back to you.
If someone attempts to register a PLB reported as stolen, your national authority will notify the appropriate police department.
PRODUCT SPECIFICATIONS
| General/Environmental | |
| Product Number | 2921 |
| Model Number | PLB-400 |
| Beacon model hardware part
number | A3-06-3138-1 |
| Size | 4.52 (L) x 2.03 (W) x 1.49” (D) |
| Weight | 5.2 oz. (148 g) |
| Buoyancy | Category 1, Buoyant
The ResQLink 400 is a buoyant PLB but will not work submerged in water. Intended operational environments include on ground and above ground including held in hand. In all cases, the beacon must be facing skyward with the antenna perpendicular. |
| Product Number | 2922 |
| Model number | PLB-425 |
| Beacon model hardware part
number | A3-06-3138- |
| Size | 4.52 (L) x 2.03 (W) x 1.49” (D) |
| Weight | 5.3 oz. (151 g) |
| Buoyancy | Category 1, buoyant
The ResQLink View is a buoyant PLB but will not work submerged in water. Intended operational environments include on ground and above ground including held in hand. In all cases, the beacon must be facing skyward with the antenna perpendicular. |
| Material | High impact and UV resistant plastic |
| Color | ACR-treuse™ (high visibility yellow) |
| Strobe | Bright white, one flash per ten seconds |
| Activation | Manual |
| Operation | 2 steps: deploy antenna, press ON button. Give clear view to sky. |
| Waterproof | 16.40 ft. (5m) @ 1 hr., 33 ft. (10m) @ 10 min. Factory tested @70° F, exceeds RTCM waterproof requirements. |
| Approvals | Includes Cospas-Sarsat and FCC
PLB-400/425 meets the requirements of Federal Communications Commission (FCC) Part 95 Subpart K. For full approval information, please visit |
| Limited Warranty | 5 years |
| Lead Free | Yes |
| Battery | |
| Batteries meet the UN Classification for non-dangerous goods. | |
| Class | Class 2 (non-hazmat) lithium batteries |
| Battery Replacement | Replace battery by due date specified on the unit
(Five (5) years from date of installation of battery in the beacon) or after emergency use. |
| Battery Life | Five (5) years |
| Operational Life | Minimum 24 hours @ -4°F/-20°C to +131°F/+55°C |
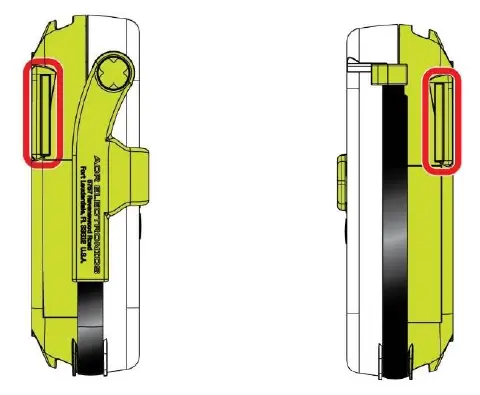
MULTIFUNCTION ACCESSORY CLIPS
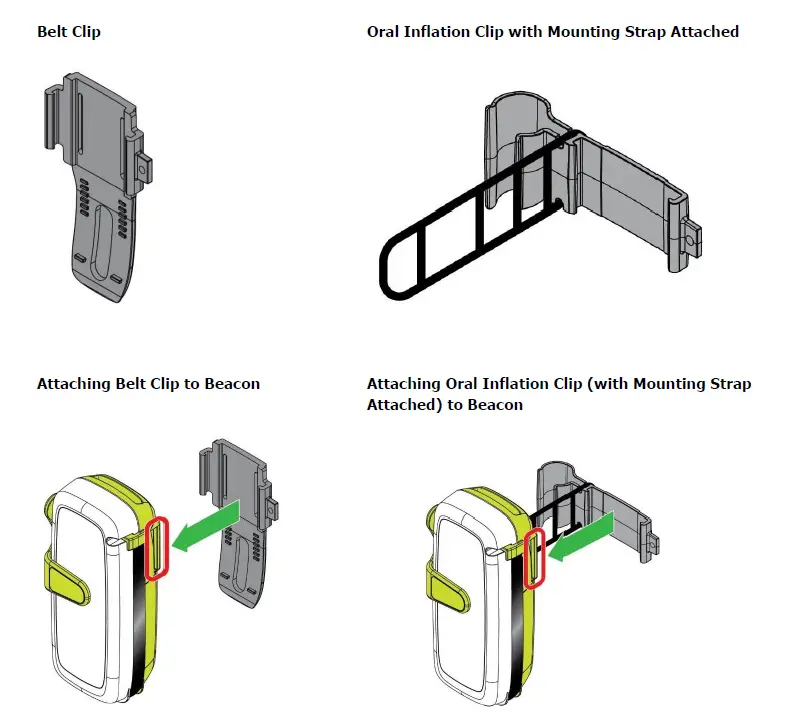
Indented areas on each side of the back case of the PLB shown below provide different attachment options. Users can utilize either the Belt Clip or the Oral Inflation Clip (both come included with the beacon) to provide different wearability options.
The Belt Clip and Oral Inflation Clip are attached to the beacon as shown below. Please note that the Oral Inflation Clip (for use when attaching the beacon to the Oral Inflation Tube on a lifejacket) is designed to be used in conjunction with the black mounting strap as shown. The purpose of the mounting strap is to prevent the Oral Inflation Clip from detaching from the Oral Inflation Tube of the lifejacket. Additionally, the belt clip can be used in conjunction with the provided velcro strap (more detail provided later in this section).
ATTACHMENT TO LIFEJACKET ORAL INFLATION TUBE USING ORAL INFLATION CLIP
After attaching the Oral Inflation Clip (with mounting strap attached to the clip) as shown above, steps 1-4 below show how the clip is attached to the lifejacket’s Oral Inflation Tube.
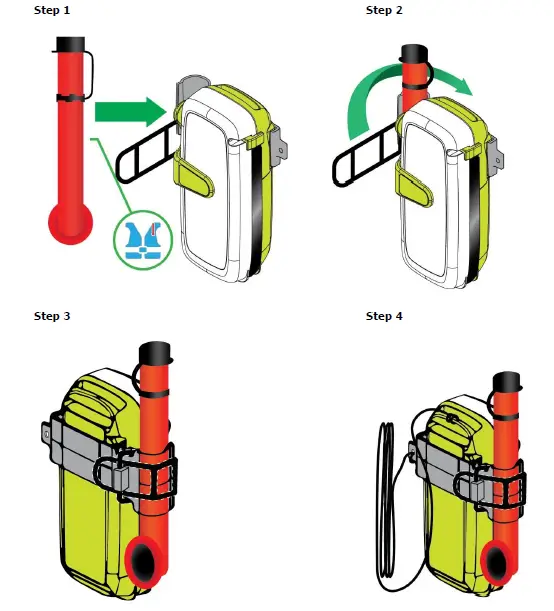
NOTE: Step 4 above requires use of the lanyard (included with your beacon) to attach the clip to the beacon as shown. One side of the lanyard should be threaded through the small hole on the side of the clip and then tied to the clip using a secure knot. The other side of the lanyard should be tied to the beacon using a secure knot (see step 4 on prior page for location where lanyard should be tied to the beacon). This offers a failsafe to ensure the beacon is not separated from the clip. The lanyard should be utilized in this same manner when using the Belt Clip.
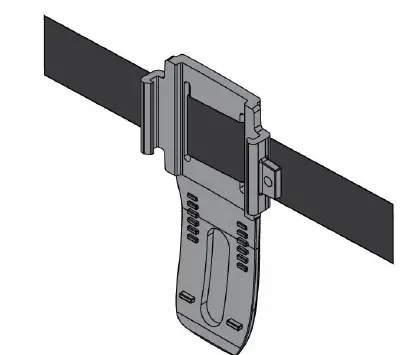
BELT CLIP
In addition to enabling the user to attach the PLB to a belt, the Belt Clip can also be used in conjunction with the provided velcro strap for a variety of different usage applications (e.g., attachment to backpack straps etc.). In order to utilize the velcro strap, thread it through the holes in the Belt Clip (as shown below) and then attach the Belt Clip to the PLB as shown in the images at the beginning of this section. After attaching the Belt Clip to the PLB, the lanyard should be attached to the Belt Clip in the same fashion as shown in the image for Step 4 of attaching the Oral Inflation Clip to the Oral Inflation Tube.
FAQs
Put it at the front so it is always within arm’s reach, between the suit and the wearer’s chest, and out of the way of the harness.
It will, indeed.
Yes. However, it is positioned so that, if not handled properly, it could harm the components.
The PLB has a lifespan of 5 years if it is never used and 24 hours if it is. Additionally, the OLAS Tag runs on a long-lasting CR2477 Lithium-Ion (User-Replaceable) battery.
You may check my review of a more recent version of ResQLink here. A compact, straightforward personal locating beacon called the ACR ResQLink alerts search and rescue teams wherever in the world.
The ResQLink 400 is a compact yet tough device that has been expertly designed and tested to ensure it can resist even the toughest elements.
The most recent personal location beacon (PLB) from ACR is called ResQLink View. It functions as a satellite- and GPS-based emergency beacon that signals a backcountry rescue.
It is a sealed device with an internal battery whose lifespan is guaranteed to be at least five years.
Batteries for ACR PLBs should be changed every five years to ensure proper performance when required.
The ResQLink series does not require a subscription, but registration with the nation’s national authority is necessary.
Batteries may be changed. The cost to send the device to an authorized battery replacement facility is about $100 plus postage. ACR advises against doing this.
ACR Electronics, Inc. must receive the completed registration card that was included with your product (if applicable) within ten days of purchase. * For the following products: PLB and EPIRB, five years.
When your beacon is turned on, it sends out a signal that satellites can pick up. Your situation will determine how long it takes for rescuers to reach you and how much the operation will cost.
When the SOS button on a One-Way communication device is hit, a signal is sent to the relevant response team, who then start looking for you. In that case, the emergency device is useless for getting in touch with the authorities.
Both PLBs are reusable, however after each usage, the battery must be changed. Another customer request was fulfilled by ACR by releasing fresh ResQLink Skins for the ResQLink View. Customize your PLB with a variety of looks, including a camouflage model.


