
MOU N200 4MP Car DVR Video Recorder Dash Cam

About the Guide
- This manual is for reference only. The operation of the actual product shall prevail if there is any inconsistency.
- All the designs and software are subject to change without prior written notice.
- All trademarks and registered trademarks mentioned are the properties of their respective owners.
- Please visit our website or contact your local customer service if there is any problem when using the device.
- If there is any uncertainty or controversy, we reserve the right of final explanation.
Functions
| Function | Video Resolution | Time-lapse Photography | Parking Mode | Collision Detection | File Browsing | Recording Time | Screen Setup | Audio Recording | Date&Time | Volume | Button Sound | Time Zone | Light Source | System Reset | Delete Files | Format |
|---|---|---|---|---|---|---|---|---|---|---|---|---|---|---|---|---|
| Specification | Varies based on product version | Yes | Yes | Yes | Yes | Varies based on product version | Yes | Yes | Yes | Yes | Yes | Yes | Yes | Yes | Yes | Yes |
Technical Specification
| Parameter | Specification |
|---|---|
| Sensor | Varies based on product version |
| Effective Pixels | Varies based on product version |
| Frame Rate | Varies based on product version |
| Screen Resolution | Varies based on product version |
| Screen Size | Varies based on product version |
| Iris | Varies based on product version |
| Field of View | Varies based on product version |
| Code | Varies based on product version |
| Audio Input | Varies based on product version |
| Audio Output | Varies based on product version |
| Storage | Varies based on product version |
| Vehicle Detection | Varies based on product version |
| Power Consumption | Varies based on product version |
| Operating Temperature | Varies based on product version |
| Operating Humidity | Varies based on product version |
| Protection Grade | Varies based on product version |
FAQ
If some functions do not work properly or the relevant setting values are changed, try restarting the camera or restoring the factory settings.
- Q: Low power/settings not saved/automatic shutdown when start the vehicle?
A: Remove the memory card, start the camera for charging for 4 hours. Contact manufacturer and return the camera to the factory to replace the battery. - Q: Memory card full?
A: Format or change the memory card. Adjust the gravity sensingto low, and format the memory card once a month. - Q: Memory card error?
A: Format or change the memory card. - Q: Please insert a SD card/SD card is not detected?
A: Memory card is damaged; low read/write speed; memory card is not compatible with the camera; no card; replace it with a genuine high-speed TF card. - Q: Unable to play video / file corrupted?
A: Please check whether the file name or folder name has been changed on the computer. This camera cannot guarantee the normal playback of active images that have been post processed by the computer or not taken by this camera. The memory card is damaged, please replace it. - Q: Camera crashes?
A: Restart or reset system. Remove the memory card. Contact the manufacturer for repair. - Q: Camera can not be powered on?
A: Check whether the power cable is connected normally. Start the camera without memory card. Connect the camera to the computer and start it. Reset system.
Packing List
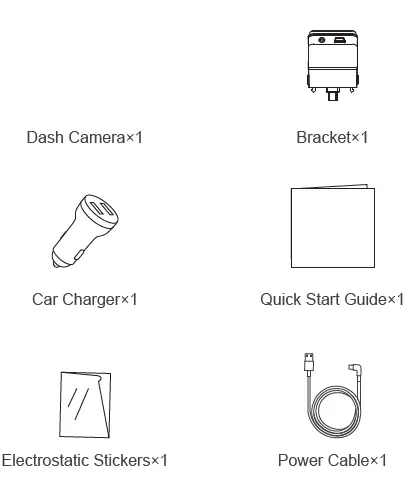
- Quick Start Guide
- Dash Cam N2 0 0
- Version 1.0.0
Installing Camera
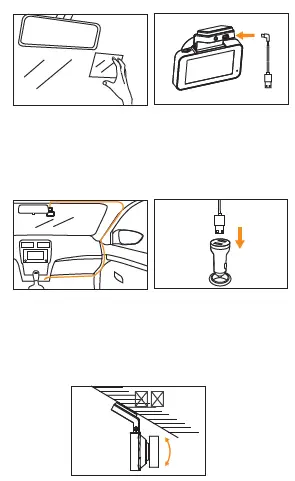
- Wipe the front windshield clean.
- Stick the electrostatic paste on the glass and ensure that it is free of bubbles.
- Install the bracket on the camera along the installation slot, and insert one end of the power cable into the power port.
- Tear off the 3M glue on the bracket, paste the camera on the electrostatic paste, and lay cable as shown in the figure.
- Insert the car charger into the cigarette lighter and connect the power cable of the camera.
- Adjust the lens to the appropriate angle, and the installation is completed.
FCC Statement
This equipment has been tested and found to comply with the limits for a Class B digital device, pursuant to part 15 of the FCC rules. These limits are designed to provide reasonable protection against harmful interference in a residential installation. This equipment generates, uses and can radiate radio frequency energy and, if not installed and used in accordance with the instructions, may cause harmful interference to radio communications.
However, there is no guarantee that interference will not occur in a particular installation. If this equipment does cause harmful interference to radio or television reception, which can be determined by turning the equipment off and on, the user is encouraged to try to correct the interference by one or more of the following measures:
- Reorient or relocate the receiving antenna.
- Increase the separation between the equipment and receiver.
- Connect the equipment into an outlet on a circuit different from that to which the receiver is connected.
- Consult the dealer or an experienced radio/TV technician for help.
To assure continued compliance, any changes or modifications not expressly approved by the party.
Responsible for compliance could void the user’s authority to operate this equipment. (Example- use only shielded interface cables when connecting to computer or peripheral devices).
This equipment complies with Part 15 of the FCC Rules. Operation is subject to the following two conditions:
- This device may not cause harmful interference, and
- This device must accept any interference received, including interference that may cause undesired operation.
FCC Radiation Exposure Statement
The equipment complies with FCC Radiation exposure limits set forth for uncontrolled enviroment. This equipment should be installed and operated with minimum distance 20cm between the radiator and your body.
Any Changes or modifications not expressly approved by the party responsible for compliance could void the user’s authority to operate the equipment.


