![]()
User Manual
NAVITEL R400 NV
Portable Video Recorder
Introduction
Dear Customer!
Thank you for purchasing this NAVITEL® product.
NAVITEL R400 NV is a multifunctional high-definition DVR with many functions and features that are described in this User Manual. Please read the manual carefully before using the device and keep it for future reference.
Device layout
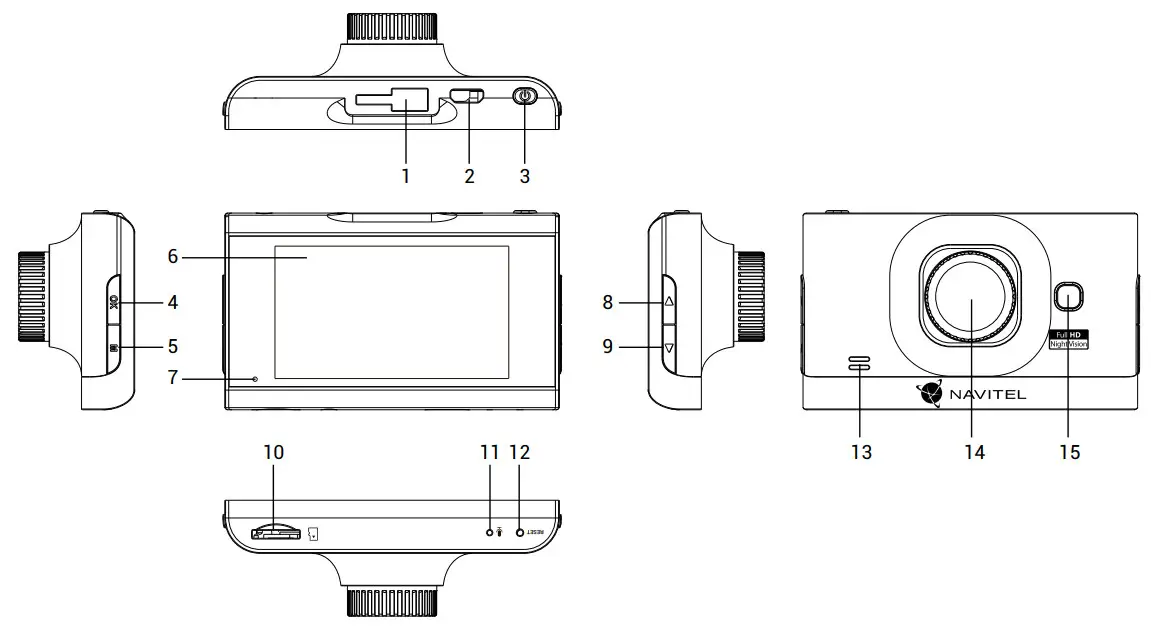
| 1. Mount port | 9. Down |
| 2. Mini-USB port | 10. MicroSD slot |
| 3. Power | 11. Microphone |
| 4. OK | 12. Reset |
| 5. Menu | 13. Speaker |
| 6. Display | 14. Camera |
| 7. LED indicator | 15. Night light |
| 8. Up |
Specifications
| Processor | MSTAR MSC8336 |
| Display | 2,7”, 960×240, TN |
| Camera | GC2053 (night vision) |
| Recording format | MOV (H.264) |
| Video resolution | 1920×1080, 30 fps |
| Image format | JPG |
| Image resolution | 3 MP |
| View angle | 120° |
| Lens | 4-layer glass |
| Storage | microSD card |
| MicroSD card capacity | Max. 64 GB |
| USB | mini-USB |
| Battery | 110 mA∙h |
| Power | USB 2.0, 5 V, 1.5 A |
| Frequency | 50/60 Hz |
| Microphone / speaker | Yes |
| Language | English |
Note: the specifications may change due to upgrades.
Installation
- Put the microSD card into the DVR. Use a high-speed SD card (Class10 or above); capacity should be within 8-64 GB.
 • To avoid malfunctions of the DVR and/or SD-card, don’t insert and remove SD-card during DVR operation.
• Before using a microSD card, please format it inside the DVR to avoid data errors. For formatting the SD-card in Menu mode select Format SD-card and confirm it. - Secure the device on the windshield with the bracket.
- Connect the car charger to the cigarette lighter socket.
- Connect the USB interface to the car charger with the charger extension cord.
- Adjust the camera position.
- Turn the power on; check whether the device is installed correctly. If the device is installed correctly, the indicator will glow red; the device will start up and begin recording (indicated by flashing blue light.
Precautions
- Use only the original charger adapter. Using another adapter may negatively affect the device’s battery. Use accessories only approved by the manufacturer.
- Permissible ambient temperature in operating mode: 0 to +35 °С. Storage temperature: +5 to +45 °С. Relative humidity: 5% to 90% without condensation (25 °С).
- Put the device away from fire sources to avoid explosion or fire.
- Do not expose the device to physical impacts.
- Avoid contacting the device with sources of electromagnetic radiation.
- Keep the lens clean. Do not use chemicals or detergents to clean the product; always turn off the device before cleaning.
- Strictly follow the laws and regulatory acts of the region where the device is used. This device can not be used for illegal purposes.
- Do not disassemble or repair the device by yourself. In case of device failure, contact the service center.
Button | Functions |
| Power | Press shortly to turn the device on. Press and hold for 3 seconds to turn the device off. In Record mode (STBY), press to switch between Record, Capture, Video, and Photo modes. In Record mode (REC), press to lock a file (protected file cannot be deleted or overwritten). In Menu mode press to choose the next menu section. |
| ОК | In Record mode (STBY), press to start recording; press again to stop recording. In Capture mode, press to take a picture. In Video mode, press to select a file, or pause/resume video. In Photo Mode, press to select a file. In Menu mode, press to select a menu item. |
| Menu | Press to enter Menu mode. In Menu mode, press to exit any menu or list of functions. |
| Up/Down | In Record mode, press Down to turn the microphone off/on. In Capture mode, press to zoom in / out. In Video / Photo mode, press to select the previous/next file. In Menu mode, press to select the previous/next menu item. |
| Reset | If the device is not responding, press to reset. |
Note: the built-in battery is designed only for recording an emergency event in parking mode and turning off the device correctly when the power is turned off; for the full operation of the device in any mode, a constant power connection is required.
NAVITEL s.r.o. hereby declares that the device NAVITEL R400 NV is compatible with the European directive EMC 2014/30/EU.
The full text of Declaration of conformity is available at the following internet address:
www.navitel.cz/en/declaration_of_conformity/r400nv
Device functions
| Format SD-card | Formatting a microSD card in the DVR is necessary for the correct operation of the device. Before using a microSD card or in case of a data error, please format the microSD card. For formatting the SD-card in Menu mode select Format SD-card and confirm it. |
| Record | Connect the device to an external power supply and it will start recording automatically (indicated by the flashing blue light). Press the OK button to stop recording (the blue light will become steady). Press OK again to record another video. Each video will be saved automatically. |
| Capture | In Record mode (STBY), press the Power button to enter a Capture mode, press the OK button to take a photo (it will be saved automatically). |
| Video | In Record mode (STBY), press the Power button twice to enter Video mode; press the Up and Down buttons to select a file; press the OK button to play a file. During playback, press OK to pause/unpause; press the Up and Down keys to fast forward / rewind. |
| Photo | In Capture mode, press the Power button twice to enter Photo mode; press the Up and Down buttons to select a file; press the OK button to play a file. |
| Loop recording | This feature allows you to save a video as a set of files given in the duration menu. If the memory card runs out of space, the unprotected files will be overwritten in the order in which they were created. |
| Record audio | Record video with or without sound. |
| Lock file | In Record mode (REC), press Power to protect the current recording. A key symbol will appear at the bottom of the screen. In Video/Photo mode, select a file, press Menu, and select Protect, then Lock Current or Lock All. Protected files cannot be deleted or overwritten. Select Unlock Current / Unlock All to remove protection. |
| Stamp | This function adds a date stamp to the record. |
| LCD OFF | The device can automatically shut off the screen to reduce power consumption; time intervals can be set in the Screen Saver menu. |
| Night light | Turn on when it’s dark to improve image brightness. |
| G-sensor | If the vehicle is hit by something, the DVR will automatically lock the current video. |
| Parking monitor | In the shutdown state, if the vibration is detected, the device will turn on automatically and start recording. |
| Battery | The red indicator lights up when the device is plugged into an external power supply; as the battery is charging, the red light will gradually dim; the red light going out means the battery is full. |
| USB-connection * | When connecting the device to a PC using a USB cable, two connection options will appear: 1) Mass Storage: play, copy and delete files. 2) Record: standard mode. |
* This function is available only in firmware version 20200528 and higher.
![]()


