
- Check the outlet being used to charge machine
- Test the outlet with a different device, like a cell phone charger or small appliance
- Verify correct charger is being used
- Label on charger should have Model K12S270050U
- If Charger is damaged > Replace Charger > Go to Parts & Supplies
- Plug the charger into the port on the battery and plug the outlet end into a functioning outlet
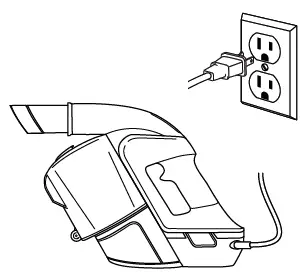
- The green lights on top of the hand vac should light up

- Battery Light Status while charging:
- 1 – 4 slow blinking green lights indicates Battery is charging
- 4 solid green lights indicate fully charged
- 1 Green flashing then no lights indicates Charger fault > Replace Charger > Go to Parts & Supplies
- No lights indicate Charger fault > Replace Charger > Go to Parts & Supplies
- 4 solid red lights indicate motor fault > Replace Hand Vac & Battery > Go to Parts & Supplies
- Light behaviors while in use:
- Green lights while running indicates battery level
- 1 Green (25%) to 4 Green (100%)
- If Battery depletes quickly to 1 green light > Replace Battery > Go to Parts & Supplies
- 1 flashing red or 4 depleting red means fault in Battery > Replace Battery > Go to Parts & Supplies
- No lights & battery is fully charged indicates a fault > Replace Battery & Power Button/Control Panel > Go to Parts & Supplies
- 4 solid red lights mean the Brush has jammed > Go to Brush/Foot Area
- Once the Battery is reinstalled it may take 10 seconds for light to turn from red to green
- If you are still having issues > Please Contact us
- Green lights while running indicates battery level


