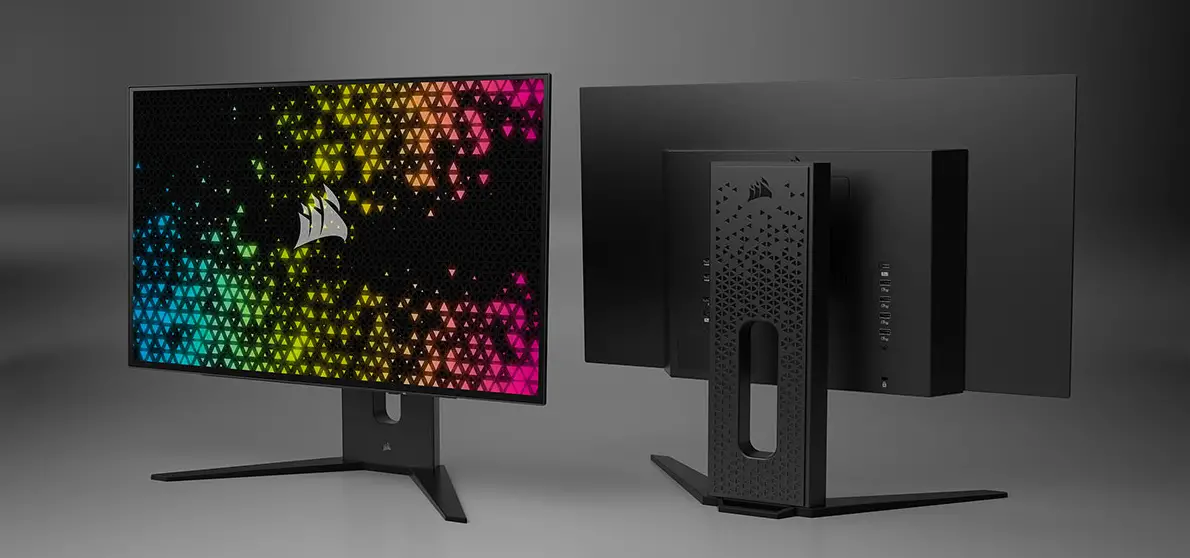
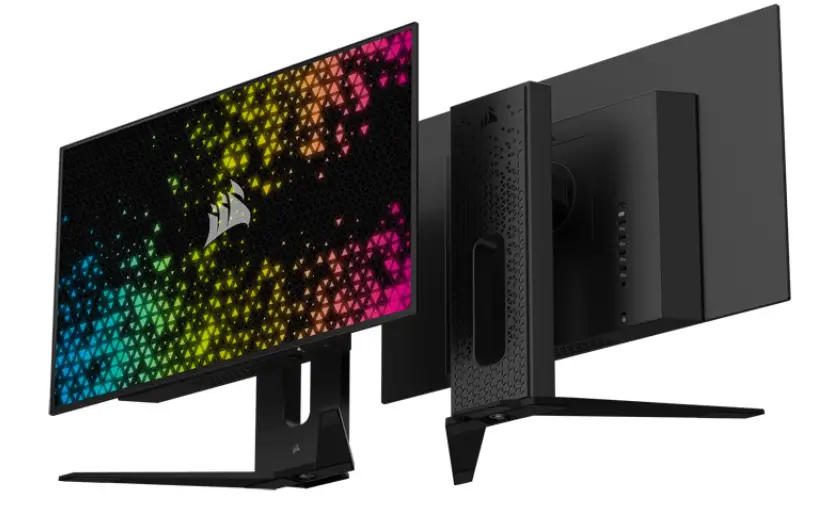
CORSAIR Xeneon 27QHD240 OLED Display
Product Information
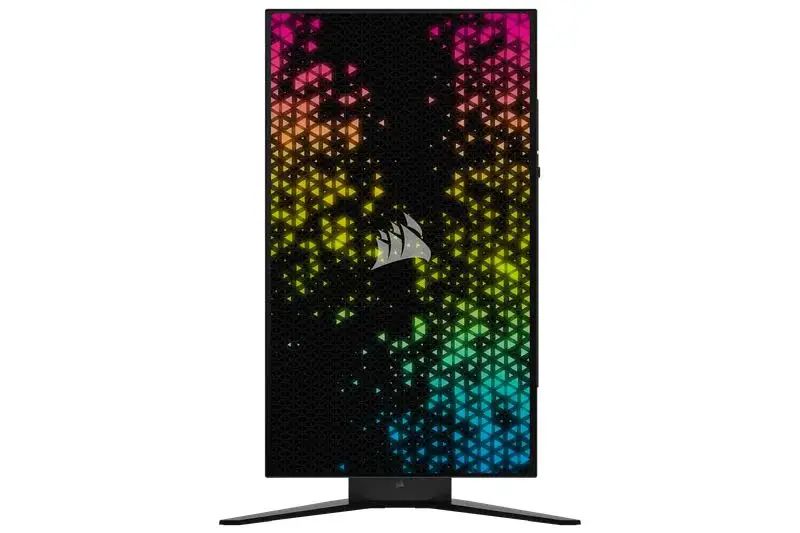
The CORSAIR XENEON 27QHD240 OLED Display is a high-end monitor designed for gaming and professional use. It features a 27-inch OLED display with a resolution of 2560 x 1440 pixels and a refresh rate of 240Hz. The monitor has a sleek and sturdy design, with several adjustment options for height, tilt, swivel, and pivot. It also comes with a range of connectivity options, including HDMI, DisplayPort, USB-C, and USB-A.
Product Usage Instructions
Assembly
- Cut the tape on the top of the box, open flaps and lay the box down with the hand cutout opening towards the top. Take hold of hand opening and slide foam out of carton.
- Remove base and center foam insert.
- Remove stand neck from the other section of foam packaging.
- Lift off top section of foam and set aside. This section contains the AC Adapter and accessory cables. The bottom section of foam contains the monitor panel.
- Align the 3 fingers on the top of the stand neck with the 3 notches in the top section of the VESA mount section. Angle the 3 fingers.
Tilt, Swivel, Pivot, and Height Adjustment
The CORSAIR XENEON 27QHD240 OLED features a range of adjustments for optimal viewing comfort:
- Tilt: -7/+15 degrees
- Height: +/- 100mm
- Swivel: +/- 30 degrees
- Pivot: +/- 90 degrees
Connectivity
The CORSAIR XENEON 27QHD240 OLED offers a range of connectivity options:
- Back Side: HDMI, DisplayPort
- Bottom Side: USB-C, USB-A
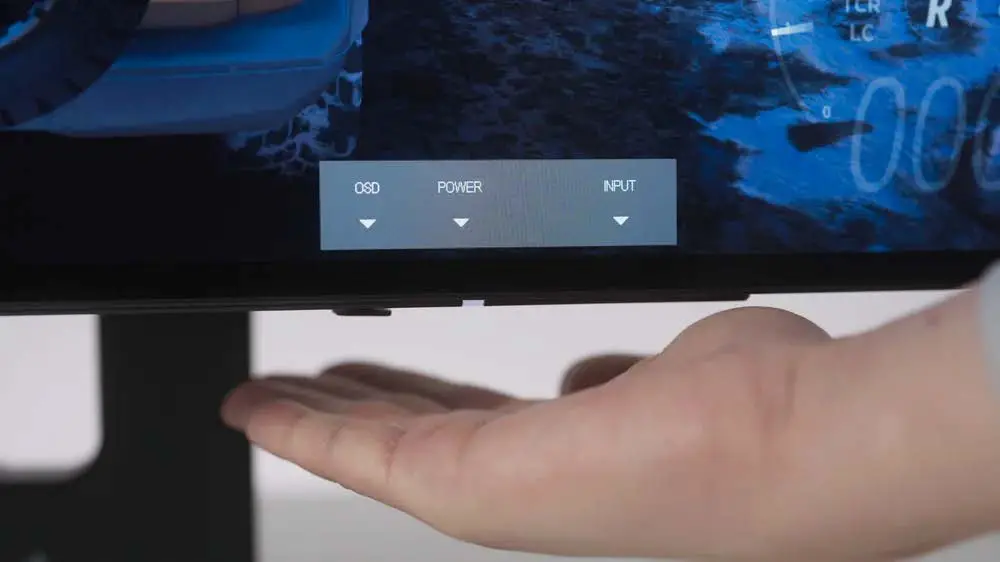
Proximity Sensor for OSD Location Indicator
To access the OSD, reach your hand to the front of the unit and a button location indicator will appear on the screen for user’s reference. This indicator activates when movement is detected within 25-50mm of the buttons. The indicator will turn off after 5 seconds.
Operations
Controls
The CORSAIR XENEON 27QHD240 OLED includes a joystick on the front-bottom side for opening shortcuts and navigating display settings.
On-Screen Display (OSD)
To access the OSD, press the joystick inward. Use the joystick to navigate the settings and press the joystick inward to confirm your selection.
OSD – Picture
The Picture menu allows you to adjust the overall picture quality:
- Brightness
- Contrast
- Sharpness
- Color Temperature
- Preset Levels: Standard, Movie, Text, sRGB, Creative, Game, HDR
- Gamma: 2.2
- Saturation: 2.4 (0-10)
- Refresh Overlay: ON/OFF
- Crosshair: Dot, Cross, Angle
- Crosshair Color: Green, Red
- Level 4: Sets the display’s color temperature to default,
8500K
FAQ
Refer to the FAQ section in the user manual for any further queries.
Technical Specifications
| Table 1: Technical Specifications | |
|---|---|
| Display Type | OLED |
| Screen Size | 27 inches |
| Resolution | 2560 x 1440 pixels |
| Refresh Rate | 240Hz |
| Connectivity | HDMI, DisplayPort, USB-C, USB-A |
| Table 2: Supported Display Modes | |
|---|---|
| Standard Mode | 2560 x 1440 (240Hz) |
| NVIDIA G-SYNC Compatible Mode | 2560 x 1440 (240Hz) |
| AMD FreeSync Compatible Mode | 2560 x 1440 (240Hz) |
About Low Blue Light & Flicker Free
The CORSAIR XENEON 27QHD240 OLED Display is designed to reduce eye strain with its Low Blue Light and Flicker Free technology.
HDMI Legal Disclosure
Refer to the HDMI Legal Disclosure section in the user manual for any further queries.
INTRODUCTION
Product Setup, User Information, and Warranty/Dead Pixel policy can be found at Customer Service – Corsair Landing Page
PRECAUTIONS
- Only use the accessories that are provided with the monitor or that recommended by the manufacturer.
- Keep the plastic packaging bag for the product in a place that cannot be reached by children.
- Before connecting the monitor to the power outlet, make sure that the voltage rating of the power cable is compatible with the power specification in the country where you are located.
- The power cord plug must be connected to a properly wired and grounded power outlet.
- Do not touch the plug with wet hands, otherwise can easily cause electric shock.
- Place the monitor in a stable and well-ventilated place.
- The holes or openings on the monitor are for ventilation. Do not cover or block the ventilation holes with any objects.
- Do not use the monitor near water, drinks, or any type of liquids. Failure to do so may result in electric shock or damage to the monitor. Make sure to unplug the monitor from the power outlet before cleaning.
- As the screen surface can be easily scratched, avoid touching the surface with any hard or sharp object. Use a soft lint-free cloth instead of a tissue to wipe the screen. You may use a glass cleaner to clean the equipment if required. However, never spray the cleaner directly onto the screen.
- Disconnect the power cable if the equipment is not being used for a long period of time.
- Do not attempt to disassemble or repair the monitor yourself.
- Please remove the protective film on the screen of the product before use.
- When the product is running or turning off, please do not unplug the power adapter.
- If the adapter is unplugged accidentally, horizontal line noise could occur momentarily. Please run “Image Retention Refresh” if you have the horizontal line noise.
(OSD/System Setting/Image Retention Refresh)
PACKAGE CONTENTS
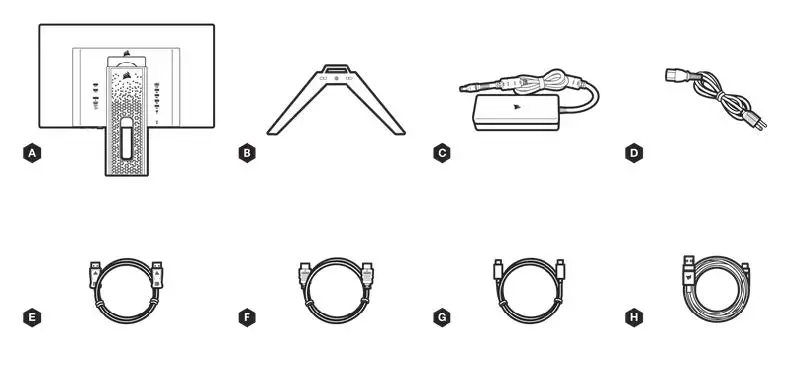
CORSAIR XENEON 27QHD240 OLED DISPLAY CONTENTS
- A. CORSAIR XENEON 27QHD240 OLED Display Panel
- B. Stand Base
- C. AC Adaptor
- D. AC Power Cable
- E. DisplayPort Cable (1.5M)
- F. HDMI Cable (1.5M)
- G. USB-C Cable (1.5M)
- H. USB-A to USB-C cable (1.8M)
ASSEMBLY
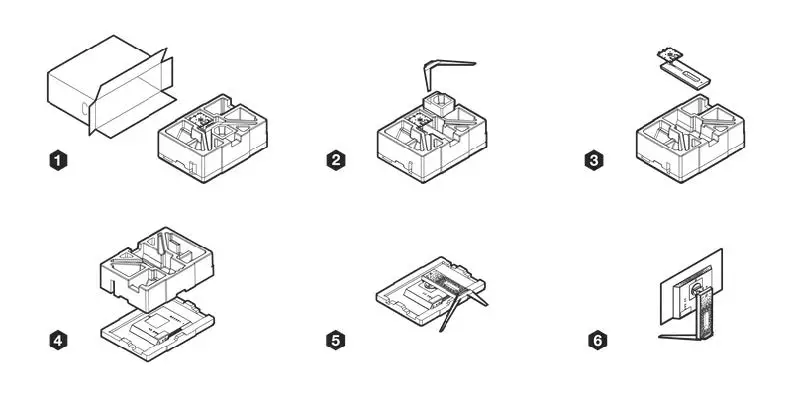
- Cut the tape on the top of the box, open flaps and lay the box down with the hand cutout opening towards the top. Take hold of hand opening and slide foam out of carton.
- Remove base and center foam insert.
- Remove stand neck from the other section of foam packaging.
- Lift off top section of foam and set aside. This section contains the AC Adapter and accessory cables. The bottom section of foam contains the monitor panel.
- Align the 3 fingers on the top of the stand neck with the 3 notches in the top section of hte VESA mount section. Angle the 3 fingers into the notches and lower into place until you hear an audible click and it is secure. Notice the push button on the bottom of the connector plate. Press down on this button and lift the stand neck up if you need to remove it in the future. This is where you will mount to a compatible VESA wall or desk mount. Pickup the stand base and align it to the bottom of the stand neck and press it into place. Lift up the key on the captive thumbscrew and turn it clockwise with your fingers until the base is secured to the stand neck.
- Pick up the monitor by the stand neck and set it upright on your desk. You can now connect it up to your devices.
TILT, SWIVEL, PIVOT, AND HEIGHT ADJUSTMENT
CORSAIR XENEON 27QHD240 OLED features a sturdy and stylish stand that offers several adjustments below down
- Tilt -7/+15 degrees
- Height +/- 100mm
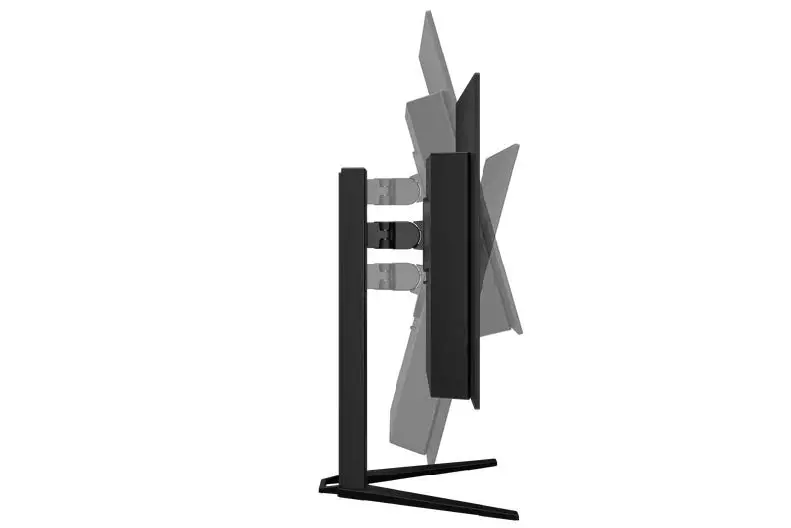
- Swivel +/- 30 degrees
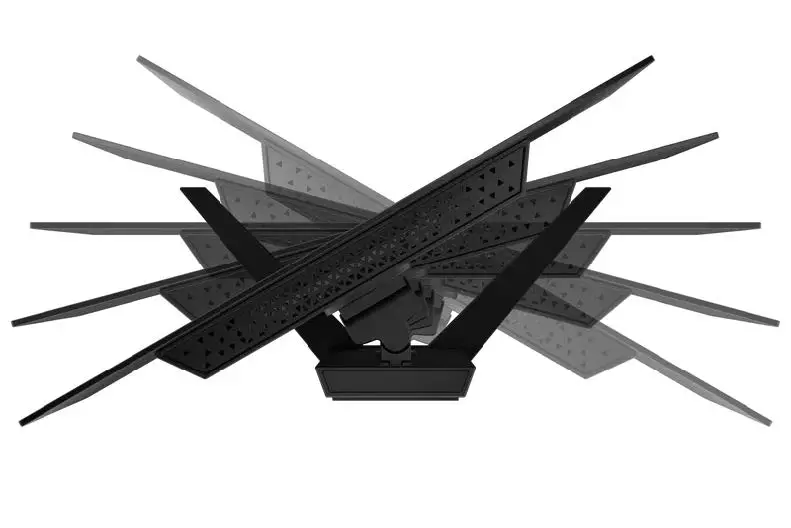
- Pivot +/- 90 degrees
CONNECTIVITY
BACK SIDE
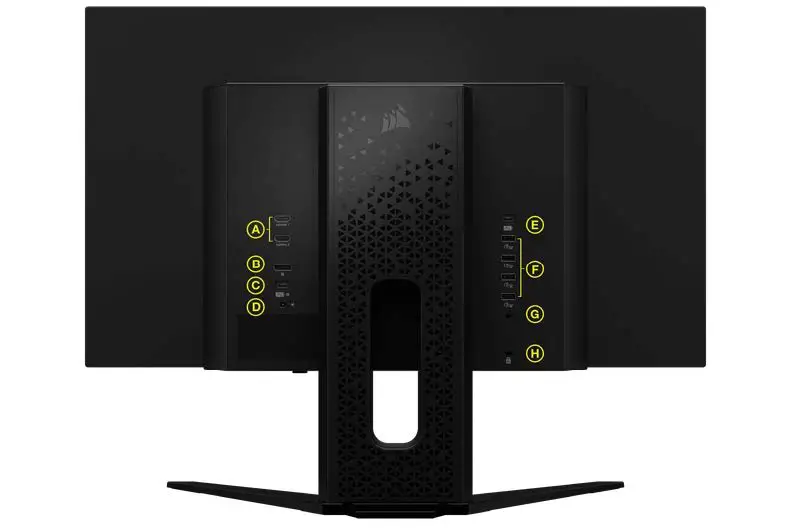
- A. HDMI 2.1 – Dual HDMI inputs correspond to “HDMI1” and “HDMI2” inputs
- B. DisplayPort 1.4 – DisplayPort input corresponds to “DisplayPort” input
- C. USB Type-C Alt DP – Supports DisplayPort Alt Mode and upstream USB input (connects to USB 3.0 ports). Corresponds to “TYPE C” input. This port or the USB Upstream Port must be connected to a USB-capable port on your host device to support downstream USB 3.0 ports.
- D. DC In – Connects to included AC adapter
- E. USB Type-C IN – Upstream USB input port. This port or the USB Type-C Port must be connected to a USB-capable port on your host device to support downstream USB 3.0 ports.
- F. USB 3.1 Type-A – Four Type-A 5Gbps USB 3.1 Gen1 ports
- G. 3.5mm Audio Jack – Headset connector for audio output
- H. Kensington lock – One security device
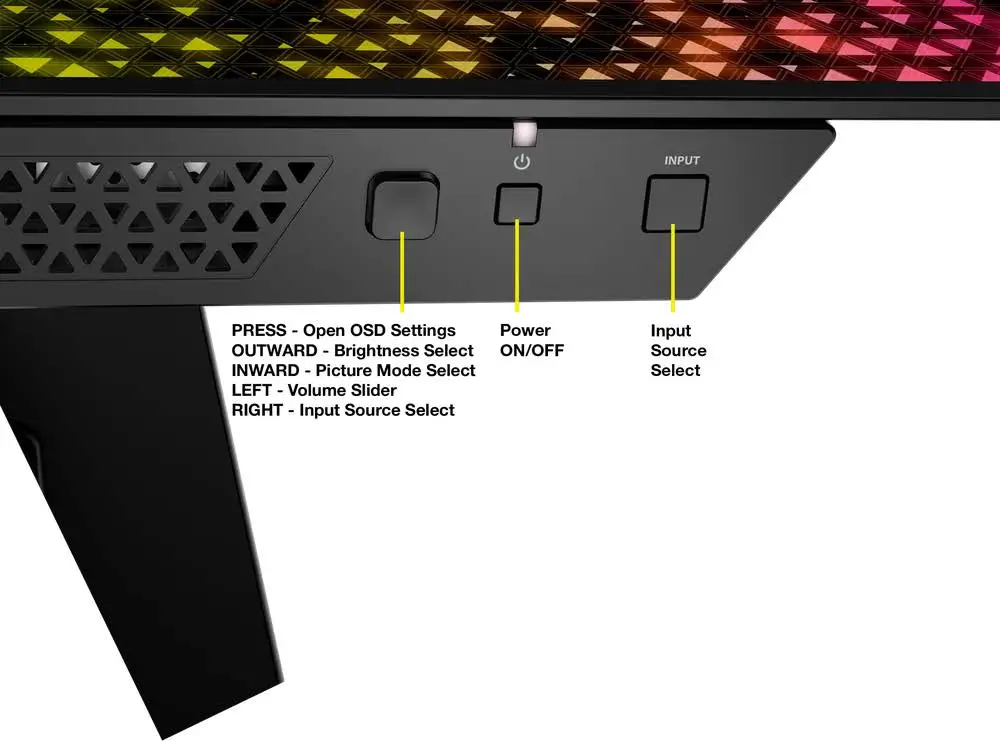
BOTTOM SIDE
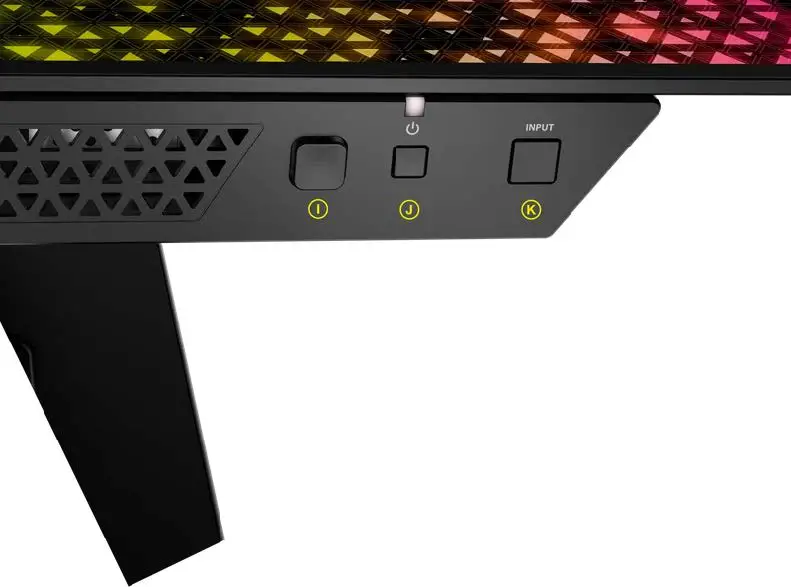
- I. OSD Joystick – For CORSAIR XENEON 27QHD240 OLED OSD selection use
- J. Power ON/OFF – Power ON/OFF CORSAIR XENEON 27QHD240 OLED. LED will reactivate if selecting a different input. LED will alternate between White and Amber color when powered off while Image Retention Refresh is running (approximately 4-5 minutes).
- K. Input Source Select – Switch through the inputs from the current input to the next one in this cycle: HDMI1, HDMI2, DP, Type-C DP Alt-Mode
PROXIMITY SENSOR FOR OSD LOCATION INDICATOR
Reach your hand here on the front of the unit and there will be a Button Location Indicator popping up on the screen for user’s reference. This indicator activates when movement is detected within 25-50mm of the buttons. The indicator will turn off after 5 seconds.
OPERATIONS
CONTROLS
Your monitor includes a joystick on the front-bottom side for opening shortcuts and navigating display settings.
ON-SCREEN DISPLAY (OSD)
By pressing the joystick inward, you can access your monitor’s display settings. You can use the joystick to navigate the settings and pressing the joystick inward will confirm your selection.
OSD – PICTURE
The first menu, labeled “Picture”, contains the following settings for adjusting the overall picture quality.
| LEVEL 1 | LEVEL 2 | LEVEL 3 | LEVEL 4 | FUNCTIONALITY |
|
Picture |
Preset | Standard | Selects a display preset factory calibrated for general use and best power savings | |
| Movie | Selects a display preset optimized for watching movies | |||
| Text | Selects a display preset optimized for reading text | |||
| sRGB | Selects a display preset optimized for HDR content in sRGB color space | |||
| Creative | Selects a display preset factory calibrated for content-creation tasks | |||
| Game | Selects a display preset optimized for playing fast-moving games | |||
| HDR | Only shows when HDR mode is active on connected device | |||
| Brightness | (0-100) | Adjusts the intensity of the display backlight | ||
| Contrast | (0-100) | Adjusts the display’s contrast | ||
| Sharpness | (0-10) | Adjusts the display’s sharpening filter, increasing edge detail | ||
|
Color Temperature | Default | Sets the display’s color temperature to default, 8500K | ||
| Standard | Sets the display’s color temperature to standard, 6500K | |||
| Warm | Sets the display’s color temperature to warm, 5000K | |||
|
Custom | R (0-100) |
Allows you to manually set the display’s color temperature with sliders controlling the red, blue, and green levels | ||
| G (0-100) | ||||
| B (0-100) | ||||
|
Gamma | 2 |
Adjusts the perceived luminance; default is 2.2 | ||
| 2.2 | ||||
| 2.4 | ||||
| Saturation | (0-10) | Adjusts the saturation level; the default is 0 | ||
|
Refresh Overlay | OFF | Toggles an overlay in the top right corner which displays the monitor’s current refresh rate, useful for tracking frames per second when Adaptive Sync is enabled | ||
| ON | ||||
|
Crosshair | OFF |
Enable Crosshair function | ||
| Dot | ||||
| Cross | ||||
| Angle | ||||
| Crosshair Color | Green | Change Crosshair Color | ||
| Red |
OSD – PIP/PBP (PICTURE-IN-PICTURE / PICTURE-BY-PICTURE)
The second menu, labeled “PIP/PBP”, lets you enable the PIP/PBP functions and display different ways.
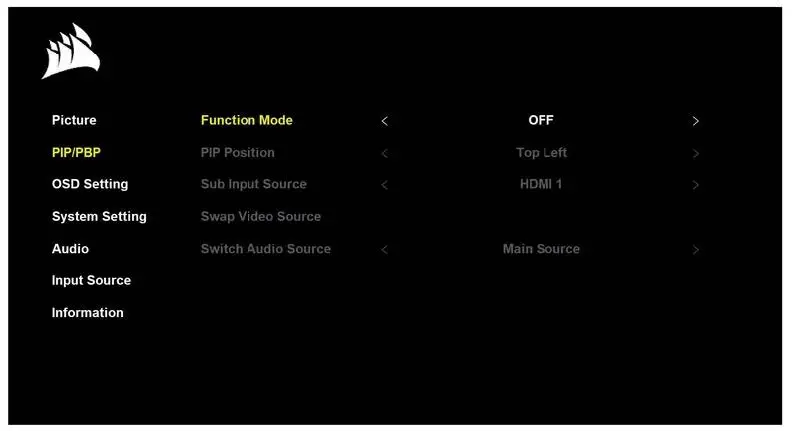
| LEVEL 1 | LEVEL 2 | LEVEL 3 | LEVEL 4 | FUNCTIONALITY |
| PIP/PBP | Function Mode | OFF | Enable PIP or PBP function | |
| PIP | ||||
| PBP | ||||
| PIP Position | Top Left | Place sub input source at top left side | ||
| Top Right | Place sub input source at top right side | |||
| Bottom Left | Place sub input source at bottom left side | |||
| Bottom Right | Place sub input source at bottom right side | |||
| Sub Input Source | HDMI 1 | Select sub input source | ||
| HDMI 2 | ||||
| Display Port | ||||
| Type C | ||||
| Swap Video Source | Swaps video source between main picture and sub picture |
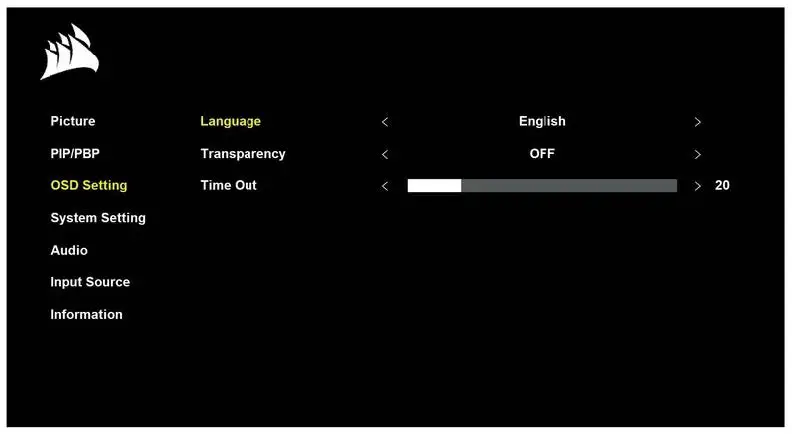
OSD – OSD SETTING
The third menu, labeled “OSD Setting”, contains the following settings for adjusting the display’s internal settings.
| LEVEL 1 | LEVEL 2 | LEVEL 3 | LEVEL 4 | FUNCTIONALITY |
| OSD Setting | Language | 繁體中⽂ | Selects the OSD’s language | |
| English | ||||
| Français | ||||
| Deutsch | ||||
| Italiano | ||||
| ⽇本语 | ||||
| 한국어 | ||||
| Português | ||||
| Español | ||||
| Transparency | OFF | Sets the OSD to be transparent or opaque | ||
| ON | ||||
| Time Out | (10-60) | Adjusts how long (in seconds) the OSD stays on screen before disappearing |
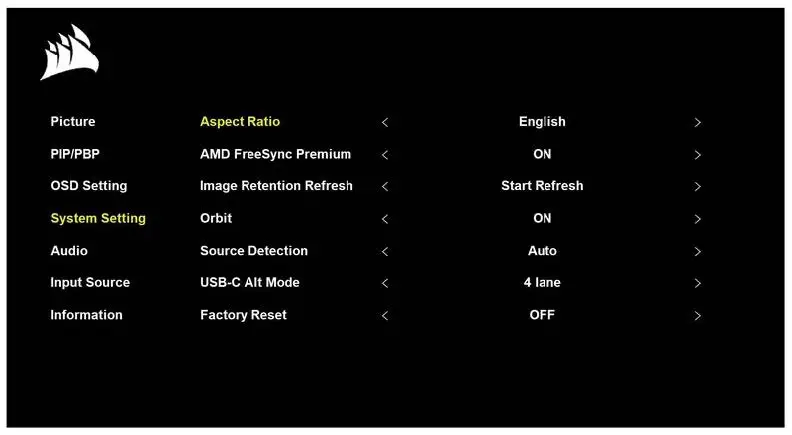
OSD – SYSTEM SETTINGS
The fourth menu, labeled “System Setting”, lets you make adjustments to the system settings
| LEVEL 1 | LEVEL 2 | LEVEL 3 | LEVEL 4 | FUNCTIONALITY |
|
System Setting | Aspect Ratio | Auto | Selects the display’s aspect ratio. “Auto” will try to match the display’s aspect ratio to the incoming video signal | |
| Full | ||||
|
Adaptive Sync |
OFF | Enables or disables the adaptive sync functionality when connected to a compatible GPU. Select ON to enable Adaptive Sync for AMD FreeSync via HDMI. NVIDIA G-Sync compatibility is available when connected via DP cable or USB Type-C Alt Mode cable to compatible GPU. For NVIDIA G-Sync functionality:
| ||
|
ON | ||||
| Image Retention Refresh | Start Refresh | Start the Image Retention Refresh process which will run for approximately 4-5 minutes. When activated, screen will blank and the power button LED will alternate between white and amber color while the monitor refreshes the screen. | ||
| Orbit | OFF | Enable the Orbit function. While activated, the image shifts 1 pixel per minute in a circular pattern to prevent image retention. | ||
| ON | ||||
| Brightness Stabilizer | OFF | Enable the Brightness Stabilizer function. When active, brightness will be limited to 150nits. | ||
| ON | ||||
| Source Detection | Auto | Determines whether the display will automatically switch to a different input if it detects a signal, or if you will need to manually switch between inputs. | ||
| Manual | ||||
|
USB-C Alt Mode | 4 Lane | Toggles the number of USB lanes to use on the USB-C port for video
| ||
|
2 Lane | ||||
| Factory Reset | OFF | Resets all monitor settings to the factory defaults |
OSD – AUDIO
The fifth menu, labeled “Audio”, lets you control the display’s audio.
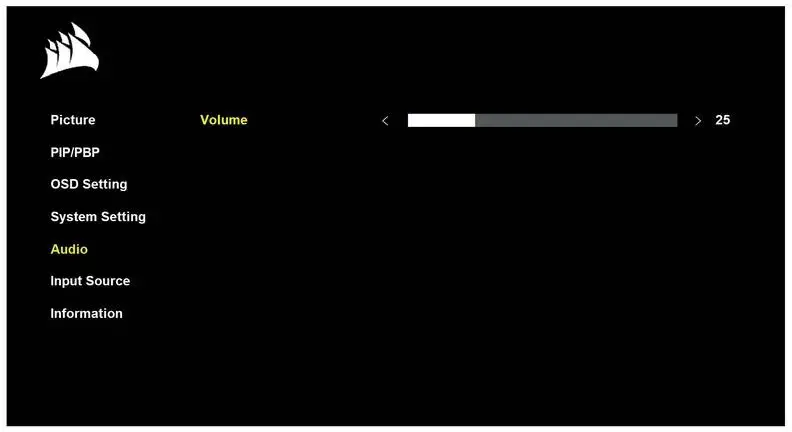
| LEVEL 1 | LEVEL 2 | LEVEL 3 | LEVEL 4 | FUNCTIONALITY |
| Audio | Volume | (0-100) | Adjusts the volume of the audio output from the headphone jack |
OSD – INPUT SOURCE
The sixth menu, labeled “Input Source”, lets you switch between the display’s different inputs.
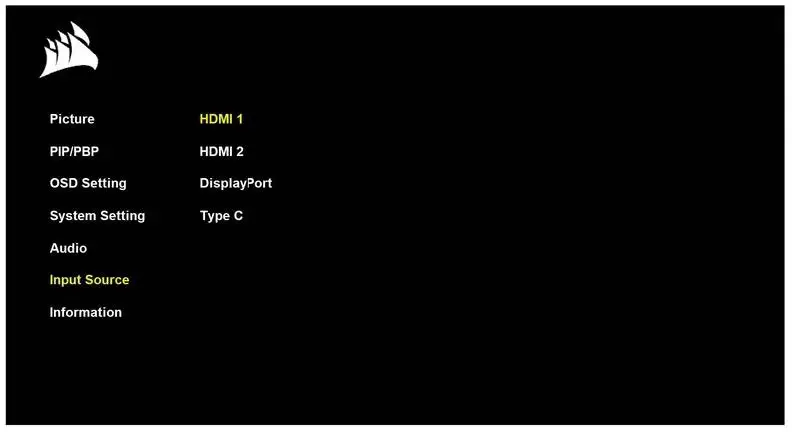
| LEVEL 1 | LEVEL 2 | LEVEL 3 | LEVEL 4 | FUNCTIONALITY |
|
Input Source | HDMI 1 | Switches to the device connected to the HDMI-1 port | ||
| HDMI 2 | Switches to the device connected to the HDMI-2 port | |||
| DisplayPort | Switches to the device connected to the “DP” DisplayPort port | |||
| Type C | Switches to the device connected to the TYPE-C port |
OSD – INFORMATION
The seventh menu, labeled “Information”, provides you monitor information.
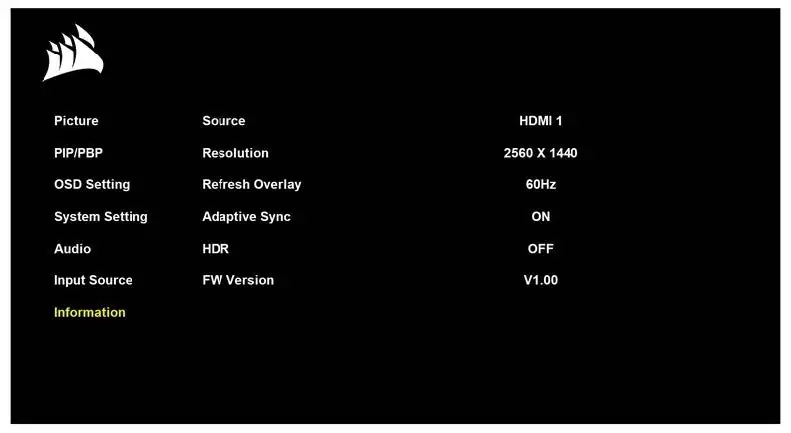
| LEVEL 1 | LEVEL 2 | LEVEL 3 | LEVEL 4 | FUNCTIONALITY |
|
Information | Source | Display the current input source | ||
| Resolution | Display the current display resolution | |||
| Refresh Overlay | Display the current refresh rate | |||
| Adaptive Sync | Adaptive Sync Status | |||
| HDR | HDR status | |||
| FW Version | Shows the current FW Version |
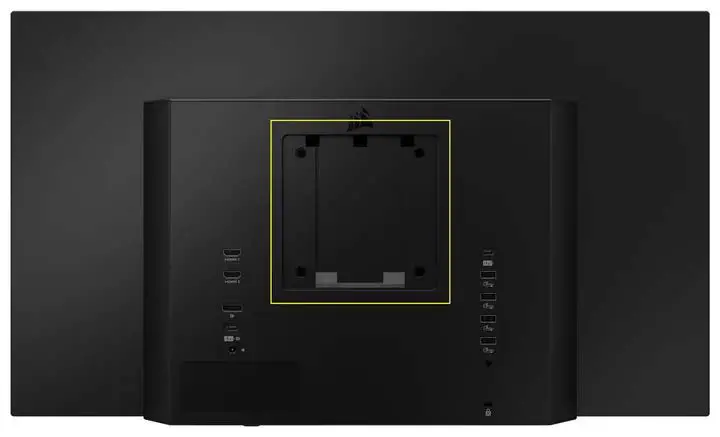
VESA MOUNT COMPATIBILITY
- Remove Stand Neck by pressing down on lock button underneath the neck hinge.
- Lift up and remove the stand.
- Attach compatible 100mm x 100mm VESA mount after ensuring weight and size support.
FAQ
- Power LED not on +
- No image on the screen +
- Image too light/dark +
- Video Signal Not Supported +
- Does the CORSAIR XENEON 27QHD240 OLED support video over USB-C? +
- I’m unable to use devices connected to the USB-A ports on my monitor when connected to my device that supports USBC
- Alt Mode using a single USB-C cable. +
- Image is stretched/squished +
- Image has color issues +
- Artifacts in onscreen image +
- Monitor has a dead pixel +
- What kind of VESA mount is compatible? +
- My CORSAIR XENEON 27QHD240 OLED monitor isn’t detected by CORSAIR iCUE +
- What adaptive refresh rate options are available to CORSAIR XENEON 27QHD240 OLED? +
- AMD FreeSync / G-SYNC isn’t enabled +
- I’m not getting the monitor’s rated 240Hz refresh rate +
APPENDIX
TABLE 1: TECHNICAL SPECIFICATIONS
| Product Name | CORSAIR XENEON 27QHD240 OLED |
| Part Number | CM-9030002 |
| Device | RDD0023 |
| USB Hub ID | CORSAIR USB 3.1 Hub |
| Panel Size | 27” Diagonal |
| Display Surface | Non-Glare |
| Pixels per inch | 109 |
| Aspect Ratio | 16:9 |
| Native Resolution | 2560 x 1440 @ 240Hz |
| Response Time (GtG) | 0.03ms |
| Display Colors | 1.07B colors (10bit RGB) |
| Panel Technology | OLED |
| Flicker-Free | Yes |
| Viewing Angles | 178° (H) / 178° (V) |
| Peak Brightness | 450 nit (SDR) / 1000 nit (HDR 3%) |
| Static Contrast Ratio | 1,500,000:1 |
| HDR Certification | HDR with 1000 nit peak brightness |
| Color Gamut (CIE 1976) | 98.5% (DCI-P3), 100% (sRGB) |
| Variable Refresh Rate | NVIDIA G-Sync Compatible Certified AMD FreeSync Certified |
| HDMI Input | 2x HDMI 2.1 |
| DisplayPort Input | 1x DisplayPort 1.4 |
| USB-C Input | 1x DisplayPort 1.4 (USB-C Alt Mode), 65W Power Delivery, USB 5Gbps Data Upstream |
| USB-C Upstream Input | 1x 5Gbps USB-C with 15W Power Delivery |
| USB-A Output | 4x 5Gbps Type-A USB Type-A 3.1 gen1 |
| 3.5mm Audio | Yes, passthrough from video input |
| Power Consumption (On) | 34.81 W |
| Power Consumption (Sleep) | <0.5W |
| Power Consumption (Off) | <0.3W |
| VESA Compatibility | 100mm x 100mm |
| Dimensions (W x H x D) | 604.4mm x 530.8mm x 224.3mm |
| Weight | 9.9kg |
| Stand Tilt | -7/+15 degrees |
| Swivel | +/- 30 degrees |
| Pivot | +/- 90 degrees |
| Height Adjust Range | 100mm |
| AC Adapter | 180W |
| Note: your device uses the following power supply: Delta ELECTRONICS. Inc. / ADP-180TB HU |
TABLE 2: SUPPORTED DISPLAY MODES
| Resolution | Refresh Rate | HDMI | DP / Type-C | |
|
640×480 |
VGA | 60Hz | V | V |
| 67Hz | V | V | ||
| 72Hz | ||||
| 75Hz | ||||
| 720×400 | Dos-Mode | 70hz | V | V |
| 800×600 | SVGA | 56Hz | V | V |
| 60Hz | V | V | ||
| 72Hz | V | V | ||
| 75Hz | V | V | ||
| 1024×768 | XGA | 60Hz | V | V |
| 75Hz | V | V | ||
| 1152×870 | XGA+ | 75Hz | V | V |
| 1280×720 | WXGA | 60Hz | V | V |
| 1280×800 | WXGA | 60Hz | V | |
| 1280×960 | WXGA | 60Hz | V | V |
| 1280×1024 | SXGA | 60Hz | V | V |
| 75Hz | V | V | ||
| 1440×900 | WXGA+ | 60Hz | V | V |
| 1680×1050 | WSXGA+ | 60Hz | V | V |
| 1920×1080 | FHD | 60Hz | V | V |
| 240Hz | V | V | ||
| 2560×1440 | QHD | 50Hz | V | V |
| 60Hz | V | V | ||
| 120Hz | V | V | ||
| 240Hz | V | V | ||
| 480P | 640x480p @ 60 Hz 4:3 | V | V | |
| 720x480p @ 60 Hz 16:9 | V | V | ||
| 576P | 720x576p @ 50 Hz 16:9 | V | V | |
| 720P | 1280x720p @ 50 Hz 16:9 | V | V | |
| 1280x720p @ 60 Hz 16:9 | V | V | ||
| 1280x720p @ 120 Hz 16:9 | V | V | ||
|
1080P | 1920x1080p @ 24 Hz 16:9 | V | ||
| 1920x1080p @ 30 Hz 16:9 | V | |||
| 1920x1080p @ 50 Hz 16:9 | V | |||
| 1920x1080p @ 60 Hz 16:9 | V | V | ||
| 1920x1080p @ 100 Hz 16:9 | V | V | ||
| 1920x1080p @ 120 Hz 16:9 | V | V | ||
| 1920x1080i @ 50 Hz 16:9 | ||||
| 1920x1080i @ 60 Hz 16:9 | ||||
|
2160P | 3840x2160p @ 24 Hz 16:9 | V | ||
| 3840x2160p @ 25 Hz 16:9 | V | |||
| 3840x2160p @ 30 Hz 16:9 | V | |||
| 3840x2160p @ 50 Hz 16:9 | V | |||
| 3840x2160p @ 60 Hz 16:9 | V | |||
| 3840x2160p @ 100 Hz 16:9 | V | |||
| 3840x2160p @ 120 Hz 16:9 | V | |||
ABOUT LOW BLUE LIGHT & FLICKER FREE
The monitor should be 50 ~ 70 cm (20 ~ 28 inches) away from your eyes.
Looking at the screen for an extended period of time causes eye fatigue and may deteriorate your eyesight.
Rest your eyes for 5 ~ 10 minutes for every 1 hour of product use.
Reduce your eye strain by focusing on objects far away.
Frequent blinking and eye exercise help keep your eyes from drying out.
The Monitor uses a low blue light panel and compliance with TÜV Rheinland Low Blue Light Hardware Solution at factory reset/default
setting mode (Ex: Brightness 75%, Contrast: 50%, CCT: Normal, Preset mode: Standard.)
HDMI LEGAL DISCLOSURE
The Adopted Trademarks HDMI, HDMI High-Definition Multimedia Interface, and the HDMI Logo are trademarks or registered trademarks
of HDMI Licensing Administrator, Inc. in the United States and other countries.
The terms HDMI, HDMI High-Definition Multimedia Interface, and the HDMI Logo are trademarks or registered trademarks of HDMI
Licensing Administrator, Inc.

SHOP
New Products
Corsair.com Exclusives
Best Sellers
Where to Buy
Certified Refurbished
EXPLORE
CORSAIR Innovation
Custom Cooling
Best Gaming Accessories
Intel 12th Generation Upgrades
AMD AM5 Upgrades
DDR5 Memory
CORSAIR
About
Investor Relations
Supply Chain Disclosure
Careers
Social Impact
Press Room
Contact Us
Blog
Board Diversity Matrix
SUPPORT
Downloads
Customer Support
Warranty
RMA/Returns
Terms of Sale
BE THE FIRST TO KNOW
GET SPECIAL OFFERS, EXCLUSIVE PRODUCT NEWS,
AND EVENT INFO STRAIGHT TO YOUR INBOX.
ENTER EMAIL ADDRESS SIGN UP
LANGUAGE English Copyright © 1996 – 2023 CORSAIR. All rights reserved. | Terms of Use | Privacy Policy | Cookies Settings | Sitemap
References
 PC Components | Gaming Gear | CORSAIR
-
corsair (@corsair) Official | TikTok
 Investor Relations | Corsair Gaming, Inc.
-
PC Components | Gaming Gear | CORSAIR
-
12th Gen Intel® Core™ Processors with CORSAIR
-
ABOUT CORSAIR
-
PC Components | Gaming Gear | CORSAIR
-
Top Game-Winning Gear - CORSAIR’s Best PC Gaming Accessories
-
CORSAIR Best Sellers | Top Products
-
Board Diversity Matrix
-
corsair.com/Categories/Products/Certified-Refurbished/c/Cor_Products_Certified_Refurbished?q=&rawQuery=(inStockFlag_boolean:true)
-
CONTACT CORSAIR
-
Custom Cooling Configurator | CORSAIR
-
DDR5 Computer Memory | CORSAIR
-
CORSAIR Downloads | CORSAIR iCUE Software
-
CORSAIR Exclusive Products
-
Hot New Products
-
CORSAIR Newsroom
-
Return Refund Policy
-
Corsair Sitemap
-
Social Impact | CORSAIR
-
Technology Innovation | CORSAIR
-
Terms of Sale
-
TERMS OF USE
-
CORSAIR (@corsair) | Instagram
-
Twitch


