![]()
Item # 000-000
Model # G15
USE AND CARE GUIDE
SMART TOILET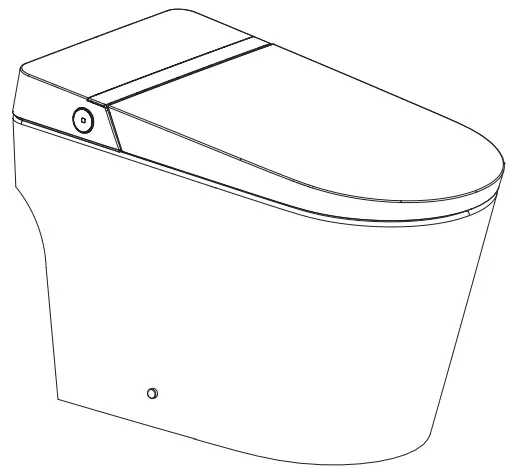 Questions, problems, missing parts? Before returning to the store,
call Glacier Bay Customer Service
8 a.m. – 7 p.m., EST, Monday-Friday, 9 a.m. – 6 p.m., EST, Saturday
1-855-HD-GLACIER
HOMEDEPOT.COM/GLACIERBAY
THANK YOU
We appreciate the trust and confidence you have placed in Glacier Bay through the purchase of this toilet. We strive to continually create quality products designed to enhance your home. Visit us online to see our full line of products available for your home improvement needs. Thank you for choosing Glacier Bay!
Safety Information
When using electrical products, especially when children are present, basic safety precautions should always be followed, including the following:
- The appliance is not to be used by persons (including children) with reduced physical, sensory or mental capabilities, or lack of experience and knowledge, unless they have been given supervision or instruction.
- This appliance can be used by children aged from 8 years and above and persons with reduced physical, sensory or mental capabilities or lack of experience and knowledge if they have been given supervision or instruction concerning use of the appliance in a safe way and understand the hazards involved.
- Children shall not play with the appliance.
- Cleaning and user maintenance shall not be made by children without supervision.
READ ALL INSTRUCTIONS BEFORE USING![]() DANGER: To reduce the risk of electrocution:
DANGER: To reduce the risk of electrocution:
- Do not use while bathing.
- Do not place or store product where it can fall or be pulled into a tub or sink.
- Do not place in or drop into water or other liquid.
- Do not reach for a product that has fallen into water. Unplug immediately.
- Do not wash the main unit (A) or electrical plug with water or detergent.
- Do not handle the electrical plug with wet hands.
- Never block the outlet of the air dryer.
- Never disassemble, repair or modify this product.
- During installation, disassembly, repair and maintenance of the product, the power plug must be switched off and water supply be shut off.
 WARNING: To reduce the risk of burns, electrocution, fire, or injury to persons:
 - Close supervision is necessary when this product is used by, on, or near children or individuals with disabilities.
- Use this product only for its intended use as described in this manual. Do not use attachments not recommended by the manufacturer.
- Never operate this product if it has a damaged cord or plug, if it is not working properly, if it has been dropped or damaged, or dropped into water. Return the product to a service center for examination and repair.
- Keep the cord away from heated surfaces.
- Never use while sleeping or drowsy.
- Never drop or insert any object into any opening or hose (J).
- Do not use outdoors or operate where aerosol (spray) products are being used or where oxygen is being administered.
- Connect this product to a properly grounded outlet only. See Grounding Instructions.
- Do not throw cigarettes and other burning materials into toilet, otherwise it might cause fire.
- This product is an electric appliance, so it must be placed far away from water and other liquid.
- Do not lay the product on its side or upside down during the electrical circuit.
- It is prohibited to use other electric appliances in the same socket.
- It is forbidden to use the power extension or unstable loose outlet.
- Do not reuse any existing water supply hoses, otherwise it might cause leakage, fire or electrical shock. Installation should include specified components and a new water supply hose (J).
![]() CAUTION: Indicates that failure to follow the instruction may cause body injury or property damage.
CAUTION: Indicates that failure to follow the instruction may cause body injury or property damage.
- Do not install or use the product in wet places such as steam room etc.
- It is recommended to use waterproof electrical outlet which should be installed in a place where it is not easy to get wet.
- This product should be used with 110V-120V, 50/60Hz electrical current only, load current is at least 15A. Power plug must be equipped with ground fault circuit interrupter or ground fault electrical leakage protector or similar high sensitive, rapid type leakage switch (Rated sensitive current under 6mA).
- When it thunders, it is strongly recommended to pull out the power plug.
- Do not stand on ceramic toilet.
- Ceramic toilet must install floor fixing bolts.
- Do not stand on product unit, seat and lid.
- Do not lean against the seat lid when using the product, to avoid damage.
- This product is equipped with a soft-closing seat lid. Do not push the toilet seat closed, or damage may occur.
- Do not use any caustic chemicals or scrubbing brush to clean this product.
- Exposure to direct sunlight is prohibited.
- Only use tap water or potable water, otherwise it may cause chafing.
- Do not connect water supply to heater outlet. Make sure inlet water temperature is between 37.4–95°F (3–35°C).
- When the room temperature is under zero degree, please drain the water tank, to avoid freezing.
- Raise room temperature to prevent the toilet from damage due to freezing.
- When moving the product from cold or wet environment into normal room temperature, wait for 2 hours until the condensation water is fully volatilized. Doing so can prevent the product from electrical short circuit.
- When not using the product over three (3) days, drain the water out of the toilet and pull the electrical plug from the wall outlet.
- Stop using the product and shut off the power when product malfunctions. Call for professional service.
GROUNDING INSTRUCTIONS
This product should be grounded. In the event of an electrical short circuit, grounding reduces the risk of electric shock by providing an escape wire for the electric current. This product is equipped with a cord having a grounding wire with a grounding plug. The plug must be plugged into an outlet that is properly installed and grounded.
![]() DANGER: Improper use of the grounding plug can result in a risk of electric shock.
DANGER: Improper use of the grounding plug can result in a risk of electric shock.
- If repair or replacement of the cord or plug is necessary, do not connect the grounding wire to either fiat blade terminal. The wire with insulation having an outer surface that is green with or without yellow stripes is the grounding wire.
- This product is factory equipped with a specific electric cord and plug to permit connection to a proper electric circuit. Make sure that the product is connected to an outlet having the same configuration as the plug. No adapter should be used with this product. Do not modify the plug provided — if it will not fit the outlet, have the proper outlet installed by a qualified electrician. If the product must be reconnected for use on a different type of electric circuit, the reconnection should be made by qualified service personnel.
Warranty
Thank you for choosing our product. This product is warranted for three (3) years from the purchasing date for free repair of problems arising out of defects in workmanship while using in accordance with installation manual and usage cautions for intended purposes.
If the product does not work properly within warranty period, please contact your nearest service center. This certificate must be presented to obtain free service under this warranty. Our company reserves the right to replace the product by other similar models.
We can fix or repair the product at a reasonable service charge after expiration of warranty period. Service charges shall be paid even during the warranty period, if breakage or damage is caused by any of the following events (including but without limitation) :
- The user’s negligence or mistake in operation, unreasonable repair or alteration.
- Product is damaged by negligence or mistake during installation.
- The movement of installation location of the product.
- Using the product outside of intended use in residential housing or commercial hotel.
- The use of non specified power supply (voltage, rating pressure).
- The dirt, sand and impurities causing invalid operation.
- Damages due to force majeure (including but not limited to natural disaster) or other incidents.
- The user fails to use in compliance with the warning or caution described in the installation manual.
Remark
- Please fill in date and seller correctly. If there are some mistakes, the warranty will get invalid.
- This three year warranty for free of charge of repair service is only for the items listed in the warranty.
- The purchasing date is subject to the purchasing invoice or receipt.
- Please keep this warranty and invoice/receipt available for repair or maintenance.
Pre-installation
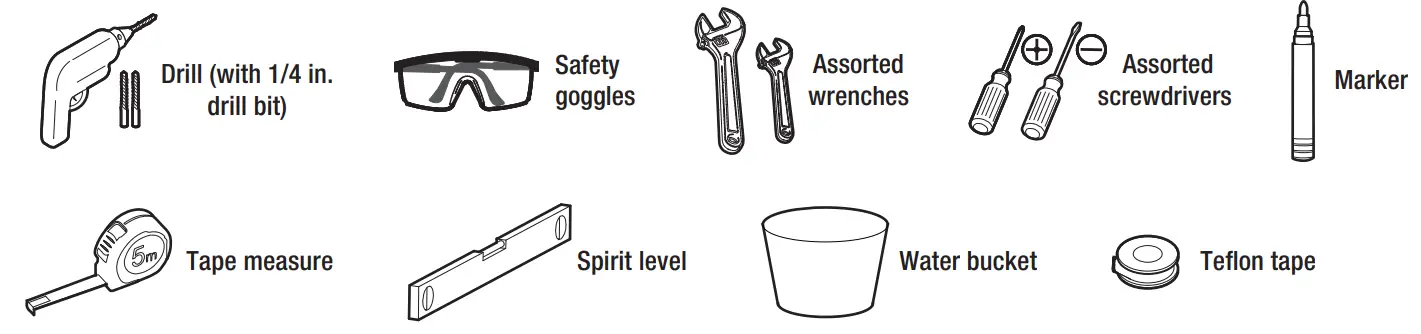
TOOLS REQUIRED
TECHNICAL DRAWING
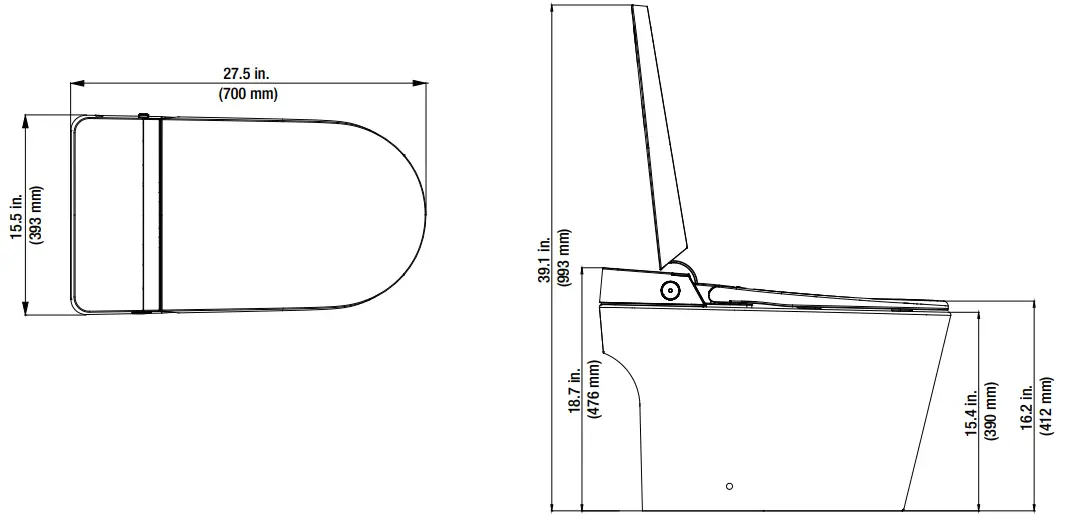
- The drawing is for reference only, and we reserve the right to modify the product appearance.
- Product appearance is subject to change in kind.
HARDWARE INCLUDED
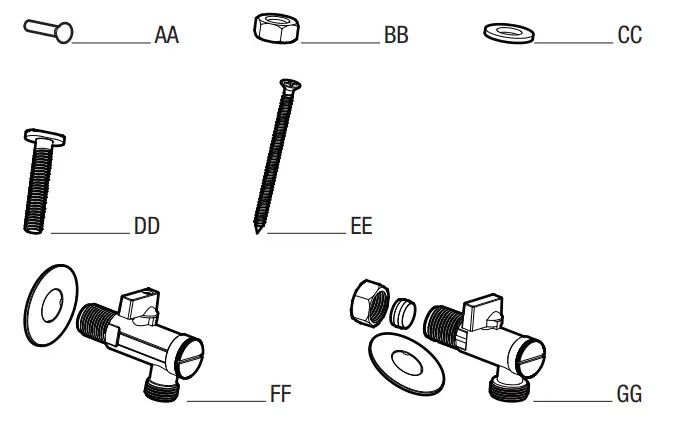
| Part | Description | Quantity |
| AA | Screw | 1 |
| BB | Nut | 2 |
| CC | Washer | 2 |
| DD | Bolt | 2 |
| EE | Screw | 2 |
| FF | Angle valve (15/16-14UNS) | 1 |
| GG | Angle valve (NPT 1/2) | 1 |
PACKAGE CONTENTS
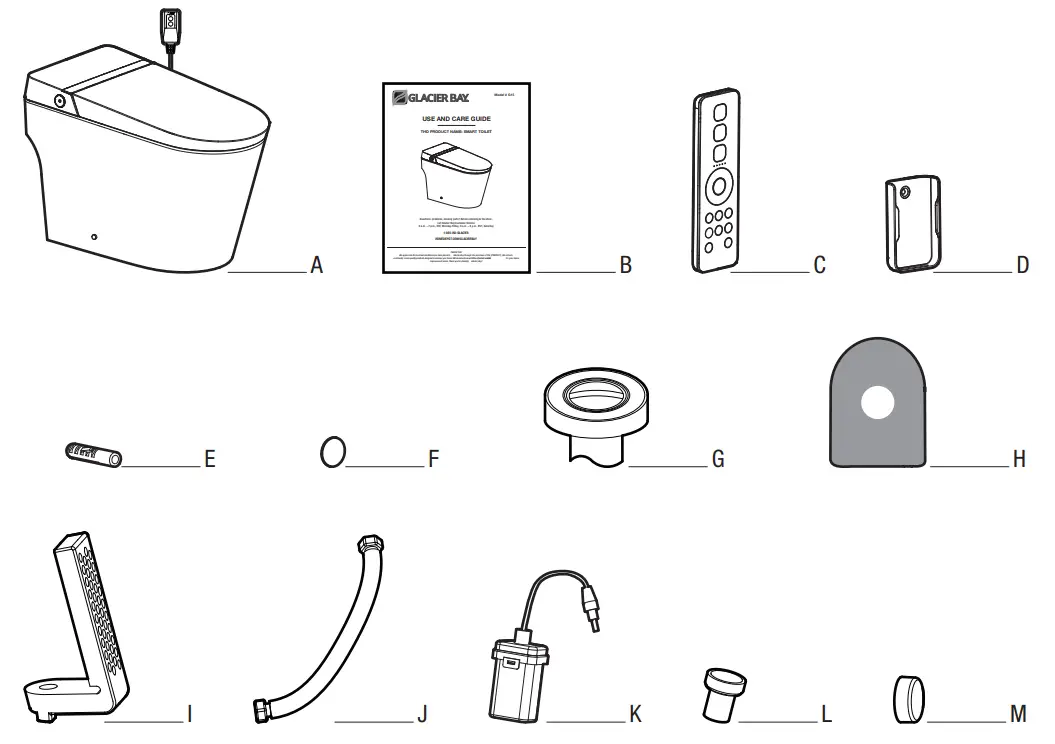
| Part | Description | Quantity |
| A | Main unit | 1 |
| B | Installation manual | 1 |
| C | Remote control | 1 |
| D | Remote control hanger | 1 |
| E | Expansion pipe | 2 |
| F | Patch | 2 |
| G | Sealing fiange | 1 |
| H | Installation cardboard | 1 |
| I | Mounting bracket | 2 |
| J | Braided hose | 1 |
| K | Battery box | 1 |
| L | Fixing sleeve | 2 |
| M | Decorative cap | 2 |
Installation
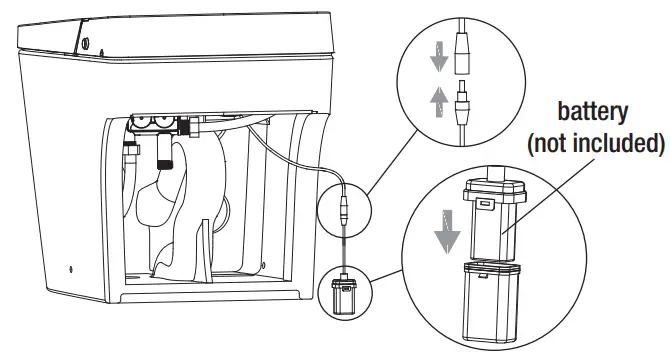
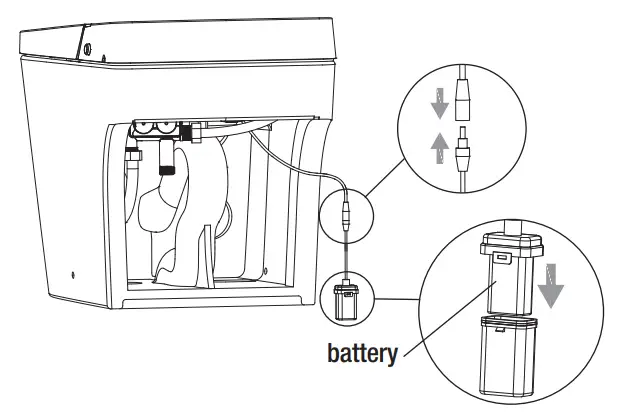
1 Installing battery box
- Take battery box (K) and insert battery (not included) for flushing without power.
- Connect battery box (K) to the connection cable under the toilet.
- Place battery box (K) at the bottom of toilet.
![]() NOTE: It is recommended to use high quality 6LR61 9V battery.
NOTE: It is recommended to use high quality 6LR61 9V battery.![]() NOTE: Connect battery box (K) to cable for flushing without power and place it at the bottom of toilet if this function is not required.
NOTE: Connect battery box (K) to cable for flushing without power and place it at the bottom of toilet if this function is not required.
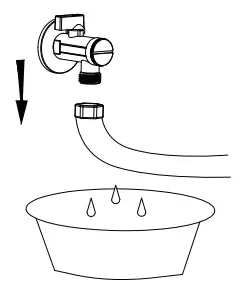
2 Checking water volume
- Minimum dynamic working water pressure:
0.18+ MPa (5.81+ gal/min or 22+ L/min), failure to meet this pressure will not achieve the best flushing effect.
![]() NOTE: Apply the methods below if you don’t have water pressure testing device.
NOTE: Apply the methods below if you don’t have water pressure testing device.
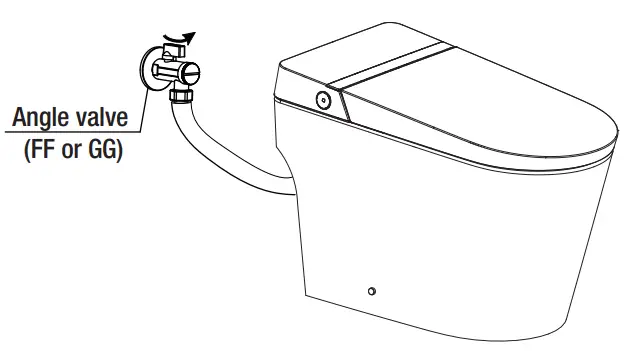
- Open the angle valve (FF or GG) to check the water volume.
If the water volume after 10 seconds is greater than 0.97 gal (3.7 L), then it is OK to proceed with installation.

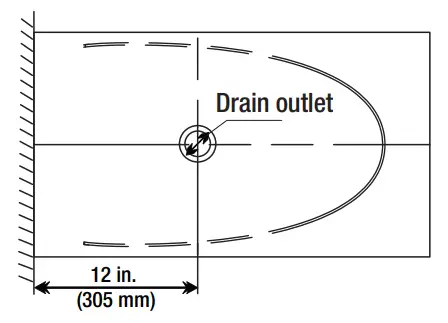
3 Installing mating angle valve
- Draw drain outlet centerline on the floor.
- Install angle valve (FF or GG) at proper position on wall according to dimension of toilet.
- Choose the correct size of mating angle valve (FF or GG) that is compatible with your water oulet from the package.
![]() CAUTION: Do not install or use the product in wet places such as a steam room, etc.
CAUTION: Do not install or use the product in wet places such as a steam room, etc.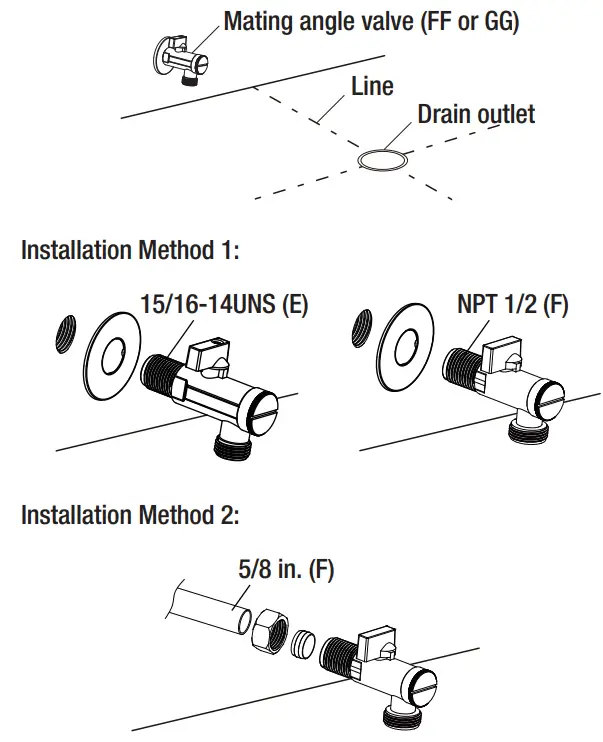 4 Installing the cardboard
- Align cardboard (H) with the centerline of drain outlet.
- Draw contour line according to cardboard (H).
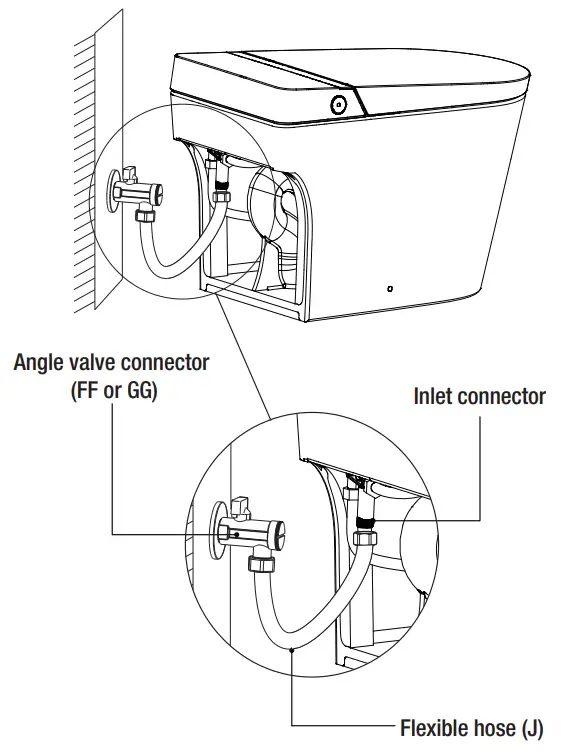
5 Connecting the hose
- Connect the water inlet and angle valve (FF or GG) of the toilet with the matching hose (J) and tighten it.
![]() WARNING:
WARNING:
The old aging water supply hose can not be used, as it might cause leakage, fire or electrical shock.
Installation of the bidet seat should include specified components and new water supply hose (J).
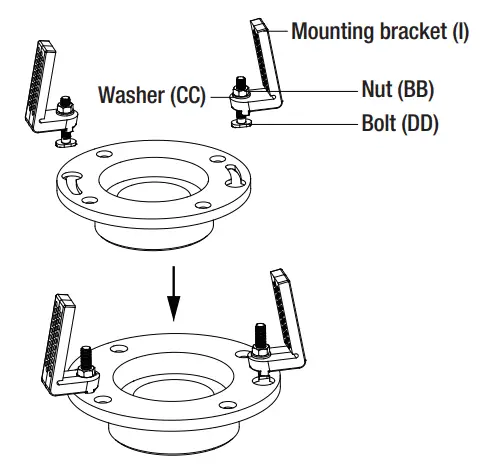
6 Installing the mounting bracket
- Assemble the mounting bracket (I) with bolts (DD).
- Install them to the pre-installed flange plate (not included) on the ground.
- Lock tight with washers (CC) and nuts (BB).
![]() CAUTION: The floor fixing bolt should be installed to ceramic toilet.
CAUTION: The floor fixing bolt should be installed to ceramic toilet.
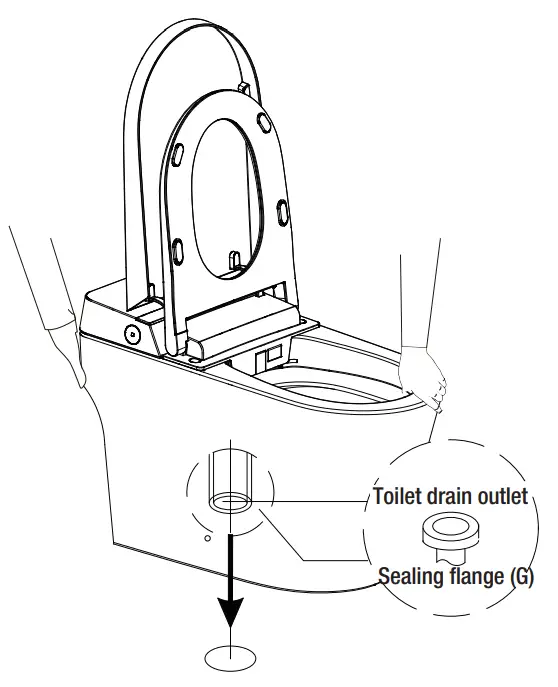
7 Installing the toilet
Install a sealing flange (G) into drain outlet.
Install toilet on the corresponding position (refer to step 4).
![]() NOTE: Two people are required to carry the toilet.
NOTE: Two people are required to carry the toilet.![]() NOTE: Please clean up the drain outlet.
NOTE: Please clean up the drain outlet.![]() NOTE: Please make sure toilet outlet sits perfectly on drain outlet.
NOTE: Please make sure toilet outlet sits perfectly on drain outlet.
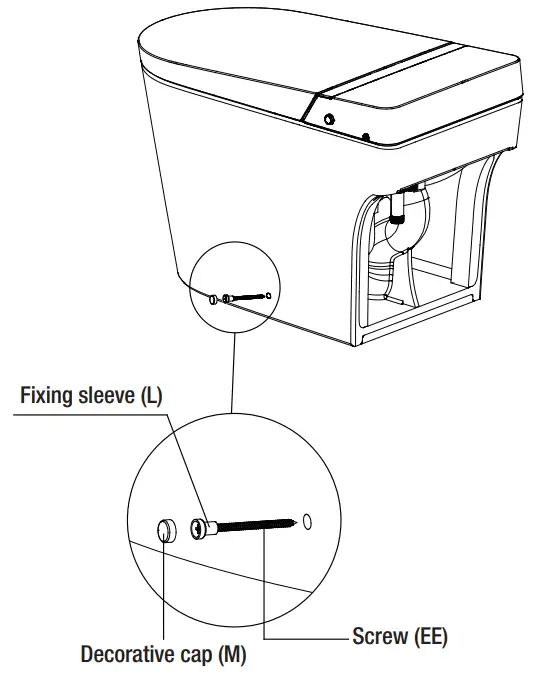
8 Installing the mounting bracket
- Put the screw (EE) through the fixing sleeve (L).
- Install it through the holes (on both sides of the toilet to the mounting bracket (I) on the ground. Lock tight.
- Install the decorative cap (M) on the fixing sleeve (L).
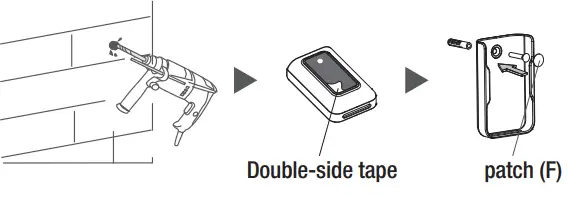
9a Installing the remote holder (Option 1)
- Drill a 6 mm diameter hole in the wall to a depth of about 35 mm.
- Tear off the double-sided adhesive sticker on the back of the hanger (D).
- Install the expansion pipe (E) into the wall hole, and align it with the hanger (D) hole. Attach the double-sided adhesive sticker on the back of the hanger (D) to the wall,
lock the screw (AA), and tear off the double-sided adhesive sticker on the back of the patch (F) and stick it on.
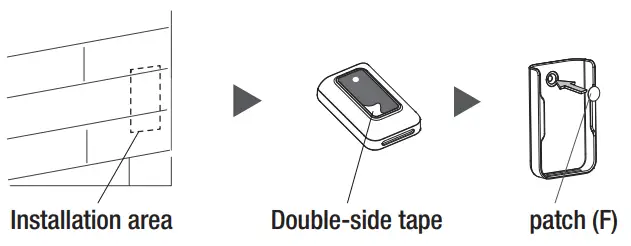
9b Installing the remote holder (Option 2)
- Clean and wipe dry the pre- installed area of the remote control hanger (D) on the wall.
- Tear off the double-sided adhesive sticker on the back of the hanger (D).
- Stick to the wall vertically, tear off the double-sided adhesive sticker on the back of the patch (F) and stick it on.

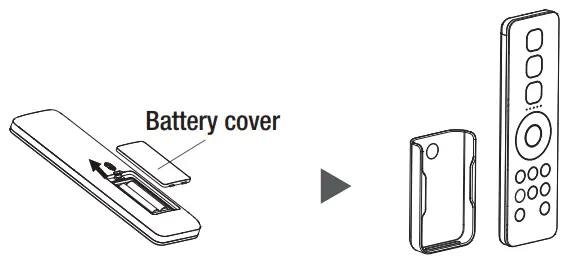
10 Battery installation
- Install the new batteries (not included) into the remote control (C) and cover the battery cover.
- Put the remote control (C) in the hanger (D).
![]() NOTE: When determining the installation position, it is necessary to ensure that the remote control (C) can be reached by hand when the person is sitting on the toilet.
NOTE: When determining the installation position, it is necessary to ensure that the remote control (C) can be reached by hand when the person is sitting on the toilet.![]() CAUTION: It is forbidden to install and use the product in the bathroom and other wet places. And do not put it in the place where it is easy to be drenched by water.
CAUTION: It is forbidden to install and use the product in the bathroom and other wet places. And do not put it in the place where it is easy to be drenched by water.
11 Turning on the angle valve
- Check the threaded connection for leaks to ensure complete sealing.
- Turn the angle valve (FF or GG) counterclockwise to the full open position.
![]() NOTE: The angle valve (FF or GG) opens with a large torque for thefirst time.
NOTE: The angle valve (FF or GG) opens with a large torque for thefirst time.
12 Connecting the power
- Plug the toilet’s leakage protection plug into a power socket.
- Press the reset switch, plug indicator lights up, indicating that the power is on.
- Press the test button prior to usage, the reset switch pops up indicating that the leakage protection function is normal.
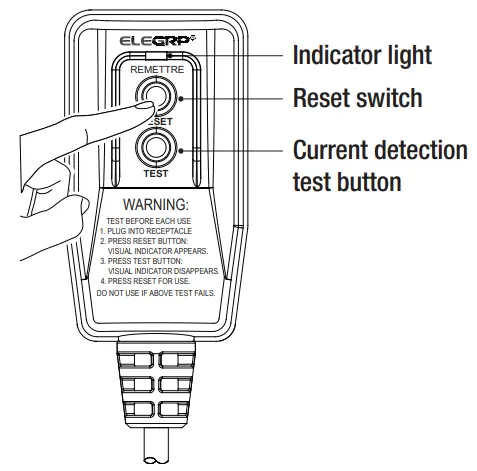
![]() NOTE: Press the TEST button (then RESET button) every month to assure proper operation.
NOTE: Press the TEST button (then RESET button) every month to assure proper operation.![]() NOTE: Only for models with leakage protection plug.
NOTE: Only for models with leakage protection plug.![]() NOTE: Please refer to the actual product.
NOTE: Please refer to the actual product.
13 Running self-inspection
- Once power is connected, the buzzer beeps and the button lights up in white. All icons on the display light up, and the self-inspection starts.
- The buzzer beeps again, then the self-inspection completes. The button lights up in white. Sterilization, water temperature and ECO icons go off and seat temperature icon lights up.
- The product is ready to use.
Operation
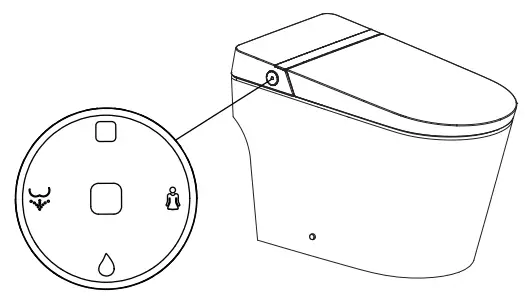
1 Parts identification
Left side
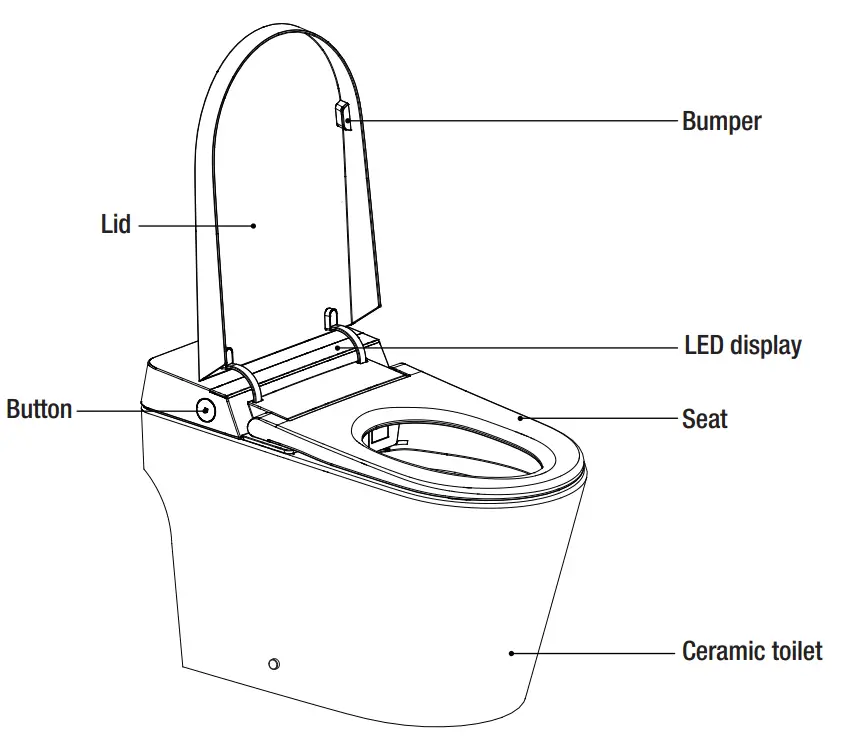
Right side
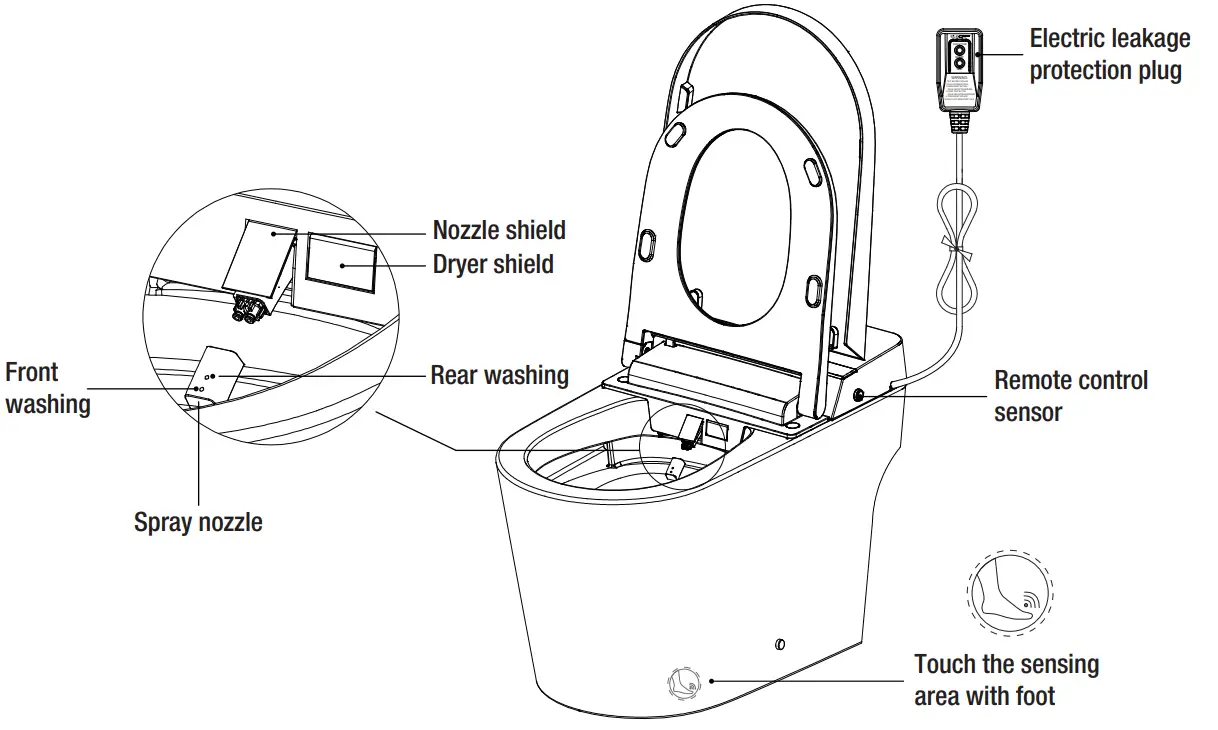
![]() NOTE: Please refer to the actual product.
NOTE: Please refer to the actual product.
2 Button functions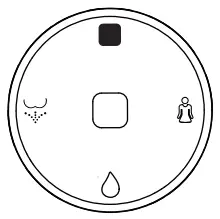
| Press and hold Stop button to enter shutdown mode (white light off). Press Stop button again to return to functional mode (white light on, not flashing). In shutdown mode, all functions and buttons (with the exception of the Stop button) will not operate. When seated, short press Stop button to stop front washing, rear washing or drying functions. When no one is seated, repeatedly press Stop button to switch between functional mode (white light always on) and energy saving mode (white light flashing). | |
Moving washing | When seated, press Rear Washing button to start rear washing function and press again to shift to moving washing. Press Stop button to stop rear washing immediately. After one washing cycle, the drying function will be automatically turned on and stop after one cycle. When no one is seated, press Rear Washing button, the nozzle will stretch out to allow access for cleaning. Press Stop button, the nozzle will retract. |
Moving washing | When seated, press Front Washing button to start front washing function and press again to shift to moving washing. Press Stop button to stop front washing immediately. After one washing cycle, the drying function will be automatically turned on and stop after one cycle. |
| When seated, long press Flushing button to start drying function. The drying will stop automatically after one cycle. Press the Stop button to immediately stop the drying function. Short press Flushing button to start flushing function. During rear washing or front washing, flushing function will not operate. During nozzle cleaning, only when spray wand is fully extended or retracted can flushing function be activated. |
![]() NOTE: Default settings for all functions are intermediate when powering on. Use remote control (C) to switch to the function level set before.
NOTE: Default settings for all functions are intermediate when powering on. Use remote control (C) to switch to the function level set before.
3 LED display description

- During self-inspection, the icons for sterilization, water temperature, seat temperature and ECO light up, and the temperature is displayed at 88°F. After self-inspection, sterilization, water temperature and ECO icons go off and seat temperature icon lights up, showing current seat temperature. The temperature shows “–” at neutral level.
- When not in energy saving mode, seat temperature icon lights up, showing current seat temperature (temperature in neutral shows “–“). During water temperature adjustment, seat temperature icon goes off and water temperature icon lights up, showing current water temperature (temperature in neutral shows “–“). Water temperature icon goes off and seat temperature is displayed after 10 seconds.
- During washing, seat temperature icon goes off and water temperature lights up, showing current water temperature (temperature in neutral shows “–“).
- Sterilization icon lights up when this function is turned on, otherwise it is off.
- In energy saving mode, ECO icon lights up. Seat temperature in neutral shows “–“, otherwise it shows Level 1.
- LED display goes off completely when shutting down.
- LED display goes off completely after 30 seconds once no longer being used. When seated or pressing any button, LED display is activated to show current status.
- When user enters the sensing range, LED display lights up showing current status. Display goes off completely 30 seconds after user leaves.
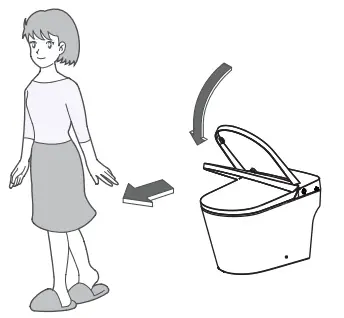
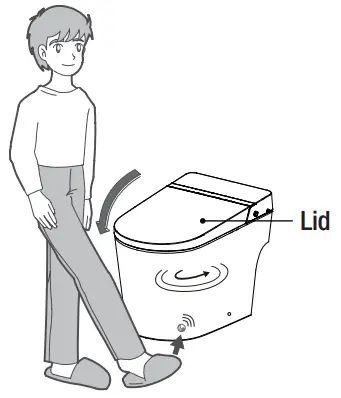
4 Lid auto open/close
- Approaching the toilet
When user enters the sensing range, the seat lid opens automatically.
- Leaving the toilet
The seat lid closes automatically 3 minutes after user leaves.
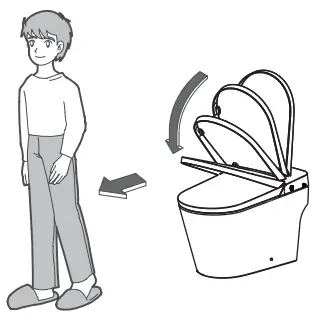
- Standing up to urinate
Open the seat by remote control (C) or hand.
The seat and lid close automatically 3 minutes after user leaves.

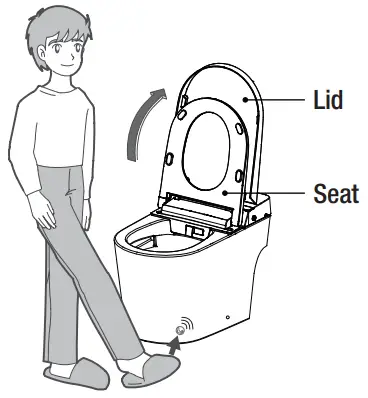
5 Foot sensor
- When the lid and seat are both closed, touch the sensing area with foot to open the lid.

- When the lid is open and seat closed, touch the sensing area with foot to open the seat.

- When the seat and lid are open, touch the sensing area with foot to close the seat and lid and activate a flush.


Remote control operation
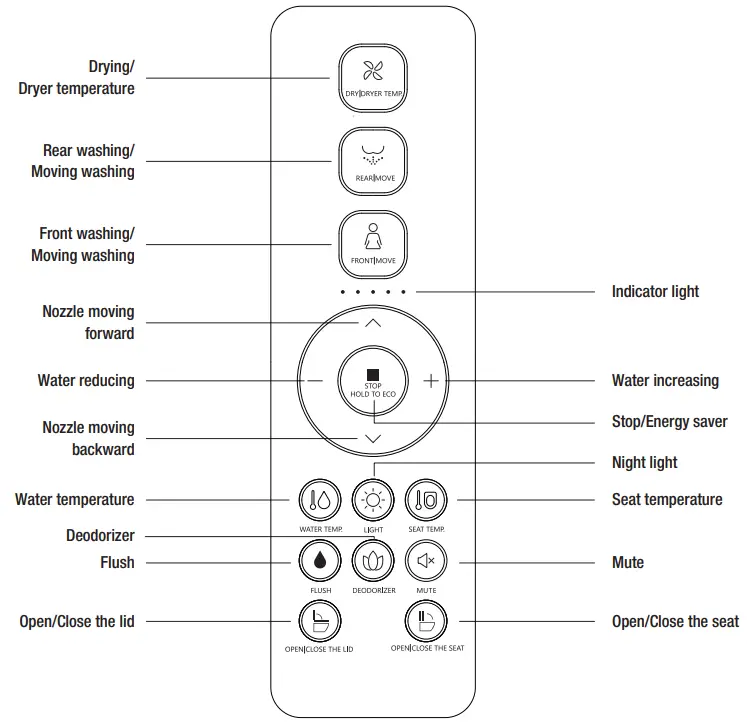
1 Button functions
![]() NOTE: The unit makes a clicking noise when front washing, rear washing, and drying functions are in operation.
NOTE: The unit makes a clicking noise when front washing, rear washing, and drying functions are in operation.![]() NOTE: Please stay backward when sitting on the seat so that the cleansing position can be easily aligned and there will be no splash.
NOTE: Please stay backward when sitting on the seat so that the cleansing position can be easily aligned and there will be no splash.![]() NOTE: The nozzle will continue to spray for 1-2 seconds after the “STOP” button is pressed.
NOTE: The nozzle will continue to spray for 1-2 seconds after the “STOP” button is pressed.
2 Using the remote
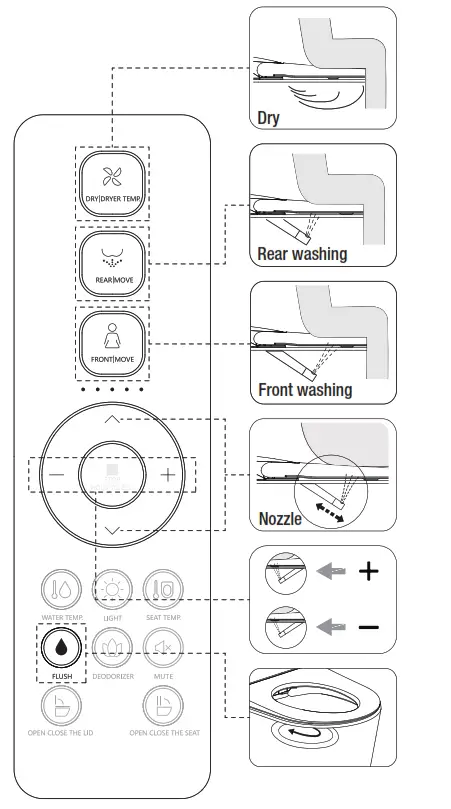
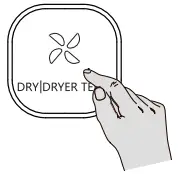
- DRY | DRYER TEMP
Press the ” ” button, the indicator light will light up, showing the current air temperature range. It will stop drying automatically after a cycle or after the user leaves the seat.
In the process of drying, press the ”” button to adjust the air temperature, and the indicator light will light up to display the air temperature range. When the indicator light is not on, it is 0 grade (normal temperature range), and the range adjustment mode is 0-5 grade in turn. - REAR | MOVE
Press “ ” button, the indicator light shows current water temperature level, and rear washing starts. Press again ” ” button to shift to moving washing (nozzle moves forward and backward to expand washing area). The washing will last for a cycle and stop automatically. Press the ”
  ” button to immediately stop washing.
 - FRONT | MOVE
Press “ ” button, the indicator light shows current water temperature level, and front washing starts. Press again ” ” button to shift to moving washing (nozzle moves forward and backward to expand washing area). The washing will last for a cycle and stop automatically. Press the ” ” button to immediately stop washing.
 - SPRAY NOZZLE POSITION ADJUSTMENT
Press ” ∧ ” or ” ∨ ” button when it is under function of rear cleaing or front washing, the indicator light will show the current nozzle position. Adjust nozzle position by 5 levels. - WATER VOLUME ADJUSTMENT
Press ” + ” or ” – ” button during rear washing or front washing, the indicator light will show the current water volume level. Adjust water volume by 3 levels. - FLUSH
Short press ” ” button, the toilet starts flushing.
Long press ”” button to turn on/off auto flush function.
When the auto flush function is turned on, toilet will automatically flush after detecting user leaving the seat.
- ECO
Long press ”” button to enter energy saving mode. Long press ” ” button again to exit energy saving mode.
Energy saving
Under energy saving mode, seat temperature is low (level 1) to achieve energy saving.

![]() NOTE: If the seat temperature before energy saving is neutral, keep the neutral after energy saving.
NOTE: If the seat temperature before energy saving is neutral, keep the neutral after energy saving.
Energy saving mode will be suspended and go to function mode if someone uses the seat in the middle of energy saving. The seat starts to heat immediately when the seat temperature is not turned off, and the energy saving mode is restored after the user leaves the seat.
- WATER TEMP.
Short press the ” ” button to adjust the water temperature. The indicator will show the water temperature level if it’s on. When the indicator is off, the water level is 0. Short press this button to adjust water temperature level from 0 to 5 in cycle.

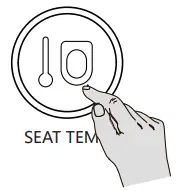
- SEAT TEMP.
Short press the ” ” button to adjust the seat temperature. The indicator will show the seat temperature level if it’s on. When the indicator is off, the seat level is 0. Short press this button to adjust seat temperature level from 0 to 5 in cycle.

- LIGHT
Night light adjustment: Short press ” ” button to turn on/turn off night light. Smart mode: Long press ” ” button to enter into smart mode (night light will be on or off by detecting the lightness of surroundings). If the product is in smart mode, short press ” ” button to exit smart mode. (Night light factory default setting is smart mode.)
- DEODORIZER
Short press ” ” button to turn on/off auto deodorization function. While the auto deodorization function is on, deodorizing starts when it detects a user is seated and stops when user leaves. When warm air is on, deodorization function is off. (This function is set to on by default.)
- MUTE
Short press ” ” button to turn on/off quiet mode.
- OPEN | CLOSE THE LID | SEAT
Short press ” ” button to open or close the lid.
Short press ” ” button to open or close the seat.
Long press ”” button to turn on/off auto lid open/close function.
- STERILIZATION
When user is not seated and washing/drying is off, long press “” button to turn on plasma sterilization function. This function will stop automatically after 2 hours. During this mode, if any other button is pressed or user is seated, it will stop automatically.
- USER CODE
Plug in the toilet. It will execute self-inspection. When finished, it beeps once.
First press ”” button, then press “” button, the indicator light will f iash.
Press the Pressure ” + ” or ” – ” button to select user 1-9 (as shown below).
The indicator light displays the corresponding user code and flashes.
Press ”” button, then press “” button. The main unit (A) beeps once to signal the remote control (C) and the toilet are matched successfully.

- AUTOMATIC PRE-WETTING
Press and hold the ”” button and press the ” ” button to turn on or off the automatic pre-wetting function. After the automatic pre-wetting function is turned on, the pre-wetting function is performed when the user is detected to be seated.
- FOOT SENSE SWITCH
Press and hold the ”” button and press the ” ” button to turn the foot sense function on or off. In the seated status, foot sense function is invalid. - TIPS
The buzzer will sound “ BEEP ” when the user presses one button which means the main unit (A) receives the signal and conduct the operation accordingly. If the buzzer doesn’t sound, it means the main unit (A) doesn’t receive the signal. Please adjust the remote control (C) direction and repress the button.
In case of power outage during nozzle spray operation, the nozzle cannot go back to place. Please wait until power is restored. In case of a power outage for a long period, please push the nozzle softly back by hand. Do not push hard, to avoid damage to nozzle and electrical machine.


Maintenance
- Main unit (A) care and maintenance
- Shut off power supply before doing maintenance.
- Use only a soft, damp cloth to clean. Avoid using harsh chemicals.
- Once cleaning is completed and all surfaces are dry, reconnect the power plug.
- Filter maintenance
- Turn off power and the angle valve (FF or GG).
- Unscrew angle valve nut.
- Remove filter net.
- Clean out the filter net under running water using a toothbrush.
- Reinstall fllter net and angle valve nut.
- Turn on the angle valve (FF or GG) and connect the power.
- Spray nozzle maintenance and care
- Nozzle self-cleaning
- When no one is seated, short press “REAR/MOVE”
- Button on the main unit (A). The nozzle will automatically extend to allow access for cleaning.
- Spray nozzle disassembly
- When the nozzle moves forward, the nozzle can be removed and cleaned separately.
- Use only a soft cloth or soft brush to clean.
- Do not pull or push the wand, to avoid damage.
- Nozzle retraction
- Put the nozzle back on and press “Stop” Button to return the spray wand to its normal position.
 |  |
Emergency troubleshooting
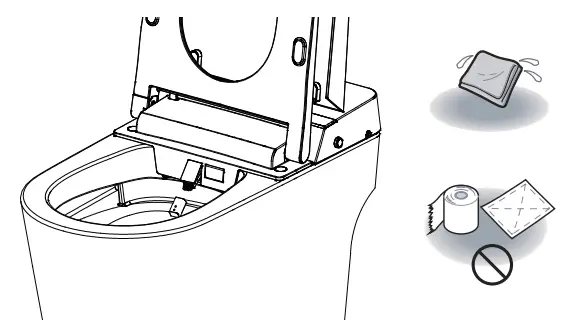
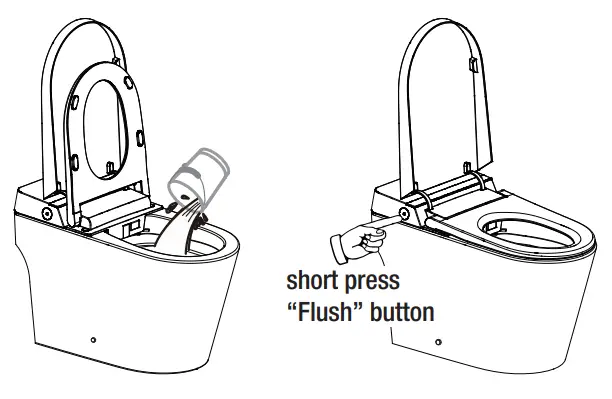
- No water supply
- Put around 2.1 gal (8 L) water into a barrel and flush the toilet bowl.
![]() NOTE: Avoid water spilling from bowl.
NOTE: Avoid water spilling from bowl.
- No power
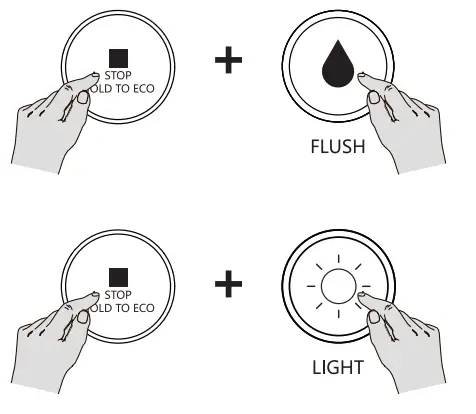
- Short press “Flush” Button on the main unit (A) to flush.
![]() NOTE: Please install battery before use.
NOTE: Please install battery before use.
- Low battery
- Operate via buttons on the main unit (A).
- Remote control (C) battery replacement:
- Remove the remote control (C) from hanger (D).
- Open the battery cover and replace the batteries.
- Put the remote control (C) back into the hanger (D).
![]() NOTE: After battery replacement, the remote control (C) settings will be restored to the defaults. Please reset.
NOTE: After battery replacement, the remote control (C) settings will be restored to the defaults. Please reset.
- Battery replacement
- Remove battery box (K) from the bottom of toilet and unplug DC connector.
- Install new battery (not included).
- Reconnect battery box (K) and put it back.

 NOTE: It is recommended to use high quality 6LR61 9V battery. NOTE: It is recommended to replace the battery every two years, otherwise there may be a risk of leakage.
 - Product unused for a period of time
- When the product is left unused for a long time, especially in cold weather, it is highly recommended to drain the water to prevent freezing.
- To discharge water
- Activate flushing, and then turn off angle valve (FF or GG) to stop water supply.
- Unplug and cut off the electricity.
- Disconnect the hose (J) from angle valve (FF or GG), drain the water and reconnect.
- For your safety, it is recommended to put antifreeze into the remaining water in the bowl.
- Please turn on power and water supply when using again.

![]() CAUTION: Before discharging water, the power must be turned off!
CAUTION: Before discharging water, the power must be turned off!
Troubleshooting
| Problem | Cause | Solution |
| No water from nozzle. | Water supply hose (J) is kinked. | Straighten the hose (J) to remove the kink. |
| Angle valve (FF or GG) is off. | Turn on the angle valve (FF or GG). | |
| A water failure occurred. | Restore the water supply. | |
| Poor water spraying. | Water supply hose (J) is kinked. | Straighten the hose (J) to remove the kink. |
| Angle valve (FF or GG) is not fully turned on. | Turn on the angle valve (FF or GG) fully. | |
| Filter is clogged. | Clean the filter. | |
| Low water temperature. | The water temperature is not set properly. | Adjust the water temperature. |
| Low seat temperature. | The seat temperature is not set properly. | Adjust the seat temperature. |
| In standby mode. | Switch to functional mode and wait for 3+ minutes. | |
| Low dryer temperature. | The dryer temperature is not set properly. | Adjust the dryer temperature. |
| Dryer not blowing. | In standby mode or energy saving mode. | Switch to functional mode to use drying function. |
| Spray wand cannot retract. | Power is off. | Push back the spray wand gently and turn power on. |
| It is stuck by impurities. | Remove the impurities. | |
| Spray wand cannot stretch out. | Power is off. | Turn on the power. |
| User is not within the sensing area of the seat. | Adjust position on seat to activate the sensor. | |
| Remote control (C) cannot display. | The positive and negative direction of the batteries is incorrect. | Reload the batteries. |
| Low battery. | Replace with new batteries. | |
| Malfunction of deodorization. | User is not within the sensing area of the seat. | Adjust position on seat to activate the sensor. |
| Deodorization function continues after user leaves. | It is normal for the deodorizing function to continue operating after user leaves, for complete odor removal. | |
| When power is off, there will be no flush by pressing knob. | The battery is low or not installed. | o Take battery box (K) off the toilet. o Open the battery box (K) lid. o Install or replace the battery. o Reconnect battery box (K) and put it back. |
![]() CAUTION: If the problem cannot be resolved as per above solutions, please disconnect the power and contact service providers.
CAUTION: If the problem cannot be resolved as per above solutions, please disconnect the power and contact service providers.![]() CAUTION: If the power leakage protection switch always trips, it means that the product is leaking. Please disconnect the power and contact service providers.
CAUTION: If the power leakage protection switch always trips, it means that the product is leaking. Please disconnect the power and contact service providers.
Technical specifications
| Model | 615 | |
| Main Unit | Rated voltage | 110 V-120 V. 50/60 Hz |
| Rated power | 1170 W | |
| Waterproof | IPX4 | |
| Power cord length | About 7.2 ft. (2.2 m) | |
| Toilet | Flush volume | 1.28 gpf (4.8 Lpf) |
| Flushing mode | Siphonic jet | |
| Rough-in | 12 in. (305 mm) | |
| Outlet outside diameter | La 3.9 in. (100 mm) | |
| Drainage method | S-trap | |
| Water pressure range | 0.18 MPa (dynamic pressure, flow rate of 5.81+ gal/min or 22.0+ Umin) – 0.8 MPa (static pressure) | |
| Washing device | Heating mode | Instant |
| Heating power | 120 V/1400 W | |
| Water temperature | 6-level adjustment | |
| Water volume | 3-level adjustment | |
| Washing mode | Rear washing / Moving washing Front washing / Moving washing | |
| Nozzle position | 5-level adjustment | |
| Water pressure protector | Pressure maintaining device. Automatic pressure relief device | |
| Anti-fouling device | Automatic nozzle cleaning, Anti-syphon device, Anti-backflow device, Filter device | |
| Safety device | Thermal fuse, Water temperature sensor. Ground protection, Thermostat, Over temperature protection, Leakage protection plug | |
| Drying device | Warm air volume | Over 0.2 ma/min |
| Warm air temperature | 6-level adjustment | |
| Heating power | 250 W | |
| Safety device | Thermal fuse. Temperature sensor. Thermostat | |
| Deodorization | Deodorization method | Photocatalyst-free |
| Heated seat | Surface temperature | 6-level adjustment |
| Heating power | 50 W | |
| Burn protection | Atter 10 minutes of use. the seat temperature will automatically drop slowly to a low level | |
| Safety device | Seat sensor. Temperature sensor. Thermostat. Thermal fuse. Leakage protection plug | |
| Caring device | Night light assembly | Intelligent. Always on. Always off |
| User ID setting | To avoid interference when used by muttiple users | |
| Automatic flushing | Automatic flushing after use | |
| Foot sensor function | Foot sensor flushing | |
| Cover opening | Cover auto-open | |
| Antibacterial site | Seat, Nozzle | |
| Rated power: Under the condition of ambient temperature 73 °F/23 °C, water static pressure 0.18 NIPa+0.02 MPa, water temperature 41 °F/5 °C, turn on toilet (A). set water pressure, seat temperature, and water temperature to the highest level in turn and perform one rear washing cycle. | ||
![]()
Questions, problems, missing parts? Before returning to the store,
call Glacier Bay Customer Service
8 a.m. – 7 p.m., EST, Monday-Friday, 9 a.m. – 6 p.m., EST, Saturday
1-855-HD-GLACIER
HOMEDEPOT.COM/GLACIERBAY
Retain this manual for future use.


