HARMAN BEYOND 1 Digital Integrated Amplifier
Important Safety Instructions
Product Overview
Thank you for purchasing JBL BEYOND series digital integrated amplifiers!
The JBL BEYOND digital integrated amplifier is optimized for use in karaoke, small commercial and pro-sumer applications.
Using built in digrtal signal processing to deliver JBL’s signature sound. Equipped with three 6.35mm microphone inputs, 2 HDMI inputs, 2 stereo RCA inputs, one optical input as well as 1 HDMI (ARC) output, a line level output for a powered subwoofer, this amplifier is designed for ultimate connectivity with a number of devices, the JBL beyond delivers warm vocals and crystal clear audio that everyone can enjoy. Bluetooth connectivity and a front mounted USB port allows for maximum play back options so you can listen to or sing along with your favorite songs. The Beyond features 2 channels of output with 1 B0Wor 360W per channel output meaning that you can pick the perfect amplifier to power your next set of JBL speakers.
Features
- Integrated Professional Grade DSP, high-efficiency Class-D power amplification
- Three levels of feedback suppression for microphone input
- Rich JBL signature karaoke sound experience with Key Change functionality
- Eight preset modes: KTV, PRO, Speech and 5 user definable settings
- Independent control of reverb and echo effects
- Music input via optical connection or Two pairs of RCA connectors
- Play music easily from your phone via Bluetooth or Flash Drive via USB playback
- Two HDMI inputs and one HDMI output featuring (ARC functionality)
- 15-band parametric equalizer for microphone input
- 15-band parametric equalizer for music input
- Knob-type speaker output terminals for Left and Right speakers
- Subwoofer RCA output for fast, simple connection to active subwoofers
- Stereo AUX RCA output
- Built-in compressor
- One 3.5 mm RS232 connector for connection to centralized control of KTV room or smart home systems
- Professional grade computer-based control or EQ and output via USB can be used to fine-tune the system
Packing List
Upon arrival of the equipment, please unpack and inspect immediately. In the event of shipping related damage, please contact the shipper immediately. Claims for damage during transport must be filed by the equipment recipient, the recipient must keep the shipping box for inspection by the transport company.
Attention: It is highly recommended that all packaging materials be retained for future use when transporting equipment. I Do not transport equipment without factory packaging.
The packing list is as follows:
- 1 x Digital Integrated Amplifier
- 1 x Power Cord
- 2 x Bracket Accessories
- 1 x Remote Control
- 1 x User Manual
- 1 x Instructions for Environmental Protection
- 1 x Adhesive Front Panel Operation Label (It can be stick on top of the device cover for easy operation indication)
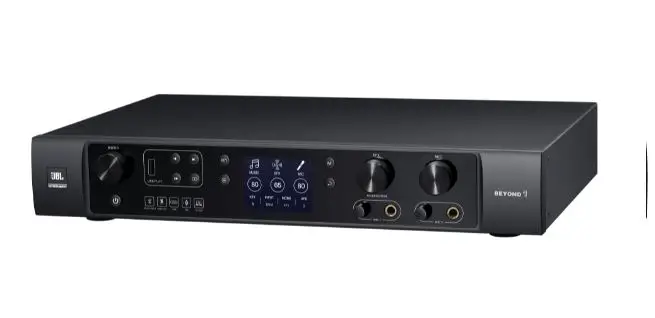
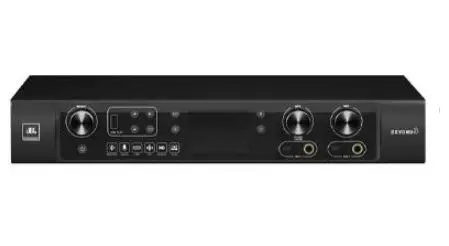
The operation method for all models of the BEYOND series digital integrated amplifiers is the same. This manual takes the images of BEYOND 3 for illustration.
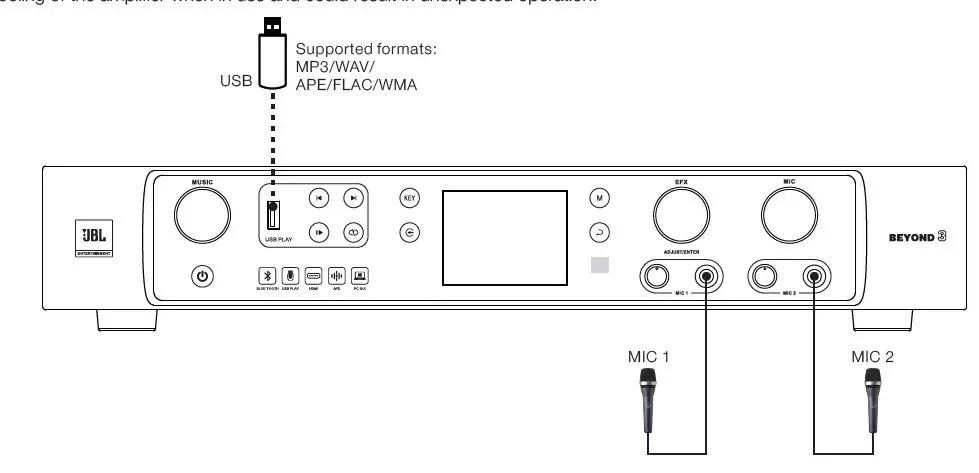
Front Panel
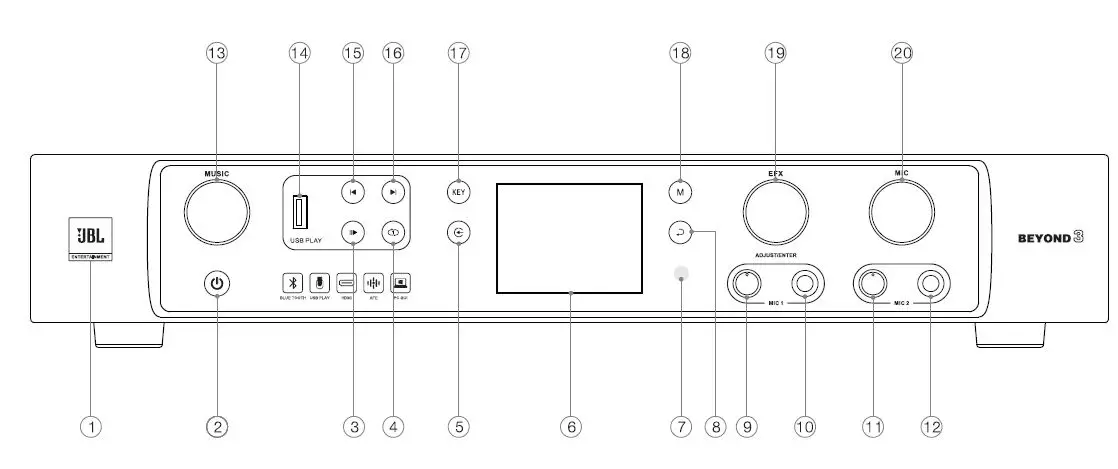
- LOGO: turns on when the equipment is started up.
- Power switch: turns on green when the equipment has power or is in standby mode, The LED changes to white after the equipment is switched on or woken from standby.
- Play/Pause button: For use with USB flash drive playback. Press this button to play or pause audio.
- Cycle button: When playing music on the USB flash disk, press this button to switch to single cycle, list cycle, and sequential cycle in sequence.
- Input selection button: press button then rotate the ADJUST/ENTER knob to select the corresponding music signal input channel.
- LCD display: displays current settings of the equipment, operation menus, and other information. Cf)
- IR: accepts remote control signals.
- Back button: press to go back to the main screen.
- MIC 1 input gain control knob: rotate the knob to adjust the input gain of microphone 1.
- MIC 1 input TRS socket (6.35 mm
- MIC 2 input gain control knob: rotate the knob to adjust the input gain of microphone 2
- MIC 2 input TRS socket (6.35 mm)
- MUSIC button: rotate the knob to adjust the volume of music. Press to enter the music setup screen.
- USB Flash Drive Port: insert the USB flash Drive and set the music input to USB/BT to play music.
- Previous button: press this button to switch to the previous audio file on the USB Flash Drive.
- Next button: press this button to switch to the next audio file on the USB Flash Drive.
- KEY button: when playing music, press this button and rotate the ADJUST/ENTER knob to adjust the music key.
- M button: press this button and rotate theADJUST/ENTERknob to select the mode Press and hold this button and press the ADJ UST /ENTER knob to save the mode
- EFX button: rotate and press the knob to adjust the effect volume. Press this button to enter the effect setup screen. This button is designed to reuse the ADJUST/ENTER knob functions.
- MIC button: rotate the knob to adjust the microphone volume. Press to enter the microphone setup screen.
Rear Panel
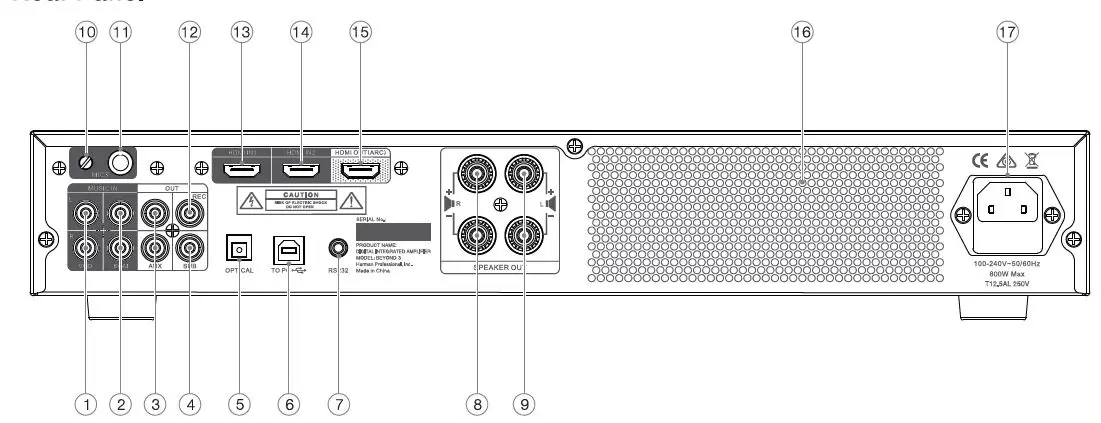
- VOD: Stereo analog signal input, RCA Connector.
- BGM: Sereo analog signal input, RCA Connector.
- AUX: Stereo analog signal output, RCA Connector.
- SU B: Mono-Analog signal for powered subwoofer, RCA Connector.
- OPTICAL: accepts optical digital input signals.
- USB: PC connection & Control vi Type-8 connector.
- RS232: 3.5 mm socket.
- Right channel of amplifier output: used to connect to the speaker and providing a terminal. @ Left channel of amplifier output: used to connect to the speaker and providing a terminal. @ MIC 3 input gain control knob: rotate the knob to adjust the input gain of microphone 3. G]) MIC 3 input TRS socket (6.35 mm)
- REC: Mono analog signal output, RCA Connector.
- HDMI 1 input
- HDMI 2 input
- HDMI output/HDMI ARC
- Air exhaust
- Mains Power input
Main Screen
After the startup, as well as, after 30s of inactivity, the system defaults to the main screen, as shown in the figure on the right.
CD-The volume is set to 20.
- The key is set neutral(original sound).
- The input source is set to the BGM.
- The effect volume is set to 35.
- The current mode is ” KTV” .
- The microphone feedback suppression is set to level 2.
- The microphone volume is set to 23.
Music Input Signal Selection
Press the button. The music input icon in the lower part of the main screen blinks, as shown in the figure on the right. Rotate the ADJ UST /ENTER knob to select the desired input channel and press theADJUST/ENTERknob to confml the selectkln. The music input icon stops blinking and the selected input channel is displayed.
The equipment supports seven types of music input channels, including VOD, BGM, OPT, USB/BT, HDMI 1, HDMI 2 & ARC.
Note: When the icon stops blinking, no further adjustments can be made until that function is selected again.

Music/Effect/Microphone Volume Adjustment
Music volume adjustment: When on the main screen, rotate the MUSIC knob to adjust the music volume. Effect volume adjustment: When the main screen, rotate the EFX knob to adjust the effect volume. Microphone volume adjustment: When on the main screen, rotate the MIC knob to adjust the microphone volume.
Note: You must be on the main screen to use volume control.
Music Setup
Press theMUSICknob to enter the music setup menu, as shown in the figure below. Rotate the ADJUST/ENTER knob to select the desired menu itern which will turn yellow-green. Press the ADJUST/ENTER (the parameter value becomes yellow-green, when selected) .RotatetheADJUST/ENTERknob to modify the parameter, then press the ADJUST/ENTER knob to confirm and exit the setting.
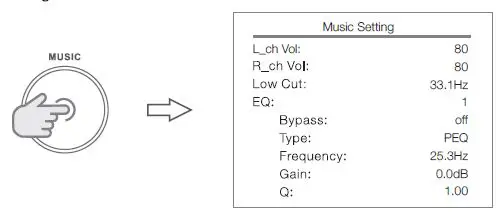
The music setup menu and parameter values are as follows:
| Menu | Description | Value Range | Remarks |
| L_ch Vol | Volume of the left channel for music output. | 0-80 | |
| R_ch Vol | Volume of the right channel for music output. | 0-80 | |
| Low Cut | Lower limit of the low frequency of music output. | off,19.7Hz-303Hz | |
| EQ | Band of music equalization. There are 15 bands in total. | 1-15 | |
| Bypass | When the bypass is set to Off, the equalization setting is applied. When the bypass is set to On, the equalization setting is not applied. | Qff,Qn | |
| Type | Equalization type. The options include: PEO (parametric equalization), LS (low-shel f equalization), and HS (high -shelf equalization). | PEO,LS,HS | |
| Frequency | The center frequency of the current equalization band | 19.7Hz – 20.2kHz | |
| Gain | The gain of the current equalization band | -2 4dB- +12dB | |
| Q | The bandwidth of the current equalization band | PEO, 0.4- 128 LS/HS, 0.4- 2.0 |
Effect Setup
Press the EFXknob to enter the effect setup menu, as shown in the figure below. Rotate the ADJUST/ENTER knob to select the desired menu item, which will tum yellow-green. Press the ADJUST/ENTER knob to select (the parameter value becomes yellow-green, when selected). Rotate the ADJUST/ENTER knob to modify, then press the ADJUST/ENTER knob to confirm and exit the setting.
The effect setup menu and parameter values are as follows:
| Menu | Description | Value Range | Remarks |
| Echo Vol | Echo volume. | 0%-200% | |
| Echo DirVol | Echo direct volume. | 0%-200% | |
| Echo LowCut | Lower limit of the low frequency of echo. | off,19.7Hz-303Hz | |
| Echo HighCut | Upper limit of the high frequency of echo. | 5.99KHz-20.2KHz | |
| Echo PreDly | Echo pre -delay time . | 0ms- 60ms | |
| Echo Delay | Echo delay time. | 0ms- 260ms | |
| Echo Repeat | Number of echoes, that is, energy ratio of each echo relative to the previous echo. | 1%- 90% | |
| Echo PreDly R | Echo pre-delay time of right channel. | 0%-50% | |
| Echo Delay R | Echo delay time of right channel. | -50%-+50% |
The effect settings menu and parameter values are as follows:
| 5.99KHz~20.2KHz | |||
| 0~200% | |||
| 0~200% | |||
| 19.7~303Hz | |||
| 5.99~20.2KHz | |||
| 0~80ms | |||
| 0~9200ms | |||
| Type:PEQ,LS,HS Frequency:19.7Hz~20.2KHz Gain:-24dB~+12dB Q:0.4~128(PEQ);0.4~2.0(LS/HS) | For PC-GUI only | ||
| Type:PEQ,LS,HS Frequency:19.7Hz~20.2KHz Gain:-24dB~+12dB Q:0.4~128(PEQ);0.4~2.0(LS/HS) | For PC-GUI only | ||
| 0~80 | For PC-GUI only | ||
| 5.99K~20.2KHz | For PC-GUI only | ||
| 0~80 | For PC-GUI only | ||
| 5.99K~20.2KHz | For PC-GUI only | ||
| 25~75% | For PC-GUI only | ||
| 1~90% | For PC-GUI only | ||
| 5.99K~20.2KHz | For PC-GUI only |
Microphone Setup
Press the MIC knob to enter the microphone setup menu, as shown in the figure below. Rotate the ADJUST/ENTER knob to select the desired menu item, which will turn yellow-green. Press the ADJUST/ENTER knob (the parameter value becomes yellow-green, when selected). Rotate the ADJUST/ENTER knob to modify, then press the ADJUST/ENTER knob to confirm and exit the setting
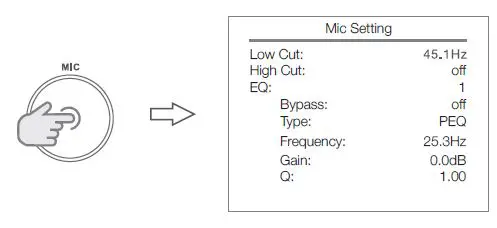
The Microphone Setup menu and parameter values are as follows:
| Low Cut | off,19.7~303Hz | ||
| High Cut | 5.99kHz~20.2KHz,off | ||
| EQ | 1-15 | ||
| Bypass | Off,On | ||
| Type | PEQ,LS,HS | ||
| Frequency | 19.7Hz~20.2KHz | ||
| Gain | -24~+12dB | ||
| Q | 0.4~128(PEQ);0.4~2.0(LS,HS) | ||
| Compressor_Thrsh | -40~0dBu | For PC-GUI only | |
| Compressor_Attack | 0.5ms~100ms | For PC-GUI only | |
| Compressor_Release | 10ms~2000ms | For PC-GUI only | |
| Compressor_Ratio | 1.0~100 | For PC-GUI only |
System Setup
Press Mand~ simultaneously to enter the system setup menu. Rotate the ADJUST/ENTER knob to select the desired menu item, which will turn yellow-green. Press the ADJUST/ENTER knob to select the menu item (the parameter value becomes
yellow-green). Rotate the ADJUST/ENTER knob to modify the parameter value, and press the ADJUST/ENTER knob to confirm and exit the setting
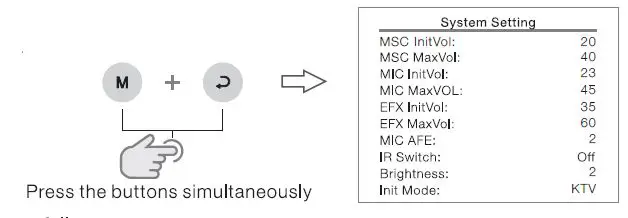
| Menu | Description | Value Range | Remarks |
| MSC lnitVol | Set the music volume at start up. | 0 to maximum music volume | |
| MSC MaxVol | Set the maximum music volume. | Max music volume is 80 | |
| MIC lnitVol | Set the microphone volume at start up. | 0 to maximum microphone volume | |
| MIC MaxVol | Set the maximum microphone volume. | Max microphone volume is 80 | |
| EFX lnitVol | Set the effect volume at start up. | 0 to maximum effect volume | |
| EFX MaxVol | Set the maximum effect volume. | Max effect volume is 80 | |
| MICAFE | Set the intensity of microphone feedback inhibition. The greater the value, the higher the intensity. | Off, 1, 2, 3 | |
| IR Switch | Off: The IR receiver function is disabled. On: The IR receiver function is enabled. | Off,On | |
| Brightness | Set the backlight brightness of the screen. The greater the value, the higher the brightness. | 1, 2, 3 | |
|
lnit Mode | AUTO: The system automatically uses the mode selected before shutdown as the power-on mode of the next time. KTV/PRO/SPCH: This is the preset mode befor e factory delivery, which is not con figurab le.USER1,To USERS: User defined modes. | AUTO, KTV, PRO, SPCH, USER 1 to USER 5 | |
| SPK Model | Set the model of the external speaker, where·—-· indicates the default configuration. | The preset speaker model varies with equipment model. | |
| SYSIM | Set the load impedance of the amplifier. | 8 ohm (Q), 4 ohm (Q) | |
| BT Switch | Off: Bluetooth is disabled. On: The Bluetooth is enabled. | Off,On | |
| BT Name | Rename amplifiers Bluetooth ID, which has a maximum of 10 characters. | A-Z, 0- 9, | |
| Language | Set the display language of the menu screen. | Chinese, English | |
| SYS Ver | Display the firmware vers ion of the equipment. |
Bluetooth Pairing and Naming
Bluetooth pairing:
Bluetooth is turned off upon delivery. To activate Bluetooth, tum Bluetooth on in the system setup menu and note the Bluetooth name of the amplifier. Use the target device (such as mobile phone) to search for the Bluetooth name of the equipment and pair them. After they are successfully pairec, you can play music via Bluetooth.
Bluetooth naming:
For example, to assign the Bluetooth name of “J B LI’ to the amplifier: Enter the system setup screen, select “Bluetooth Name” from the menu, press the “ADJUST/ENTER”knob to select it , rotate the ADJUST/ENTER knob until the parameter value is displayed as “J”, press the ADJUST/ENTER knob to confirm the vaiue and display the second letter, then rotate the ADJUST/ENTER knob until letter “B” is displayed,
press theADJUST/ENTERknob to confirm the value and display the third letter, and continue to rotate the ADJUST/ENTER knob. When the third letter is displayed as “L”, press and hold theADJUST/ENTERknob to confirm the new name and exit the setup screen.
Bluetooth/USB Audio Playback
Set the music input mode to” USB/BT”. The amplifier will automatically plays audio files on the USB flash drive upon insertion. By default, the equipment plays audio files on the USB flash drive preferentially. When you play audio files through Bluetooth, if you insert the USB flash disk, the equipment changes to play the audio files on the USB flash drive immediately. Supported USBfilesystems: FAT16, FAT32, and ExFAT/Fat64. Supported USB File formats: MP3, WAV, APE, FLAG, and WMA USB Maximum capacity: 32 GB
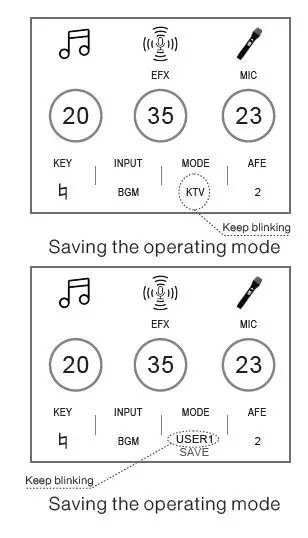
Operating Mode Recalling and Saving
To recall: Press the M button. The operating mode icon in the lower part of the main screen begins blinking, as shown in the figure on the right. Rotate the ADJUST/ENTER knob and select the desired operating mode. Press the ADJUST/ENTER knob to confirm and exit. The operating mode icon stops blinking and displays the new operating mode.
Operating mode saving: Long press the M button. The operating mode icon in the lower part of the main begins blinking, and “SAVE” is displayed below the icon, as shown in the figure on the right. Rotate the ADJUST/ENTER knob and select the desired operating mode to save. Press the ADJUST/ENTER knob to confirm and exit. The operating mode icon stops blinking and “SAVE” disappears.
Note: The KTV, PRO, and SPCH operating modes are not customizable. When saving the operating mode, you can select only USER1 to USER5 modes.
Press and hold the ADJUST/ENTER and MIC knobs simultaneously for 3s to lock all knobs and buttons (except for the power button) on the panel. To unlock, press and hold the ADJUST/ENTER and MIC knobs simultaneously for 3s again.
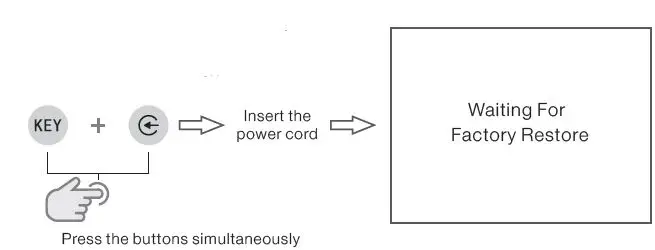
Restore Factory Default Settings
Before performing this operation, check whether the power cord is connected with the equipment. If connected, unplug the power cord.
Press and hold KEY and buttons simultaneously. Insert the power cord. The equipment automatically restores to the factory defaults. The green indicator on the power switch blinks. After the restoration is complete, the equipment enters standby, the screen is off, and the green indicator on the power switch is on.
Note: Restoring factory defaults erased all parameters and preset configured by the user. The system restored to its default factory configuration.
Linkage Control/Firmware Update over PC
After connecting the amplifier to the PC through the USB connector on the rear of the unit, you can manage the equipment using the operation software (PC-GUI) or update the amplifier’s firmware.
Install the operation software as follows:
- Log in to JBL official website https://www.jblpro.com/zh, enter the entertainment product category, select the BEYOND series digital integrated amplifiers, and download the operation software.
- Connect the PC and amplifier via USB.
- Log in to the operating software UI of JBL BEYOND series digital integrated amplifiers.
Update the firmware as follows:
- Log in to JBL official website https://www.jblpro.com/zh, enter the entertainment product category, select the BEYOND series digital integrated amplifiers, and download the firmware update file.
- Press and hold and buttons simultaneously. Insert the power cord. The equipment automatically enters the interface, which will display the words “Software Updating”. Connect the PC and amplifier via USB.
- Run the firmware update file.
- Restart the equipment as prompted.
RS232 INTERFACE AND PROTOCOL
General data format:
| Item | Frame header | Frame length | ItemId | SubItem | Parameter | SumCRC |
| Bytes | (0xFE)1 | 1 | 1 | 1 | 2 | 1 |
SumCRC: Checksum, which is the sum of all CRC data, that is, crc=data1+data2+data3+…
Note: When SumCRC is equal to or greater than 0xFE, SumCRC is set to 0.
Description of frame length: 0x07 represents 7 bytes (with checksum) and 0X06 represents 6 bytes (without checksum) Description of parameter width: If the parameter contains two bytes, it is in big endian mode (the high bytes are at first). For example
Table of function code:
| Function | ItemId | SubItem | Parameter | Description |
| Standby | 0x01 | 0x01 | 0x0000 | , 0: OFF/shutdown/standby |
| Mute | 0x02 | 0x01 | 0x0000 | 1: Mute, 0: Unmute |
| Switch mode | 0x03 | 0x01 | 0x0000 | 1: KTV, 2: PRO, 3: SPCH, 4:USER1,. . . , 8: USER5 |
| Switch modes in cyclic mode | 0x03 | 0x02 | 0x0000 | 0: Switch to next mode |
| Function | ItemId | SubItem | Parameter | Description |
| Switch input signals | 0x04 | 0x01 | 0x0000 | 1: VOD, 2: BGM, 3: OPT, 4: USB/BT, 5: HDMI 1, 6: HDMI 2, 7: ARC |
| Switch input signals in cyclic mode | 0x04 | 0x02 | 0x0000 | 0: Switch to next signal |
| Bluetooth | 0x05 | 0x01 | 0x0000 | 1: On, 0: OFF |
| Adjust music volume | 0x06 | 0x01 | 0x0000 | 1: MUS+, 0: MUS- |
| Set music volume | 0x06 | 0x02 | 0x0000 | Music volume value |
| Adjust microphone volume | 0x07 | 0x01 | 0x0000 | 1: MIC+, 0: MIC- |
| Set microphone volume | 0x07 | 0x02 | 0x0000 | Microphone volume value |
| Adjust effect volume | 0x08 | 0x01 | 0x0000 | 1: EFX+, 0: EFX- |
| Set effect volume | 0x08 | 0x02 | 0x0000 | Effect volume value |
| Adjust the tone of music | 0x09 | 0x01 | 0x0000 | 2 : b3 , 3 : b2 , 4 : b1 , 5: , 6: #1 , 7 : #2 , 8: #3 |
| Switch the tones of music in cyclic mode | 0x09 | 0x02 | 0x0000 | 0: Original tone, 1: Switch among b1, b2, and b3 in cyclic mode, 2: Switch among #1, #2, and #3 in cyclic mode |
| Adjust high frequency volume of music | 0x0A | 0x01 | 0x0000 | 0: -, 1: + |
| Adjust intermediate frequency volume of music | 0x0A | 0x02 | 0x0000 | 0: -, 1: + |
| Adjust low frequency volume of music | 0x0A | 0x03 | 0x0000 | 0: -, 1: + |
| Reset EQ volume of music | 0x0A | 0x04 | 0x0000 | 1: Reset to zero |
| Adjust high frequency volume of microphone | 0x0B | 0x01 | 0x0000 | 0: -, 1: + |
| Adjust intermediate frequency volume of microphone | 0x0B | 0x02 | 0x0000 | 0: -, 1: + |
| Adjust low frequency volume of microphone | 0x0B | 0x03 | 0x0000 | 0: -, 1: + |
| Reset EQ volume of microphone | 0x0B | 0x04 | 0x0000 | 1: Reset to zero |
| Playback using USB | 0x0C | 0x01 | 0x0000 | 0: Pause, 1: Play |
| Playback using USB – song switching | 0x0C | 0x02 | 0x0000 | 0: Next song, 1: Previous song |
| Playback using USB – cycle | 0x0C | 0x03 | 0x0000 | 0: Cancel single cycle, 1: Set single cycle, 2: Set list cycle |
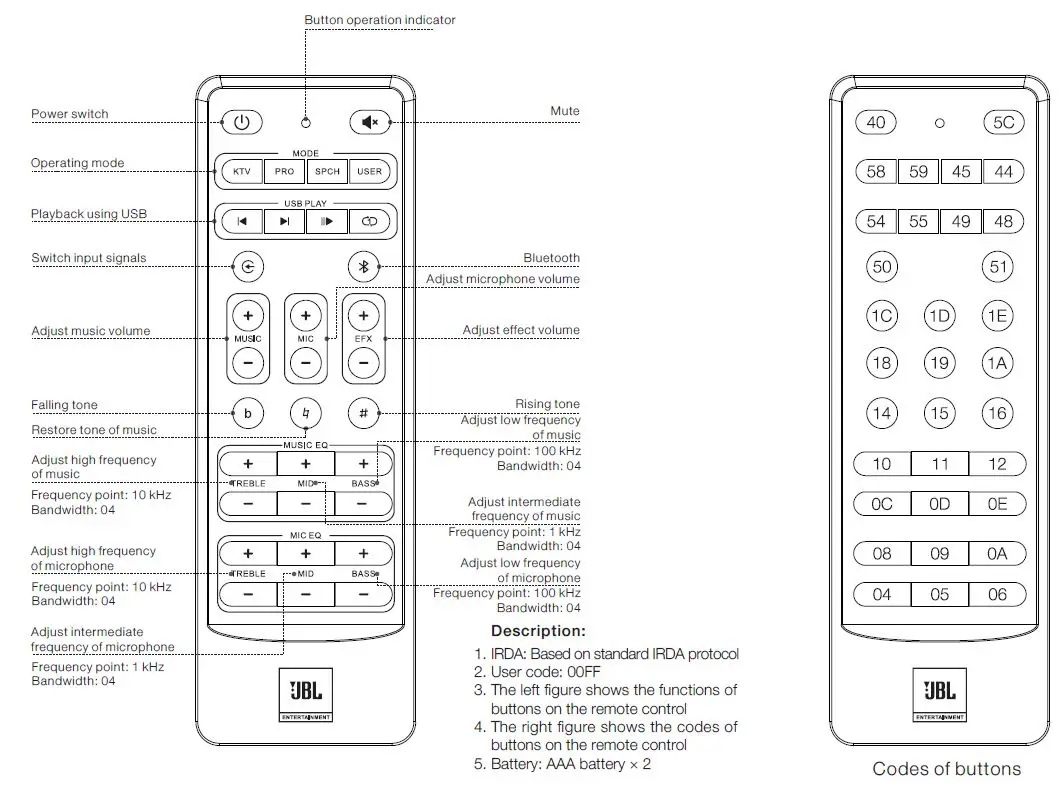
Remote Control and Control Code
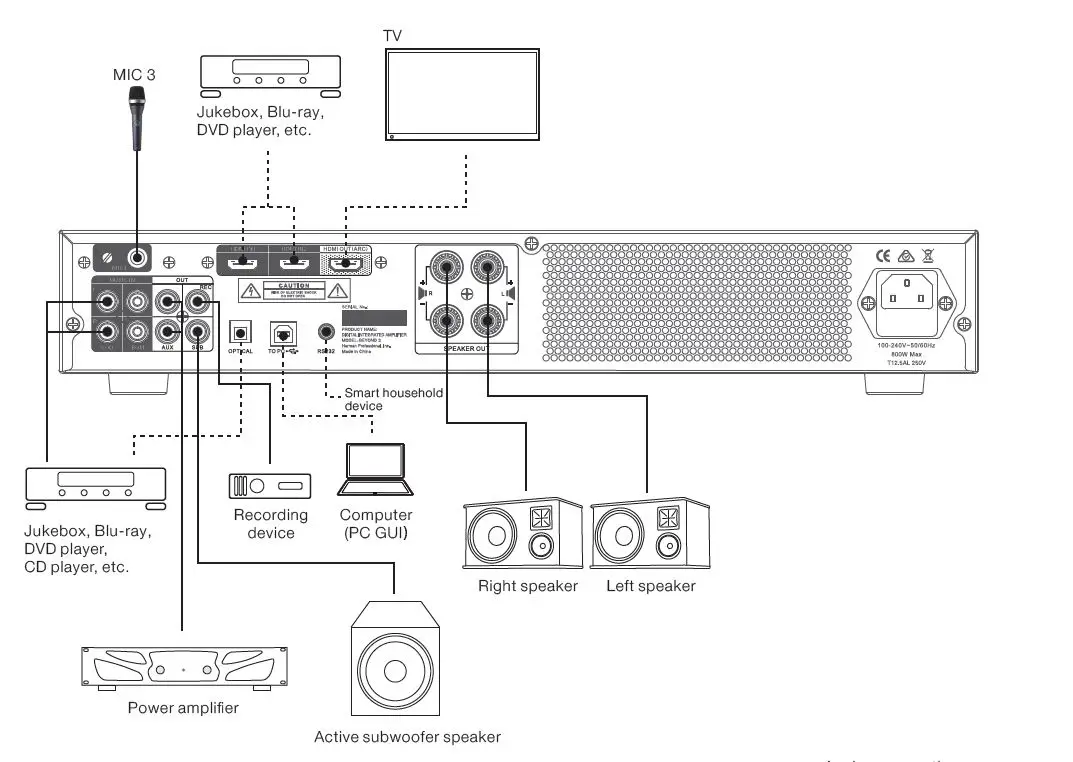
System Connection
Please refer to the following “Connection Diagram of Common Systems” for system connection.
Attention:
- Make sure that all devices are powered off before connecting the system.
- Please adjust the volume of all devices to the lowest level, and then turn on the power supply of the equipment.
- The power supply of the equipment shall follow the principle of “Last on, First off”.
- In order to ensure proper HDMI playback, it is strongly recommended to use HDMI version 2.0 cables.
- When transmitting the audio signal to this equipment through HDMI ARC, please set the audio signal output of the source to as “PCM” output.
- When using the equipment, do obstruct the rear panel exhaust vent or block the air flow around the unit, as this will prevent proper cooling of the amplifier when in use and could result in unexpected operation.
Specification Parameters
| BEYOND 1 | BEYOND 3 | ||
| Input interface | |||
|
Music input | Playback using USB | USB Type-A x 1 | |
| Stereo input | RCA x 2 (Groups) | ||
| HDMI input | HDMI x 2 | ||
| ARC input | HDMI x 1 | ||
| Optical input | Optical socket x 1 | ||
| Microphone input | 1/4″ JACK input | 6.35 mm socket x 3 | |
| Output interface | |||
| HDMI output | HDMI x 1 | ||
| Stereo output | RCA x 1 (Group) | ||
| Recording output | RCA x 1 | ||
| Subwoofer output | RCA x 1 | ||
| Speaker output | Binding Post terminal x 2 | ||
| Control port | |||
| USB ( for PC control ) | USB Type-B x 1 | ||
| RS232 | 3.5 mm socket x 1 | ||
| Technical Specifications | |||
|
Signal-to-noise ratio | RCA input, 8 ohm (Ω) load, A-weighted | ≥85dB | |
| 1/4″ TRS input, 8 ohm (Ω) load, A-weighted | ≥75dB | ||
| Frequency response | RCA input, 8 ohm (Ω) load, 1 W, 20~20 kHz | -1dB ~ +1dB | |
| 1/4″ TRS input, 8 ohm (Ω) load, 1W, 50~14 kHz | -3dB ~ +1.5dB | ||
|
Distortion (THD+N) | RCA input, 8 ohm (Ω) load, 1 kHz, rated power output, 20~20 kHz bandwidth | ≤1% | |
| 1/4″ TRS input, 8 ohm (Ω) load, 1 kHz, rated power output, 20~20 kHz bandwidth | ≤1% | ||
| Input impedance | RCA input, f=1 kHz | 3.2k ohms | |
| 1/4″ TRS input, f=1 kHz | 3.2k ohms | ||
| Rated power | THD+N ≤ 1%, 8 ohm (Ω) load, 1 kHz | 2 x 180W | 2 x 360W |
|
Playback using USB | Audio format | MP3,WAV,APE,FLAC,WMA | |
| File system | FAT16,FAT32,ExFAT/Fat64 | ||
| Maximum capacity | 32G | ||
| Bluetooth | Version | V4.2/2.1+EDR | |
| Dimensions (W x D x H) | Product: 42.8cm x 31.5cm x 7.6cm Packaging: 51cm x 44cm x 17cm | ||
| Net weight | 5.4kg | 5.8kg | |
| Gross weight | 7.0kg | 7.4kg | |
| Power requirements | JBL-BEYOND1CN: 220V~50Hz JBL-BEYOND3CN: 220V~50Hz | JBL-BEYOND1AP/J: 100V-240V~50/60 Hz JBL-BEYOND3AP/J: 100V-240V~50/60 Hz | |
Warranty Information
JBL offers a limited warranty on the BEYOND series digital integrated amplifiers from the date of the original purchase.
WHO IS PROTECTED BY THIS WARRANTY? Your JBL Warranty protects the original owner and all subsequent owners for one year, so long as: A.) Your JBL product has been purchased in China, Japan and/or other Asian countries. (This Warranty does not apply to JBL products purchased elsewhere except for purchases by military outlets. Other purchasers should contact the local JBL distributor for warranty information.); and B.) The original dated bill of sale is presented whenever warranty service is required.
what dose the jbl warranty cover
Except as specified below, your JBL Warranty covers all defects in material and workmanship. The following are not covered: Damage caused by accident, misuse, abuse, product modification or neglect; damage occurring during shipment; damage resulting from failure to follow instructions contained in your Instruction Manual; damage resulting from the performance of repairs by someone not authorized by JBL; claims based upon any misrepresentations by the seller; any JBL product on which the serial number has been defaced, modified or removed.
who pays for what?
JBL will pay all labor and material expenses for all repairs covered by this warranty. Please be sure to save the original shipping cartons because a charge will be made if replacement cartons are requested. Payment of shipping charges is discussed in the next section of this warranty.
HOW TO OBTAIN WARRANTY PERFORMANCE?
If your JBL product ever needs service, please contact your local dealer, Harman Authorized Service Center or Harman China Professional Product Customer Service Hotline (400 166 7806). We may direct you to an authorized JBL Service Agency or ask you to send your unit to the factory for repair. Either way, you’ll need to present the original bill of sale to establish the date of purchase. Please do not ship your JBL product to the factory without prior authorization. If transportation of your JBL product presents any unusual difficulties, please advise us and we may make special arrangements with you. Otherwise, you are responsible for transporting your product for repair or arranging for its transportation and for payment of any initial shipping charges. However, we will pay the return shipping charges if repairs are covered by the warranty
limitation of implied warranties
All implied warranties, including warranties of merchantability and fitness for particular purpose, are limited in duration to the length of this warranty.
exclusion of certain damages
JBL’s liability is limited to the repair or replacement, at our option, of any defective product and shall not include incidental or consequential damages of any kind. Some states do not allow limitations on how long an implied warranty lasts and/or do not allow the exclusion of incidental or consequential rights, which vary, from state to state.


