GATOR GTRAKAST 3G Asset Tracking System User Guide
Inclusions
- Main device Mount bracket • USB charging cable
Main functions
- 3G ( Quad
- Band )
- Intelligent power saving
- IPX5 waterproof
- Tamper alert
- Strong magnetic performance
- Fast charging
- 10000mAh battery
- Voice monitoring
Specification
| Frequency | 850/900/1900/2100MHz |
| Location accuracy | <10 meters |
| Monitoring range | 5 meters |
| Battery | 10000mAh/3.7V industrial grade lithium polymer battery |
| Standby | Up to 2 years (GSM off, one position per day) Up to 50 davs (Cellular always connected GPS sleep); Up to 120 (GPS always on |
| LED | 1 red LED for GSM; 4 blue LEDs for battery |
| Operating temperature | -20”C- *70”C |
| Dimension | 108(L) x 61(W) x 30(H) mm |
| Weight | 285g |
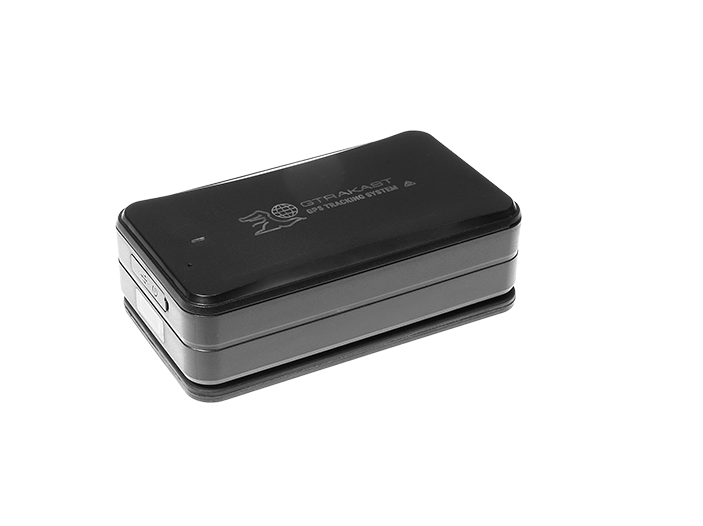
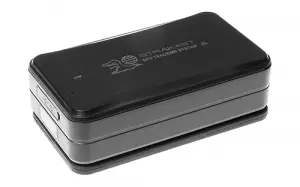
Appearance
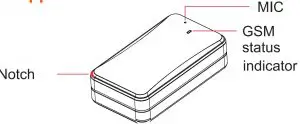
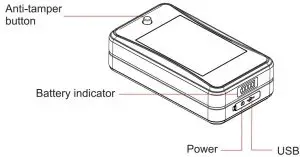
Push and loosen the button will trigger tamper alert
GSM Cellular Indicator
| Status | Meaning |
| Flicker quickly ( every 0.3 seconds) | GSM initialization/ No GSM signal/ No SIM card |
| Flicker slowly ( 0.1s on; 2s off) | Login platform |
| Always ON | Calling |
The GSM/Cellular indicator turns off after the device operates for more than 3 minutes. To check the status whilst on (after the light has gone off), short press the power button to activate the indicator. The indicator will automatically turn off in 60 seconds.
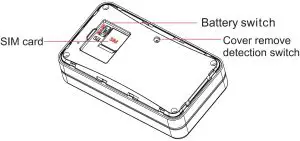
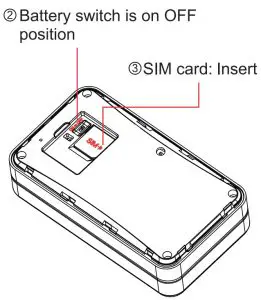
Sim card
The SIM card should have access to GPRS and SMS. Remove the cover, switch to OFF and insert the full size SIM card.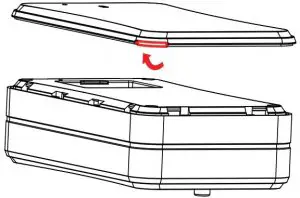
Installation
With it’s strong magnet, the device is easy to install onto any Ferris metal surface. For non metallic (non ferris) surfaces a magnetic mounting base is supplied attached with 3M foam tape.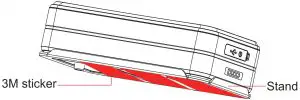
Operation
Power ON/OFF
Power on: Press the power button for 3 seconds ( with battery switch in the ON position)
Power off: Press power button for 3 seconds (or turn the battery switch to off)
SOS Number
(Used only for direct SMS alerts). Not used on Gator subscriber SIM cards as it is server driven).
Set The SOS number via SMS (SMS functionality is only valid in tracking mode.)
- SMS command to add SOA number: SOS,A, number 1, number 2, number 3#
E.g. SOS,A,1351234xxxx, 1371234xxxx,1301234xxxx# - SMS command to delete SOS number: SOS,D,number sequence 1, number sequence 2, number sequence 3#
E.g. SOS,D,1,2,3# - Query current SOA number: SOS#
SOS Number
Long standby mode (0)
SMS command: MODE,0# ( standby mode ) If you send this command to the device SIM card,The device’s GPS and data connection is turned off to save power, SMS is still active (to re enable it to Mode 1 when needed.)
Tracking mode (1) (default): GSM is always ON and location data is uploaded at the mode 2 set time intervals T1,T2. The time interval can be set on the designated platform or via SMS. SMS command format: MODE,1,T1,T2# 1 means tracking mode.
T1: (Object is moving )upIoad interval of GPS data in moving status, unit: second, 5-86400s; default: 10s
T2: Upload interval of GPS data when the object is static unit: second, 5-86400s; Default: 0s, no data uploaded. The more frequent the data interval the more battery power it uses.
86400 Seconds = 1Day ( 24Hrs)
Ultra-long standby mode: The device wakes up and uploads location data in a fixed time.
Notice: In this mode, all commands will NOT be executed until the device wakes up at the preset time interval. If you want to compel the device to wake up and receive a command (when in this mode), you can
- trigger the tamper alert button or b) Reboot the device: Press and hold the power button for 3 SMS command format: MODE,3,T1,T2#
“2” means ultra-standby mode.
- trigger the tamper alert button or b) Reboot the device: Press and hold the power button for 3 SMS command format: MODE,3,T1,T2#
“T1” means the start time of sleeping period. Format: HH:MM.
T2” means the sleep time interval, range 1-72(hours). Default: 24 hours.
Note: SMS commands take effect after the device wakes up. E.g.MODE,2,12:00,8# (Meaning: The device starts to fall asleep at 12:00, and wakes up every 8 hours).
Tamper Alert
The anti-tamper button (when popped out )
In standby mode, an alert message will be uploaded and tracking mode will be activated for 20 minutes if device is tampered with. After 20 minutes, the device enters into ultra-long standby mode. The tamper alert can be turned off by command: canceI#
Cover Removal Alert
Cover detection sensor alert when device cover is opened. In standby mode, an alert message will be uploaded and tracking mode will be activated for 20 minutes. After 20 minutes, the device enters into ultra-long standby mode. Dis-assembly cover removal alert can be turned off by command: canceI#
Low Battery Alert
When the battery is low, the device will activate its low battery alarm.
Vibration alarm
The vibration alarm only works in mode 1 (tracking mode). To activate this function, Please send SMS 111 to the device by SOS number and the device will be in arming status. To turn on the vibration alarm, please send command SENALM, ON# SMS command for device disarming: 000
Geo-fence alarm
The geo-fence alarm only works in mode 1 (tracking mode). When the vehicle enter/exit the preset geo-fence area, the device will send alarm to the SOA numbers when the geo-fence function is ON.
Voice monitoring
Use preset SOS number to send command MONITOR# to the device. Device would automatically call you back in a second. Pick up and monitor the voice inside the vehicle.
Power on alarm
Alarm will be sent when the device starts. SMS command: BOOTALM,A,M#
A=ON/OF F; default: ON M=0-1; alarming way, 0: GPRS, 1: SMS+GPRS; default: 0; BOOTALM,A,OFF# Turn off the power on alarm
Power off alarm
Alarm will be sent when the device power off. SMS command: PWROFFALM,X,M#
X=ON/OFF; default: ON
M=0-1; alarming way, 0: GPRS, 1: SMS+GPRS; default: 0;
Power off restriction
When power off restriction command is sent by SOS numbers, the device can’t power off by pressing the power button.
PWRLIMIT,X# X=ON/OFF; ON: means power off forbidden, OFF: means allow to power off;
PWRLIMIT#
Check ON/OFF status.
Warning
Battery specified by manufacturer is recommended. Maintenance or service arising from any other accessories is not guaranteed. Manufacturer assumes no responsibility for any damage caused by non-original accessories.
- Do not bend or open the battery.
- Do not immerse or burn the battery.
- Device dis-assembly is strongly forbidden.
- Non-professionals’ operation may cause device damage.
Troubleshooting
If you are having trouble with your device, try these trouble shooting procedures before contacting a service professional.
| Problems | Causes | Solutions |
| Poor signal | The signal waves are unable to transmit or receive using GPS or Cellular signals | Test this using the device away from objects in the open. If OK in the open but not on the object, try find a better location. |
| Unable to boot | Power switch is off | Switch to ON |
| Battery low | Charge | |
| Non active SIM | Insert SIM valid card | |
| Unable to connect to the network | SIM card inserted incorrectly | Check SIM card |
| Dirty pins on tne SIM card | Clean SIM card | |
| Invalid SIM card | Contact network supplier | |
| Not in GSM service area | Move to service area | |
| Poor signal | Move to area with strong signal |
IMEI/SIM number safeguard
Copy the IMEI/I.D. number (10-digit bar code of the device), and the SIM card number and place here for safe keeping before installing the device. NOTE: DO NOT LEAVE THIS INFORMATION INSIDE THE VEHICLE (for security reasons)
IMEI number
SIM number
Retailer
Date of purchase
Technical assistance
If you need assistance setting up or using your Gator product now or in the future, call Gator Support Australia.
TEL: 03 — 8587 8898
FAX: 03 — 8587 8866
Mon-Fri 9am — Spm AEST
Please retain this user guide for future reference. If you would like to download a digital copy of this manual, or other Gator manuals/software, please visit the website gatortracking.com.au.
This manual is considered correct at time of printing but is subject to change. For latest manuals and updates refer to the website.


