![]()
![]() Reel GA50 Laser Meter
Reel GA50 Laser Meter
User Manual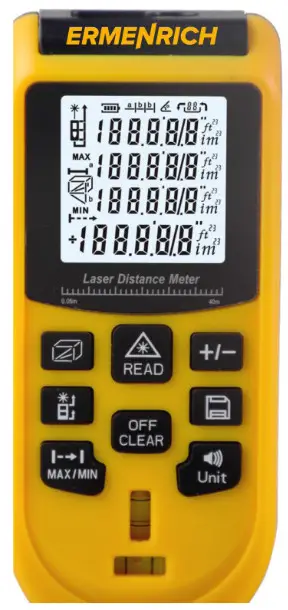
Ermenrich Reel GA50 Laser Meter
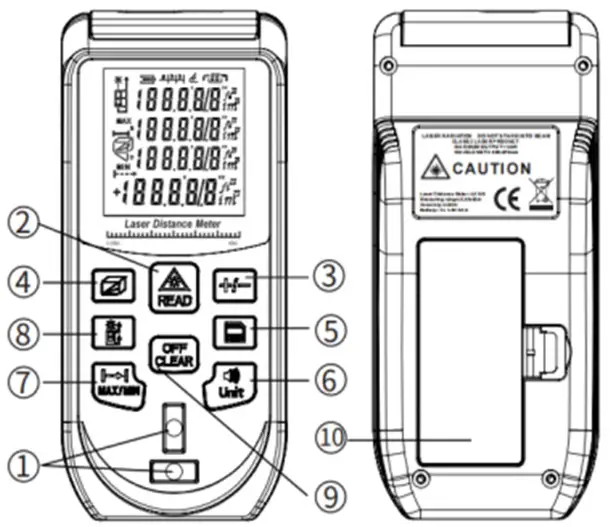
- Horizontal and vertical bubble levels
- READ button
- ADDITION/ SUBTRACTION button
- FUNCTION button
- HISTORY RECORDS button
- ALARM/UNITS SWITCH button
- CONTINUOUS MEASUREMENT button
- REFERENCE SWITCH button
- OFF/CLEAR button
- Battery compartment
Getting started
Open the battery compartment cover and insert 2 AAA batteries according to the correct polarity. Close the cover.
Using
Press (2) to turn the device on. Press (2) to turn the laser on and aim the laser beam at the target. Press (2) again to measure the distance.
Press (6) and hold it for 3 seconds to turn the buzzer on/off.
Press (9) and hold it for 3 seconds to turn the device off.
Reference point
The default reference point is the bottom end of the device. Press (8) to change the measurement point from the bottom to the top of the device (Fig. A).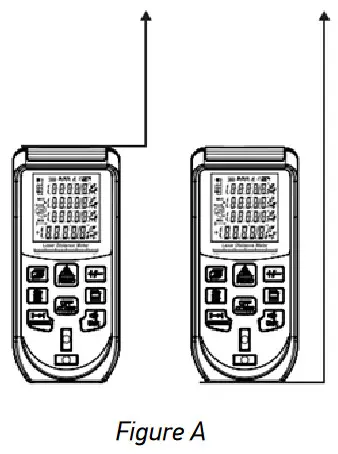 Units of measurement
Press (6) to change the unit of measurement.
Units of measurement options
| Distance | Area | Volume | |
| 1 | 0.000m | 0.000m2 | 0.000m3 |
| 2 | O.00ft | O.00ft2 | 0.00ft3 |
| 3 | 0.0in | 0.0in2 | 0.0in3 |
Display information
| Single distance measurement mode | |
| Area measurement mode | |
| Volume measurement mode | |
| Calculations with 2 additional measurements (Pythagorean theorem) | |
| Calculations with 3 additional measurements (Pythagorean theorem), method 1 – legs summation | |
| Calculations with 3 additional measurements (Pythagorean theorem), method 2 – legs subtraction | |
| Battery status |
Single distance measurement
When the device is turned on, it goes into single distance measurement mode automatically. Press (2) to turn the laser on. Aim the laser beam at the target and press (2). The value will be displayed on the screen.
Continuous measurement
Press (7) to enter continuous measurement mode. Press (2) to turn the laser on. Aim the laser beam at the target and press (2) again. The device will keep taking measurements one after another. MAX, MIN, and the last measured values (Fig. B) will be displayed on the screen.
Press (9) to stop the continuous measurement, and press (9) again to return to single measurement mode.
Area measurement
Press (4) to enter area measurement mode. Aim the laser beam at the target and press (2) to measure 2 sides of the target. The area will be calculated automatically (Fig. C).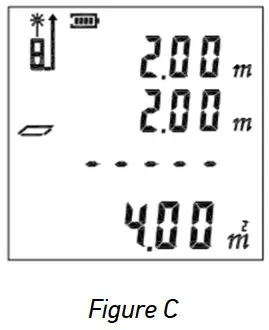
Volume measurement
Press (4) to enter volume measurement mode. Aim the laser at the target and press (2) to measure the length, width, and height of the three-dimensional target. The volume will be calculated automatically (Fig. D).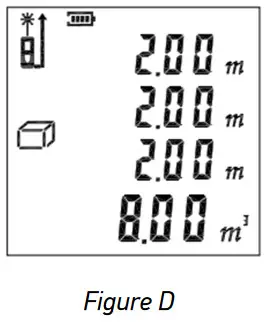
Calculations with 2 additional measurements (Pythagorean theorem)
Press (4) to enter the calculations with 2 additional measurements (Pythagorean theorem). Aim the laser at the target and press (2) to measure the lines А and В (Fig. E). Line C will be calculated automatically.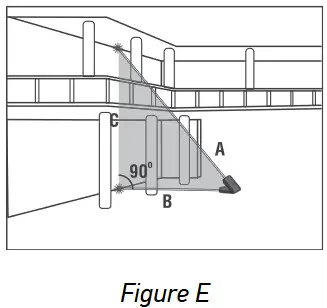 Calculations with 3 additional measurements (Pythagorean theorem), method 1 – legs summation
Press (4) to enter the calculations with 3 additional measurements (Pythagorean theorem), method 1 – legs summation. Aim the laser at the target and press (2) to measure the distance D by making 3 additional measurements. Make measurements of lines А, В and С one by one (Fig. F). Length of line D will appear in the main line on the display.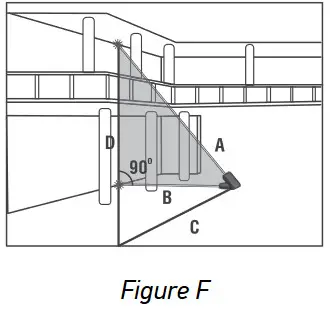 Calculations with 3 additional measurements (Pythagorean theorem), method 2 – legs subtraction
Press (4) to enter the calculations with 3 additional measurements (Pythagorean theorem), method 2 – legs subtraction. Aim the laser at the target and press (2) to measure the distance D by making 3 additional measurements. Make measurements of lines А, В and С one by one (Fig. G). Length of line D will appear in the main line on the display. 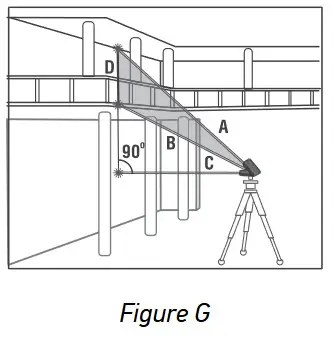
Addition and Subtraction
Direct the laser beam at the target and then take a measurement. Press (3) to add the next measurement (plus icon appears on the screen). Take the next measurement.
To subtract the measurement, press (3) and hold it for 2 seconds (minus icon appears on the screen).
History records
Press (5) and hold it for 3 seconds to record the current measurement. Press (5) to view the recorded values. Press (9) to clear the previous record.
Specifications
| Measuring range | 0.05–50m |
| Measuring accuracy | ±3.0mm |
| Units of measurement | m, ft, in |
| Laser class | class II, 620–670nm, <1mW |
| Laser beam /device auto-off | 20/60 seconds |
| History records | 16 groups |
| Power supply | 2 AAA batteries |
| Operating temperature range | 0… +40°C (32°… 104°F) |
| Storage temperature range | –20… +70°C (–4… +158°F) |
| Dimensions | 51x27x114mm/2x1x4.4in |
| Weight | 129g/0.28lb |
The manufacturer reserves the right to make changes to the product range and specifications without prior notice.
Care and maintenance
Please carefully read the safety instructions and user manual before using this product. Otherwise, it may result in hazardous laser radiation and electric shock. Keep away from children.
This is a class II laser product. Please DO NOT look directly into the beam with unprotected eyes or through an optical device at any time and never direct it toward other people. Do not remove any safety labels. Do not aim the device directly at the sun. Do not try to disassemble the device on your own for any reason. For repairs and cleaning of any kind, please contact your local specialized service center. Protect the device from sudden impact and excessive mechanical force. Do not use the product in explosive environment or close to flammable materials. Store the device in a dry cool place. Only use accessories and spare parts for this device that comply with the technical specifications. Never attempt to operate a damaged device or a device with damaged electrical parts! If a part of the device or battery is swallowed, seek medical attention immediately.
Battery safety instructions
Always purchase the correct size and grade of battery most suitable for the intended use. Always replace the whole set of batteries at one time; taking care not to mix old and new ones, or batteries of different types. Clean the battery contacts and also those of the device prior to battery installation. Make sure the batteries are installed correctly with regard to polarity (+ and –). Remove batteries from equipment that is not to be used for an extended period of time. Remove used batteries promptly. Never short-circuit batteries as this may lead to high temperatures, leakage, or explosion. Never heat batteries in order to revive them. Do not disassemble batteries. Remember to switch off devices after use. Keep batteries out of the reach of children, to avoid risk of ingestion, suffocation, or poisoning. Utilize used batteries as prescribed by your country’s laws.
Levenhuk International Lifetime Warranty
All Levenhuk telescopes, microscopes, binoculars, and other optical products, except for their accessories, carry a lifetime warranty against defects in materials and workmanship. A lifetime warranty is a guarantee on the lifetime of the product on the market. All Levenhuk accessories are warranted to be free of defects in materials and workmanship for six months from the purchase date. The warranty entitles you to the free repair or replacement of the Levenhuk product in any country where a Levenhuk office is located if all the warranty conditions are met.
For further details, please visit: www.levenhuk.com/warranty
If warranty problems arise, or if you need assistance in using your product, contact the local Levenhuk branch.
![]() Levenhuk Inc. (USA): 928 E 124th Ave. Ste D, Tampa, FL 33612,
Levenhuk Inc. (USA): 928 E 124th Ave. Ste D, Tampa, FL 33612,
USA, +1-813-468-3001, [email protected]
Levenhuk Optics s.r.o. (Europe): V Chotejně 700/7, 102 00 Prague 102,
Czech Republic, +420 737-004-919, [email protected]
Levenhuk®, Ermenrich® are registered trademarks of Levenhuk, Inc.
© 2006–2023 Levenhuk, Inc. All rights reserved.
www.levenhuk.com
20230213
References
 Доживотна гаранция на Levenhuk – Официален уебсайт на Levenhuk в България
-
Levenhuk optical instruments store | Levenhuk - best optical equipment
-
Levenhuk lifetime warranty details | Levenhuk - best optical equipment
-
Doživotní záruka společnosti Levenhuk – Oficiální webové stránky Levenhuk pro Českou republiku
 Levenhuk Lebenslange Garantie – Die offizielle Website von Levenhuk in Deutschland
-
Garantía internacional de por vida Levenhuk – Compre desde el sitio web oficial de Levenhuk en España
-
Levenhuk Lifetime Warranty – Levenhuk’s official website in USA
-
A Levenhuk élettartamra szóló szavatossága – A Levenhuk hivatalos magyarországi weboldala
-
Gwarancja bezterminowa Levenhuk – Oficjalna witryna internetowa Levenhuk w Polsce
-
Поддержка - Гарантийное обслуживание Левенгук - Levenhuk Russia


