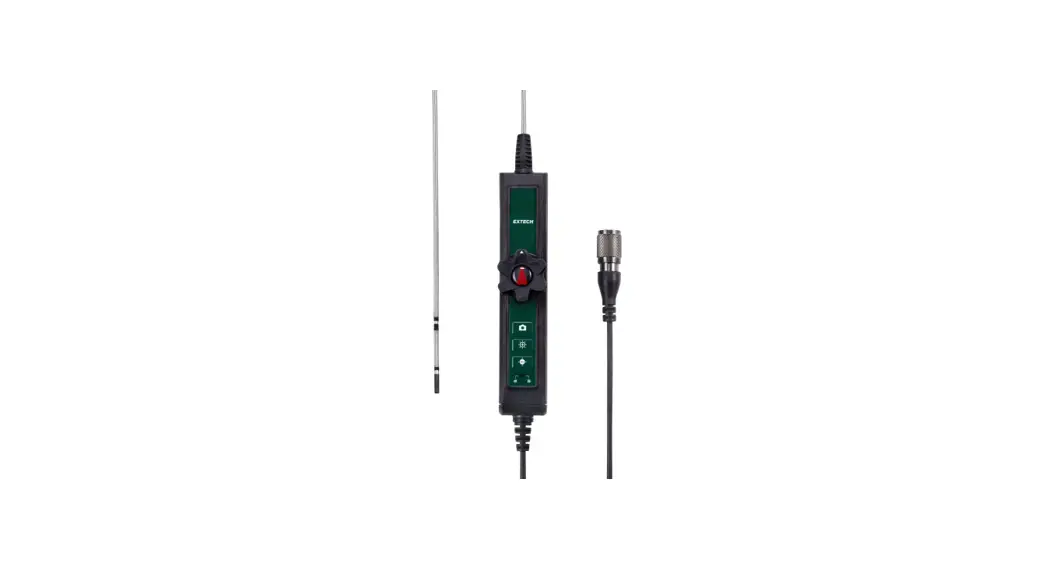
![]() HDV7C-A2-39-HD-1 Two Way Articulating Camera Probe
HDV7C-A2-39-HD-1 Two Way Articulating Camera Probe
User Manual Model HDV7C-A2-39-HD-1. For use with HDV700 Video Scope.
Introduction
Thank you for selecting the Extech two-way articulation probe with High Definition (HD) camera. The probe is intended for use with the HDV700 VideoScope. Obtain the HDV700 user manual and additional translations of this user manual on the support site
Safety
Please read and understand all safety cautions before use.![]() CAUTION
CAUTION
- Do not insert the probe into flammable liquid or gas.
- Before inspecting a vehicle, shut off the engine. Allow the metal and liquids in the vehicle to cool before inspection.
- This product is designed for industrial use only. It is not intended for use in human or other biological inspection.
- Do not disassemble the product, damage to the product and electrical shock may occur.
- Do not allow the camera head to come in contact with acidic, corrosive or heated material, serious damage to the equipment can occur.
Description
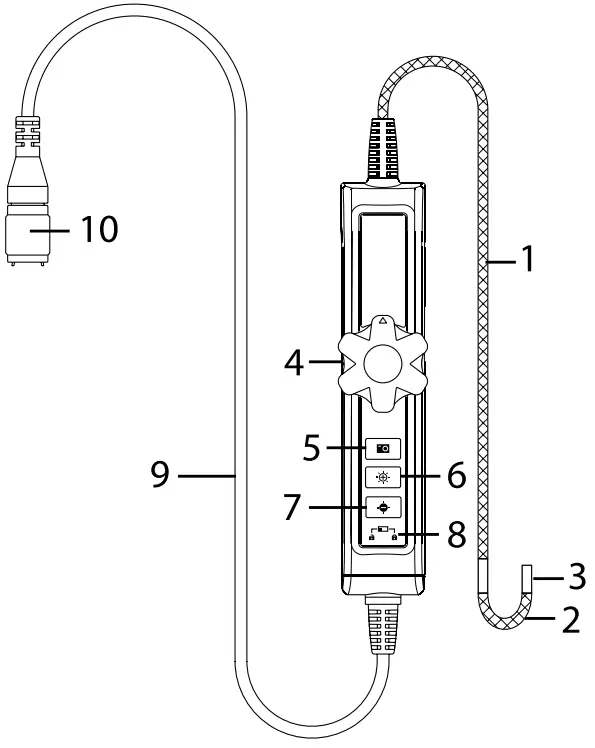
- Probe
- Articulating neck
- Camera head
- Articulation control dial
- Image and video recording button
- Brightness increase button
- Brightness decrease button
- Button lock/unlock button
- Connecting cable to HDV700
- HDV700 connector
Connecting the Probe
The steps below explain how to safely connect the probe to the HDV700 monitor. Always turn the HDV700 power off before replacing the probe.
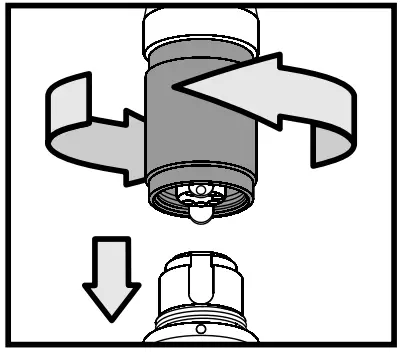
- Align the white dot on the probe connector with the white dot on the monitor connector.
- Plug the probe into the monitor unit, ensuring proper alignment and full insertion.
- Tighten the collar nut to secure the connection. Do not overtighten.
Operation
Controlling Articulation
Turn the control dial (4) clockwise to bend the probe neck to the right; turn the dial counter-clockwise to bend the neck to the left, as shown in the image below. The articulation range is 180° maximum.
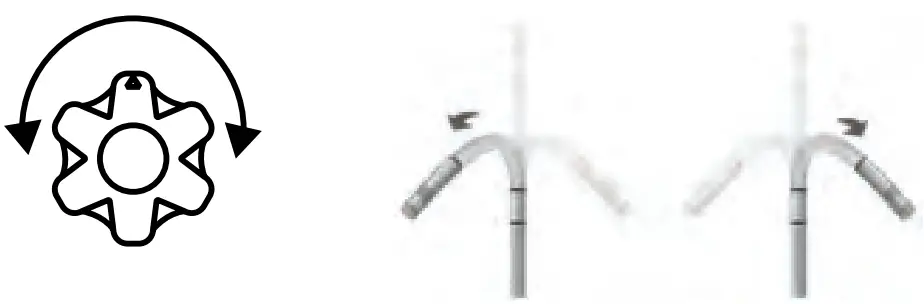
![]() CAUTION
CAUTION
Do not use excessive force when turning the control dial, damage to the camera probe can result. Do not attempt to force the flexible neck past its maximum angle. Stop turning the control dial when the maximum angle is reached.
Use caution when removing the probe from an inspection area; if the neck is at an angle, it may bind and become difficult to remove. Straighten the neck before removing the probe from the inspection area.
Image and Video Capture Button
Short press the Image and Video Capture button (5) ![]() to capture a still image. Long press to start or stop video recording. Images and videos are stored on the micro SD card.
to capture a still image. Long press to start or stop video recording. Images and videos are stored on the micro SD card.
The HDV700 user manual provides detailed information regarding media management. Obtain the user manual from the support website (see Support section below).
Brightness Control Buttons
Use the brightness controls ![]() (6, 7) to increase and decrease the brightness of the camera images.
(6, 7) to increase and decrease the brightness of the camera images.
Control Button Lock Switch
Use the locking switch (8) to disable the three control buttons (5, 6, 7).
Measurement Considerations
- The probe contains small circuitry that controls the optics and electronics of the camera. To ensure reliability, do not bend the probe more than 90°.
- Do not coil the probe < 6 in. (15 cm) in diameter in use.
- To avoid camera damage, please straighten the neck before removing it from the inspection area. Failure to do so may cause the camera to become stuck in the inspection area.
- The neck, near tip of the probe, is particularly sensitive to excessive force. Never bend the neck by hand; use only the control dial.
- Please keep the probe’s alignment as straight as possible while in use.
- Do not force the control dial when resistance to movement is felt; Damage to the camera can result.
- Do not allow the probe to forcefully impact an object.
- Do not put excessive weight on any area of the probe.
- Never use the probe as a hammer, hook, or other tool.
- Never use the probe tip to clear pathways or to unclog a pipe.
Storage and Maintenance
- To clean the probe, wipe with a soft cloth dampened with a mild detergent and clean water. Do not use abrasive detergents. Do not use corrosives or solvents to clean the probe. Use a high quality lens cleaning fluid and a lint-free swab to clean the camera and worklight lenses.
- To protect the camera, keep the lens cap, and other supplied protective coverings, attached when not in use. Store in the original case.
- Straighten the neck angle before placing in storage.
- Avoid direct sun exposure. Store in a cool, dry, and well-ventilated area.
- Do not coil the probe < 6 in. (15 cm) in diameter when storing, damage to the probe may result.
Specifications
| HD Camera resolution | 1280(H) x 720(V) pixels |
| Frame rate | 30 frames per second (fps) |
| Probe diameter | 0.15 in. (3.9 mm) |
| Probe head diameter | 0.2 in. (4.5 mm) |
| Probe head length | 0.5 in. (17 mm) |
| Probe length | 3.3 ft (1 m) |
| Articulation angle | 180° maximum (the angle may decrease if the probe is looped) |
| Probe head material | Stainless steel |
| Probe body material | Braided mesh stainless steel |
| Work lights | LED lamps encircle the camera lens |
| Field of View (FOV) | 90° |
| Depth of Field (DOF) | 0.4 to 4.0 in. (1 to 10 cm) |
| Operation and Storage temperature | 14℉ to 140℉ (–10℃ to 60℃) |
| Liquids approved for probe submersion | Brake and transmission fluid, diesel fuel, unleaded gasoline, engine oil, and CPC hydraulic oil (46AWS) |
| Ingress protection | Probe tip and body: IP 67 (IEC 60529) Protected from submersion in water up to 3.3 ft (1 m) for 30 minutes maximum. In use: rain, splashes, and accidental submersion |
Two-Year Warranty
FLIR Systems, Inc. warrants this Extech brand instrument to be free of defects in parts and workmanship for two years from date of shipment (a six-month limited warranty applies to sensors and cables).
![]() 1.888.610.7664
1.888.610.7664![]() www.calcert.com
www.calcert.com
[email protected]
#NAS100125; r. AB/88002/88004; en-US


