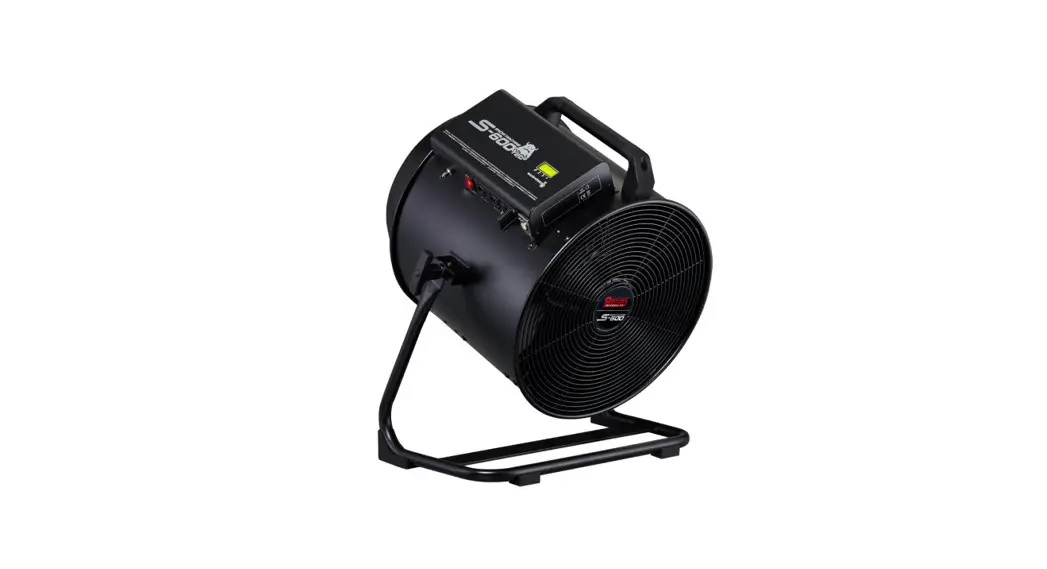
![]() S-600 Yeti Snow Machine
S-600 Yeti Snow Machine
User Manual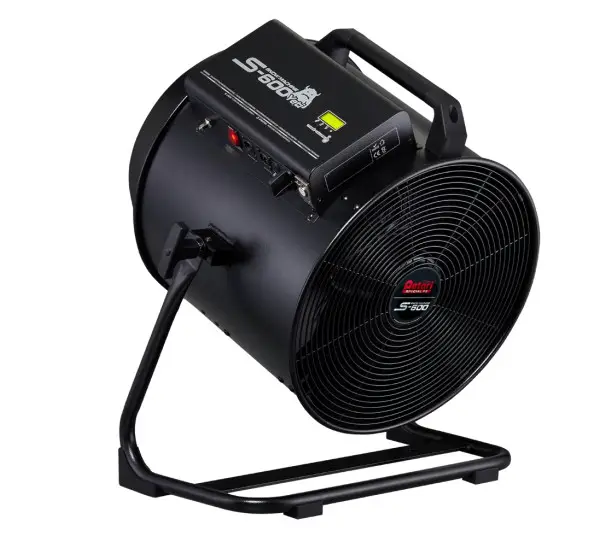
 © 2022 Antari Lighting and Effects Ltd.
![]()
Introduction
Please read this user manual carefully before operating the machine.
Please put this manual in a place where you can refer to it at any time.
If you encountered any problems, please contact your local Antari dealer for advice and assistance.
Safety Information
![]() CAUTION!
CAUTION!
Please read the following safety information carefully before operating the machine.
This information includes important safeguards about installation, usage, and maintenance. Pay attention to all warning labels and instructions in this manual and printed on the machine.![]() DANGER!
DANGER!
Electrical shock
Always connect the machine to the correct voltage. It will lead to electrical shock or burn and may cause serious consequences if connecting to incorrect or improper voltage.![]() WARNING!
WARNING!
Risk of electrocution
Always connect the machine to a protected circuit and ensure it is properly grounded to avoid the risk of electrocution.
※ Damage caused by the disregard of this user manual is not subject to warranty. Enter and its dealer will not accept liability for any resulting defects or problems.
2.1 Installation
- Keep this device dry. This machine is not waterproof. Do not expose the machine to water splashes.
- Place the machine on a flat surface. Installed in a well-ventilated area. Provide at least 50 cm of space around the machine.
- Make sure there are no flammable materials close to the machine while operating. Never add flammable liquid of any kind to the machine.
- Before connecting the machine to power, always check the voltage indicated on the machine matches your local AC voltage. Do not use the machine if the AC power voltage does not match.
- If the supply cord is damaged, it must be replaced by a special cord or assembly available from your local Antari dealer for replacement.
- No user-serviceable and modifiable parts inside. Never try to repair this product, an unauthorized technician may lead the machine to damage or malfunction.
- This product is for indoor use only! Do not expose to rain or moisture. If the fluid is spilled, disconnect the AC power and clean it with a damp cloth. If the fluid is spilled onto electronic parts, immediately unplug the machine and contact your local Antari dealer for advice.
- Pay attention to all warning labels and instructions on the machine before operation.
2.2 Operation
- Do not operate the machine with bundled power cables. It could be a fire hazard.
- Do not operate the machine in an area with unstable voltage. This may burn out internal components and cause the machine to fail to work.
- Do not use the machine against humans, animals,s or flames. Make sure there are no flammable materials close to the machine.
- For adult use only. The machine is not to be used by persons (including children) with reduced physical, sensory or mental capabilities, or lack of experience and knowledge. Never leave the machine running unattended.
- Children are being supervised not to play with the machine.
- If you hear a strange sound or experience a machine failing to work, stop using it immediately. Turn off and unplug the machine, and contact your local Antari dealer for service.
- Turn off and unplug the machine while it’s not in use.
- Make sure the machine is turned off before unplugging it.
- Do not use the machine upside down or tilt it. It may damage the machine and make it malfunction.
- Before transporting the machine, make sure the fluid tank is completely drained.
- Snow fluid may present health risks if swallowed. Do not drink snow fluid. Store it securely. In case of eye contact or if fluid is swallowed immediately look for medical advice.
- Be sure to unplug the machine before filling the snow fluid.
- If the machine fails to work, unplug the machine and stop operation immediately. Contact your local Antari dealer for help.
2.3 Grounding Instruction
This appliance must be grounded in the event of malfunction or breakdown, grounding provides a path of least resistance for electric current to reduce the risk of electric shock. This appliance is equipped with a cord having an equipment-grounding conductor and a grounding plug. The plug must be plugged into an appropriate outlet that is properly installed and grounded in accordance with all local codes and ordinances.
DANGER – Improper connection of the equipment-grounding conductor can result in a risk of electric shock. The conductor with insulation having an outer surface that is green with or without yellow stripes is the equipment-grounding conductor. If repair or replacement of the cord or plug is necessary, do not connect the equipment-grounding conductor to a live terminal. Check with a qualified electrician or servicemen if the grounding instructions are not completely understood, or if in doubt as to whether the appliance is properly grounded. Do not modify the plug provided with the appliance. If it will not fit the outlet, have a proper outlet installed by a qualified electrician.
This appliance is for use on a nominal 120V circuit and has a grounding plug that looks like the plug illustrated in sketch A in Figure 73.1. A temporary adaptor, which looks like the adaptor illustrated in sketches B and C, may be used to connect this plug to a 2 pole receptacle as shown in sketch B if a properly grounded outlet is not available. The temporary adaptor should be used only until a properly grounded outlet can be installed by a qualified electrician. The green-colored rigid ear, lug, and the like, extending from the adaptor must be connected to a permanent ground such as a properly grounded outlet box cover.
Whenever the adaptor is used, it must be held in place by the metal screw.


Package Items
Immediately upon receiving the machine, carefully unpack the carton, check the content to ensure that all parts are present and have been received in good condition. If any parts appear damaged or mishandled from shipping, notify the shipper immediately and retain the packing material for inspection.
3.1 Standard Package
1 x S-600 Snow Machine
1 x PowerCon True 1 Power Cord
1 x User Manual or scan QR code on the technical label
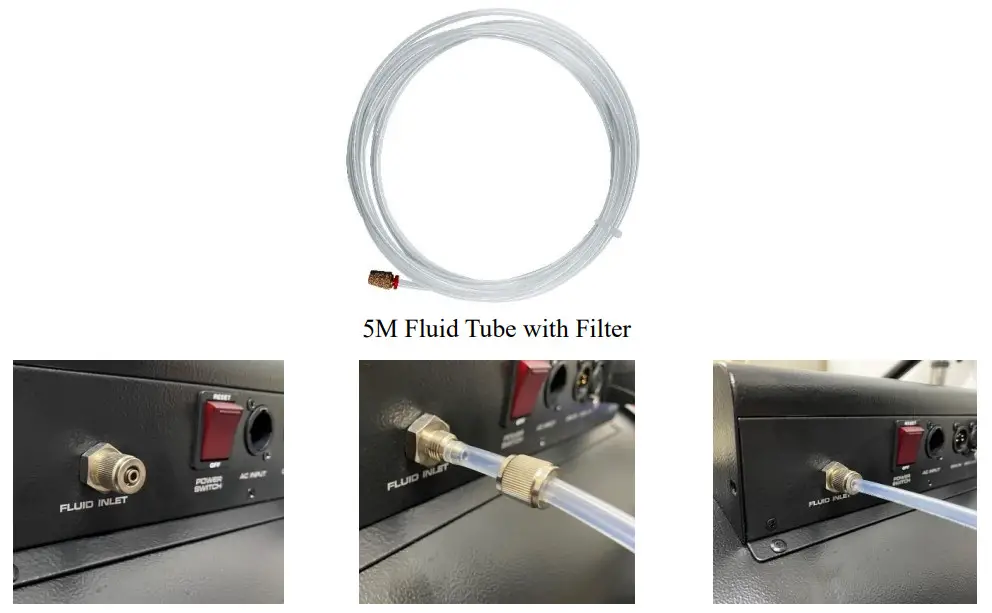
1 x 5M Fluid Tank Feed Tube with Filter
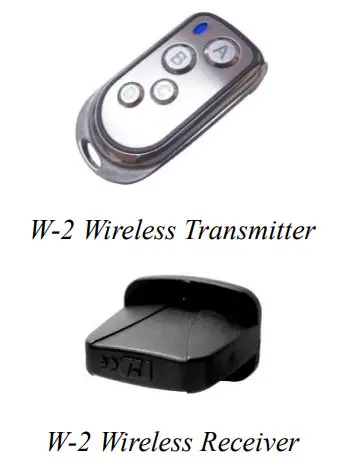
1 x W-2 Wireless Transmitter (Receiver has been installed onto the machine)
1 x Hanging Bracket
3.2 Optional Accessories
| Item Code | Description |
| WTR-90 | W-2 & W-DMX Receiver & W-DMX-PCB |
| SC-4 | Cable Remote |
| S-600-BH | 5-Liter Bottle Holder |
Product Overview
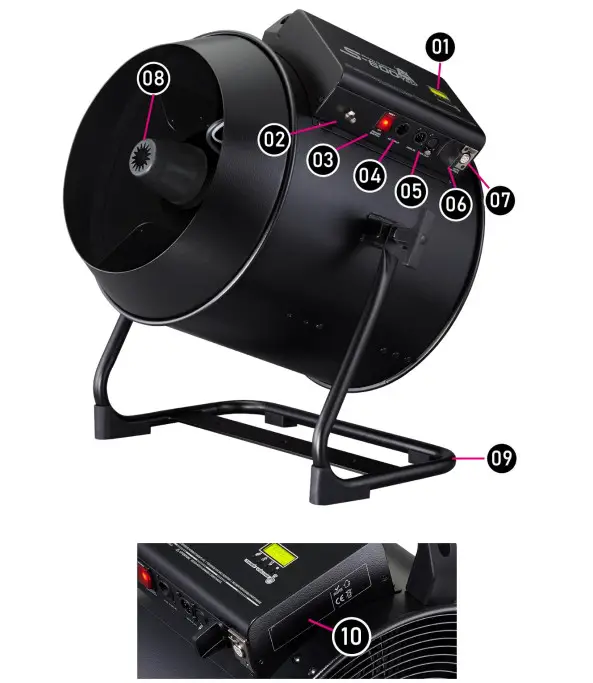
| 01. Control Panel | 02. Fluid Tube Connection |
| 03. Main Power Switch | 04. True 1 PowerCon Connector |
| 05. XLR 5-Pin DMX Connector | 06. Wireless Receiver Antenna |
| 07. SC-4 Remote Connector | 08. Output Nozzle |
| 09. Hanging Bracket | 10. Technical Label |
Technical Label Information
Read the information on the technical label before operation.
The technical label is attached on one side of the control panel.
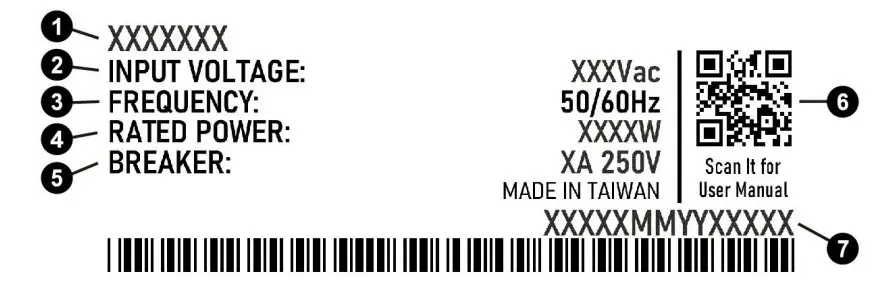
| 1. Model Name | 2. Input Voltage |
| 3. Frequency | 4. Rated Power |
| 5. QR CODE for User Manual | 6. Serial No. |
Snow Fluid
![]() CAUTION!
CAUTION!
Always disconnect from the mains before filling the machine. Never add flammable liquids. If fluid gets inside the machine, please contact your local Antari dealer for service.
Only use Antari SL-N, SL-AN, SL-H, SL-C, and SL-UV fluid for the S-600 Snow Machine. The machine is tested and calibrated with this liquid to get the best output performance. Warranty will be void if any other type of liquid is used, improper use of liquid may lead to machine failure and malfunction.
Setting Up
![]() CAUTION!
CAUTION!
Risk of injury caused by falling objects.
Make sure the installation location, fastening connecting, and rigging hardware can hold at least 10 times the weight of the machine.
Make sure that the machine is installed securely and cannot fall down.
It will cause severe injuries if the machine falls down.
Step 1. Place the machine on a flat surface and in a suitably large area with at least 50 cm open space around the machine.
Step 2. Connect the 5M fluid tube to S-600 and put the filter into the tank. Please do not bend the fluid tube and fill the fluid tank with Antari snow fluid.
Step 3. Connect the machine to a suitably rated power supply. To determine the power requirement for the machine, refer to the label on the back of the machine.
Step 4. Turn on the machine, and press the [VOLUME]/[DOWN] button on the control panel to start making snow. To stop making snow, press the [STOP] /[■] button
Step 5. To turn off the machine, press the [STOP] /[■] button and put the power switch in the OFF position.
※ Notice:
The motor of the S-600 continues running for about 5 seconds after the [STOP] /[■] button is pressed. Please turn off the main power after the motor stops running.
Operation
S-600 Yeti snow machine can be operated in the following modes. The machine can accept 1 kind of signal at 1 time. When using different control modes at the same time, the machine will work according to built-in control priority.
- Manual: operation via the control panel
- Timer: operation via the control panel
- DMX 512
- SC-4 Wired Remote (Optional)
- Wireless DMX (Optional)
- W-2 Wireless Transmitter
Priority: Wireless DMX (Optional) > DMX512 > W-2 Wireless Transmitter > SC-4 Wired Remote (Optional) > Manual
Please see the following pages for instructions on your choice of operation.
8.1 Control Panel Operation
The machine can be operated in manual or timer modes with the onboard digital control interface 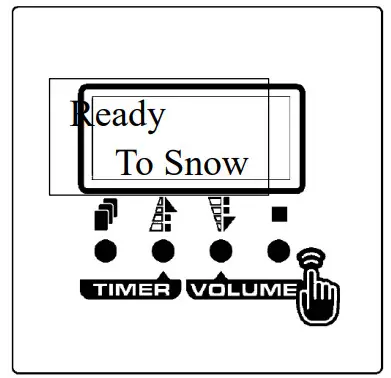
| Button | Function |
| Scroll through the settings menu | |
| ▲[UP]/[TIMER] | Increase setting value/Activate Timer function |
| ▼[DOWN]/[VOLUME] | Decrease setting value/Activate Volume function |
| ■[STOP] | Deactivate Timer/Volume function Confirm/Leave Setting Menu |
8.2 Control Menu
Menu | Item | Description | |
|
DMX | DMX512 Add: XXX | DMX-512 Address: 1-510 (S-600 occupies 3 control channels.) | |
| LinkMode Wired | Link Mode: Wired / Wireless | ||
| W-DMX | W-DMX Linking: Linking canceled | ||
| Unlink? | |||
| Manual | Interval | Set interval time at timer mode from 5 to 240 minutes | |
| XXX min | |||
| Duration | Set duration time at timer mode from 5 to 240 minutes | ||
| XXX min | |||
| Volume | Set output volume at volume mode from 0 to 100% | ||
| Out XXX% | |||
| Blower | Set blower output from 0 to 100% to adjust snowflake size. The smaller output, the bigger snowflake. | ||
| XXX% | |||
| Fan Speed | Set fan speed from 0 to 100% | ||
| XXX% | |||
| Info | W-DMX — | W-DMX ok | W-DMX Transmitter assigned, DMX signal received. |
| No DMX | W-DMX transmitter assigned, No DMX signal | ||
| TX Lost | W-DMX link lost or linking to the transmitter | ||
| Unassign | W-DMX Transmitter not assigned | ||
| UID 1ED8 | Product UID Code | ||
| 06020001 | |||
| Run Time | Accumulated Snowing time: 0 – 9999999 hour | ||
| 0000000H | |||
| Setting | W.Remote | Wireless Transmitter: Pair / Unpair | |
| Pair | |||
| Run Last | Run the last setting: On / Off | ||
| Set Off | |||
| KeySound | Keypad Sound: On / Off | ||
| Set On | |||
| Backlite | Screen Backlite: On /Off / AlwaysOn | ||
| AlwaysOn | |||
| Default | Reset to factory settings | ||
| Proceed? | |||
Machine Status Message
| Screen | Description |
| S-600 | Software Version |
| AC Input AC-XXX | Input Voltage |
| Ready To Snow | The machine is ready to make snow. |
| Remote Out XXX% | SC-4 wired remote operating (only shows when SC-4 is connected) |
| Volume Out XXX% | Running at volume mode |
| Interval XXX min | Running at timer mode, Interval time |
| Duration XXX min | Running at timer mode, Duration time |
| DMX-512 Add: XXX | Current DMX 512 channel |
| Priming 100% | Activate pump at maximum output |
| Wrong Voltage! | Wrong input voltage |
DMX Connection
10.1 DMX Connector Pin Assignment
The machine provides a 5-pin XLR connector for DMX connection. The diagram below indicates pin assignment information.
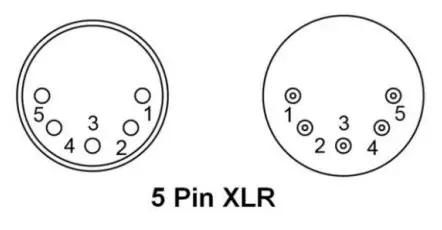
| Pin | Function |
| 1 | Ground |
| 2 | Data- |
| 3 | Data+ |
| 4 | N/A |
| 5 | N/A |
10.2 DMX Channel Function
| Channel | Mode | DMX Value | Function |
| Channel 1 | Snow Output Volume | 0-5 | Snow off |
| 6-255 | Snow Output 0-100% | ||
| Channel 2 | Blower Output | 0-5 | Blower off |
| 6-255 | Blower Output 0-100% | ||
| Channel 3 | Fan Output | 0-5 | Fan Off |
| 6-255 | Fan Output 0-100% |
RDM
The S-600 snow machine Yeti is RDM enabled, allowing the control system to configure, monitor, and manage. See the below table for supported RDM parameters.
| GET. Wowed | SET Allowed | Category | RDM Parameter ID’s (Slot 21-22) | Value | Required | |
| I | ||||||
| Network Management | DISC_UNIQUE_BRANCH | Ox0001 | 0 | |||
| DISC_MUTE | 0x0002 | 0 | ||||
| DISC UN MUTE | 0x0003 | 0 | ||||
| O | RDM Information | QUEUED_MESSAGE | ||||
| 0x0020 | ||||||
| o | SUPPORTED PARAMETERS | Ox0050 | 0 | |||
| 0 | PARAMETER DESCRIPTION | 0x0051 | 0 | |||
| 0 | Product Information | DEVICE INFO | Ox0060 | 0 | ||
| O | PRODUCT DETAIL _ID_LIST | 0x0070 | ||||
| O | DEVICE MODEL DESCRIPTION | 0x0080 | ||||
| o | MANUFACTURER LABEL | 0x0081 | ||||
| 0 | 0 | DEVICE LABEL | 0x0082 | |||
| 0 | SOFTWARE VERSION LABEL | Ox00C0 | 0 | |||
| DMX5I2 Setup | DMX PERSONALITY | Ox00E0 | ||||
| 0 | 0 | |||||
| 0 | DMX_PERSONALITY_DESCRIPTION | Ox00E1 | ||||
| O | 0 | DMX_START_ADDRESS | Ox00F0 | 0 | ||
| O | SLOT_INFO | (0x0120) | 0x0200 | |||
| O | SLOT_DESCRIPTION | (0x0121) | ||||
| O | DEFAULT_SLOT_VALUE | (0x0122) | ||||
| O | Sensors | SENSOR_DEFINITION | ||||
| O | O | SENSOR_VALUE | 0x0201 | |||
| O | DEVICE_HOURS | 0x0400 | O | |||
| O | O | Control | IDENTIFY_DEVICE | 0x1000 | O | |
Wireless Control Operation
S-600 is equipped with a W-2 wireless control function as a standard. Receiver attached to S-600 before shipped from the factory.
12.1 W-2 Wireless Transmitter
- Battery:27A 12V
- Effective distance: In free open space, the effective distance is about 50 meters, actual usage depends on obstacle level; the effective distance varies.
- W-2 Wireless remote control system equipped with 4 buttons to activate, deactivate, and adjust snow, motor, and fan output levels.
| Button | Function |
| [A] | Press Once: activate the output Keep pressing for 2 seconds: turn off S-600 |
| [B] | Adjust snow output level Range: 0/20/40/60/80/100% |
| [C] | Adjust the motor output level Range: 0/20/40/60/80/100% |
| [D] | Adjust the fan output level Range: 0/20/40/60/80/100% |
12.2 W-2 Wireless Receiver
S-600 is equipped with a W-2 wireless control function as a standard. The transmitter is included in the package.
Receiver attached to S-600 before shipped from the factory.
12.3 Registering a Transmitter
- Transmitter can be paired or deleted from the receiver.
- Each receiver can pair up to 5 transmitters.
- Follow the below steps to pair or delete the transmitter.
Step 1. Press [MENU] button and select [Setting]. Screw the menu until [W. Remote] shows on display.
UP: Pair
DOWN: Unpair
Step 2A. Press the [UP/▲] button to select [Pair] to pair a new transmitter. Press the [STOP / ■] button, and press any button on the W-2 transmitter to finish pairing.
Step 2B. Press the [DOWN/▼] button to select [Unpair] to delete an existing transmitter.
Wireless DMX Operation (Optional)
13.1 WTR-90 (Optional)
WTR-90 includes a 2-in-1 (W-DMX & W-2) receiver and a W-DMX-PCB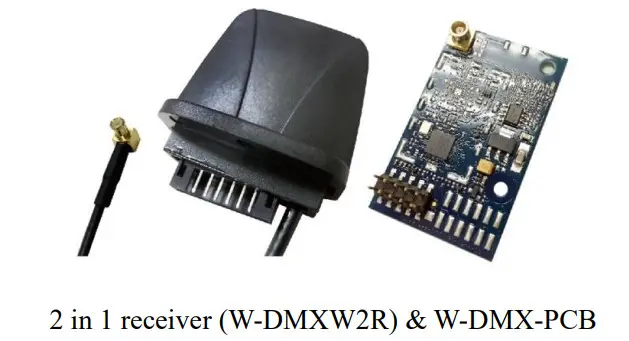
13.2 Installation Steps
Step 1. Release unscrew the receiver, and replace it with the 2-in-1 receiver (W-DMXW2R). Connect it to the cable shown as the below photo and then screw it to the panel. 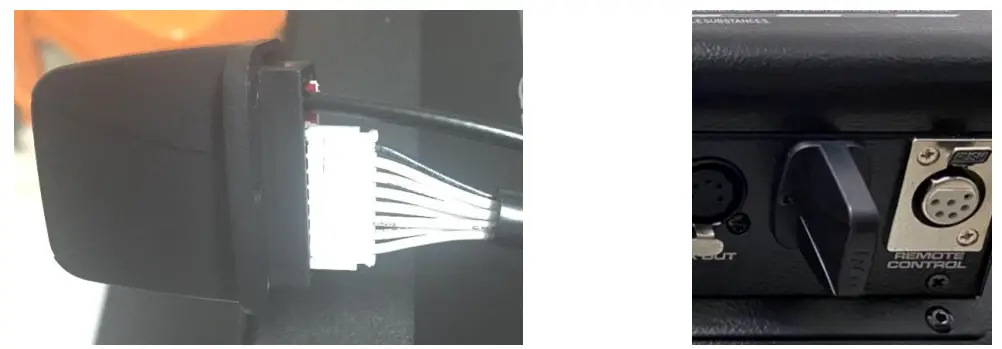
Step 2. Connect the receiver’s cable with W-DMX-PCB and then install the W-DMX-PCB onto the main PCB circled in red below.
※ Please make sure the W-DMX-PCB pins are firmly installed and attached to the S-600 main PCB.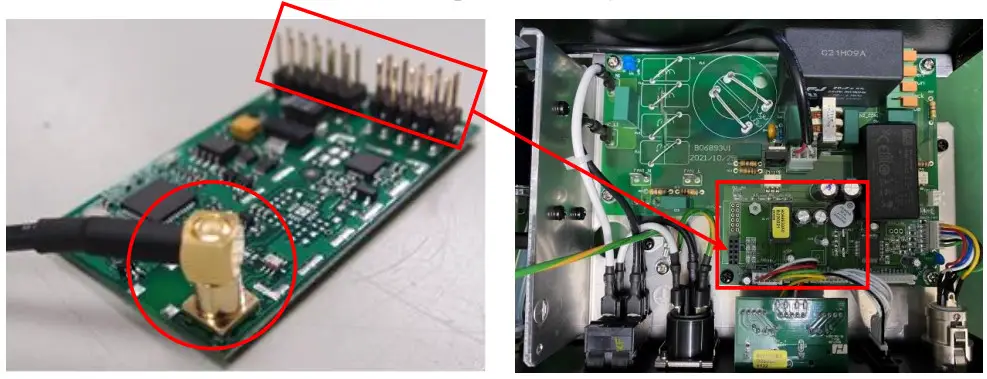
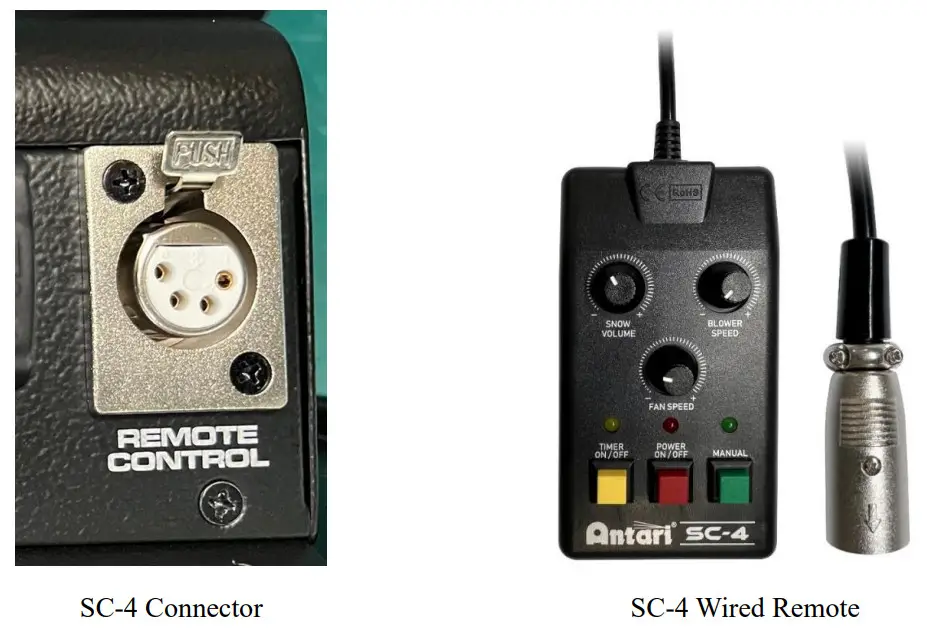
SC-4 Wired Remote Operation (Optional)
The wired remote control SC-4 enables control of the machine from a remote location. With three push buttons and 3 rotary knobs to activate/deactivate, priming and snow, motor and fan output level adjustment.
| Button/Knob | Function |
| [SNOW VOLUME] Knob | Adjust snow output level 0-100% |
| [BLOWER SPEED] Knob | Adjust motor output level 0-100% to adjust snowflake size. |
| [FAN SPEED] Knob | Adjust fan output level 0-100% |
| [TIMER] Button | Activate Timer Setting Interval and duration time is set on the control panel. The output level is controlled by a rotary knob on SC-4. |
| [POWER] Button | Turn On/Off SC-4 remote |
| [MANUAL] Button | Max snow, motor, and fan output level. |
※IMPORTANT NOTE:
- Press the [POWER] button to activate the SC-4 remote.
- With the first-time operation, a new tank of fluid or refill the fluid may not pump properly due to an airlock in the pipeline, use the [MANUAL] button to activate a pump, motor, and fan at maximum output to push the air out of the pipeline.
S-600-BH / 5-liter bottle holder (Optional)
An optional S-600-BH / 5-liter bottle holder is available to meet the needs of different occasions. Follow the below steps to install the bottle holder. 
Step 1. Release the T-shaped handle on S-600.
Step 2. Install S-600-BH to the machine.
Step 3. Screw the T-shaped handle back to S-600 tightly to complete the installation.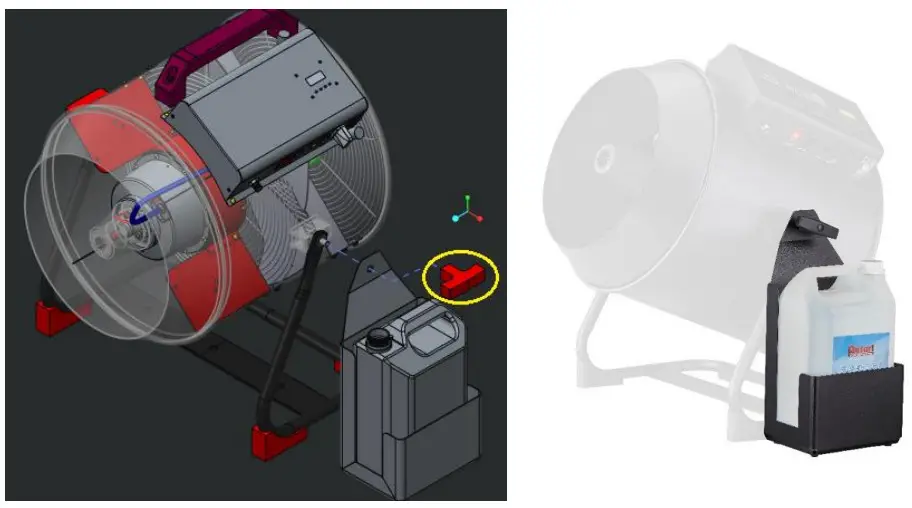
Service and Maintenance
![]() DANGER!
DANGER!
Disconnect from mains before starting maintenance operation!
- Do not allow the machine to become contaminated.
- Remove dust from air vents with an air compressor, vacuum or a soft brush.
- Only use a damp cloth to clean the casing.
- It is recommended to run the machine on a monthly basis in order to achieve the best performance and output condition.
- Excessive dust, liquid, and dirt built up will degrade performance and cause overheating.
- Before storing away after the operation, pump pure water through the system for at least 1 to 2 minutes.
This will help clean out the remaining snow fluid and prevent the pump from malfunctioning on the next usage.
Technical Specifications
| S-600 | |
| Input voltage | US model : AC 100-120V, 50/60Hz 10A EU model : AC 220-240V, 50/60Hz 5A |
| Rated power | 1200W |
| Fluid consumption | 400 ml/min |
| Compatible fluid | Antari SL-N Snow Foam Fluid Antari SL-AN Premium Snow Foam Fluid Antari SL-H Super Dry Snow Foam Fluid Antari SL-C Anti-Freezing Snow Foam Fluid Antari SL-UV UV Snow Foam Fluid |
| Ambient temp/ range | 5°C — 40°C (41°F — 104°F) |
| Control | Manual, Timer,DMX 512, Wireless Wireless DMX (Optional) |
| DMX channels | 3 channels |
| Connection | Neutrik Powercon (Power) XLR 5-pin (DMX) |
| Included accessories | W-2 Wireless Radio Transmitter 5-Meter Fluid Tube with Filter Hanging Bracket |
| Optional accessories | WTR-90 Wireless DMX SC-4 Cable Remote S-600-BH Bottle Holder (For 5-Liter Bottle. Bottle is not included) |
| Dimension | L 461.2 W 596 H 629.6 mm (L 18.16 W 23.47 H 24.79 inch) |
| Weight | 24 kg (52.9 lbs) |
Machine Dimension

Exploded diagram
19.1 AC-120V
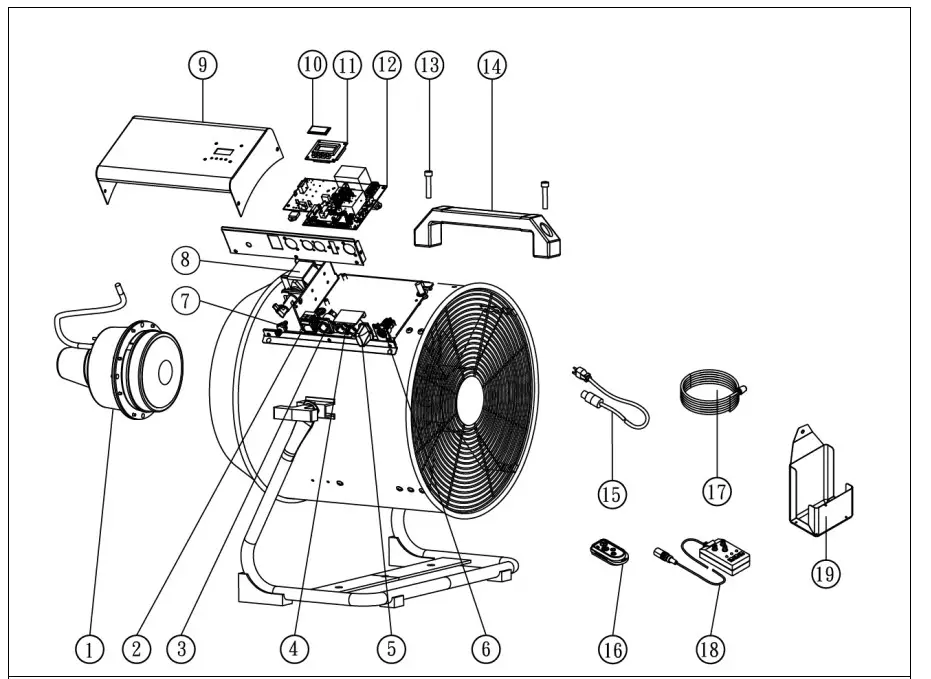
| SPARE PARTS OF S-600 | |||||
| 1 | S-600-M | Air blower | 11 | S-600-PCBC | Control P.0 board |
| 2 | C040039B0 | Rocker switch / Power | 12 | S-600-PCB | Main P.0 board |
| 3 | C04312621 | Power socket (Inlet) | 13 | CO1007010 | Socket head cap screw |
| 4 | S-600- PCBD5 | P.0 board DMX SPin | 14 | CO2025000 | Handle |
| 5 | W-2A | Wireless transmitter | 15 | S-600-PC | Power cord & Plug |
| 6 | C045E2900 | Control inlet socket | 16 | W-2RA | Wireless Receiver |
| 7 | C00013610 | Fluid tube connector | 17 | FT-P-6-4A-5M | Fluid tube with filter / 5M |
| 8 | S-600-P | Pump (Group) | 18 | SC-4 | Wired remote controller (Optional) |
| 9 | S60000100 | Steel | 19 | S-600-BH | Bottle holder (Optional) |
| 10 | CO2000700 | Acrylic | |||
19.2 AC-230V
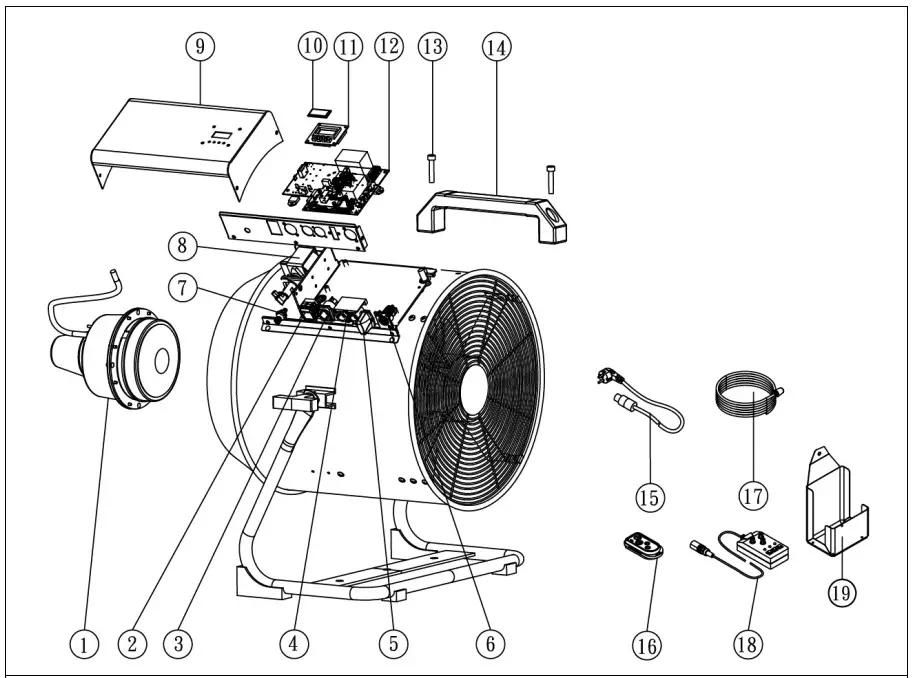
| SPARE PARTS OF S-600 | |||||
| 1 | S-600E-M | Air blower | 11 | S-600-PCBC | Control P.0 board |
| 2 | C040039A0 | Rocker switch / Power | 12 | S-600-PCB | Main P.0 board |
| 3 | C04312621 | Power socket (Inlet) | 13 | C01007010 | Socket head cap screw |
| 4 | S-600-PCBD5 | P.0 board DMX 5Pin | 14 | CO2025000 | Handle |
| 5 | W-2E | Wireless transmitter | 15 | 5-600-PC | Power cord & Plug |
| 6 | C045E2900 | Control inlet socket | 16 | W-2RE | Wireless Receiver |
| 7 | C00013610 | Fluid tube connector | 17 | FT-P-6-4A-5M | Fluid tube with filter / 5M |
| S-600-P | Pump (Group) | 18 | SC-4 | Wired remote controller (Option all | |
| 9 | S60000100 | Steel | 19 | S-600-BH | Bottle holder (Optional) |
| I0 | CO2000700 | Acrylic | |||
![]()
![]() C08S6000
C08S6000
22
© 2021 Antari Lighting and Effects Ltd. www.antari.com


