CANOPIA Automatic Louver Window Opener
HOW TO ASSEMBLE
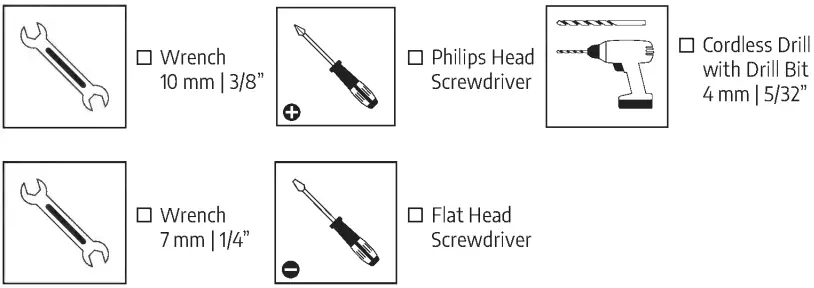
AUTOMATIC LOUVER WINDOW OPENER™
Suitable for Palram – Canopia Greenhouses with pre-assembled Side Louver Window
IMPORTANT!
Please read these instructions carefully before starting assembly. Keep these instructions in a safe place for future reference.
www.canopia.com
 AFTER SALES SERVICE
PARTS REQUEST
In the case of missing or damaged parts, do not return product to store.
Go to the link below or scan the QR code for help, it will direct you to a form that will help us assist you as soon as possible. Contact us on our website: bit.ly/3js7yZi
ASSEMBLY ASSISTANCE
If you need any technical assistance in assembling your product, go to the link below or scan the QR code for help. It will direct you to a form that will help us assist you as soon as possible.
 Contact us on our website: bit.ly/3kqqFEc
CUSTOMER SUPPORT
WE ARE HERE TO HELP
For general questions: bit.ly/3kY07dP
| USA | |
| 877-627-8476 | |
| [email protected] | |
| CANADA | |
| 905-5646007 | |
| [email protected] | |
| UNITED KINGDOM • IRELAND | |
| 01302-380775 | |
| [email protected] | |
| GERMANY | |
| 0180-522-8778 | |
| [email protected] | |
| FRANCE • BELGIUM | |
| +33-169-791-094 | |
| [email protected] | |
| ISRAEL | |
| 04-848-6816 | |
| [email protected] | |
| ITALY • NETHERLANDS • PORTUGAL • SPAIN | |
| +33-169-791-094 | |
| [email protected] | |
| AUSTRIA • LUXEMBURG • LIECHTENSTEIN | |
| +49-180-522-8778 | |
| [email protected] | |
| AUSTRALIA | |
| 03-9219-4444 | |
| [email protected] | |
| NORWAY • SWEDEN • ARGENTINA • GREECE • GREENLAND • ICELAND • ESTONIA • JAPAN • LATVIA • LITHUANIA MAURITIUS • MEXICO • ROMANIA • RUSSIA • TURKEY • UZBEKISTAN • UKRAINE • SWAZILAND • KOREA | |
| +972-4-848-6816 | |
| [email protected] | |
| AUSTRALIA – GREENHOUSES | |
| 03-9544-6-999 | |
| [email protected] | |
| HUNGARY • SLOVAKIA | |||||||
| +420-493-523-523 | |||||||
[email protected]
| |||||||
| DENMARK | |
| 07-575 42 70 | |
| [email protected] | |
| SOUTH AFRICA | |
| 011-397-7771 | |
| [email protected] | |
| CROATIA • SLOVENIA | |
| 0599-37-057 | |
| [email protected] | |
| CZECH REPUBLIC | |
| 0493-523-523 | |
| [email protected] | |
| FINLAND | |
| Neuvonta: 09-6866720 Tuki / Varaosat: 050-3715350 | |
| www.horisontenterprises.fi [email protected] | |
| POLAND | |
| Infolinia: 801-011-929 22-349-93-36 | |
| [email protected] | |
| CYPRUS | |
| 0224-971-13 | |
| [email protected] www.alpacodomica.com | |
| SWITZERLAND | |
| 062-287-33-77 | |
| [email protected] | |
BEFORE ASSEMBLY
- Please CAREFULLY READ all instructions BEFORE STARTING THE ASSEMBLY of the Automatic Side Louver Opener.
- Carry out the steps In the order set out in the instructions.
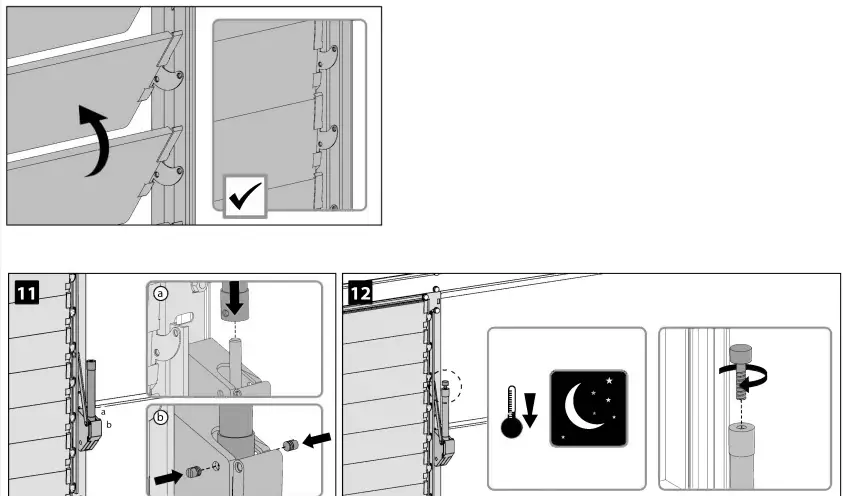
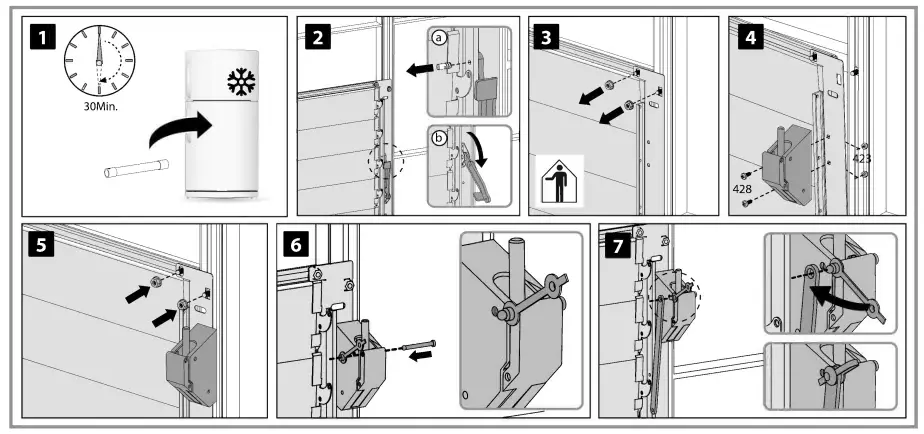
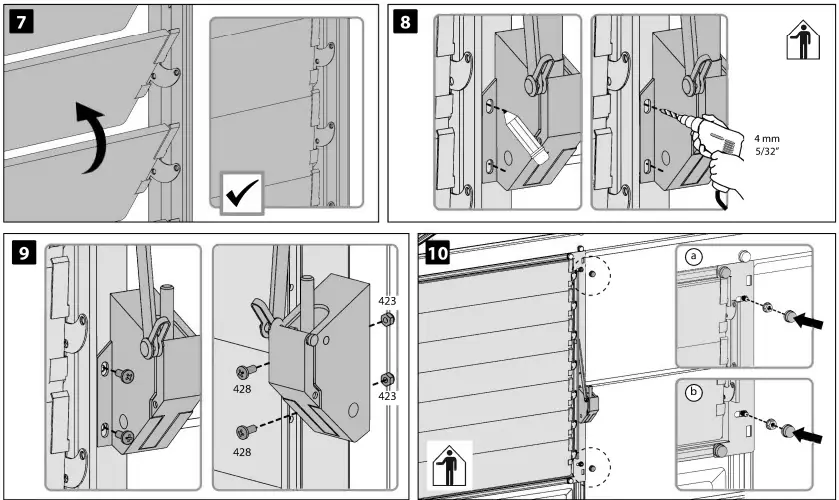
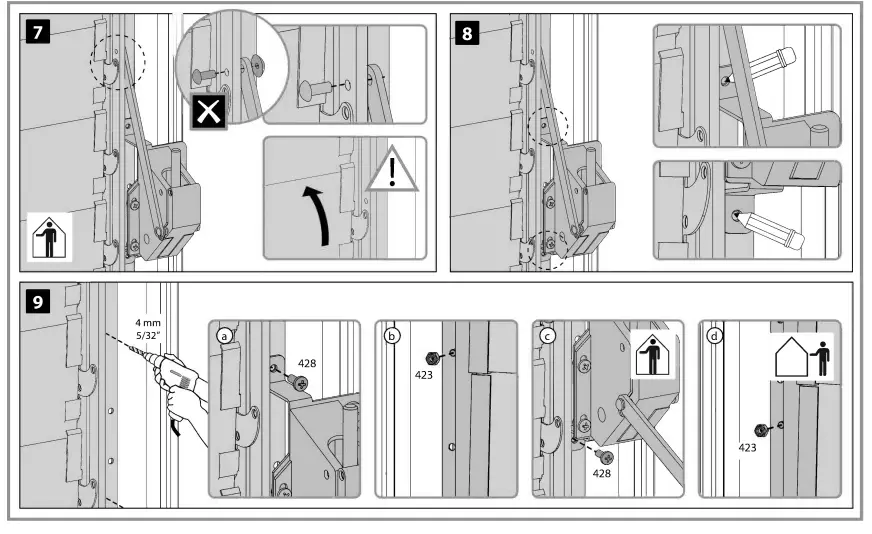
- Close the louvre. Press upwards to ensure louvre blades are fully closed.
If necessary, adjust the position of the louvre opener to ensure that the louvre blades are fully closed. - Tighten the two screws just enough to hold the louver control opener firmly in place and to ensure it does not slip. Do not overtighten.
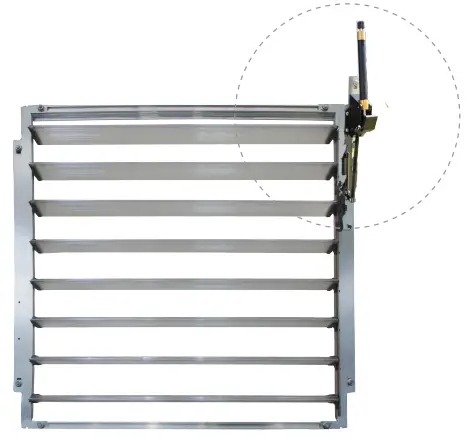
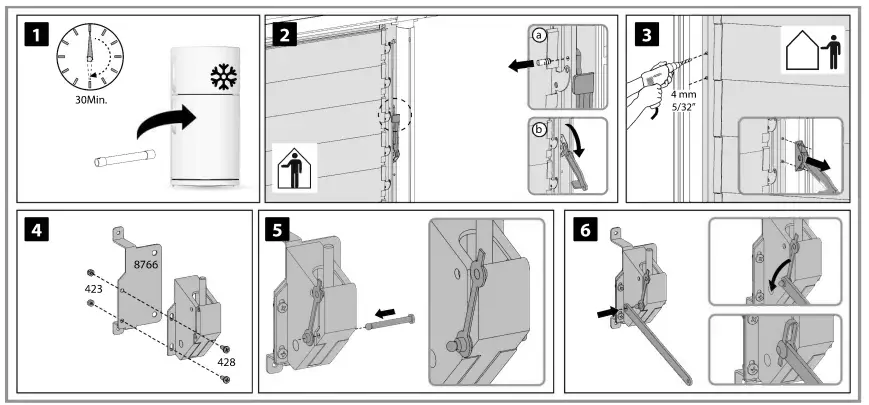
- It is necessary to cool the cylinder before fitting.
- Fit the adjusting screw into the end of the cylinder.
FITTING THE UNIT
- If a manual vent opener is already assembled, it should be removed.
- Follow the next steps for fitting the unit according to the greenhouse model you have purchased.
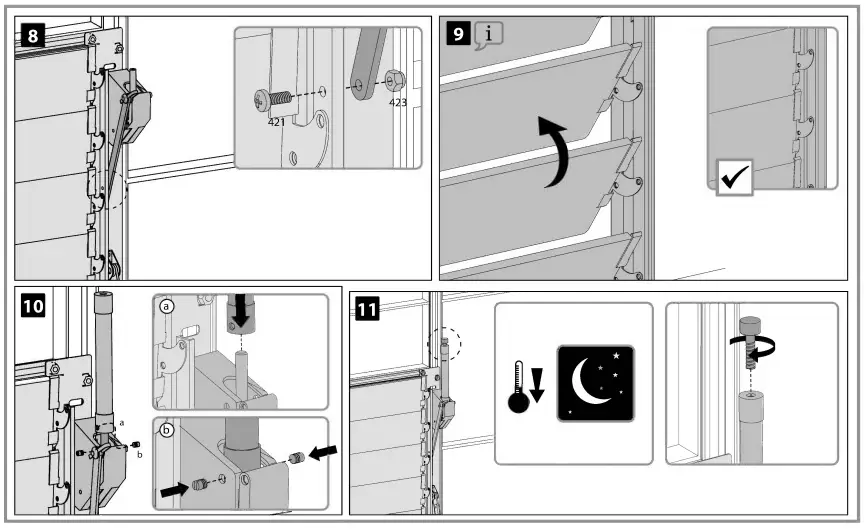
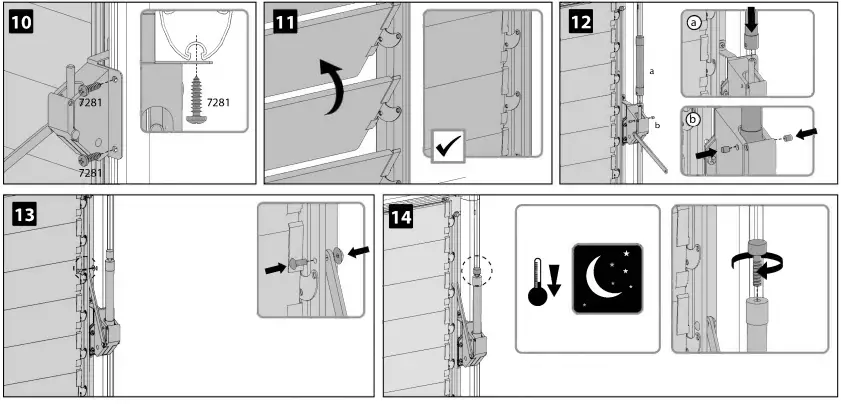
- After allowing the cylinder to reach the temperature at which you wish the louver to start opening, operate the louver manually by pulling down on the arm to remove the pressure and firmly turn the adjusting screw in the direction of the ‘LO’ arrow (clockwise), until the unit begins to open the louver without manual assistance .
- Any rise of the greenhouse temperature will now cause the louver to open wider. Further adjustment may be necessary, in which case repeat the process.
- By turning the adjusting screw in the direction of the ‘LO’ arrow ( clockwise) the louvre starts opening at a lower temperature. If the adjusting screw is turned in the direction of the ‘HI’ arrow (anti-clockwise) the louver will not open until a higher temperature is reached.
- Please note adjustment cannot be made without operating the unit manually by pulling down on the arm to relieve the return spring pressure.
- Manual Override – If you wish to open or close the louver manually, remove the top half of the plastic catch and carefully remove the link arm from the pivot pin. Providing you do not move the unit or the adjusting knob, the unit will operate at your chosen temperature when reconnected.
IMPORTANT INFORMATION
- Do not heat more than 50°C (122°F).
- Do not apply heavy load on louver when locking or covering.
- Do not attempt to dismantle the cylinder.
TECHNICAL INFORMATION
- Opening temperature range adjustable between 15°C and 25°C (59°F and 77°F) GUARANTEED
TOOLS & EOUIPMENT
DURING ASSEMBLY
- During assembly, you will encounter different icons for different products.
Please see below for more information: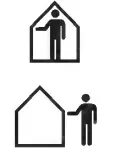
- This icon indicates that the installer should be inside the product.
- This icon indicates that the installer should be outside the product.
SUITABLE FOR HARMONY / HYBRID MYTHOS / GLORY / OCTAVE BALANCE / ESSENCE / AMERICANA SUITABLE FOR HARMONY/ HYBRID/ MYTHOS /GLORY/ OCTAVE/ BALANCE/ ESSENCE/ AMERICANA
 SUITABLE FOR GRAND GARDENER/ PRESTIGE/ HOBBY GARDENER / ECO GROW
 SUITABLE FOR OASIS SERIES