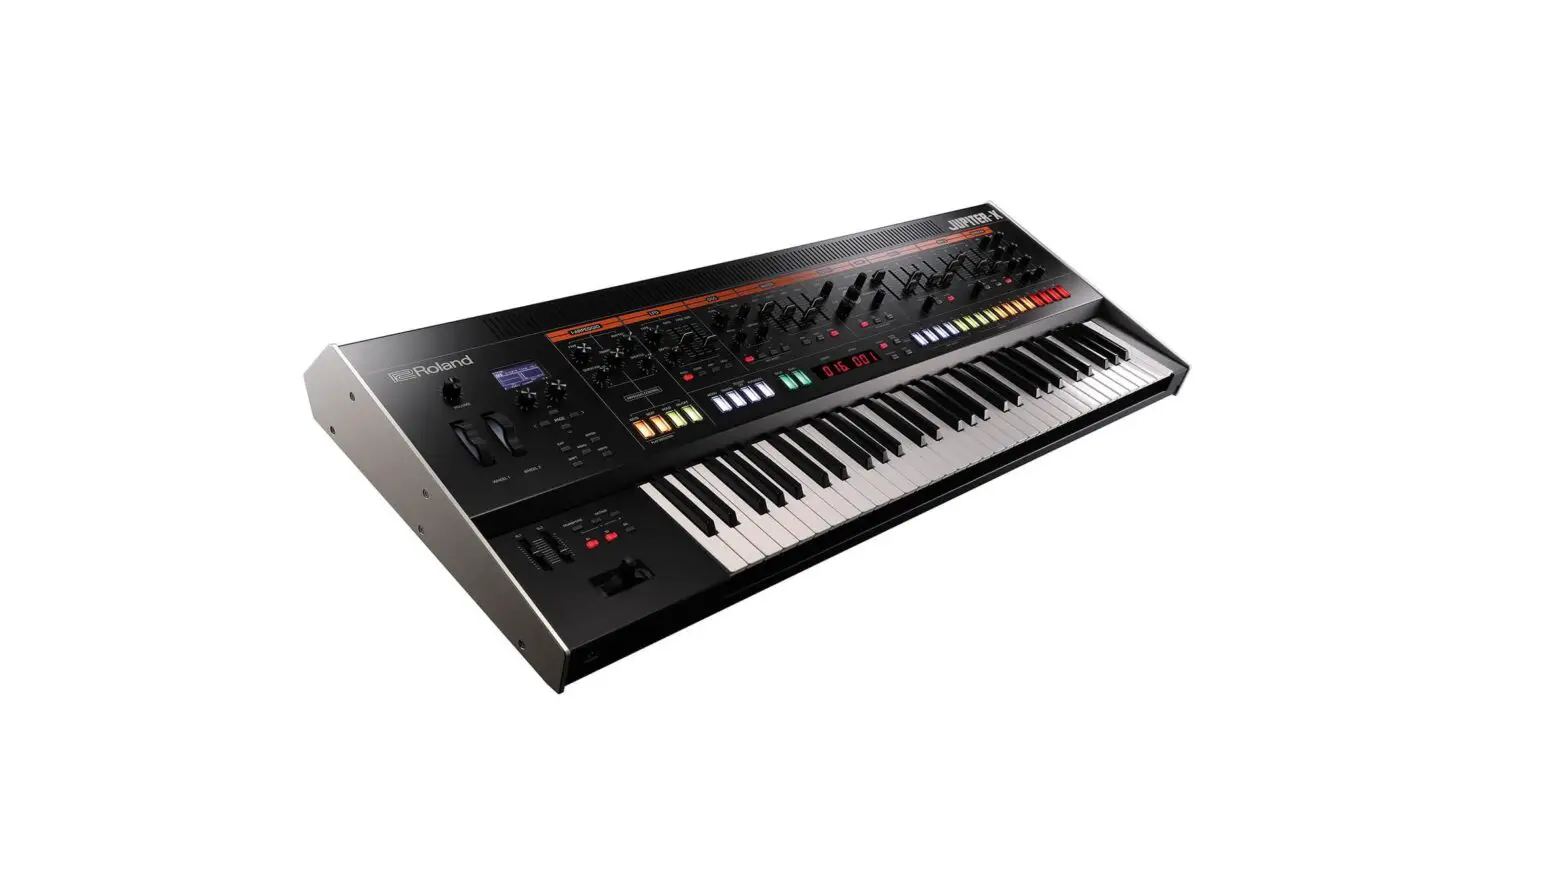
Roland JUPITER-X Xm Multi-Timbral Digital Synthesizers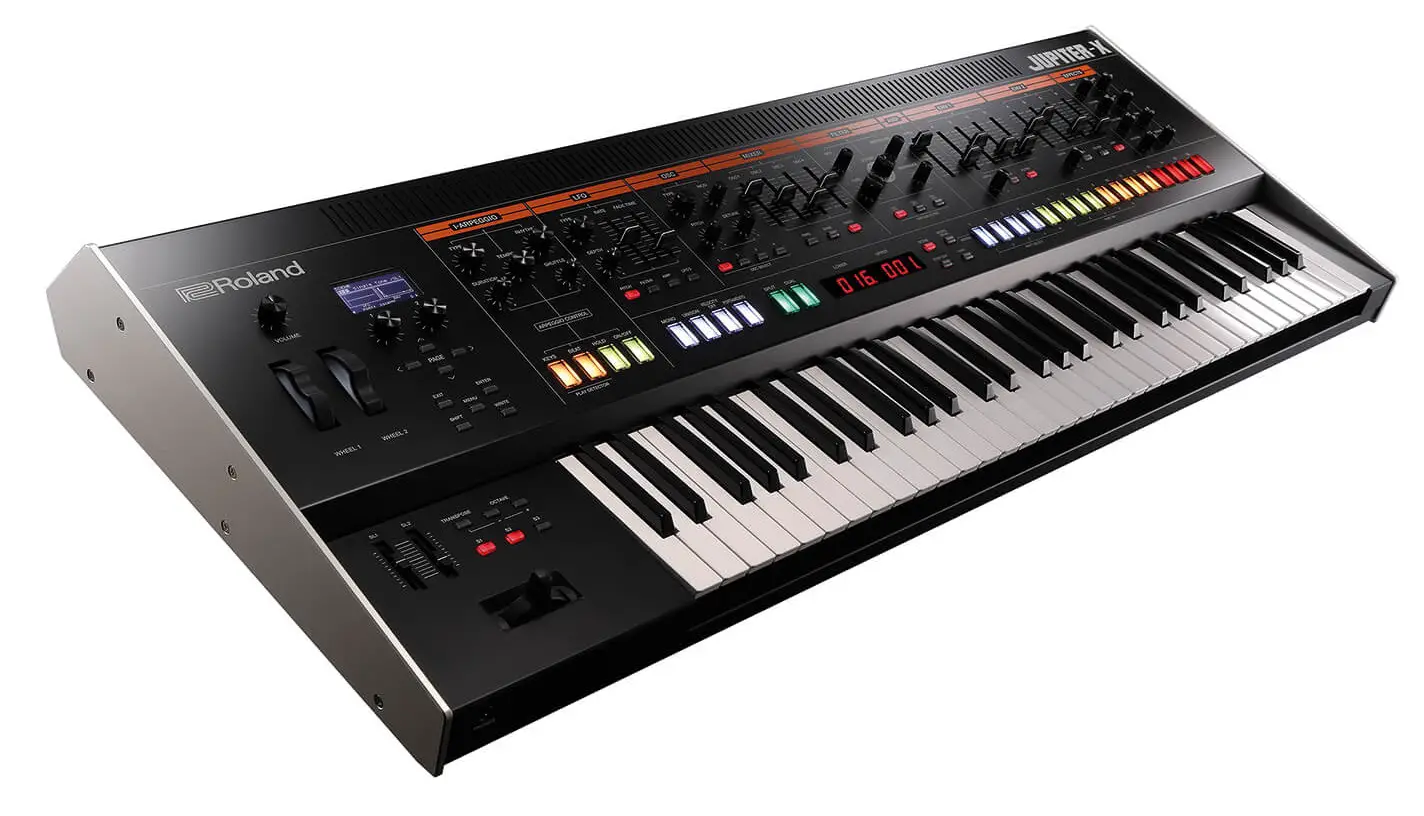
Updating the JUPITER-X/Xm to the Latest Version
Before using the Vocal Designer Model Expansion, you must update the JUPITER-X/Xm to the latest version.
Download the latest version at the website shown below, and follow the steps shown to install the update.
https://roland.cm/jupiter-x_dl (JUPITER-X)
https://roland.cm/jupiter-xm_dl (JUPITER-Xm)
Downloading the Vocal Designer Model Expansion
Download and install the Vocal Designer Model Expansion from Roland Cloud Connect (using the WC-1, sold separately) or Roland Cloud Manager.
Using Roland Cloud Connect (Using the WC-1, Sold Separately) to Install Vocal Designer
View the Setup Manual and Owner’s Manual from the Roland Cloud Connect product page shown below.
https://roland.cm/wc1
Using Roland Cloud Manager to Install Vocal Designer
Here’s how to download and install using Roland Cloud Manager.
Installing the Roland Cloud Manager
- On your computer, download Roland Cloud Manager from the Roland Cloud website.
Access the website listed below to download the appropriate installer for your computer.
https://www.roland.com/us/categories/roland_cloud/ - Double-click the installer you downloaded to begin the installation.
Proceed with the installation by following the directions shown onscreen.
When you see a message saying that the installation was successful, click the [Close] or [Finish]. - Start the Roland Cloud Manager that you installed, and register your account.
Follow the onscreen instructions to register.
Downloading the Vocal Designer Model Expansion
- Start Roland Cloud Manager.
- Click “Hardware” on the Menu tab.
A list of hardware appears. - Click “JUPITER-X/XM.”
A list of contents appears. - Click Vocal Designer Model Expansion.
The Vocal Designer Model Expansion download page appears. - Click “Get Lifetime Key” to purchase a Lifetime Key.
- Once you’ve made your purchase, click “Library” on the Menu tab.
A list of the contents you have purchased appears. - Select “Vocal Designer Model Expansion” and download.
Installing the Vocal Designer Model Expansion
Getting the file ready
- When using a USB flash drive for the first time, you must format it on the JUPITER-X/Xm.
Ø“Formatting a USB Flash Drive” (Owner’s Manual)
- Connect the USB flash drive to your computer.
- Save the file (EXM006_VocDsgnr.exz) to the root directory of the USB flash drive.
- Disconnect the USB flash drive from your computer.
Installing on the JUPITER-X/Xm
- Insert the USB flash drive you prepared in “Getting the file ready” into the JUPITER-X/Xm.
- Turn the power of the JUPITER-X/Xm on while holding down the [ENTER] button.
The EXPANSION top screen appears.
- Press the PAGE [æ] button to go to the installation screen.
- Use the PAGE [ä] and [å] buttons to select “EXM006_VocDsgnr,” and press the [ENTER] button or the PAGE [æ] button.
A confirmation message appears.
If you decide to cancel, press the [EXIT] button.
MEMO
The user license registration screen appears if you’re installing for the first time.
To continue installing, use the PAGE [æ] knob to select “OK,” and then press the [ENTER] button. - Use the PAGE [æ] button to select “OK,” and press the [ENTER] button.
- Turn the power off, then on again.
This allows you to use the Vocal Designer Model ExpansionIndication Action Expansion Memory Full! There is not enough memory available for installation. Follow the steps in “Uninstalling a Model Expansion” to free up the memory. Incorrect License! The Vocal Designer Model Expansion is currently linked to a different user license. Follow the steps in “Transferring User Data and Initializing Your User License” (p. 5) to initialize the user license.
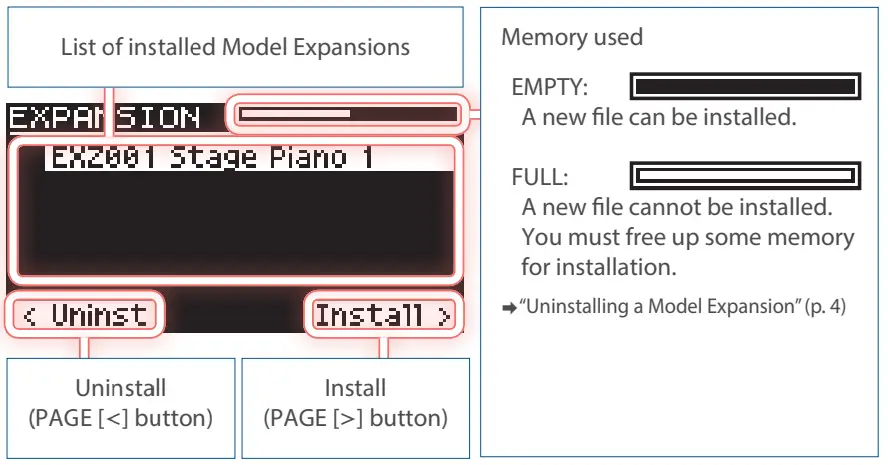
Uninstalling a Model Expansion
If there is not enough free memory, you can uninstall Model Expansions that are already installed, and then install the Vocal Designer Model Expansion.
- Hold down the [ENTER] button and turn the JUPITER-X/Xm on.
The EXPANSION top screen appears. - On the EXPANSION top screen, use the PAGE [ä] and [å] buttons to select the file to uninstall.
- Press the PAGE [ç] button to go to the uninstallation screen.
A confirmation message appears.
If you decide to cancel, press the [EXIT] button. - Use the PAGE [æ] button to select “OK,” and press the [ENTER] button.
MEMO
The uninstall process works the same even if you’ve installed the Model Expansion with Roland Cloud Connect (WC-1).
Transferring User Data and Initializing Your User License
What is a user license?
The Model Expansions are linked to the user license of the user who downloaded them.
You cannot import or install Model Expansions with different user licenses on a single JUPITER-X/Xm.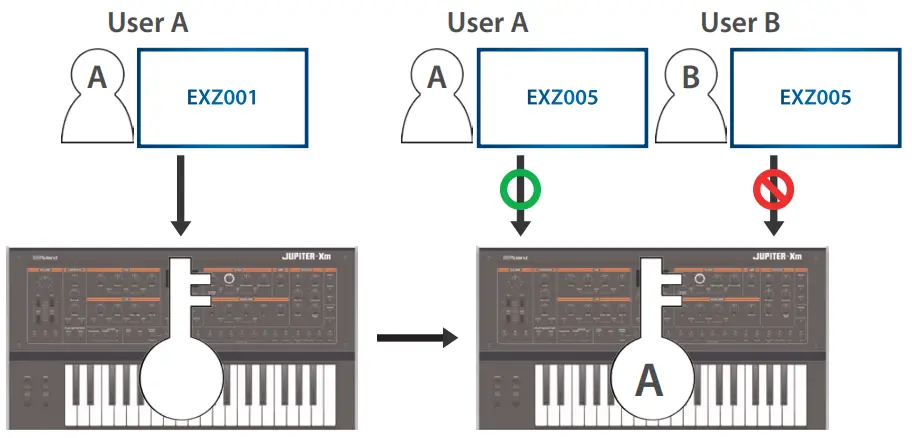
When you want to import or install a Vocal Designer Model Expansion that has a different user license from the Model Expansions already registered in the JUPITER-X/Xm, follow the steps in “Transferring User Data and Initializing Your User License” to initialize the user license.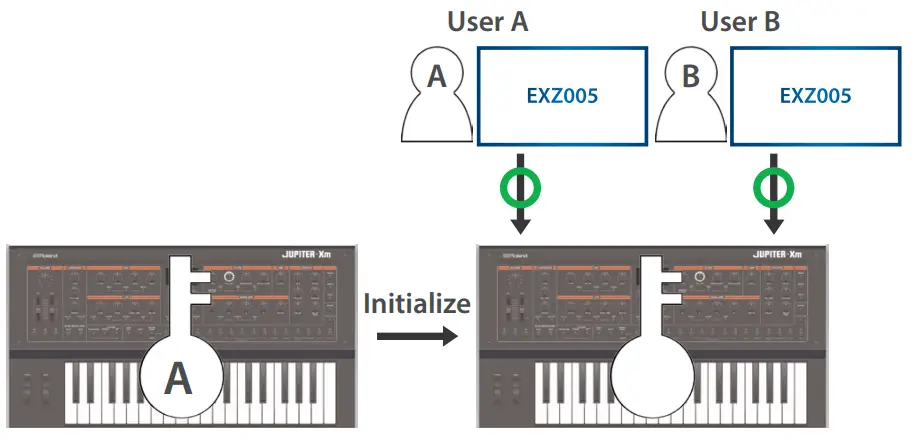
By initializing the user license, you can install a Vocal Designer Model Expansion that you’ve downloaded with a new user license.
NOTE
- This deletes all Model Expansions that are already installed.
- Never turn off the power or remove the USB flash drive while the “Executing…” message is shown.
- Press the [MENU] button on the JUPITER-X/Xm.
- Use the [1] knob or the PAGE [ä] and [å] buttons to select “UTILITY,” and press the [ENTER] button.
- Use the [1] knob to select “FACTORY RESET,” and then press the [ENTER] button.
The FACTORY RESET screen appears. - Select the item using the PAGE [ä] and [å] buttons, and using the [ENTER] button to select or deselect the items, select only the “Remove License” check boxes.
- If you have not imported or installed a Sound Pack, Wave Expansion or Model Expansion, the “Remove License” check boxes are not shown.
- If you select the other check boxes besides the “Remove License” check boxes and execute this operation, this initializes all of the corresponding data.
Ø“Returning to the Factory Settings (Factory Reset)” (Owner’s Manual)
- Press the PAGE [æ] button.
A confirmation message appears.
If you decide to cancel, press the [EXIT] button. - To execute, use the [2] knob to select “OK,” and then press the [ENTER] button.
“Completed. Turn off power” is shown on the display. - Turn the JUPITER-X/Xm off.
This initializes the user license. - Follow the steps in “Installing the Vocal Designer Model Expansion” (p. 4) to install the Vocal Designer Model Expansion on the JUPITER-X/Xm.
Error Messages
| Indication | Action |
| USB Memory Not Ready! | The USB flash drive cannot be recognized. Make sure that your USB flash drive is correctly inserted into the JUPITER-X/Xm. |
| Expansion File Not Found! | This is shown when there is no Expansion file in the USB flash drive. Make sure that the file has been correctly saved and that the file extension is “.exz”. |
| Incorrect File! | This is shown when the selected tone file is not supported by the JUPITER-X/Xm, or when the file is corrupted. Check which instruments support the original download, and try downloading again. |
| Incorrect License! Please Remove License | This is shown when the Vocal Designer Model Expansion is currently linked to a different user license. To install, provide a file that uses the same user license as the Expansion already installed, or initialize the user license. |
| Expansion Memory Full! | This is shown when there is not enough free memory to install an Expansion. In this case, you can uninstall Model Expansions that are already installed to free up memory. |
| It has already been installed | This is shown when the Vocal Designer Model Expansion has already been installed. You don’t need to reinstall. |
Part and Model Bank Settings
Setting the Part
Only “PART 1” can be used to select parts for the Vocal Designer.
Follow the steps below to set the current part to “PART 1.”
- On the SCENE top screen, press the [PART] button to enter the part select mode.
- Press the [1] button to set the current part to “PART 1.”
Setting the Model Bank
Registering the Vocal Designer to a model bank
- Hold down the [MODEL BANK] button and press a model bank button ([1]–[16]).
If the [PART] button is lit, press the [PART] button again to make it go dark. - Press the PAGE [ä] button to move the cursor to “Attr.”
You can also use the [1] knob to move the cursor. - Use the [2] knob to select “MODEL.”
- Press the PAGE [å] button to select where to register the Vocal Designer.
You can also use the [1] knob to select the model. - Use the [2] knob to select “VOCAL DESIGNER.”
- If you want to save the setting, execute the System Write operation.
Ø “Saving the System Settings (System Write)” (Owner’s Manual)
Selecting a Vocal Designer tone using the model bank
- Press the [MODEL BANK] button.
The MODEL BANK top screen appears.
Use the [1]–[16] buttons to switch to tone select mode. - Select the model bank where you registered the
Vocal Designer by pressing one of the [1]–[16] buttons.
The tones for the Vocal Designer are shown.
You can use the [2] knob to select a tone on this screen as well. - Press the [ENTER] button.
A list of tones is shown. - Use the [2] knob to select the tone.
You can use the [1] knob to select the tone quickly. - Press the [ENTER] button.
The tone is now selected.
You can also select Vocal Designer tones from the Vocoder category.
The tone category for the Vocal Designer is always “Vocoder.
Adjusting the Mic Input Level
On the MODEL BANK top screen, press the PAGE [æ] button once to switch to the VD SETTINGS screen.
Follow the steps below to adjust the mic input level.
- Connect a microphone to the rear panel MIC IN jack.
NOTE
The JUPITER-X/Xm supports dynamic microphones and electret condenser microphone (mono). It does not support condenser microphones. - Set the rear panel [MIC GAIN] knob to approximately the center position.
- Press the [MODEL BANK] button.
- Press the PAGE [æ] button.
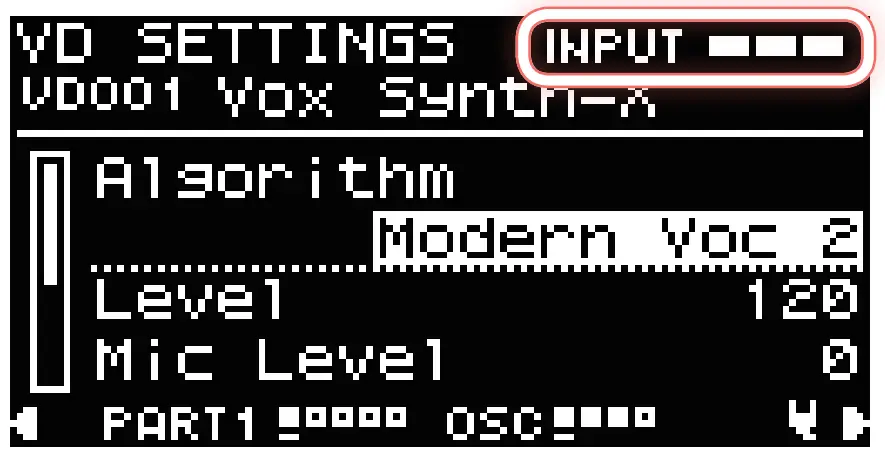
The VD SETTINGS screen appears. - On the VD SETTINGS screen, make fine adjustments to the MIC GAIN.
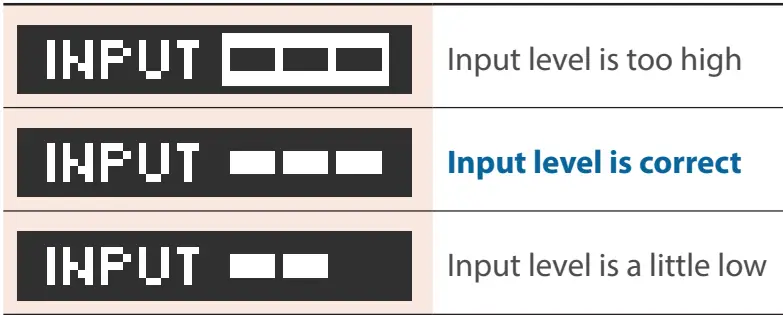
Sing into the mic at your usual volume. The input level is shown at the top right-hand part of the VD SETTINGS screen.
Adjust the [MIC GAIN] knob so that the input level indicator is at the appropriate level.

- For model expansions other than the Vocal Designer/VOCODER, the mic sound is output from the JUPITER-X/Xm.
If you aren’t using the mic with model expansions other than the Vocal Designer/VOCODER, set “Mic Thru” to “OFF” in the MENU Ó SYSTEM screen. - You can use a controller to switch between the Vocal Designer/ VOCODER sound and the unaltered sound from the mic. See the “VOC/MIC” item of “List of functions that can be assigned to the controllers” in the “JUPITER-X/Xm Parameter Guide” (PDF) for details.
- For model expansions other than the Vocal Designer/VOCODER, the mic sound is output from the JUPITER-X/Xm.
Tone Settings for the Vocal Designer
This shows you how to make the tone settings for the Vocal Designer.
The screens that appear in Vocal Designer differ depending on the “Carrier Type” selected, as shown below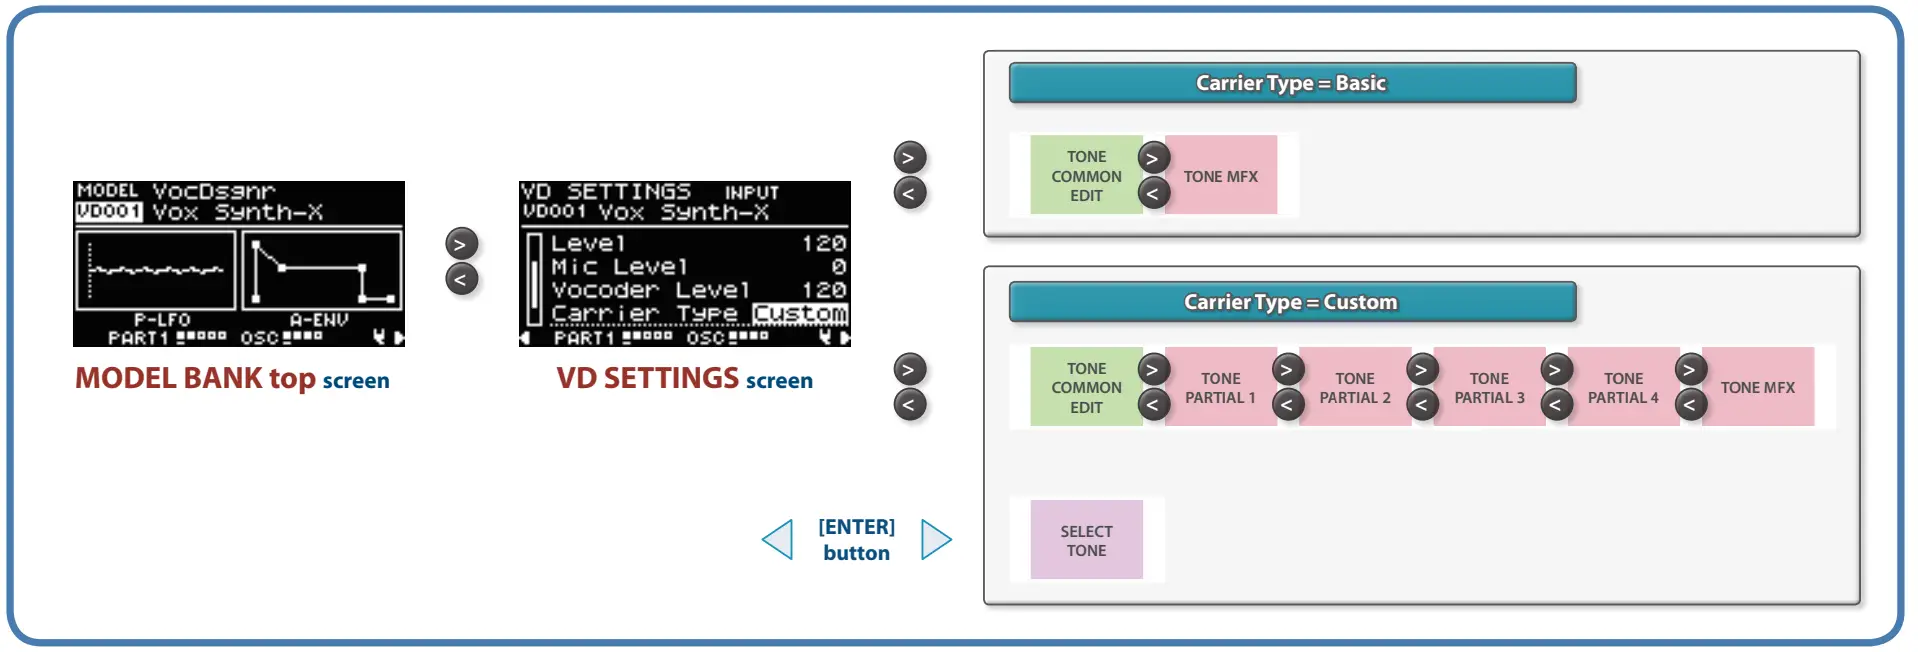
| Parameter | Explanation | |
| Algorithm | Select the processing method for the Vocal Designer. | |
| Classic A | Algorithms used for large choral groups, such as in classical music. These match a wide variety of genres with a choral sound, not just classical music. | |
| Classic B | ||
| Classic C | ||
| Male&Fem 1 | Algorithms that work independently for male and female vocal parts. Creates a multidimensional sound that’s thicker than “Classic,” using less notes in each chord. The female tones come from the right side of the stereo field, and the male tones come from the left side. When the Carrier Type is set to “Custom,” you can assign the notes to the female tones when Out Assign for the partial is set to “DRY”; and you can assign the notes to the male tones when Out Assign is set to “MFX.” | |
| Male&Fem 2 | ||
| Gospel A | Algorithms suitable for jazz and gospel music. | |
| Gospel B | ||
| Gospel C | ||
| Pop A | Algorithms suitable for small-group choruses, such as popular music. | |
| Pop B Pop C | ||
| BackGround 1 |
Algorithms suitable for background chorus parts. | |
| BackGround 2 | ||
| BackGround 3 | ||
| BackGround 4 | ||
| BackGround 5 | ||
| Modern Voc 1 | Algorithms suitable for vocoder use. | |
| Modern Voc 2 | ||
| Modern Voc 3 | ||
| Vocoder 1 | ||
| Vocoder 2 | ||
| Vintage 1 | ||
| Vintage 2 | ||
| WahVox (KBD) *1 A wah effect is applied according to how hard you press the keys. | ||
| WahVox (VEXP) *1 A wah effect is applied according to the mic input volume. | ||
| A wah effect is applied according to the CC17 (controller number 17) value. WahVox (CTRL) *1 For example, when you assign CC17 (controller number 17) to the Ctrl pedal, you can use the Ctrl pedal to apply a wah effect. | ||
| *1 This can only be selected when the Carrier Type is “Basic.” | ||
| Level | Sets the overall volume while retaining the balance between the Mic Level and Vocoder Level. | |
| Mic Level | Sets the output level of the unprocessed mic input audio signal. Raise the Mic Level to make the words that are being sung sound more clear. The effect applied to the mic signal can be configured in the MENU Ó SYSTEM screen. | |
| Vocoder Level | Sets the output level of the sound processed by the Vocal Designer. | |
| Carrier Type | Sets the edit type for the Vocal Designer. | |
| Basic | You can change the resulting vocoder sound simply by configuring the Algorithm. | |
| Custom | You can create various vocoder sounds by combining the algorithm with the Custom tone. Ø For details on how to select a Custom tone, refer to “Select the Custom tone (carrier tone)” (p. 8). * When one of the following three algorithms is selected, the Carrier Type can’t be set to “Custom.” When this is set to “Custom,” the algorithm automatically switches to “Vintage 2.”
| |
Select the Custom tone (carrier tone)
When you set the Carrier Type to “Custom,” “[ENTER] to Select” is displayed.
Move the cursor to “[ENTER] to Select” and press the [ENTER] button to switch to the SELECT TONE screen.
To select a carrier tone, select the model that includes the desired tone, select the tone and then press the [ENTER] button to confirm.
- With the Custom type, you can select the PR-A, PR-B, PR-C, PR-D, JP-X INT, COMMON, and Installed EXZ tones, as well as the Z-Core tones saved in USER.
- All the parameters of the copy source tone (carrier tone) except the MFX are copied to the custom tone (no link is created to the copy source tone).
Carrier Thru function (checking the carrier tone)
When using the “Carrier Type: Custom” setting, you can play the keyboard while holding down the [SHIFT] button on a specified screen to hear just the carrier tone (this is called “carrier thru”).
- Press the PAGE [ç] [æ] buttons while holding down the [SHIFT] button to keep the unit in the “carrier thru” state.
If you decide to cancel, press the [EXIT] button. - You can use the Carrier Thru function on the following screens.
- VD SETTINGS screen
- SELECT TONE screen
- TONE COMMON EDIT screen
- TONE EDIT PARTIAL screen
- TONE MFX screen
Selecting a Tone
- Press the [MODEL BANK] button.
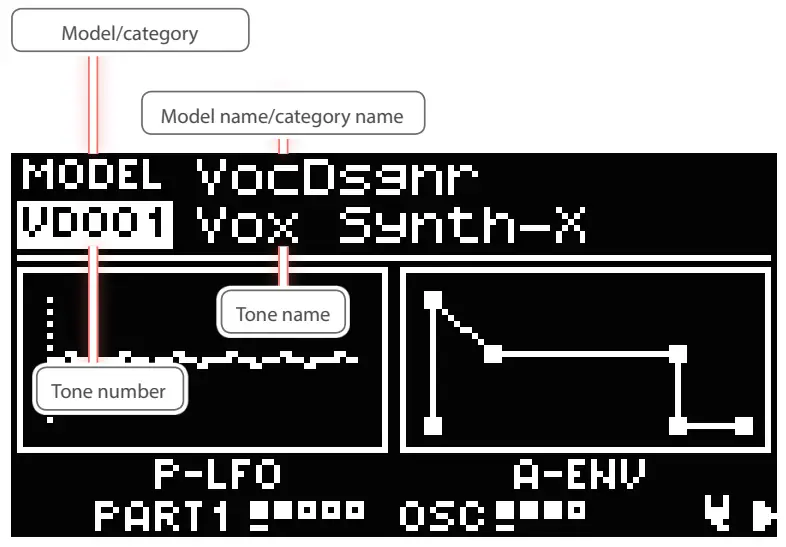
The MODEL BANK top screen appears.
- Press the PAGE [ä] button to move the cursor to the model name/category name.
- Use the [2] knob to select “VocDsgnr.”
- Press the PAGE [å] button to move the cursor to the tone number.
- Use the [2] knob to select the tone.
You can use the [1] knob to select the tone quickly.
MEMO
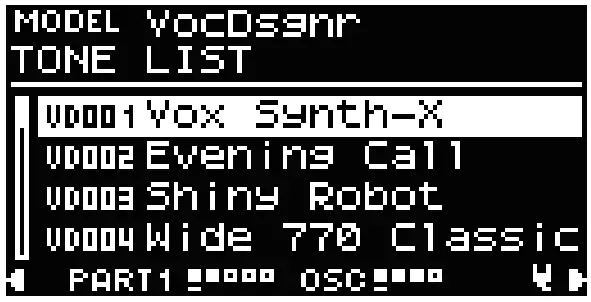
Move the cursor to the model name/category name or the tone number and press the [ENTER] button. The tone list appears.
- Press the [ENTER] button to select the tone.
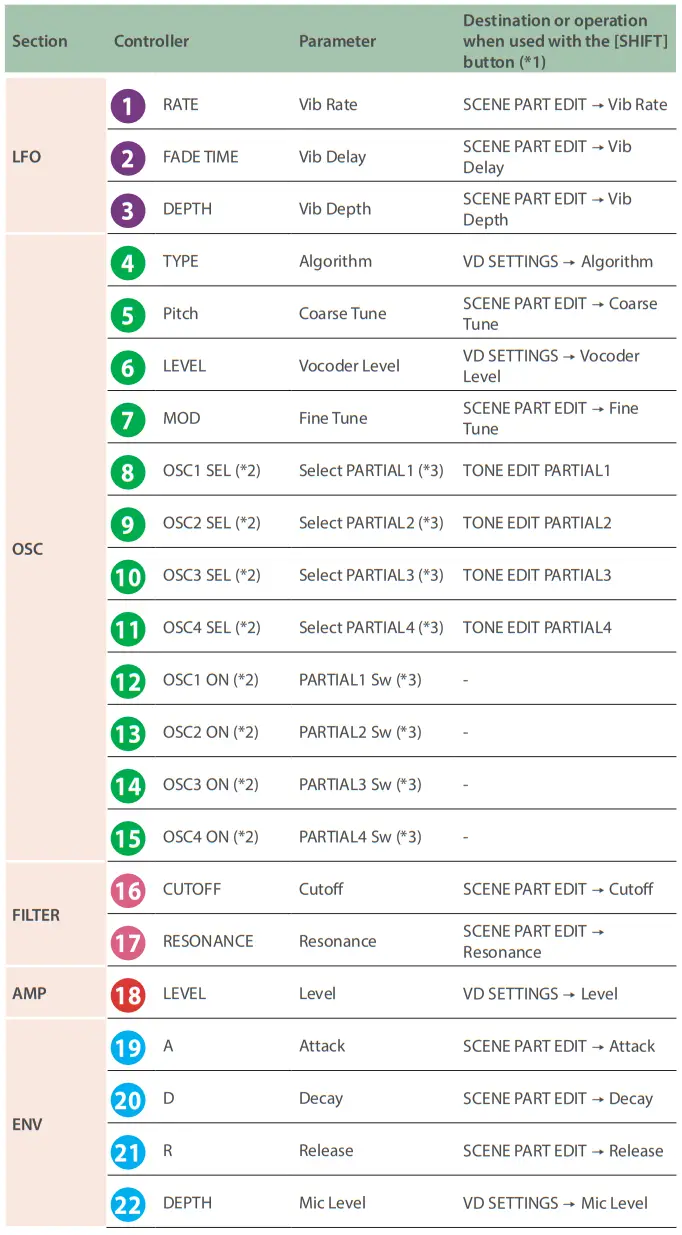
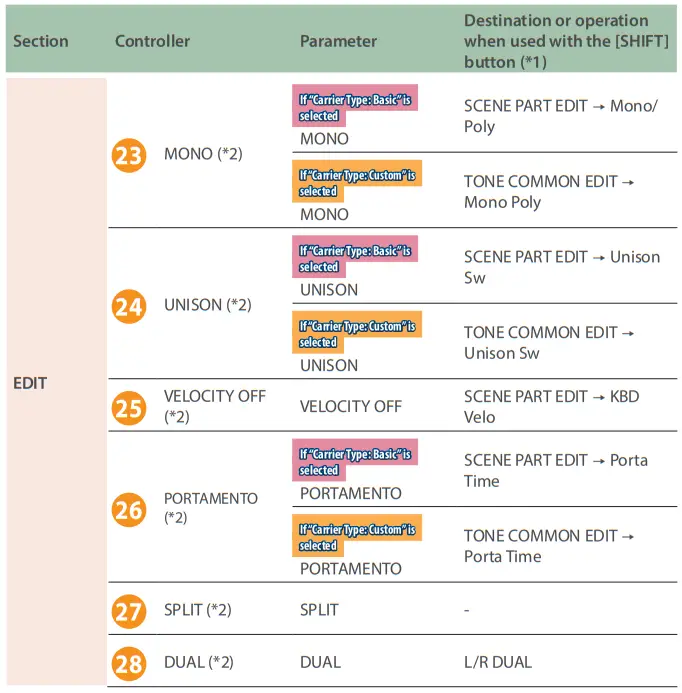
Controls on the JUPITER-X and Their Associated Parameters
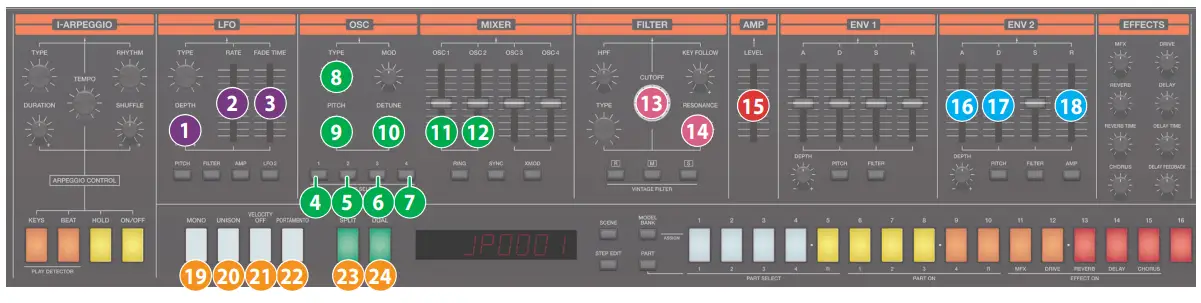
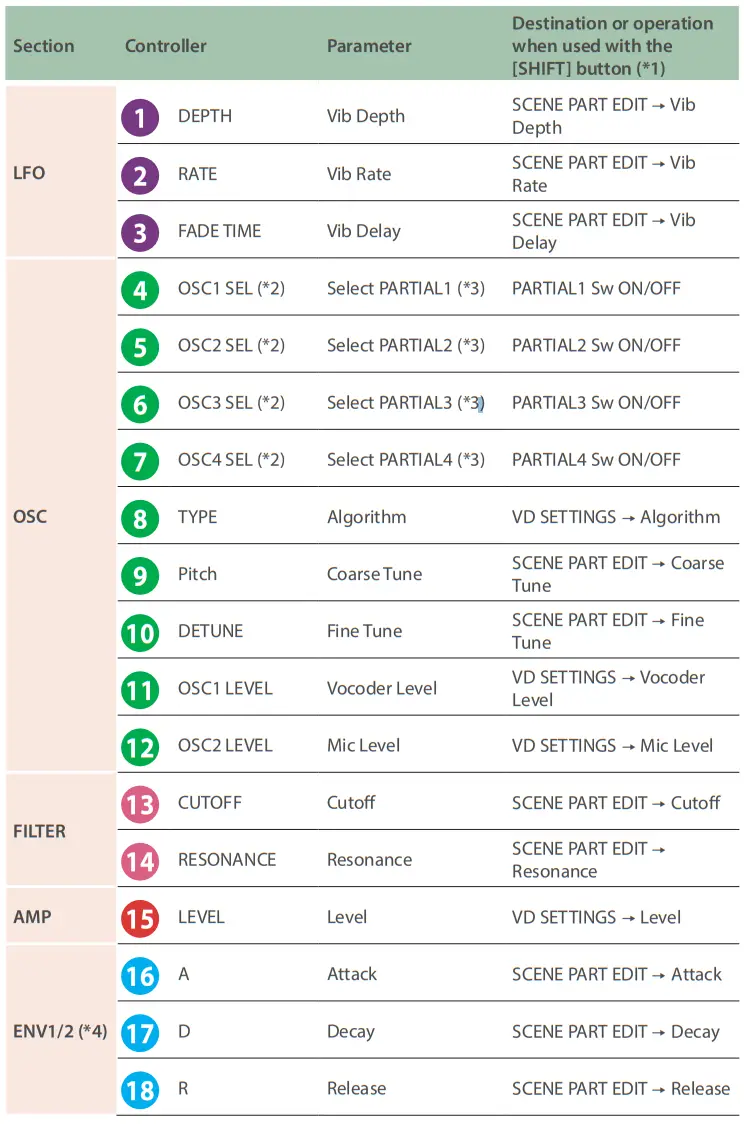
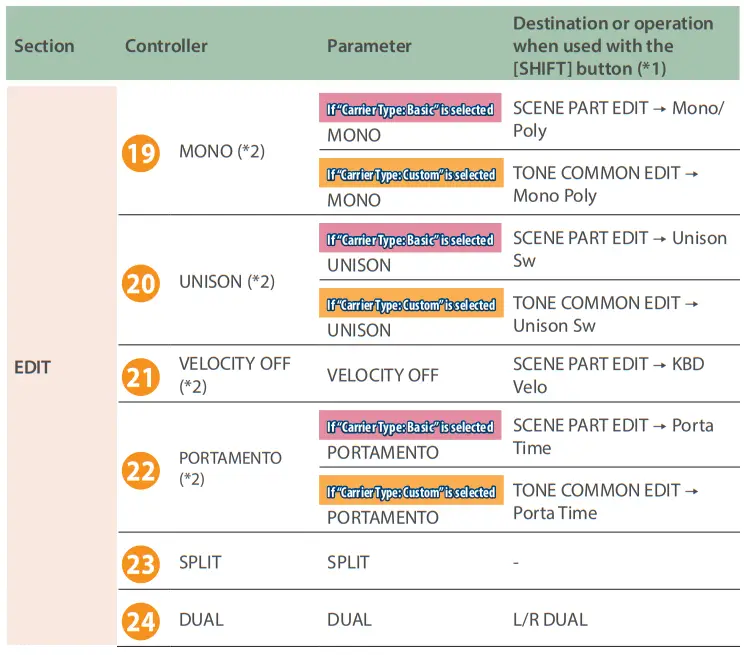
- The screen does not change when you press the [SHIFT] button while the SELECT TONE screen is displayed.
- Cannot be operated on the SELECT TONE screen.
- This is only enabled when “Custom” is selected for Carrier Type.
- Only ENV2 can be used with the Vocal Designer.
* For other parameters, see the “JUPITER-X/Xm Parameter Guide” (PDF).
Controls on the JUPITER-Xm and Their Associated Parameters
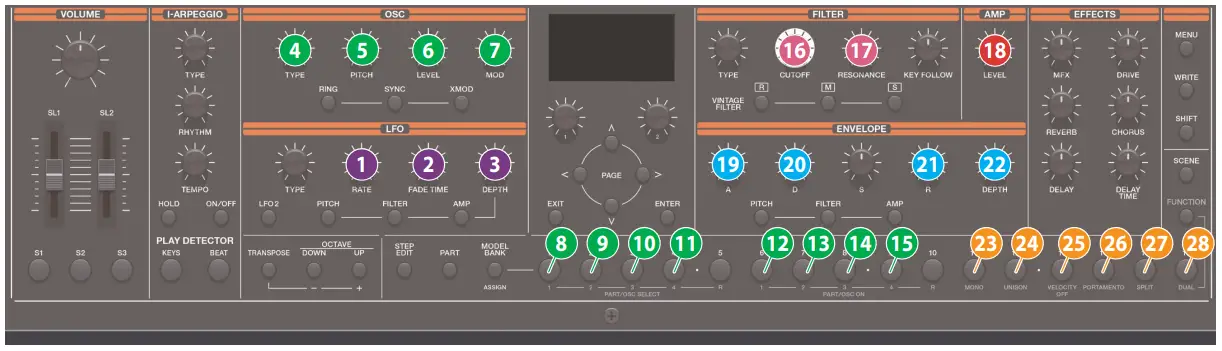
- The screen does not change when you press the [SHIFT] button while the SELECT TONE screen is displayed.
- Cannot be operated on the SELECT TONE screen.
- This is only enabled in function mode when Carrier Type is set to “Custom.”
* For other parameters, see the “JUPITER-X/Xm Parameter Guide” (PDF).
TONE COMMON Parameters
TONE COMMON
Vocal Designer Model Expansion
These are the tone parameters that are shown when Carrier Type is set to “Basic.”
For the parameters shown when this is set to “Custom,” refer to the tone parameters (RD-PIANO, XV-5080, PR-A, PR-B, PD-C, PR-D, COMMON, JP-X INT) in the “JUPITER-X/Xm Parameter Guide” (PDF)
| Parameter | Value | Explanation |
| Level | 0–127 | Adjusts the overall volume for the carrier tone. |
| Pan | L64–63R | Sets the panning for the tone. A setting of “L64” pans the sound all the way to the left, “0” pans the sound to the center, and “63R” pans the sound all the way to the right. |
| Coarse Tune | -48–+48 | Specifies the pitch in semitone steps (maximum ±4 octaves). |
| Fine Tune | -50–+50 | Sets the pitch of the sound in one-cent steps (up to ±50 cents). |
| Octave | -2–+2 | Sets the pitch of the tone’s sound in octaves (up to ±2 octaves). |
Sound List
Tone
Vocal Designer Model Expansion
| No. | Name | Category | MSB | LSB | PC |
| VD001 | Vox Synth-X | Vocoder | 97 | 78 | 1 |
| VD002 | Evening Call | Vocoder | 97 | 78 | 2 |
| VD003 | Shiny Robot | Vocoder | 97 | 78 | 3 |
| VD004 | Wide 770 Classic | Vocoder | 97 | 78 | 4 |
| VD005 | Synth Diver | Vocoder | 97 | 78 | 5 |
| VD006 | Sing With This | Vocoder | 97 | 78 | 6 |
| VD007 | Alien Choir | Vocoder | 97 | 78 | 7 |
| VD008 | Oct Shift Choir | Vocoder | 97 | 78 | 8 |
| VD009 | Solo Droid | Vocoder | 97 | 78 | 9 |
| VD010 | Digi Praise | Vocoder | 97 | 78 | 10 |
| VD011 | SerCoder | Vocoder | 97 | 78 | 11 |
| VD012 | Stereo Vocoder | Vocoder | 97 | 78 | 12 |
| VD013 | Paris With Love | Vocoder | 97 | 78 | 13 |
| VD014 | Clarity | Vocoder | 97 | 78 | 14 |
| VD015 | JP Classic | Vocoder | 97 | 78 | 15 |
| VD016 | VP Phantom | Vocoder | 97 | 78 | 16 |
| VD017 | Baby Robots | Vocoder | 97 | 78 | 17 |
| VD018 | Open Harmonies | Vocoder | 97 | 78 | 18 |
| VD019 | 33Thousand | Vocoder | 97 | 78 | 19 |
| VD020 | TalkBoxer | Vocoder | 97 | 78 | 20 |
| VD021 | Cosmique | Vocoder | 97 | 78 | 21 |
| VD022 | Da Boogie | Vocoder | 97 | 78 | 22 |
| VD023 | Solo Kid | Vocoder | 97 | 78 | 23 |
| VD024 | EuroTune | Vocoder | 97 | 78 | 24 |
| VD025 | MonoVoco | Vocoder | 97 | 78 | 25 |
| VD026 | Monokrome | Vocoder | 97 | 78 | 26 |
| VD027 | Mister Dister | Vocoder | 97 | 78 | 27 |
| VD028 | Metallique | Vocoder | 97 | 78 | 28 |
| VD029 | ModW. FM Voice | Vocoder | 97 | 78 | 29 |
| VD030 | Helmet Lead | Vocoder | 97 | 78 | 30 |
| VD031 | Punk Lead VOC | Vocoder | 97 | 78 | 31 |
| VD032 | Phase Talker | Vocoder | 97 | 78 | 32 |
| VD033 | Supaglide | Vocoder | 97 | 78 | 33 |
| VD034 | Transcoder | Vocoder | 97 | 78 | 34 |
| VD035 | StepLFO Line MW | Vocoder | 97 | 78 | 35 |
| VD036 | Panning Voices | Vocoder | 97 | 78 | 36 |
| VD037 | Wavescan Voc | Vocoder | 97 | 78 | 37 |
| VD038 | Pulsar VOC Mod | Vocoder | 97 | 78 | 38 |
| VD039 | Slicer Pad MW | Vocoder | 97 | 78 | 39 |
| VD040 | Techno Choir | Vocoder | 97 | 78 | 40 |
| VD041 | Quarter Voices | Vocoder | 97 | 78 | 41 |
| VD042 | Pan Vox | Vocoder | 97 | 78 | 42 |
| VD043 | Breath SynVox | Vocoder | 97 | 78 | 43 |
| VD044 | Soothers | Vocoder | 97 | 78 | 44 |
| VD045 | Praisers | Vocoder | 97 | 78 | 45 |
| VD046 | Aca Buddies | Vocoder | 97 | 78 | 46 |
| VD047 | Stereo Sweets | Vocoder | 97 | 78 | 47 |
| VD048 | Warmcoder | Vocoder | 97 | 78 | 48 |
| VD049 | Neo Church | Vocoder | 97 | 78 | 49 |
| VD050 | Neo Gospel | Vocoder | 97 | 78 | 50 |
| VD051 | Churchville | Vocoder | 97 | 78 | 51 |
| VD052 | Praisebotic | Vocoder | 97 | 78 | 52 |
| VD053 | Vibra Solo | Vocoder | 97 | 78 | 53 |
| VD054 | Wide Choir | Vocoder | 97 | 78 | 54 |
| VD055 | Soft Choir | Vocoder | 97 | 78 | 55 |
| VD056 | Deep Choir | Vocoder | 97 | 78 | 56 |
| No. | Name | Category | MSB | LSB | PC |
| VD057 | Gospel Soft | Vocoder | 97 | 78 | 57 |
| VD058 | Ooooh choir | Vocoder | 97 | 78 | 58 |
| VD059 | Oct Mod Shift | Vocoder | 97 | 78 | 59 |
| VD060 | Harmonic Gospel | Vocoder | 97 | 78 | 60 |
| VD061 | Silent Voices | Vocoder | 97 | 78 | 61 |
| VD062 | Sung Prayer | Vocoder | 97 | 78 | 62 |
| VD063 | Amazing Choir | Vocoder | 97 | 78 | 63 |
| VD064 | Warm Voices | Vocoder | 97 | 78 | 64 |
| VD065 | 770 Classic A | Vocoder | 97 | 78 | 65 |
| VD066 | 770 Classic B | Vocoder | 97 | 78 | 66 |
| VD067 | 770 Classic C | Vocoder | 97 | 78 | 67 |
| VD068 | 770 Male&Fem 1 | Vocoder | 97 | 78 | 68 |
| VD069 | 770 Male&Fem 2 | Vocoder | 97 | 78 | 69 |
| VD070 | 770 Gospel A | Vocoder | 97 | 78 | 70 |
| VD071 | 770 Gospel B | Vocoder | 97 | 78 | 71 |
| VD072 | 770 Gospel C | Vocoder | 97 | 78 | 72 |
| VD073 | 770 Pop A | Vocoder | 97 | 78 | 73 |
| VD074 | 770 Pop B | Vocoder | 97 | 78 | 74 |
| VD075 | 770 Pop C | Vocoder | 97 | 78 | 75 |
| VD076 | 770 BackGround 1 | Vocoder | 97 | 78 | 76 |
| VD077 | 770 BackGround 2 | Vocoder | 97 | 78 | 77 |
| VD078 | 770 BackGround 3 | Vocoder | 97 | 78 | 78 |
| VD079 | 770 BackGround 4 | Vocoder | 97 | 78 | 79 |
| VD080 | 770 BackGround 5 | Vocoder | 97 | 78 | 80 |
| VD081 | 770 Modern Voc 1 | Vocoder | 97 | 78 | 81 |
| VD082 | 770 Modern Voc 2 | Vocoder | 97 | 78 | 82 |
| VD083 | 770 Modern Voc 3 | Vocoder | 97 | 78 | 83 |
| VD084 | 770 Vocoder 1 | Vocoder | 97 | 78 | 84 |
| VD085 | 770 Vocoder 2 | Vocoder | 97 | 78 | 85 |
| VD086 | 770 Vintage 1 | Vocoder | 97 | 78 | 86 |
| VD087 | 770 Vintage 2 | Vocoder | 97 | 78 | 87 |
| VD088 | 770 WahVox(KBD) | Vocoder | 97 | 78 | 88 |
| VD089 | 770 WahVox(VEXP) | Vocoder | 97 | 78 | 89 |
| VD090 | 770 WahVox(CTRL) | Vocoder | 97 | 78 | 90 |
| VD091 | INIT TONE | Vocoder | 97 | 78 | 91 |
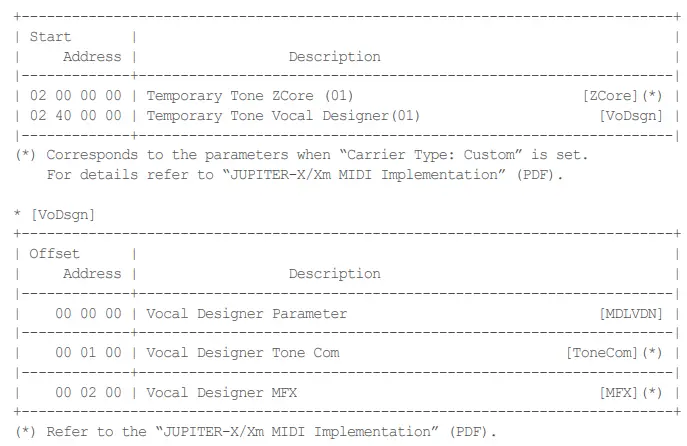
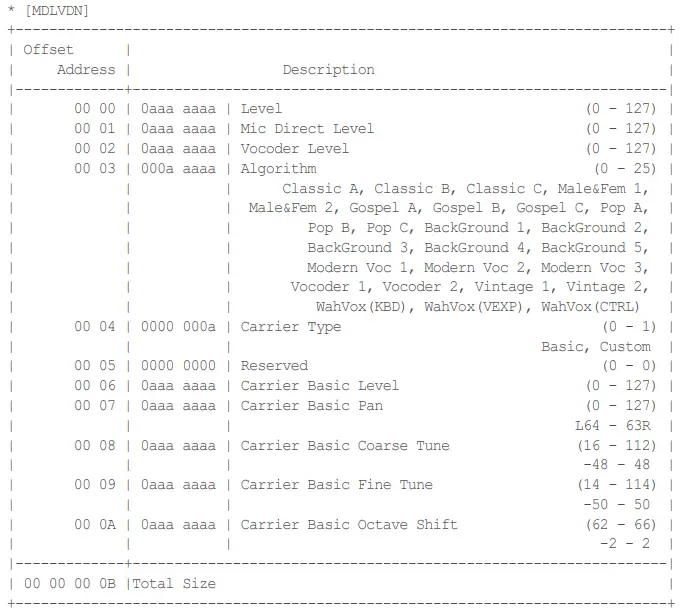
MIDI Parameter Address Map