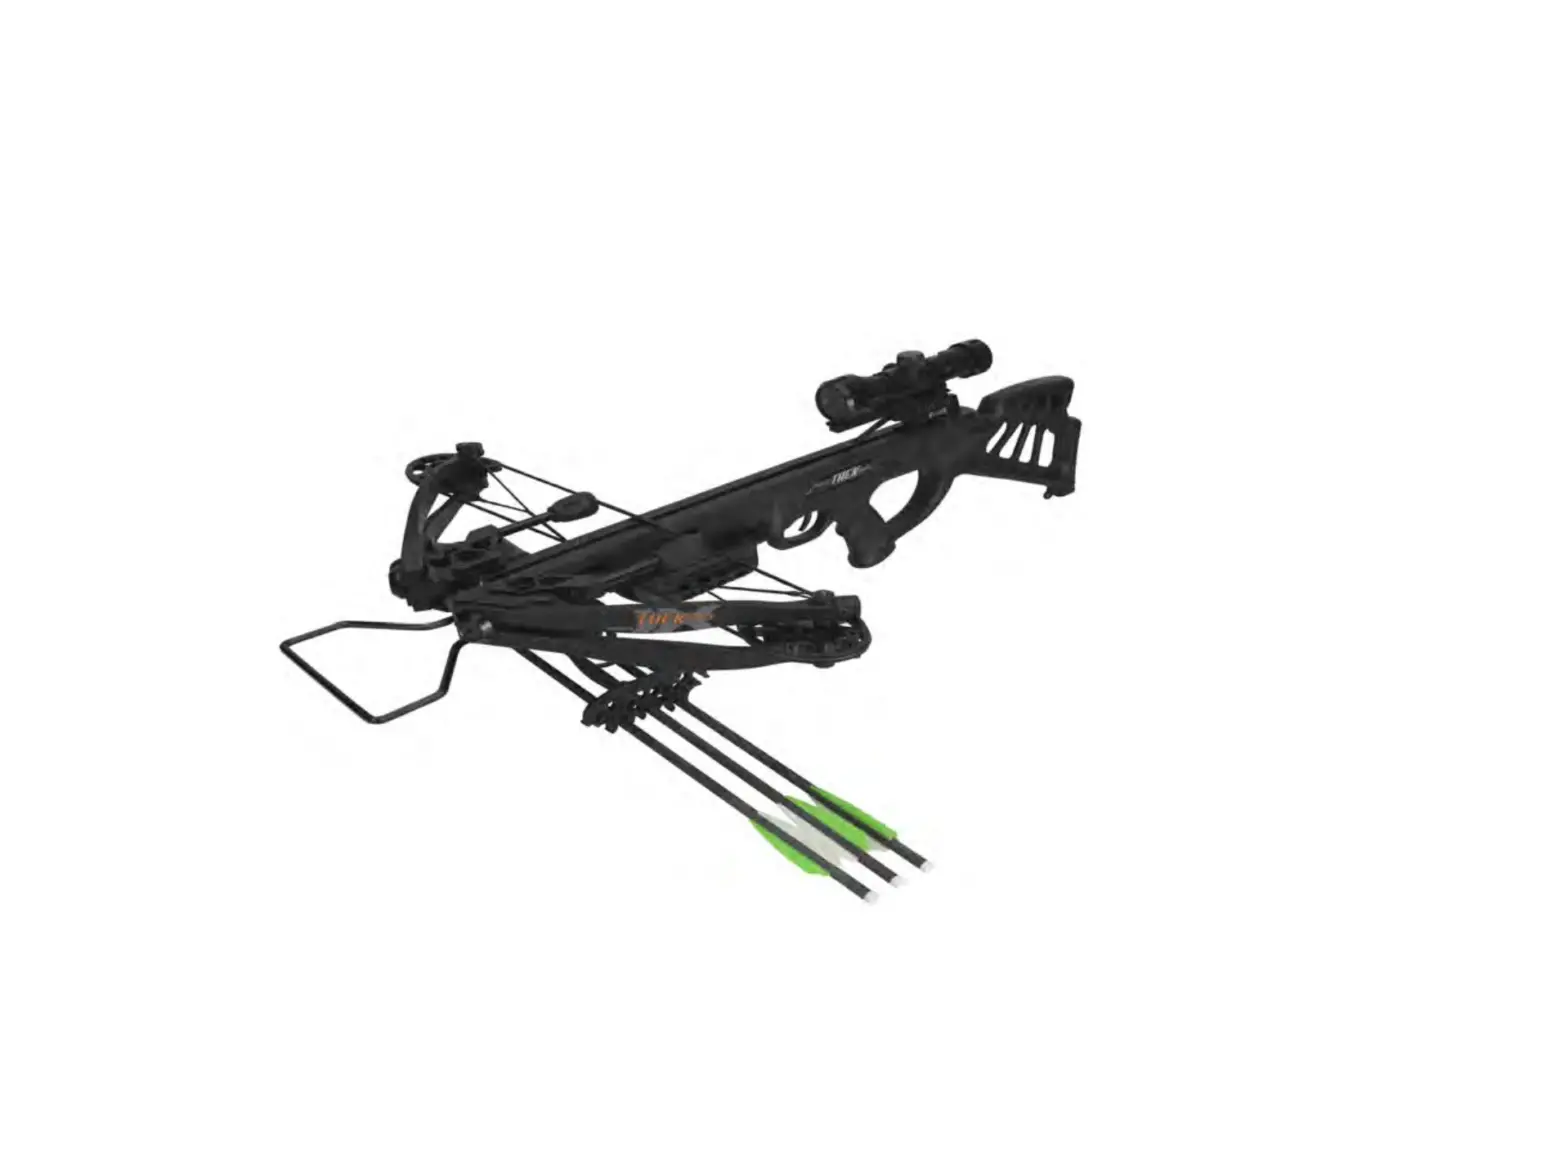
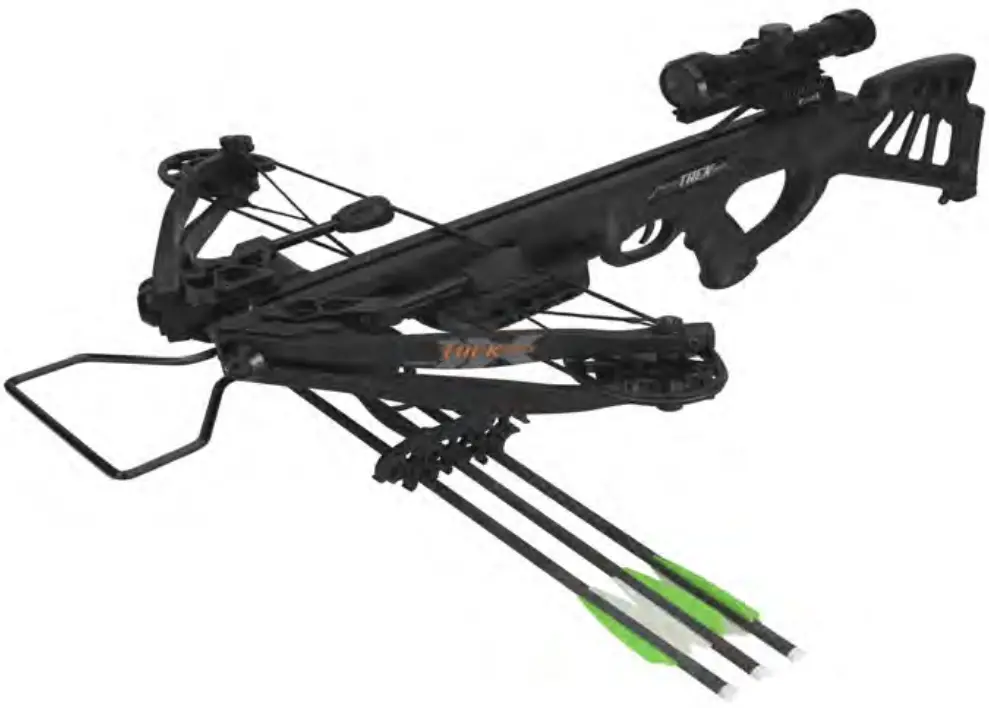
Bear ARCHERY AC93A2A72002 Konflict 405 Super-Fast Crossbow
SAFETY
Crossbows should only be used if the shooter is properly trained in safety or under the direct supervision of a competent instructor. You MUST ALWAYS follow the safety warnings and instructions provided in this manual and any updates at beararchery.com.
The Manual should always accompany your BEAR X Crossbow and must be transferred upon change of ownership or when used by another person.
|
| Your New BEAR-X Crossbow is a lethal and deadly weapon that is intended for hunting and target shooting only. ALWAYS keep your finger off the trigger until you are ready to fire. ALWAYS know your target, and what is beyond. ALWAYS keep your hands and fingers out of the bowstring path. ALWAYS keep the operating manual with your BEAR-X Crossbow. ALWAYS use the arrows recommended for your model of BEAR-X Crossbow ALWAYS point your BEAR-X Crossbow in a safe direction. |


HAND & FINGER SAFETY
Crossbows designs inherently travel along a path on the rail at an extreme high speed. As a result, the bow string has a large amount of high-energy and will cause significant injury if it contacts any part of the body during release.
The shooter must keep all body parts away from the path of the bowstring and cable paths.
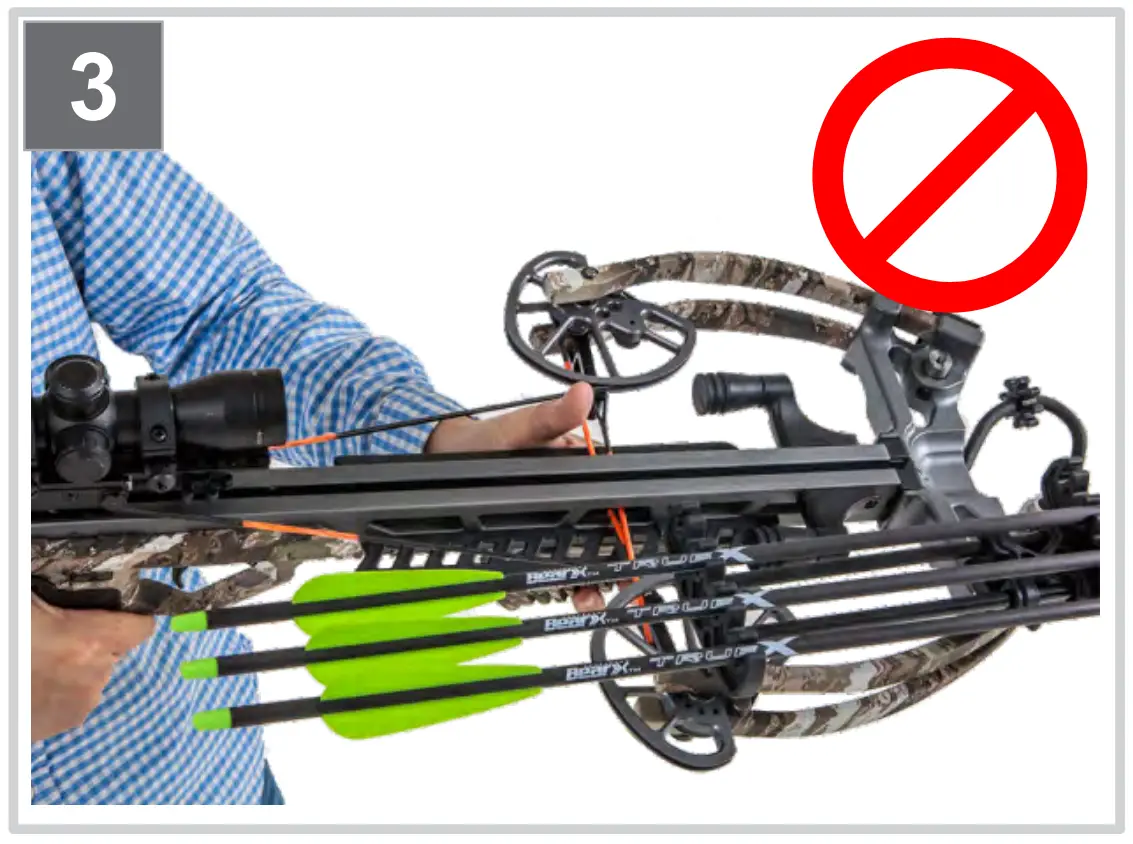
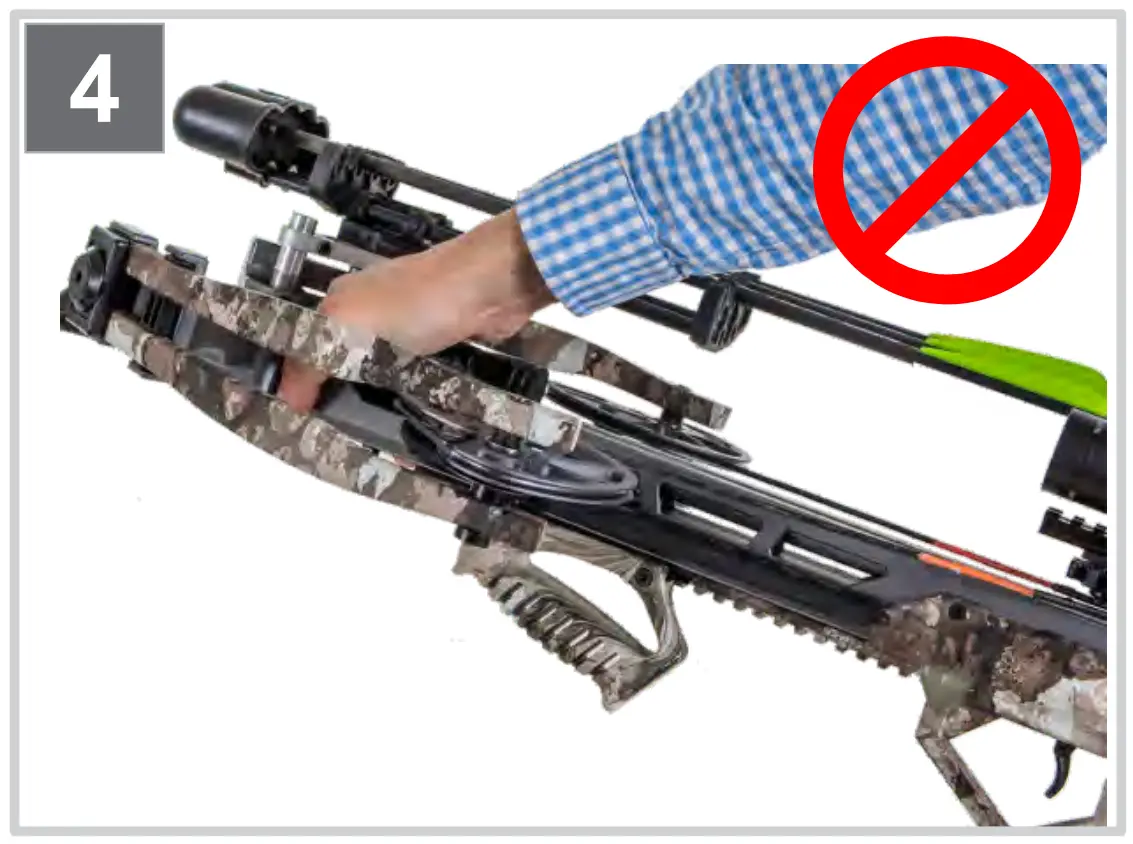
Pictures 1-4. Improper Hand Position – with your fore-grip positioned as shown you will have a severed hand or finger amputation
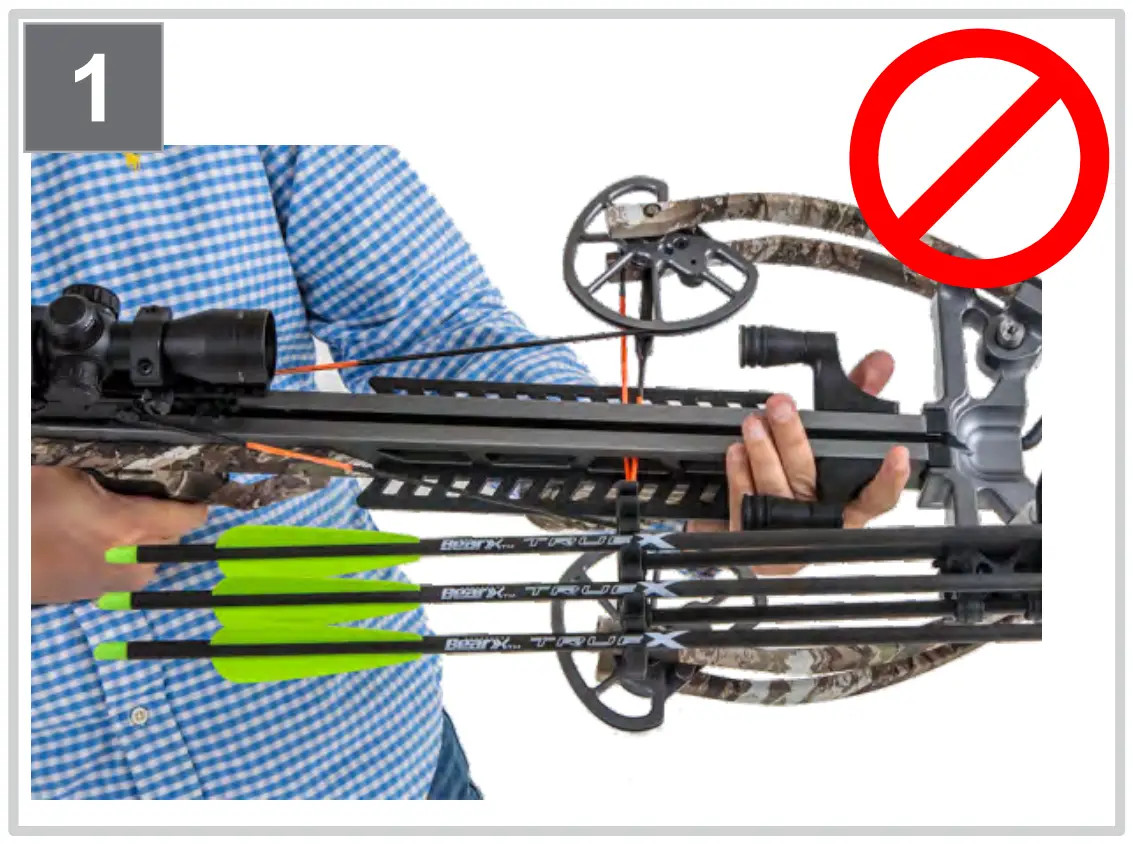
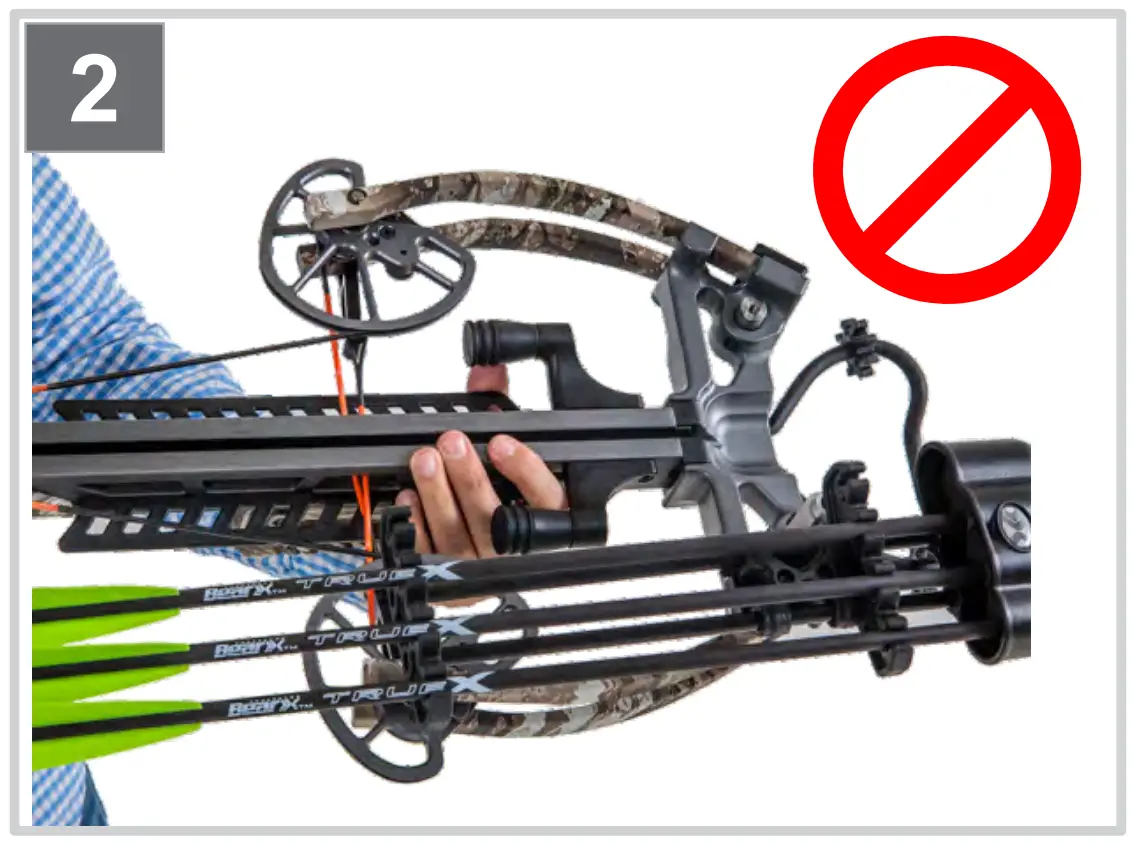
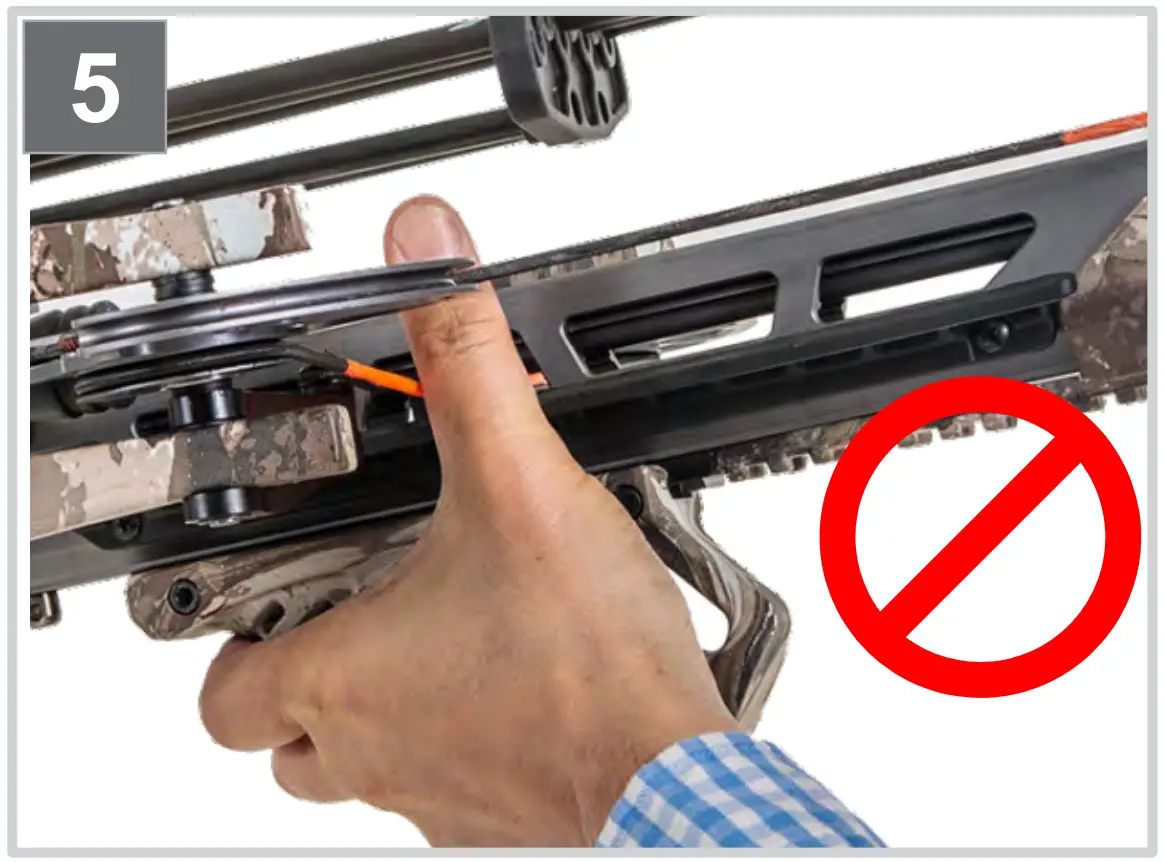
Pic 5. Improper Hand Position – with your foregrip positioned as shown you will have a severed hand or finger amputation
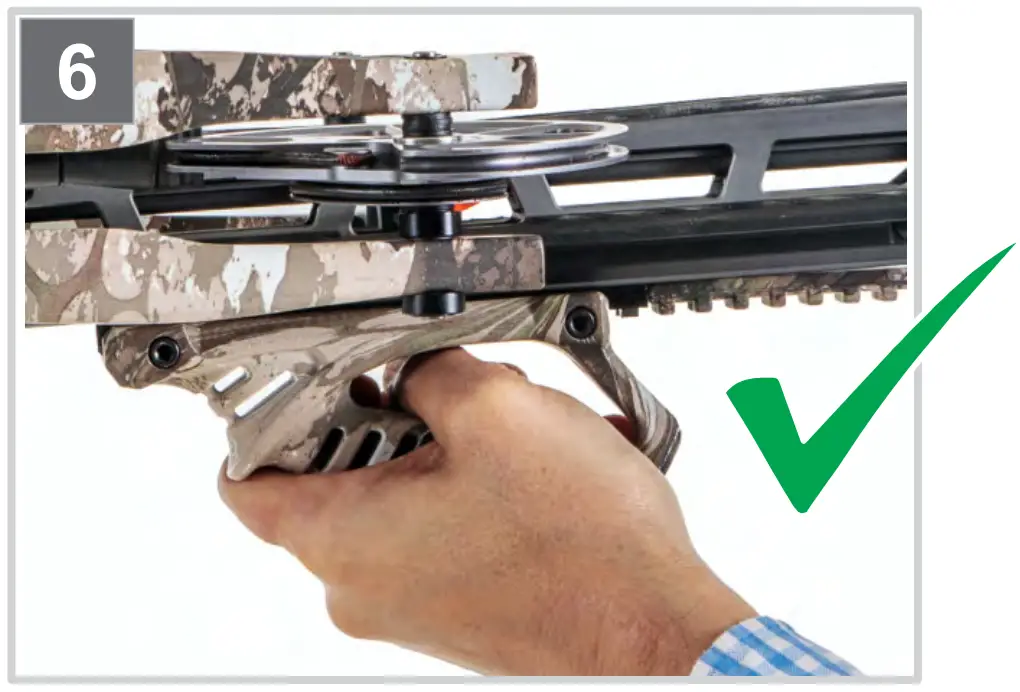
Pic 6. Proper Hand Position – Proper way to hold the fore-grip on your Bear-X crossbow
General Safety Instructions
!!!!!CAREFULLY READ THE COMPLETE MANUAL!!!!!
Your New BEAR-X Crossbow is a lethal and deadly weapon that is intended for hunting and target shooting. Use for other purposes will cause serious injury or death.
It is your responsibility for the safe operation of you Bear- X Crossbow. For your safety and the safety of bystanders you must always remain aware of the inherent danger of handling your BEAR-X Crossbow.
Please register your product! This will allow Bear to send you important updates about your BEAR-X Crossbow.
Register online at https://beararchery.com/registration
 |
| Discharging your Bear-X Crossbow with any part of your body in the path of the bowstring will result in amputation or at least a very serious injury. KEEP fingers below the finger guards and NEVER remove finger guards from your Bear-X Crossbow. |
 |
To minimize risk of death and serious injury:
|
 |
| Follow the safety advice and instruction in this manual, keep this manual with you BEAR-X Crossbow. |
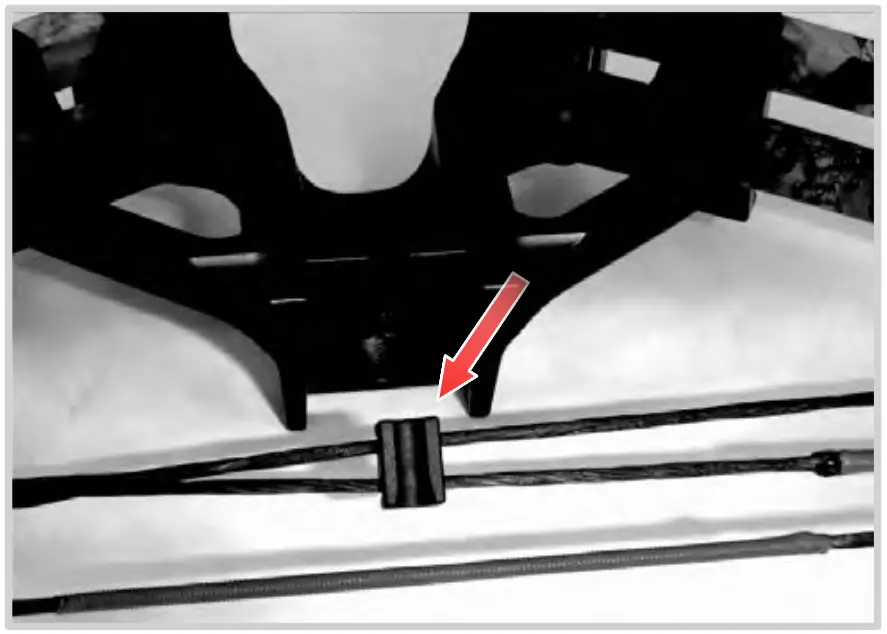
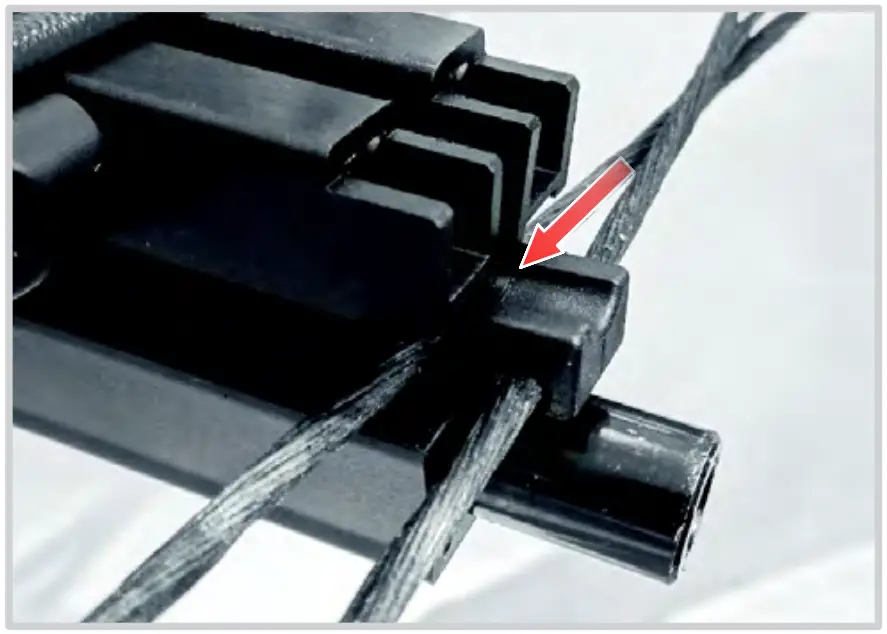
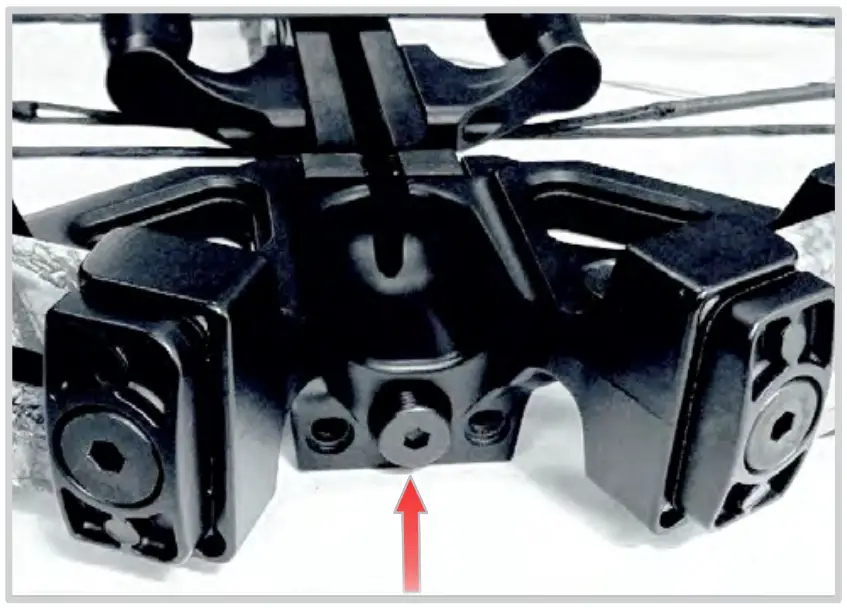
Section A – Front – End and Stock Assembly
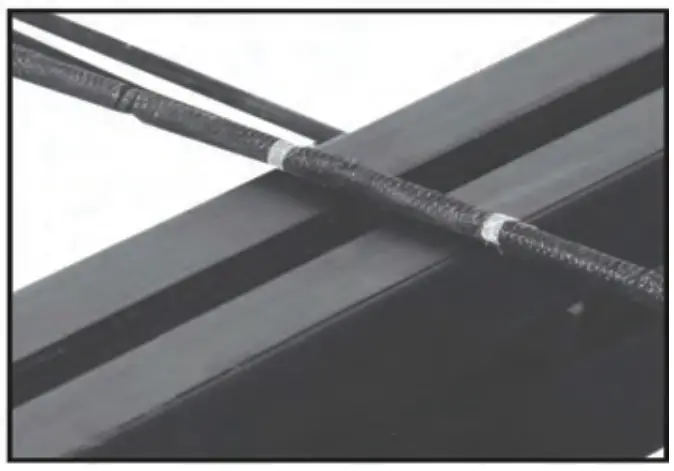
- Be sure the Cable Slide is properly aached to the cables.
Note: The cables will cross on one side of the riser.
- Slide the Cable Slide into the Crossbow Stock Assembly.
- Slide the Riser onto the Stock Assembly.

- Install and ghten the Riser bolt firmly.

Install the 1/4”x1/4” Set Screw (Part to the boom of the riser to prevent the riser bolt from backing out).

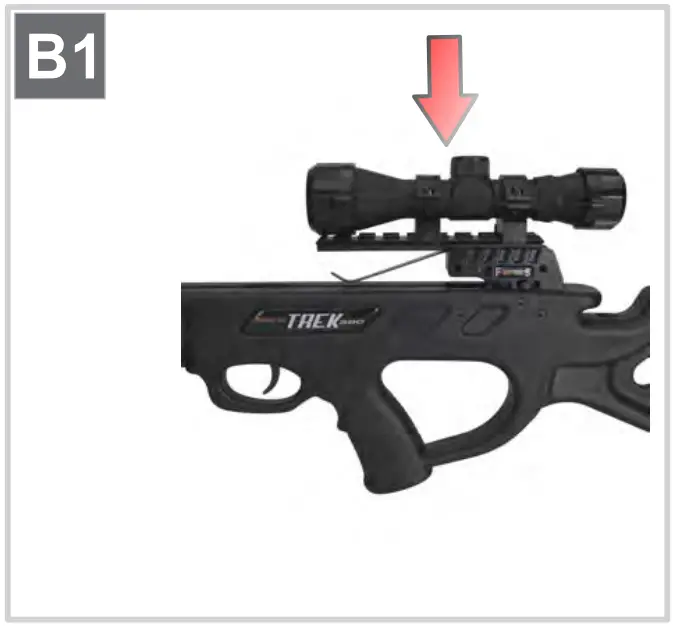
Section B – Mounting the Scope , Quiver & Stirrup
- Mount Scope as shown in Detail B1.

- Attach Quiver as shown in Detail B2.

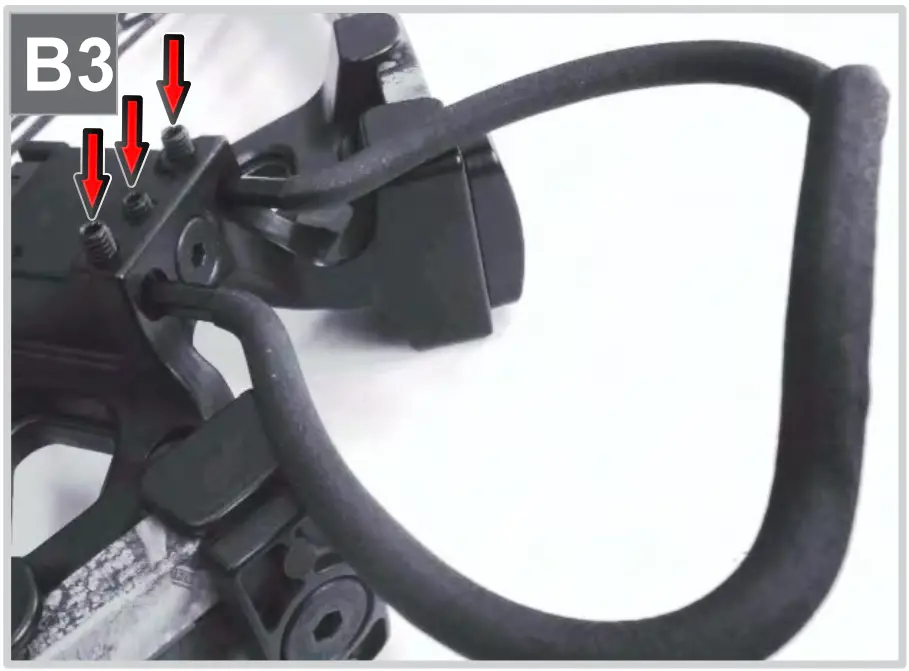
- Attach the Stirrup to the riser by using the 2 longer set screws. Make sure the flat of the Stirrup is facing the bottom of the bow and is aligned with the set screw holes on the bottom of the riser. See Detail B3.

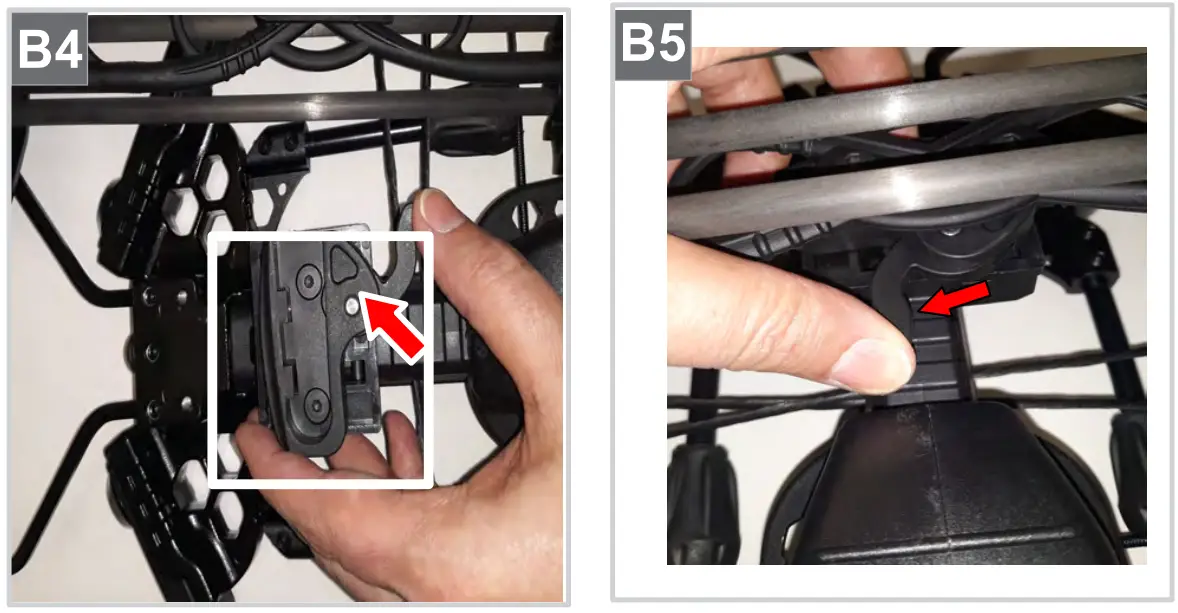
Section B – Detaching Quiver / Rotating Quiver - To detach quiver pull up on the quiver release lever (See B4) and detach quiver as shown in Detail B5.


Section C – Arrows , Nock , and Inspection
 |
| Your Bear-X crossbow was shipped with and require the use of 370-grains arrows. Failure to use arrows with a weight less than 370-grains will void your warranty and could cause a partial dry-fire that could result in serious personal injury. |
|
|
Section D – Safety and Trigger operation
6. Note the location of the safety indicator. F ( dot) = red fire and S ( dot) means safety is on. See Picture green D1 below and detail D2.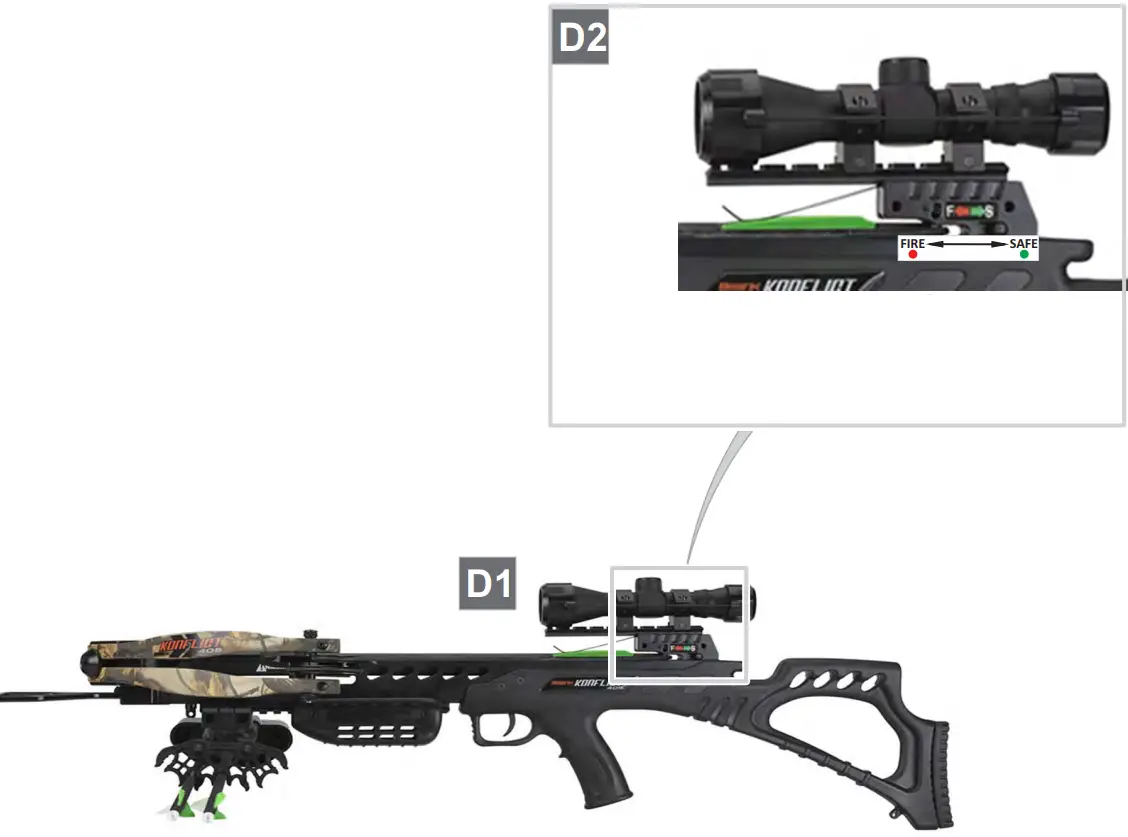
ONCE COCKED
When cocked the anti-dry fire switch will move from “ON” to ”OFF”, and the safety catch from “FIRE” to the “SAFE” position.
7. When you receive the crossbow, the dry fire indicator is at “ON” and Safety switch is at “FIRE” position.
8. After cocking, the dry fire indicator will move from “ON” to “OFF”, and the safety switch from” FIRE” to”SAFE” position. After loading arrow, dry fire indicator will move from”OFF” to “ON”, and the safety switch will remain at “SAFE”. When you are ready to shoot, move the safety indicator from “SAFE” to “FIRE” position and pull trigger.
Section E – Cocking
|
| Make sure that you apply rail lube to the rail before cocking. Before use, lubricate the string serving and rail with lubricant. Failure to do so will result in premature string wear, parts should be re-lubricated every 10 to 15 shots. See “Maintenance” section page 14 for additional information. |
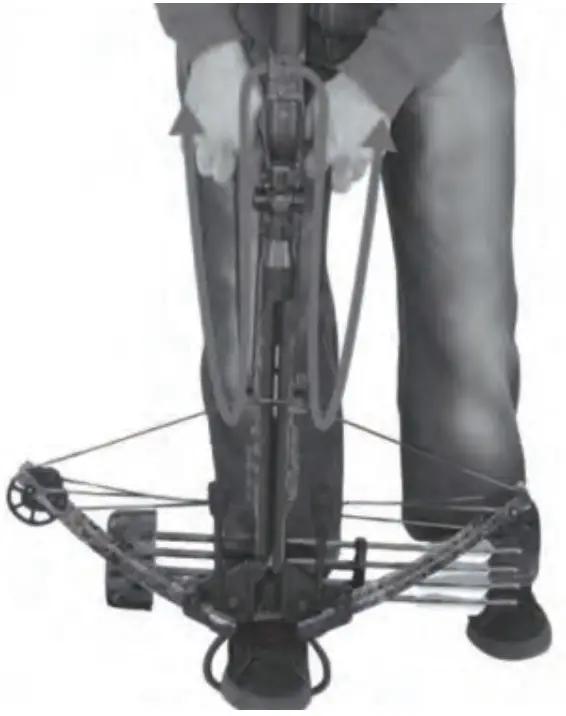
Place your foot into the stirrup.
Pull both T-handles simultaneously, smoothly drawing the crossbow string back under the crossbolt retention spring and into the string opening in the trigger mechanism. ( tension will keep cocking hooks against barrel if done properly). Continue drawing fully to the rear until the trigger safety moves to the “safe” position. Relax the tension slightly to ensure the trigger latch has fully captured the crossbow string. The crossbow is now fully cocked, ready for loading. Remove the rope cocker before shooting.
Mark your string to ensure that you are cocking the bow in a consistent manner.
Due to the high draw weight involved in cocking the bow, it is easy to cock the crossbow off center.
Failure to cock the crossbow squarely will result in poor accuracy. Simply mark the string with a marker or other means visibly ensure the bow is being cocked properly.
Section E – Loading
12. When loading an arrow, hold it between your index and middle fingers and your thumb, close to center of the arrow. This method keeps your fingers away from the path of the bowstring. Insert the white vane into the barrel’s flight groove as shown in Detail E6.
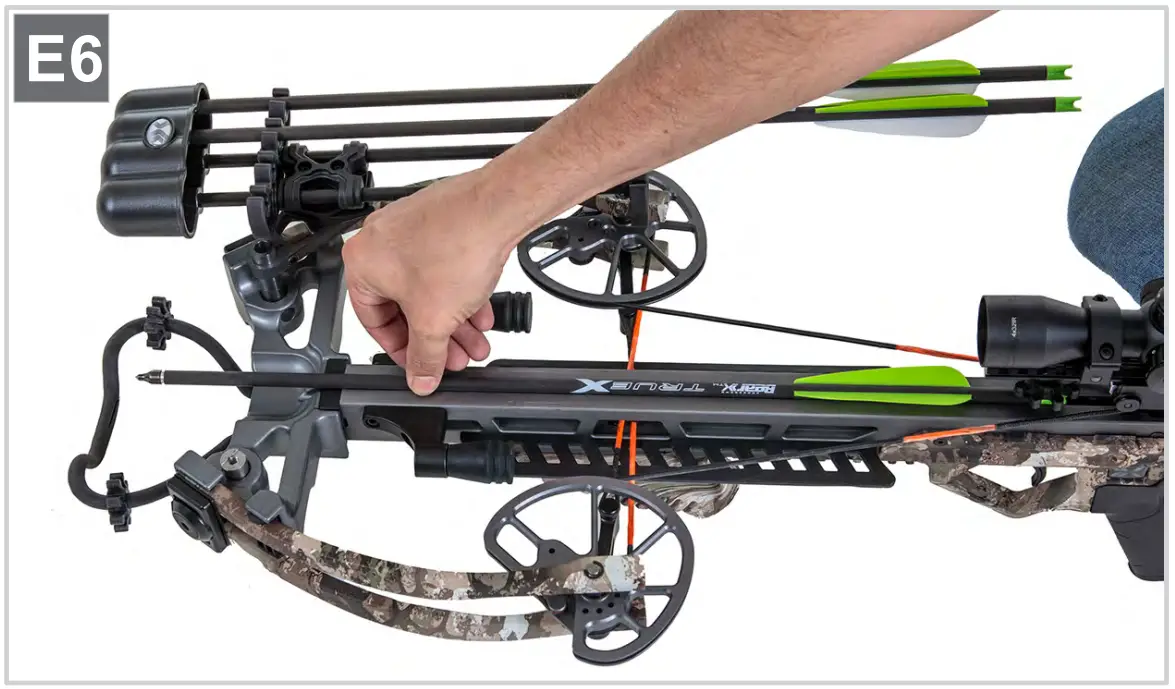
13. Slide the nock end of the arrow under the arrow retenon spring/retenon brush and lower the front of the arrow into the barrel’s flight groove. Connue sliding the arrow sha into the trigger box’s string slot unl it stops against the bowstring. At this point, your hand and fingers should be safely in front of the end of the bowstring’s release path and out of harm’s way. See Detail E6.
Unloading
|
|
14. The safest way to unload crossbow is to fire the arrow into suitable target or rock-free ground. If firing into ground, make sure ground is not frozen or hard and shoot at point approximately 4 to 5 feet in front of you at a 45 degree angle. Firing at greater distances may result in lost arrow in dirt or ricochet.
NOTE: Never leave Bear-X crossbow cocked more than 12 hours. See “General Maintenance” secon on page 14 for addional informaon.
Section F – Shooting your Crossbow
|
| To avoid serious personal injury or finger amputation always keep clear of the bowstring path and below the finger guards. You must read and understand Section A – General Safety, Section D – Safety and Trigger Operation, and Section E Cocking, Uncocking, Loading and Unloading. |
|
|
- Determine the yardage to the target, it should be 10 yards for the first time shooting you Bear-X crossbow.
- Cock and load your crossbow as described in Section E – Cocking, Loading and Unloading.
- Point your loaded crossbow toward the intended target with one hand on the fore-grip and the other hand on the stock.
- Ensure your fingers and hands are not in the bowstring path and are positioned below the safety guards.

Section G – Sighting in the Scope
|
| To avoid serious personal injury or finger amputation always keep clear of the bowstring path and below the finger guards. |
|
| You must read and understand Section A – General Safety, Section D – Safety and Trigger Operation, and Section E – Shooting Your Crossbow sections of the manual to avoid serious property damage, personal injury or loss of life. |
Sight your crossbow at 10 yards. You will be sighting in the TOP CIRCLE on your scope of the shortest distance. The other circles below the top one will offer you additional yardage sight points, the lower the circle the further the distance. These distances will depend on your initial yardage sighting of the top circle, and depend on your bolt (bolt shaft length, size and weight of tip).
Windage adjustment knob:
Arrow striking right, adjust windage wheel CLOCKWISE
Arrow striking left, adjust windage wheel COUNTER-CLOCKWISE.
Adjustment Scale: 1 Click – ¼” @ 100 yards.
Scope Features:
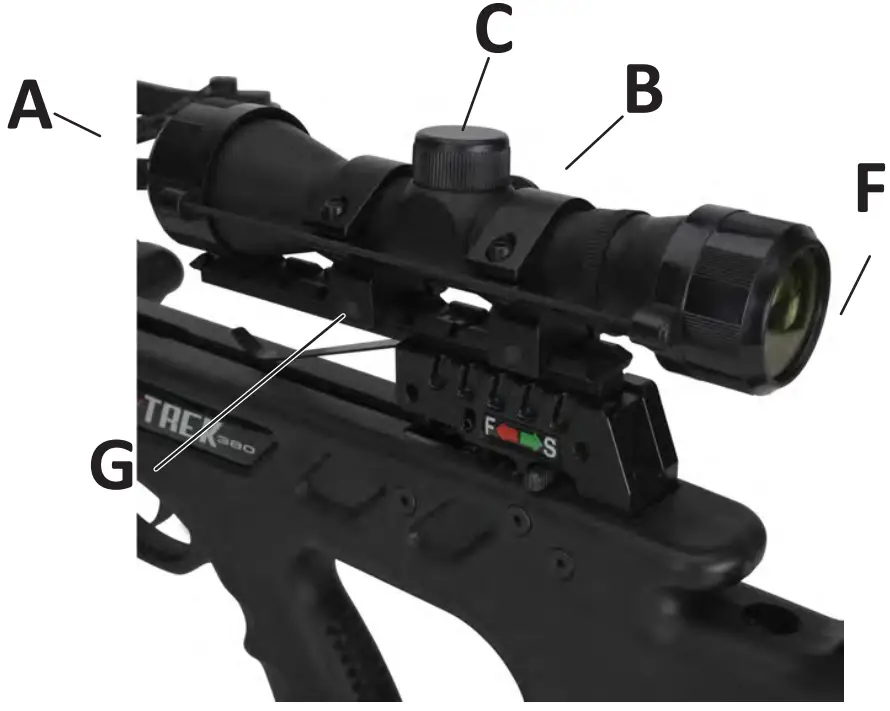
A: Object End
B: Windage Adjustment
C: Elevation Adjustment
D: Eyepiece
E: Locking Nuts
Section H – Maintinance
|
|
General Maintenance:
- General
· Check for worn or loose parts - Strings and Cables
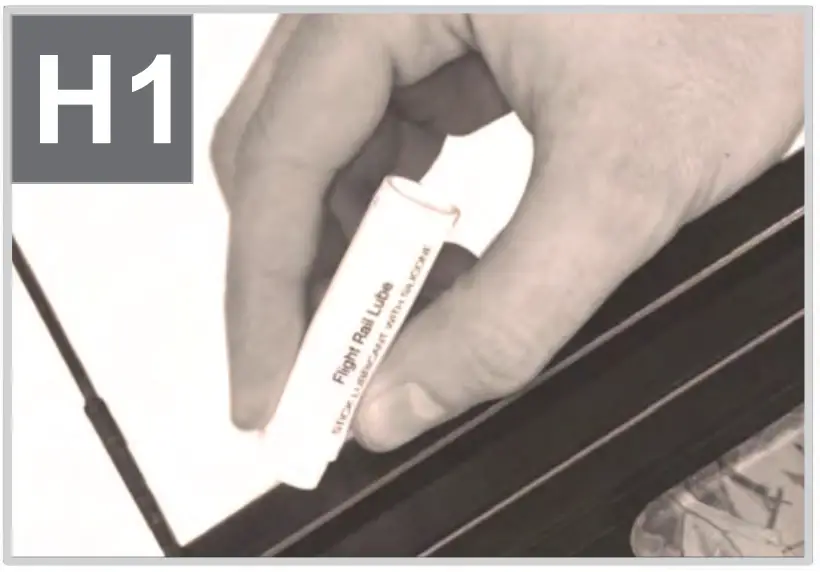
· Before use, lubricate the string serving and rail with the provided lubricant. Failure to do so will result in premature string wear. Parts should be re-lubricated every 10 to 15 shots. See picture H1 below.
· Replace immediately any worn strings, frayed strings, frayed cables and damaged cocking rope.
· Recommend changing the strings and cables every two years or 450 shots. - Storage
· Store your Bear-X crossbow in a locked cabinet or safe location far from the reach of children.
· Never store your crossbow in a hot area, such as an attic, car truck or next to heat source – long term exposure will damage your crossbow.
· Never leave Bear-X crossbow cocked inside a vehicle or when stored.
· Never leave Bear-X crossbow cocked more than 12 hours.
· Also, storing it in a humid location may cause some parts to rust. - Bolts and Screws
· Do not loosen limb bolts to relieve string pressure when not in use.
· Periodically you might need to tighten scope rings and stock mounts. - Service
· To obtain service contact the Customer Service Department at 1-800 694-9494.
Parts List
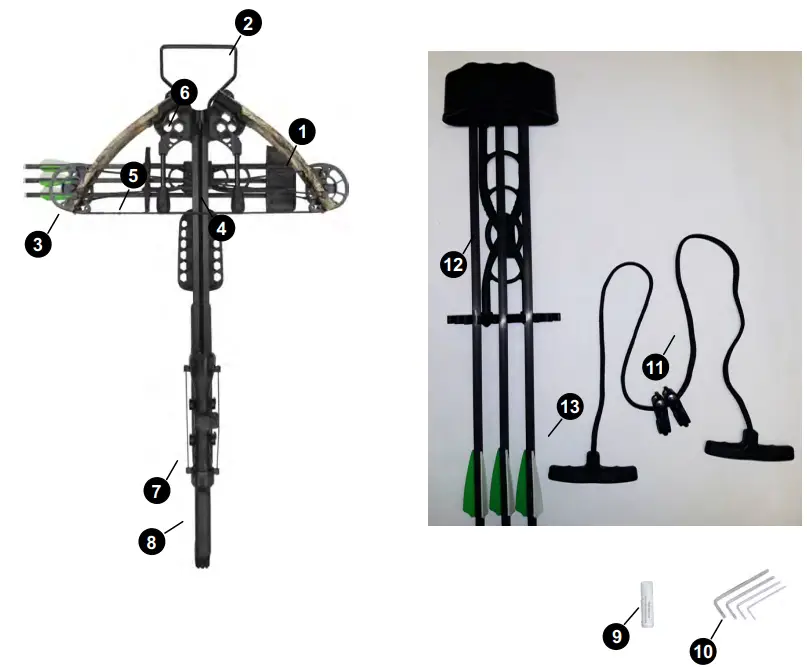
Parts List:
- Limb
- Foot Stirrup
- Cam
- Cable
- String
- Riser
- Scope
- Stock
Accessories: - Rail Lube
- Allen Wrenches
- Rope Cocker
- Quiver
- Arrow/Bolt
BEAR ARCHERY WARRANTY STATEMENT
All Bear Archery compound bows are backed with a Limited Lifeme Warranty to the original owner. This warranty applies to limbs, risers, and cams. This warranty consists of the following programs:
Limbs: 100% covered at no charge for the first 5 years, 50% of replacement cost aer.
- Risers: Lifeme Warranty.
- Cams: Lifeme Warranty.
Original Owner
Warranty applies only to the original owner and is not transferable. Proof of
purchase may be required.
Items Not Covered
Cables, strings, bearings, paint and/or film dipped finishes resulng from normal wear and tear are not included in this warranty.
Damage Not Covered
Damage caused by abuse, mishandling, dry firing, alteraon or modificaon made to original products are not covered under this warranty. The use of any bow press other than those approved by Bear Archery will void this warranty. Addionally, shoong of arrows less than 5 grains per pound of peak draw weight will void this warranty. Bear Archery reserves the right to make parts substuons on warranty coverage at Bear Archery’s sole discreon, for any reason.
Bow Warranty Registraon
For this warranty to be in effect, the on-line warranty registraon process must be completed at BearArchery.com and submied within 30 days of purchase.
Tradional Bows
1 year Limited Warranty to the original owner.
Youth Bows
90 Day Limited Warranty to the original owner.
In the event a bow requires warranty service, please contact the Bear Archery Customer Department at 800-694-9494 for a return authorizaon (RA) number and return shipping instrucons. For full warranty details, please log on to BearArcheryProducts.com for further informaon.
2200 Stringtown Rd.
Evansville, IN 47711
800 – 694 – 9494
fax 812 – 467 – 1245
www.BearArchery.com


