conrad SA 1200P Carbon Dioxide Detector Datalogger Function Instruction Manual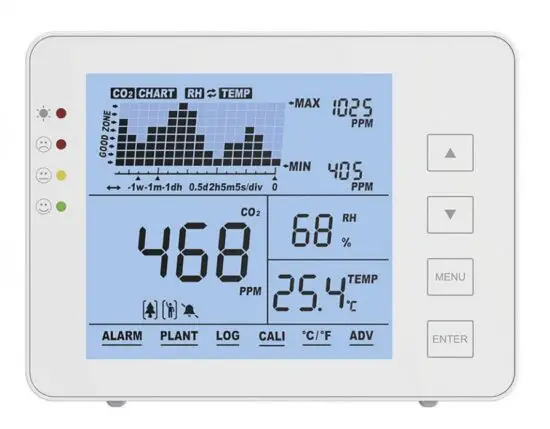
Getting Started
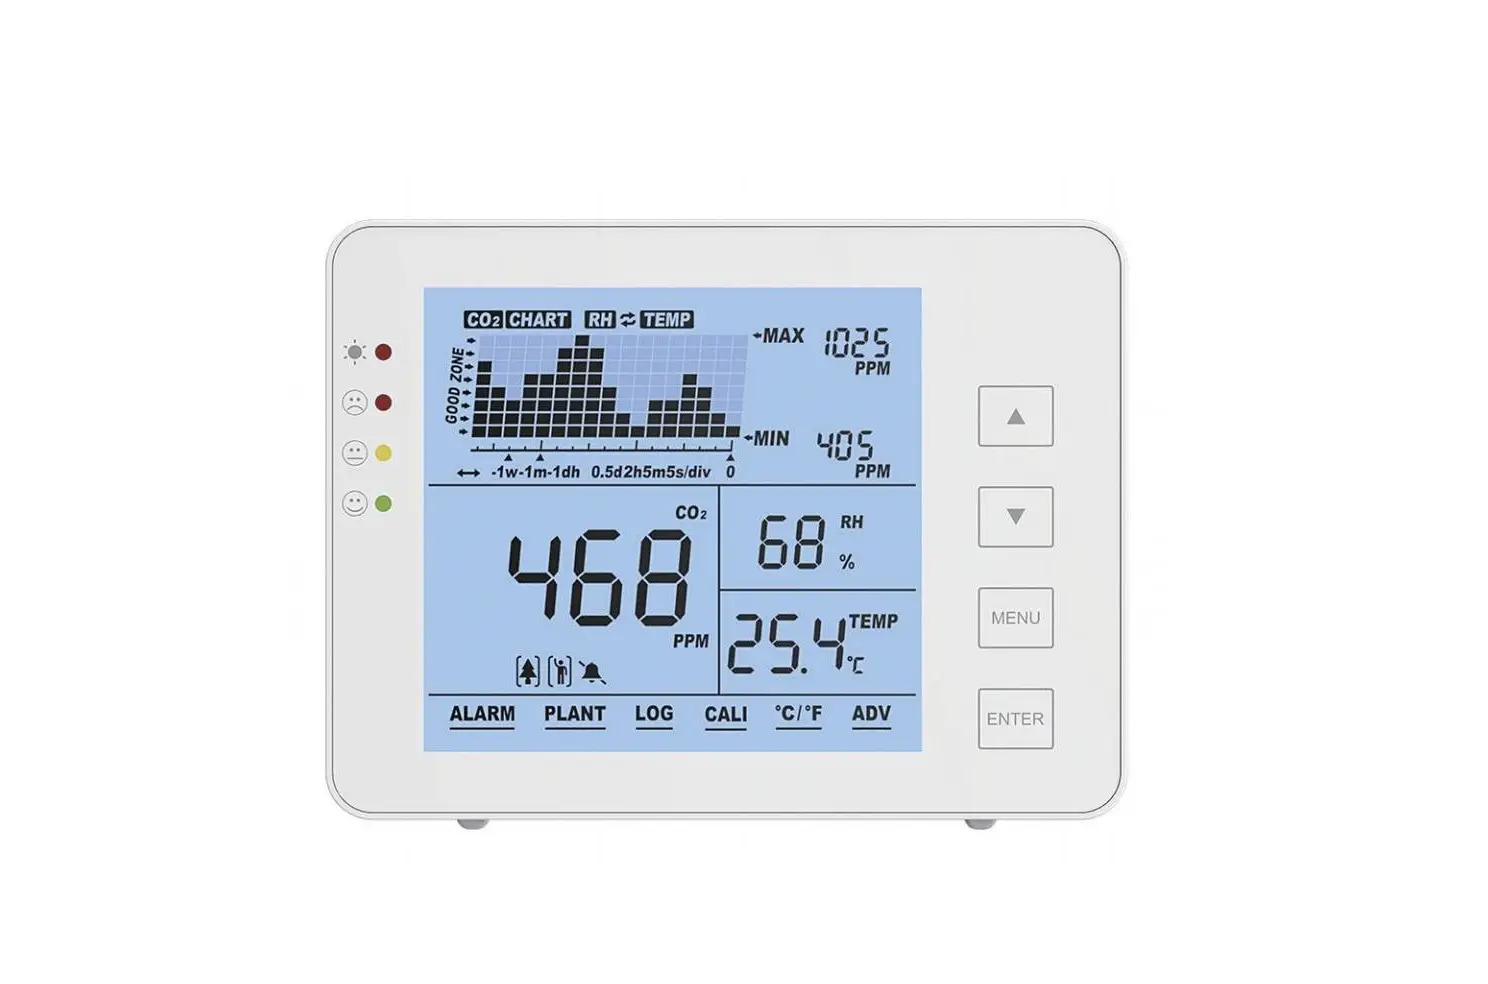
Thanks for purchasing our desktop CO2 monitor! This product is used to monitor CO2 concentration, humidity(RH) and temperature(TEMP) for indoor air quality monitoring.
Packing List
CO2 Monitor Unit
USB Cable for Power
User’s Manual
AC Adapter (Optional)
Features at a Glance
Large Display
Touch Button Operation
15° Bevel Design, Easy to Read
Low Drift NDIR Sensor, Long Lifespan
Audible and Visible Alarm
Chart with Variable Time Zoom Levels
CO2/RH/Temperature Monitor Tracer
Auto-Calibration and Manual Calibration
Max/Min Value Display in Certain Time
Overview
Drawing Sketch and Components List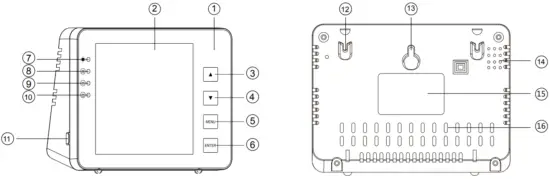
| Item | Description | Item | Description |
| 1 | Front Panel | 9 | Good Level |
| 2 | LCD | 10 | Low Level |
| 3 | 11 | USB Port | |
| 4 | 12 | Hole for Rope | |
| 5 | 13 | Hole for Screws | |
| 6 | 14 | Hole for Buzzer | |
| 7 | Power Indicator | 15 | Label |
| 8 | High Level | 16 | Hole for Sensors |
General Operation and Settings
- Use provided USB cable to connect the device. Once the countdown is complete, your device is ready to use. See detail in Page 3.
- Use
 and buttons to switch timeline and CO2/RH/TEMP. The trend chart displays the history records for any of the three parameters. See detail in Page 5.
 - To restore factory defaults, hold for 4 seconds until an audible beep is heard.
- Press once will bring up the main menu. To select the function, press / button. See detail in Page 7.
- Select
 to switch human
 and plants modes. See detail in Page 8.
 - Select
 to change the high/low alarms for human and plant . See detail in Page 11.
 - Enter
 to switch alarm
 and mute . See detail in Page 8.
 - Enter
 to switch temperature units C and F. See detail in Page 11.
Operating Instructions
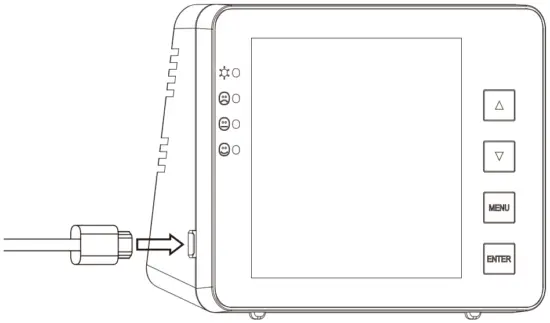
- When first unboxing, plug in the unit with the provided USB cable as shown on the right.
- Once successfully connected, the power indicator and 3 LEDs flash one by one.
- Main display shows a countdown from 10.
Once the countdown is complete, your product is ready to use. No initial setup or calibration is needed
LCD Display
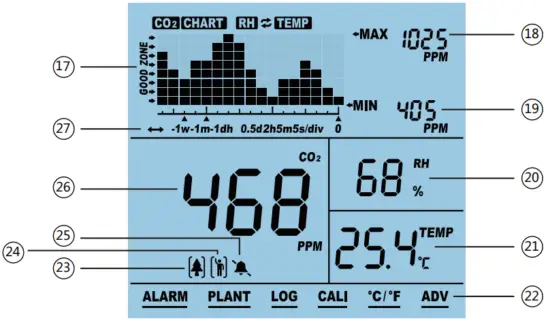
| Item | Name | Item | Name |
| 17 | CO2/RH/TEMP Chart | 23 | Plant Mode |
| 18 | Max Reading of Chart | 24 | Human Mode |
| 19 | Min Reading of Chart | 25 | Audible Alarm On/Off |
| 20 | RH Reading | 26 | CO2 Reading |
| 21 | Temperature Reading oC / o F | 27 | Time per Division- indicates the chart’s span of time |
| 22 | Main Menu |
Trend Chart Display
The below chart displays the past readings for any of the three parameters (CO2/RH /TEMP). There are 4 modes that can be toggled by using![]() key: CO2, TEMP, RH, and Cycle(automatically cycles through CO2/TEMP/RH).
key: CO2, TEMP, RH, and Cycle(automatically cycles through CO2/TEMP/RH).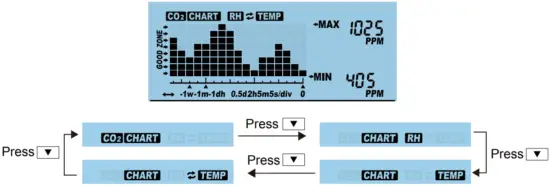
Press ![]() will toggle the available Zoom Levels for each parameters.(Minute/Hour/ Day/Week)
will toggle the available Zoom Levels for each parameters.(Minute/Hour/ Day/Week)
Below is a table that shows the available Zoom Levels for all parameters CO2/RH/ TEMP,as well as the duration of each division for corresponding Zoom Levels:
| Zoom Level (Time Span) | Time per Division |
| 1M(minute) | 5sec /div |
| 1H(hour) | 5m/div |
| 1D(day) | 2h/div |
| 1W(week) | 0.5d/div |
Max/Min
At the top right corner of the display, there are two numerical indicators: MAX and MIN.As the Zoom Level is changed, the MAX and MIN values will reflect the maximum and minimum values on the chart of the selected parameter(CO2, RH and TEMP).

The Main Menu functions can be actived by pressing . Pressing / once will bring up the main menu, with an underlining flashing bar indicating the current choice.
To select the function, press![]() when it is underlined by the flashing bar. Note that after 30 seconds if nothing is pressed, the Main Menu will disappear and the device will revert to the normal state.
when it is underlined by the flashing bar. Note that after 30 seconds if nothing is pressed, the Main Menu will disappear and the device will revert to the normal state.
| Function | Description |
| ALARM |  |
| When ALARM display | |
| PLANT | 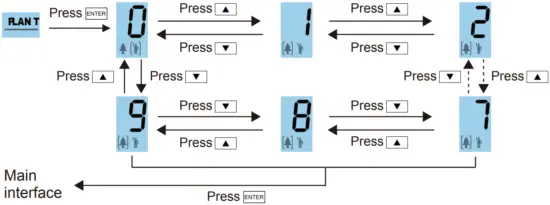 |
| Select number 0 to enter human mode. 0 is defaulted as human mode, unchangeable. The preset Low and high alarm are 800 and 1200ppm. Enter “ADV” to adjust them if necessary. In plant mode, it allows user to select between types of plants for optimal setting by using | |
| LOG |  |
| This function allows the user to see historical data records. | |
| CALI | 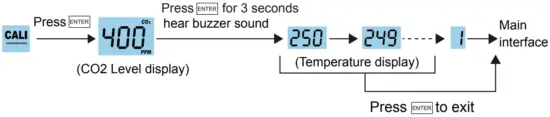 |
| Before calibration, run this device for at least 20 minutes with windows open or in outdoor environment with portable battery source to reach an atmosphere with 400ppm CO2. Wait till the CO2 reading is stable, follow above steps for calibration. After calibration leave it 10 minutes before normal use. | |
| ºC / ºF | 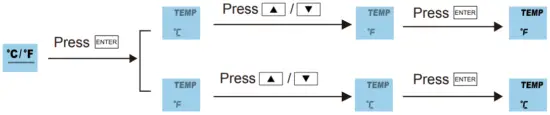 |
| Use this function to toggle between Celsius ( C ) and Fahrenheit ( F ) for the temperature display. | |
| ADV | 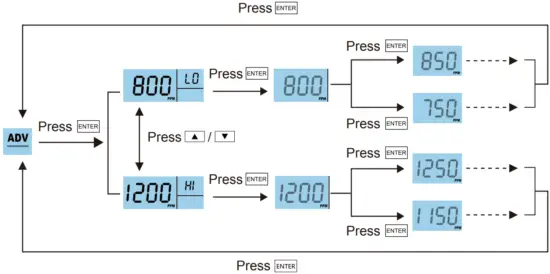 |
| Use this function to set high and low alarm values of human mode (0) as well as the first option of plant mode (1). High and low alarms for options 2-9 under plant mode are not adjustable. See details in Page 14. (Appendix) |
Specifications
Typical test conditions: Ambient Temp: 23 3°C, RH=50%~70%, Altitude= 0~10 meters
| Measurement | Specifications |
| Operating Temperature | 32°F ~ 122°F (0°C ~ 50°C) |
| Storage Temperature | -4°F ~ 140°F (-20°C ~ 60°C) |
| Operating & storage RH | 0-95%(non-condensing) |
| CO2 Measurement | |
| Measuringe range | (0-5000)ppm |
| Display resolution | 1ppm (0-1000); 5ppm (1000-2000); 10ppm (>2000) |
| Accuracy | (0~3000)ppm: ± 50ppm ± 5% of reading (take the Maximum) |
| (>3000)ppm: ± 7% of reading | |
| Repeatability | 20ppm at 400ppm |
| Temp compensation | ±0.1% of reading per ℃ |
| Response time | <2 min for 63% of step change or < 4.6 min for 90% step change |
| Warm-up time | <20 seconds |
| Temperature Measurement | |
| Operating temperature | 32°F ~ 195°F (0°C ~90°C) |
| Display resolution | 1°F / 0.1°C |
| Response time | <20 minutes (63%) |
| RH Measurement | |
| Measuring range | 5~95% |
| Accuracy | ±5% |
| Display resolution | 1% Main interface display,1% Max/Min display |
| Operating Voltage | DC(5±0.25)V |
| Dimension | 120*90*35mm |
| Weight | 170g ( 6.0oz) |
Appendix
| No. | Refers | Low/High Alarm | Adjustable |
| 0, | FOR Human | 800-1200ppm | Yes |
| 1, | FOR Customized Plant | 600-900ppm | Yes |
| 2, | FOR Bean | 600-900ppm | No |
| 3, | FOR Chillies | 800-1000ppm | No |
| 4, | FOR Cucumber | 1000-1500ppm | No |
| 5, | FOR Grape | 800-1400ppm | No |
| 6, | FOR Orchid | 800-1400ppm | No |
| 7, | FOR Potato | 1200-1800ppm | No |
| 8, | FOR Strawberry | 800-1200ppm | No |
| 9, | FOR Tomato | 800-1200ppm | No |


