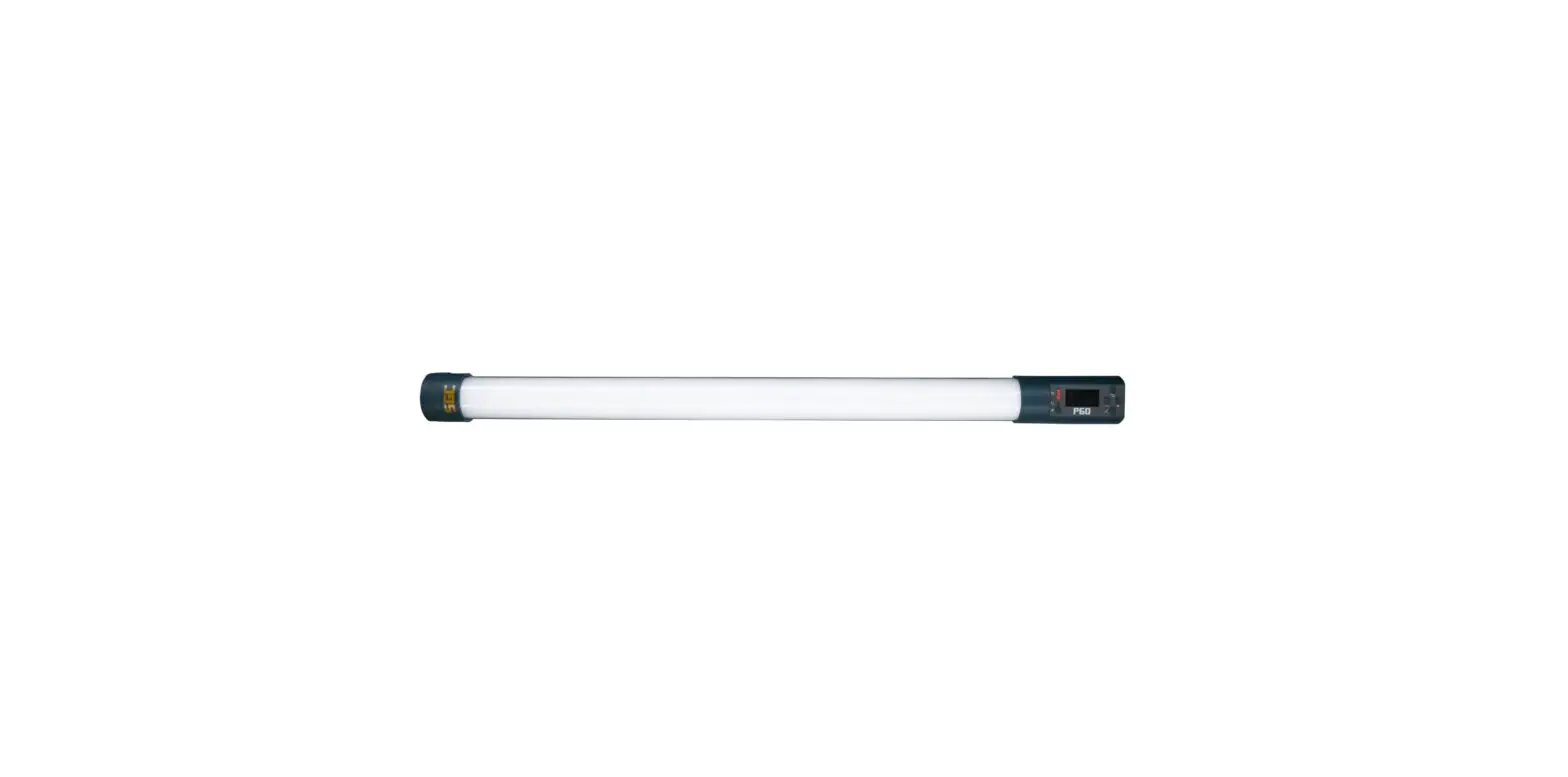
SGC Lighting P60 PRISM LED Tube Light

Foreword
Thank you for purchasing the SGC Prism Series LED Light.
Instructions
- Please read this user manual carefully.
- This user manual is designed to be sturdy for long-term usage. Include this manual when passing the product on to third parties.
- Beware of the warnings listed and follow instructions for optimal usage and product life.
Warning:
Do not leave the product unattended in surrounding with excessive heat, humidity, and other harmful elements. Do not use corrosive chemicals for cleaning the product. Operate carefully to not cause damage by dropping the product or hitting other objects with it. Always seek an authorized service or agent if your product has problems. Please note that the warranty does not apply to repair(s) arising out of the third party or unauthorized disassembly, although you may request such repairs on a chargeable basis. We strongly recommend using cables provided by SGC and any malfunctions or damages caused by third-party cables will not be covered by the warranty. The instructions and information in this manual are based on thorough, controlled company testing procedures. Designs and product specifications may change without notice.
Intended Use
Intended use of the SGC Prism LED Lights includes:
- The user has read the instructions of this manual.
- The user is using the products within the operating conditions and limitations described in this manual.
- Improper use means using the product(s)other than as described in this manual or under conditions that differ from those described herein.
Package Contents
- 1x Prism60 OR Prism120 tube-type LED lamp
- 1 x SGC replaceable Li-Ion 16000mAh capacity Battery Pack
- 1 x AC Power Supply
- 1 x Lamp Holder
- 1 x Carrying Case
- 1 x User Manual
Package contents may be updated or changed without notice. various accessories are constantly being developed. Please check our website www.sgclights.com to learn more.
Product Specifications
| Models | P60 | I P120 | |
| Optics | While | Diffuser | |
| Beam Angle | 150• | ||
| Color Temp. | 2700.6500K | ||
| Color Temp. Tolerance | ,ooK | ||
| Color Accuracy Standard | CRl:>95, TLCl>95 | ||
| Hue | 0-360° | ||
| Saturation | 0-100% | ||
| Power Input Range | DC24V | ||
| Power Consumption | 18W | I | 36W |
| Power Port | DC input, 2.5’5.Smm barrel connector | ||
| Lumens (@6000K) | 2300Im | I | 4600Im |
| Dimming | 0-100% | ||
| Software Interface | On-beard Controller wilh Display | ||
| IP Rating | IPSO | ||
| Operational Temp. | -20-4o•c | ||
| Fixture Dimensions | 043’605mm | I | 043’1205mm |
| Fixture Weight | 0.7kg | I | 1.0kg |
| Battery Capacity | 16000mAh | I | 16000mAh |
| Battery Pack Charge Life | Expecled ballery pack capacity atter 300charging cycles: >70% | ||
| Expected Lamp Life | 25000Hours | ||
| Controls | Manual on-beard conlrol, wired/wireless OMX, Wireless Remote Conlroller (oplional) | ||
Functional Description
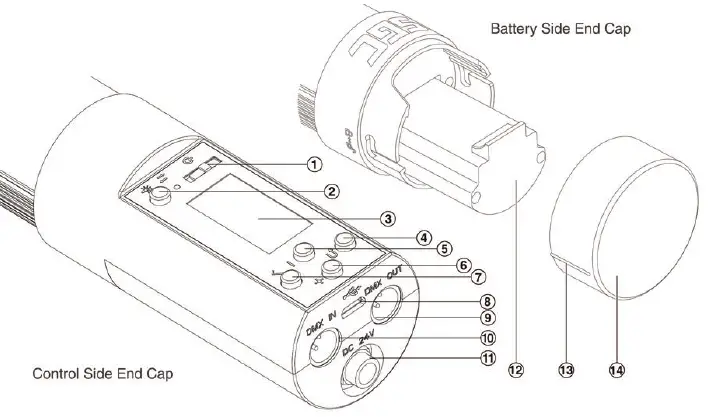
- Power Switch
- Soft Switch Button
- Menu Screen
- Return Button
- Minus/Left Button
- Plus/Right Button
- Confirm Button
- Micro USB Update Port
- DMX OUT Port
- DMX IN Port
- DC Input Port
- Rechargeable Battery Pack
- Locking Pin Indicator
- Battery Cap
Operations
Li-Ion Rechargeable Battery Pack
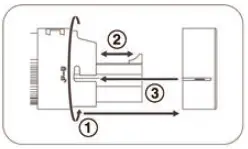
- Removing and Inserting of Battery Pack

- Twist the battery cap to unlock and remove it from end cap
- Use the built-in tab to pull out the battery pack or insert it
- Align the locking-pin indicator when re-inserting the battery cap
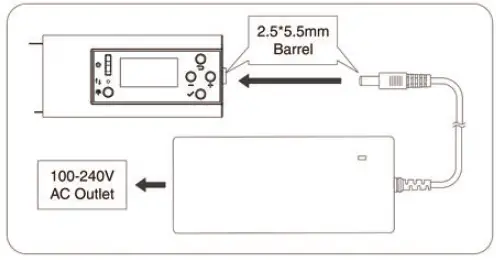
- Charging – Directly inside a fixture (default)
 When a supplied AC power supply is connected to the fixture, it will provide power for the fixture to operate and/or charge the rechargeable battery pack depending if the battery is inside or not. When to hold down the soft switch button for 3 seconds, the display interface will jump to the battery display interface. The previous screen will be returned in 3 seconds.
 Solid battery icon with bars: current Battery Level.
 Flashing empty battery icon: the battery has less than 5% charge remaining and needs to be charged.
 Display s the charging text under the power icon while charging.
- Charging – Using an external battery charger (optional)
An optional external battery charger can be purchased to charge additional battery packs separately.
 When a supplied AC power supply is connected to the fixture, it will provide power for the fixture to operate and/or charge the rechargeable battery pack depending if the battery is inside or not. When to hold down the soft switch button for 3 seconds, the display interface will jump to the battery display interface. The previous screen will be returned in 3 seconds.
Control Button Functions
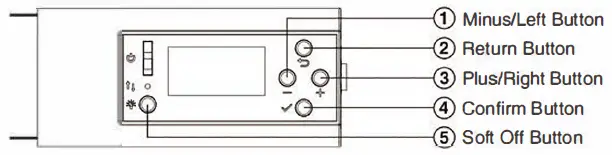
- Use 1/3 while Main Menu items are highlighted to navigate the control menu horizontally. Press 4 to select the Main Menu item desired.
- Use 1/3 while Sub Menu items are highlighted to navigate the control menu vertically. Press 4 to select the Sub Menu item desired.
- Use 1/3 once a Sub Menu item is selected to navigate the control parameters. Press 2 to return to the Sub Menu level and use 1/3 to choose a different Sub Menu item under the same Main Menu item or press 2 to return to the Main Menu level and choose a different Main Menu item.
- Press 5 to make changes to the lamp settings with the light off. Once the desired settings are chosen, press 5 again to turn the light back on with that setting. When to hold down the Soft Off button for 3 seconds, the display interface will jump to the battery display interface.
- The previous screen will be returned in 3 seconds.
| Main Menu | Sub Menu | Parameters | Description |
| CCT | Brightness | 0·100% | Adjust the brightness of the light being produced |
| Color Temp. | 2700-6500K | Adjust the color temperature of light being produced | |
| +/- Green | 100M-100G | Adjust green/magenta shift of light being produced | |
| HSI | Brightness | 0-100% | Adjust brightness of light being produced |
| Hue | 0-359° | Adjust color hue of light being produced | |
| Saturation | 0-100% | Adjust saturation of the ootor of light being produced | |
| CTP | Brightness | 0-100% | Adjust brightness of light being produced |
| Preset Color | 3200K, 4000K, 5600K, 6000K, Red, Green, Blue, Magenta, Yellow, Orange | Choose one of preset colors for light being produced |
| Main Menu | Sub Menu | Parameters | Description |
| FX | Brightness | 0-100% | Adjust brightness of light being produced |
| Effect | Rainbow, Short Circuit,paparazzi, Flashes, Fir1,Fir2, Fir3,Cop1,Cop2, | Choose one of preset lighting effects for light being produced | |
| Demo | |||
| Rate | 0-100% | Adjust the rate of the light- ing effect chosen | |
| SET | Master/Slave | On/Off | Check and control Lead/ Follow mode: please refer to more details on page 8 |
| Wired OMX | Status, Address, Profile | Set up wired OMX connec- lion: please refer to more details onpage 8 | |
| Wireless OMX | Status, Address, Channel | Set up wireless OMX con- nection: please refer to more details onpage 8 | |
| BT | Status | On/Off | Check status of Bluetooth connection |
| Reset | Yes/No | Reset Bluetooth connection |
| Main Menu | Sub Menu | Parameters | Description |
| Info. | Language | English/Chinese | Choose the language in which the control menu is displayed in |
|
Version |
V0.1-9.0 |
Current version of control software | |
| RST | Reset | On/Off | Factory reset that resets the light to following parameters: 100% brightness, 3200K Color Temperature, +/- Green 0G, Hue 0°, Sat 100%, Lead/Follow: Off Wired DMX:Off, Address 001, Profile P1 Wireless DMX: Off, Address 001, Channel Auto |
Setting up for remote control using Bluetooth
Enter the main menu BT and the status will automatically show On. Use Reset to link the device with a new smartphone or tablet.
Download the Sidus Link app on a smartphone or a tablet and register. Please make sure Bluetooth is turned on on the mobile device before start using the app to remotely control the lights.
Please refer to Sidus Link instruction manuals for detailed control parameters. Using the Sidus Link APPYou can download the Sidus Link app from the iOS App Store or Google.
Play Store for enhancing the functionality of the light. Please visit Sidus. link/app/help for more details regarding how to use the app to control your Aputure lights.
Setting up remote control using Wireless DMX or Master/Slave mode
Master/Slave mode is where a light can be set as a Master and control a group of additional lights set to Slave, which mimic the behavior of the Master light.
Wireless OMX:
To use an OMX controller with wireless OMX capability to control the lights remotely, enter the main menu SET, and set Master/ Slave to Off. Enter the Wired OMX sub menu, set the Status to On,
and choose a desired OMX address. Please refer to pages 8-10 of this User Manual for available OMX profiles. In order to add more lights to be controlled individually using the same wireless OMX controller, a different OMX address needs to be entered that is at least 10 numbers apart.
Wireless Master/Slave: In order to create groups of lights that behave the same under a single channel that is controlled by an OMX controller, wired Master/Slave mode can be set up.
- Enter the main menu SET and check the status of Master/Slave. If it is set to On, the light is set as a Master. If it is set to Off, the light is set as a Slave. Start by setting a light as a Master.
- Enter the submenu Wireless OMX and set the Status to On, and choose a desired OMX address. Please refer to pages 8-10 of this User Manual for available OMX profiles.
Setting up remote control using Wired DMX or Master/Slave Mode
Wired OMX:
To use an OMX controller to control the lights remotely using the RJ45 ports, enter the main menu SET, and set Master/Slave to Off. Enter the Wired OMX sub menu, set the Status to On, and choose a desired OMX address. Please refer to pages 8-1 0 of this User Manual for available OMX profiles.
Wired Master/Slave:
- Enter the main menu SET and check the status of Master/Slave. If it is set to On, the light is set as a Master. If it is set to Off, the light is set as a Slave. Start by setting a light as a Master.
- Enter the submenu Wired OMX and set the Status to On, and choose a desired OMX address. Please refer to pages 8-10 of this User Manual for available OMX profiles.
OMX Profiles and Parameters
| P1: HSIC – 8bit, 5 OMX Channels | ||||
| Channel | Function | 8bit Value | Actual Value | Note |
| 1 | Intensity | 0-255 | 0-100% | |
| 2 | Color Temp. | 0-255 | 2700-6500K | |
| 3 | +/- Green | 0-10 | 0-4% | No effect |
| 11-20 | 5-8% | Fullminus green | ||
| 21-119 | 9-46% | -99 – –1% green | ||
| 120-145 | 47-57% | Neutral | ||
| 146-244 | 57-96% | +1 – +99% green | ||
| 245-255 | 96-100% | Full plus green | ||
| 4 | Hue | 0-255 | 0-359° | |
| 5 | Saturation | 0-255 | 0-100% | |
| P2: HSIC • 16bit, 7 OMX Channels | ||||
| Channel | Function | Sblt Value | Actual Value | Note |
| 1/2 | Intensity | 0-65535 | 0-100% | |
| 3 | Color Temp. | 0-255 | 2700-6500K | |
| 4 | +/- Green | 0-10 | 0-4% | No effect |
| 11-20 | 5-8% | Full minus green | ||
| 21-119 | 9-46% | -99 – -1% green | ||
| 120-145 | 47-57% | Neutral | ||
| 146-244 | 57-96% | +1 – +99% green | ||
| 245-255 | 96-100% | Full plus green | ||
| 5/6 | Hue | 0-65535 | 0-359° | |
| 7 | Saturation | 0-255 | 0-100% | |
| P3: HSI · 8bit, 3 Channels | ||||
| Channel | Function | 8bit Value | Actual Value | Note |
| 1 | Intensity | 0-255 | 0-100% | |
| 2 | Hue | 0-255 | 0-359° | |
| 3 | Saturation | 0-255 | 0-100% | |
| P4: CCT • 8bit, 3 Channels | ||||
| Channel | Function | 8bit Value | Actual Value | Note |
| 1 | Intensity | 0-255 | 0-100% | |
| 2 | Color Temp. | 0-255 | 2700-6500K | |
| 3 | +/- Green | 0-10 | 0-4% | No effect |
| 11-20 | 5-8% | Full minus green | ||
| 21-119 | 9-46% | -99 – -1% green | ||
| 120-145 | 47-57% | Neutral | ||
| 146-244 | 57-96% | +1 – +99% green | ||
| 245-255 | 96-100% | Full plus green | ||
| PS: CCT · 8bit, 2 Channels | ||||
| Channel | Function | 8bit Value | Actual Value | Note |
| 1 | Intensity | 0-255 | 0-100% | |
| 2 | Color Temp. | 0-255 | 2700-6500K | |
| P6: RGB – 8bit, 3 Channels | ||||
| Channel | Function | 8bit Value | Actual Value | Note |
| 1 | Red | 0-255 | 0-100% | |
| 2 | Green | 0-255 | 0-100% | |
| 3 | Blue | 0-255 | 0-100% | |
| P7: CCT & RGB • 8bit, 6 OMX Channels | ||||
| Channel | Function | 8bit Value | Actual Value | Note |
| 1 | Intensity | 0-255 | 0-100% | |
| 2 | Color Temp. | 0-255 | 2700-6500K | |
| 3 | +/- Green | 0-10 | 0-4% | No effect |
| 11-20 | 5-8% | Full minus green | ||
| 21-119 | 9-46% | -99 – -1% green | ||
| 120-145 | 47-57% | Neutral | ||
| 146-244 | 57-96% | +1 – +99% green | ||
| 245-255 | 96-100% | Full plus green | ||
| 4 | Red | 0-255 | 0-100% | |
| 5 | Green | 0-255 | 0-100% | |
| 6 | Blue | 0-255 | 0-100% | |
| PS: CCT & RGB -16bit, 10 OMX Channels | ||||
| Channel | Function | 8bit Value | Actual Value | Note |
| 1/2 | Intensity | 0-65535 | 0-100% | |
| 3 | Color Temp. | 0-255 | 2700-6500K | |
| 4 | +/- Green | 0-10 | 0-4% | No effect |
| 11-20 | 5-8% | Full minus green | ||
| 21-119 | 9-46% | -99- -1% green | ||
| 120-145 | 47-57% | Neutral | ||
| 146-244 | 57-96% | +1 – +99% green | ||
| 245-255 | 96-100% | Full plus green | ||
| 5/6 | Red | 0-65535 | 0-100% | |
| 7/8 | Green | 0-65535 | 0-100% | |
| 9/10 | Blue | 0-65535 | 0-100% | |
Guangdong Quasar Culture& Technology Co., Ltd.
3rd Floor, Jinzhou Mansion, Guanlong Road, Dongchecg District, Dongguan City, Guangdong Province, China
+86-0769-22011691
[email protected].
http://www.sgclighting.com.


