![]()
![]() Item no. 013991
Item no. 013991
SAFE
OPERATING INSTRUCTIONS
![]() Important! Read the user instructions carefully before use. Save them for future reference. (Translation of the original instructions)
Important! Read the user instructions carefully before use. Save them for future reference. (Translation of the original instructions)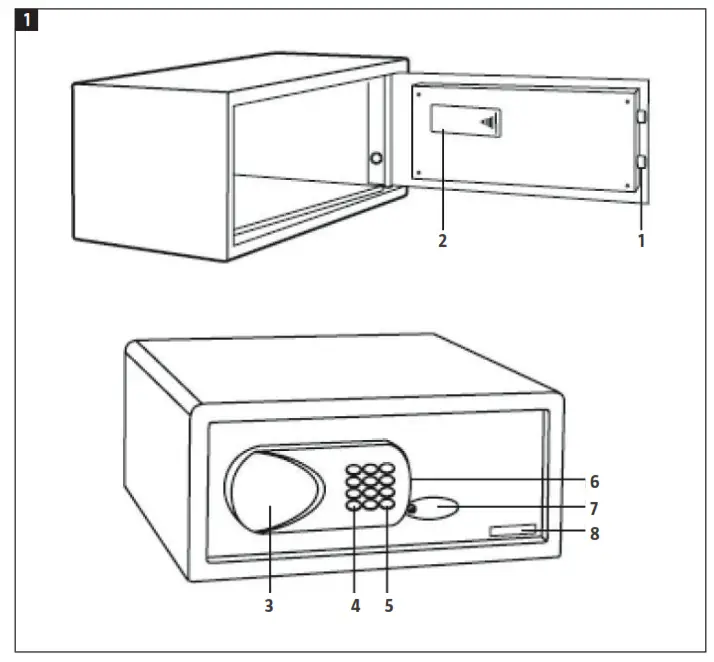
SAFETY INSTRUCTIONS
NOTE: Never store emergency keys in the safe.
SYMBOLS
| Read the instructions. |
| Approved in accordance with the relevant directives. |
| Recycle discarded product in accordance with local regulations. |


TECHNICAL DATA
| Battery | 4 x 1.5 V AA |
| External dimensions | W437 x H195 x D380 mm |
| Internal dimensions | W434 x H192 x D320 mm |
| Weight | 11.5 kg |
| Volume | 26 L |
| Material | Steel |
| Wall thickness | 1.5 mm |
| Door thickness | 5 mm |
DESCRIPTION
| 1. Lock bolts 2. Battery compartment 3. Display 4. Clearing button | 5. LOCK button 6. USB port (for CEU) 7. Emergency lock cover 8. Serial number |
INSTALLATION
MOUNTING THE SAFE ON A WALL
- Drill screw holes at the required place on the wall.
- Screw on the selected fittings, depending on the wall material.
- Mount the safe on the wall with selected fittings.
- Check that the safe is firmly in place and tighten the screws.
IMPORTANT:
- Use suitable screws and plugs, depending on the surface of the wall.
- Insert four new batteries with the correct polarity as shown by the markings in the battery compartment.
USE
POWER SUPPLY
Battery
The battery power supply is activated automatically if there is a power failure.
IMPORTANT: Do not mix old and new batteries or different types of batteries.
OPENING AND CLOSING WITH PERSONAL CODE
- Enter the required code (3–6 digits) and press the LOCK button. CLOSED is shown on the display and the safe is locked.
- Enter the same code (3–6 digits) again. OPENED is shown on the display and the safe is unlocked.
MASTER CODE
Opening with master code
- Press the LOCK button twice.
- SUPER is shown on the display. Enter 000000. The safe unlocks.
Setting the master code
- With the door to the safe open, press the CLEAR button twice.
- PROG is shown on the display. Enter 842627 and press the LOCK button.
- OLD is shown on the display. Enter the old master code (default master code is 000000) and press LOCK.
- NEW is shown. Enter the required 6 digit master code and press the LOCK button.
- GOOD is shown on the display to indicate that the master code has been changed.
Setting the date and time
- With the door to the safe open, press the CLEAR button twice, enter 055261 and press the LOCK button. DATE is shown on the display.
- The date is first shown as below.
| Year | Month | Day | |||
| 0 | 0 | 0 | 0 | 0 | 0 |
- Example: Enter 180730 for 30 July 2018:
| Year | Month | Day | |||
| 1 | 8 | 0 | 7 | 3 | 0 |
- Press LOCK to confirm.
- The time is now shown as below:
| Hour | Minutes | Seconds | |||
| 0 | 0 | 0 | 0 | 0 | 0 |
- Example: Enter 160130 for the time 16:01:30 (hh:mm:ss):
| Hour | Minutes | Seconds | |||
| 1 | 6 | 0 | 1 | 3 | 0 |
- Press LOCK to confirm. GOOD is shown on the display.
EMERGENCY OPENING
The first time the safe is opened, during an electrical fault, or if you have forgotten the code, the safe can be opened with the emergency key.
OPENING AND CLOSING HISTORY
The display program can store 100 combinations.
- With the door to the safe open, press the CLEAR button twice, enter 162550 and press the LOCK button.
- RECORD is shown on the display and the register opens.
- The register is shown in two display images. Follow the instructions below.
| Button | Function |
| 2 | Go to the previous item. |
| 8 | Go to next item. |
| 4 | Show previous content on the display. |
| 6 | Show next content on the display. |
| 5 | Go to the last item in the register. |
- Press the LOCK button to exit the register.
- Example: Opening with master code on 30 July 2018 at 16:01:30
- The display shows:
| Year | Month | Day | |||
| 1 | 8 | 0 | 7 | 3 | 0 |
- Press button 6 to show the following content on the display.
| Hour | Minutes | – | Opening with | ||
| 1 | 6 | 0 | 1 | – | 2 |
| Button | Opening with |
| 1 | User code |
| 2 | Master code |
| 3 | CEU |
| 4 | Key |
- Press the CLEAR button to exit.
Care for the environment!![]() Must not be discarded with household waste! This product contains electrical or electronic components that should be recycled. Leave the product for recycling at the designated station e.g. the local authority’s recycling station. Jula reserves the right to make changes. In the event of problems, please contact our customer service.
Must not be discarded with household waste! This product contains electrical or electronic components that should be recycled. Leave the product for recycling at the designated station e.g. the local authority’s recycling station. Jula reserves the right to make changes. In the event of problems, please contact our customer service.
www.jula.com
Produsent/Manufacturer Jula AB, Box 363, 532 24 SKARA
Distributor
2021-06-16 © Jula AB
For the latest version of operating instructions, see www.jula.com


