
NUX B-6 2.4GHz Wireless System for Saxophone
WARNING
To reduce the risk of fire or electric shock, do not expose this appliance to rain or moisture.
CAUTION
This device complies with part 15 of the FCC Rules. Operation is subject to the following two conditions: (1) this device may not cause harmful interference, and (2) this device must accept any interference received, including interference that may cause undesired operation. Any changes or modifications not expressly approved by the party responsible for compliance could void the user’s authority to operate the equipment.
NOTE: This equipment has been tasted and found to comply with the limilB for a Class B digital device, pursuant to Part 15 of the FCC Rules. These limits are designed to provide reasonable protection against harmful interference in a residential insmllation. This equipment generates, uses and can radiate radio frequency energy and, if not insmlled and used in accordance with the instructions, may cause harmful interference to radio communications. However, there is no guarantee that interference wili not occur in a particular installation.
If this equipment does cause harmful interference to radio or television reception, which can be determined by turning the equipment off and on, the user is encouraged to try to correct the interference by one or more of the following measures:
- Reorient or relocate !he receiving antenna.
- Increase the separation between the equipment and receiver.
- Connect the equipment into an outlet on a circuit different from that to which the receiver is connected.
- Consult the dealer or an experienced radio/JV technician for help.
The device has been evaluated to meet general RF exposure requirement. The device can ba used in portable exposure condition without restriction.
The lightning symbol within a triangle means, “Electrical caution!” It indicates the presence of information about operating voltage and potential risks of electrical shock. The exclamation point within a triangle means, “Caution!” Please read the information next to all caution signs.
System Overview
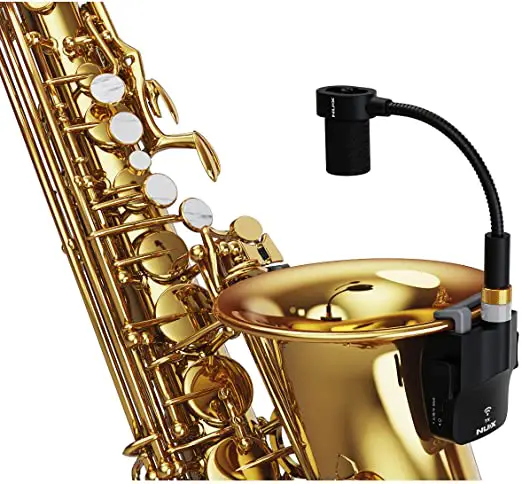
NUX B-6 wireless system is designed for saxophone to mic it wirelessly, you can use it with Soprano, Alto and Tenor. B-6 features with automatic setup, 2.4GHz interference-free broadcasting frequency and 24-bit 44.1 kHz high quality audio transmitting. The signal latency is super low and less than 4ms. The operation range is around 20 meters (65-feet). B-6 comes with a power case which can store, protect, and charge the wireless units.
B-6 is user-friendly, just turn on transmitter and receiver, and it will be paired within few seconds. Each wireless set has a unique pairing algorithm, it automatically detects each other and configures their own IDs. The signal never interferes with other wireless including the Wi-Fi signal.
How to Operate
- INSTALLATION
- Insert the gooseneck microphone plug firmly into the microphone input jack of the TX until you hear a “pop” sound, and lock the nut tightly.
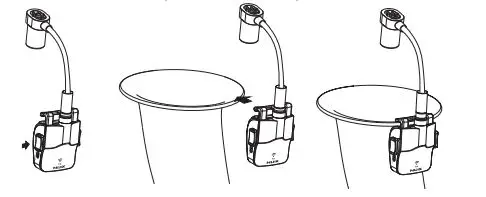
- Press the left and right sides of the TX to open the clip and fix it on the edge of the bell.
- Bend down the gooseneck microphone so that the microphone head points towards the center of saxophone bell and keep a moderate distance.

- TURN ON
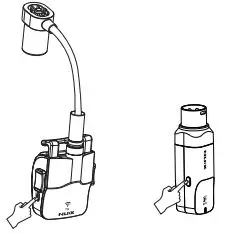
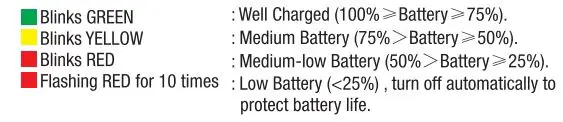
- Press and hold the POWER/SCENE buttons to turn ON the TX and RX. Before it gets paired automatically, you can see the battery status in 1 second.


- After 2 seconds, it will be paired automatically, and the receiver’s round indicator will flash GREEN.
*B-6 will detect the best channel in 2.4GHz frequency band, if the TX and RX get paired, both will show GREEN. 11 the RX doesn’t receive signal, RX’s LED will flash RED. Once the RX receives the signal, it will show GREEN.
- Press and hold the POWER/SCENE buttons to turn ON the TX and RX. Before it gets paired automatically, you can see the battery status in 1 second.
- OPERATE
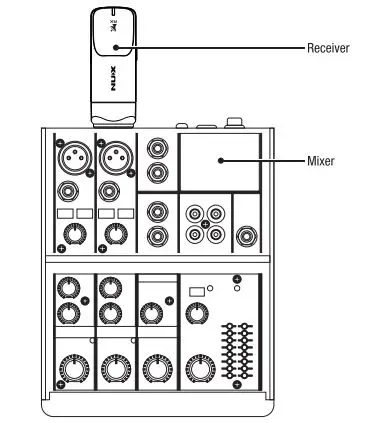
Connect the RX to the unit you want to send the signal (mixer, audio interface, etc.) . Then, enjoy it.
- STORAGE & CHARGING
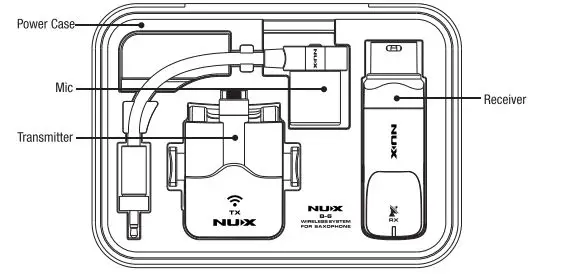
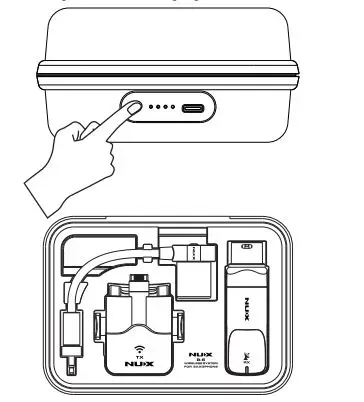
- After the performance is finished, press and hold the POWER/SCENE buttons of TX and RX to turn off TX and RX respectively. Press firmly on the left and right sides of TX to open the clip, remove it from the edge of the bell, and remove the gooseneck microphone from the TX. Unplug the RX from the external device. Finally, put all the components back into the power case according to the following figure.

- Use the B-6’s power case to charge the B-6. After storing TX & RX according to the above picture, lightly press the power button switch on the side of the power case, and the battery indicator light will light up to indicate the activation of the charging function. After the wireless devices are fully charged, the power case charging function will automatically turn off. When only 1 battery indicator light of the power case lights up, please charge the power case in lime.
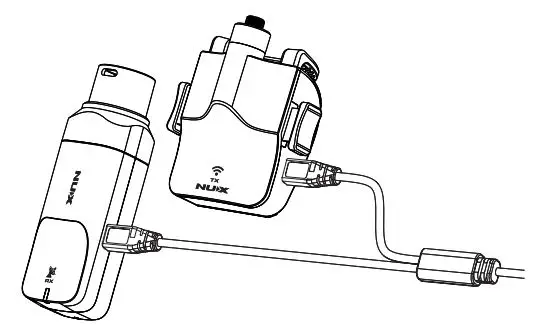
NOTICE: To charge the power case, please make sure that your power adaptor can deliver output of 5V / 1A(or more). - You can also use the attached Type-CY-cable to connect with a 5V/1A(or more) adaptor to charge the TX and RX respectively. When charging, the working status indicators of the wireless devices will show a steady red , and the indicators will automatically turn off after charging. B-6 cannot work when charging.

- After the performance is finished, press and hold the POWER/SCENE buttons of TX and RX to turn off TX and RX respectively. Press firmly on the left and right sides of TX to open the clip, remove it from the edge of the bell, and remove the gooseneck microphone from the TX. Unplug the RX from the external device. Finally, put all the components back into the power case according to the following figure.
- RESET ID MATCH
ID Match- B-6 already sets ID matched before shipping, but if you want to use different TX or RX to get paired, please follow the steps to reset ID match. Turn off the devices, hold the POWER/SCENE buttons on TX and RX for more than 5 seconds, then it will enter to ID match status. When the RX blinks from RED to GREEN, it finishes ID match.
NOTE: Our product uses Li-polymer battery, before using the product, please charge the battery first. When not using for a long period, charge or activate it in 3 months.
Function Introduction
Scene Function
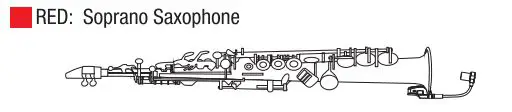
Because different types of saxophone have different frequency response characteristics, we have set up scene functions for the three commonly used saxophone types. You can select scenes according to the type of saxophone to obtain richer sound expression.
After the B-6 is turned on, under normal working conditions, you can short press the POWER/SCENE button on the TX to switch between different scenes to adapt to the type of saxophone. After the wireless devices are turned on and paired, the working status indicators of TX and RX are steady green. This is the default mode: Alto Saxophone.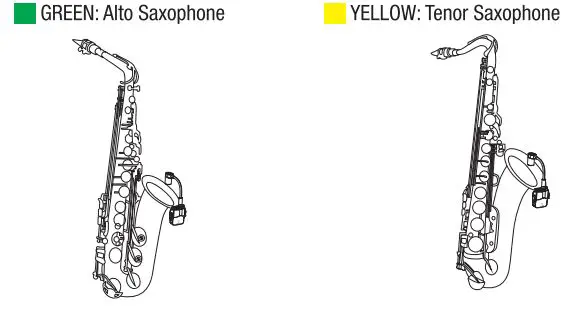
Auto Off Function
If there is no signal for 10 minutes, B-6 TX will turn off automatically to save battery power. When TX is off, after 10 more minutes, RX will also turn off automatically.
NOTE: While you are charging !he device, B-6 will stop working, and go to battery charging. LED shows RED as charging, while it’s fully charged, RED indicator will turn off.
* Recommended: Please stay 2 meters (6 feeij away 1rom the Wi-Fi router for the best performance.
* NUX offers different types of 2.4GHz wireless systems(like guitar wireless, mic wireless, and saxophone wireless), you can use up to 6 systems simultaneously. Please avoid using other wireless systems together with NUX ones, or there may be noise or interference issues.
Specifications
- Frequency Band: 2.4GHz ISM
- Sampling Rate: 24biV44.1 kHz
- Latency:< 4ms
- S/N: 11 OdB (-A-weighted)
- THD + Noise: <0.2% C1 kHz
- TX/RX Battery Run Time: > 4hrs
- Battery Capacity
– TX/RX Battery Capacity: SOOmAh / 3.7V
– Power Case Battery Capacity: 3000mAh I 3. 7V - Dimensions
– Power Case: 153mm(L) x 113mm(W) x 55mm(H)
– TX: 60mm(L) x 53mm(W) x 31 mm(H)
– RX: BOmm(L) x 25mm(W) x 25mm(H) - Weight: 389g
- specifications and features are subject to change without notice.
Acc1111ori111
- Type-C USB Y cable x 1
- Manual


