![]() Feelstorm Technology VB602 Video Baby Monitor
Feelstorm Technology VB602 Video Baby Monitor
User Manual
Installation Instructions
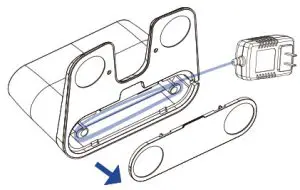
- Handle residual cable.
 Collect residual cable into the cable tray at the bottom. charging dock to prevent it from being pulled and power outage caused thereby.
 - Place the charging dock against a wall, and connect the power supply.
 Notes:
* Do not expose the charging dock to direct sunlight.
* Please ensure a space of at least 0.5m on both the left and right sides of the charging dock, and a space of at least 1.5m in front of it. - Power on and charging
At initial use, long press” “the button for 3 seconds to power on, and manually place the main machine onto the charging dock by aligning the pole piece with the charging electrode. In daily use, you can start intelligent recharging by directly pressing”
 ” a button.
 Tips:
Tips:
* When the main machine fails to power on due to low battery level, place it on the charging dock for charging.
* The main machine will start up automatically after being connected to the charging dock, and cannot be shut down during charging. - To assemble accessories based on different cleaning modes.
Sweeping mode (Please assemble the dust case or two-in-one water tank) Push in place the dust box into the machine horizontally until you hear a click. Tips:
Tips:
* to sweep, either the dust box or the two-in-one water tank is fine.
* Clean the dust box or the two-in-one water tank regularly to avoid stains that bring about ineffective cleaning.
Mopping mode (Please assemble the two-in-one water tank, the mop support, and the mop).
1. Open the rubber cover of the two-in-one water tank; fill the water, tank with water; then close the rubber cover. 2. Push in place the two-in-one water tank into the machine horizont ally until you hear a click.
 3. Attach the wet cloth that has been dried into the duster bracket, and stick the duster to the Velcro.
 Tips:
Tips:
Do not use any detergent. disinfectant or solid cleaning agent on nor fill hot water into the product, which may corrode or damage the integ rated tank. - To assemble accessories based on different cleaning modes.
4. Manually press the clips on both sides of the duster bracket, and push the duster bracket to the bottom of the robot in the indicated direction. Tips:
Tips:
* During mopping, set virtual wall or restricted zone in carpet area.
* Before starting the sweeping/mopping function, be sure to remove any water accumulated on the floor.
* After completion of mopping, immediately remove the integrated tank and mop holder, empty the tank, clean the mop and dry it in the air.
* Do not use the mopping function when nobody is at home. - Use Your Robot with the Shellbot App
To enjoy all available features, it is recommended to control your robot via the Shellbot App.
Before you start, make sure that:
• Your smartphone or tablet is connected to a Wi-Fi network.
• Your smartphone or tablet is running iOS 10.0 (or above) or Android 5.0 (or above).
• The 2.4GHz band wireless signal is enabled on your wireless router.
• The Wi-Fi status light on the robot is slowly flashing blue.
• Robot is attached to the Charging Base to ensure it has enough power during setup. 1. Download the shell bot App from the App Store (iOS devices) or Go ogle Play (Android devices).
2. Open the app and create a user account.
3. Tap the”+” icon in the top right corner to add your robot to your Shellbot account.
4, Follow the instructions in the app to set up the Wi-Fi connection
– After connecting successfully, you can control the robot via the app.
– With the app, you can select a cleaning mode, set the time, schedule a cleaning, view the system status, and access additional features.
 Collect residual cable into the cable tray at the bottom. charging dock to prevent it from being pulled and power outage caused thereby.
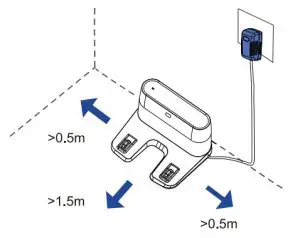 Notes:
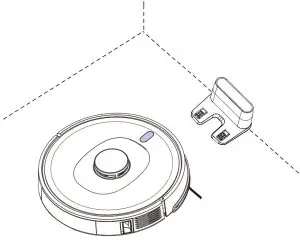 Tips:
Tips: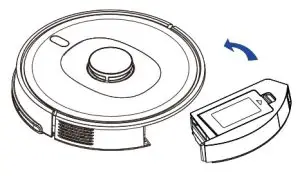 Tips:
Tips: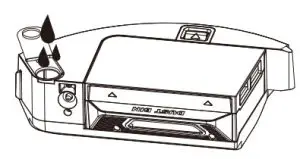 2. Push in place the two-in-one water tank into the machine horizont ally until you hear a click.
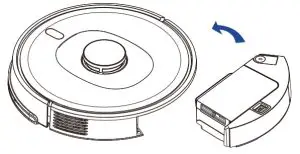 3. Attach the wet cloth that has been dried into the duster bracket, and stick the duster to the Velcro.
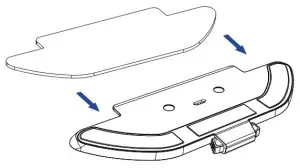 Tips:
Tips: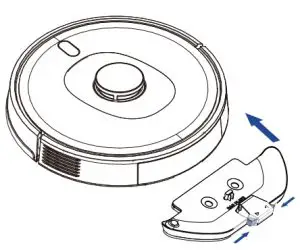 Tips:
Tips: 1. Download the shell bot App from the App Store (iOS devices) or Go ogle Play (Android devices).
Installation Instructions
Wi-Fi Status Light
 | Slowly flashing blue | Waiting for connection |
| Solid blue | Connected to your wireless router |
Restore Factory Settings
Press and hold” ![]() “”
“”![]() ” on RoboVac for 3 seconds to restore factory settings if necessary.
” on RoboVac for 3 seconds to restore factory settings if necessary.
– You will hear a voice prompt when the settings have been reset and the Wi-Fi status light will slowly flash blue. Now you can follow the Wi-Fi instructions in the Shellbot Home app to set up the Wi-Fi conneection.
Schedule Cleaning
With the Shellbot Home app, you can schedule RoboVac to start cleaning at a particular time.
Tips:
You can set the time and customize the cleaning schedules from Sund ay to Saturday on the Shellbot Home app. This function is available in the app only.
Operation Instructions
Power-On/Off
The robot will start up automatically after connecting to the charging dock and it cannot shut down.
Long press “![]() “Button for 3 seconds; the power indicator light com es on, and the robot enters the power-on state.
“Button for 3 seconds; the power indicator light com es on, and the robot enters the power-on state.
When the robot is stationary, long-press the “![]() ” Button for 3 second to shut it down.
” Button for 3 second to shut it down.
Quick mapping
At initial use, no map is stored in App, so you have to place the main machine onto the charging dock, and choose Quick Mapping in the App. The main machine will create a map but not start sweeping. After returning to the charging dock automatically, the main machine will finish mapping and store the map automatically.
Tips:
During mapping, do not move the robot and keep it away from Child and pet Sweeping or mopping In power-on status, short press the button “![]() “, and main unit will active sweeping/mopping mode depending on the accessory mounted.
“, and main unit will active sweeping/mopping mode depending on the accessory mounted.
Pause
When the main machine is in operation, press any button to cease operation; press button “![]() ” to continue sweeping; press button “
” to continue sweeping; press button “![]() ” 11 to return it to charging dock for charging and finish a current sweeping task.
” 11 to return it to charging dock for charging and finish a current sweeping task.
Equipment recharge
In the power-on state, short press” ![]() “button to enter recharge mode When the robot cleaning is finished, it will enter recharge mode auto matically.
“button to enter recharge mode When the robot cleaning is finished, it will enter recharge mode auto matically.
The white button light on the robot blinks.
The main unit will start recharging automatically in case of low battery level during the course of sweeping, and return to the breakout point to proceed with sweeping automatically after the battery is full.
Breakpoint Resume
When proceeding at breakout point is activated, the main machine will search for charging dock for charging in case of low battery level dur ing the course of cleaning, and return to the breakout point to proceed with the previous cleaning task Proceeding at breakout point will be can called if a previous cleaning task is ended manually during charging.
Sleep
Unless during charging, the main machine will go to sleep automati cally when it is left idle for 5 minutes and power off automatically when it has slept for 6 hours. In sleep status, pressing any button will wake the main machine up.
Tips:
The main machine will not go to sleep when charging on the charging do ck.
Refilling tank or cleaning mop half-way
To refill tank or clean mop during the course of sweeping/mopping press any button to cease it and remove and refill the tank or remove and clean the mop, and re-mount it after completion and short press the button “![]() ” to proceed with the previous task.
” to proceed with the previous task.
Operation Instructions
Model/level selection
In-App, you can choose various cleaning modes and water flow rates.
Non-Disturbance Mode
When the non-disturbance mode is activated, proceeding at the breakout point, scheduled cleaning and active voice reporting are unavailable in the main unit. Non-disturbance mode is activated by default during the period from 22:00 to 7:00. The non-disturbance mode can be deactivated in App.
Global cleaning
When no map is stored, if global cleaning is chosen, the main machine will start cleaning each zone by a square area of 6mx6m. When any map is stored, if global cleaning is chosen, the main machine will start cleaning each room along the planned route. Upon completion of cleaning, the main machine will return to the charging dock.
Memory map
When the memory map is activated in App, the main machine will save and update the map after finishing the cleaning task and recharging. After a map is completed successfully, you can split or merge zones or name any room in the App.
Edge Cleaning
When choosing edge cleaning in the App, the main machine will auto matically recognize a range of the area to clean, start cleaning al on edge and return to the charging dock automatically after finishing cleaning.
Specified-area cleaning
When an area to be cleaned is defined in App, the main machine will clean the defined area.
Tips: During cleaning, the main machine may go beyond a defined area, so be sure to remove any obstacle on the floor within the defined area since the definition of any area will not ensure safe separation.
Fixed-point cleaning
When choosing fixed-point cleaning and choosing a target point in App, the main machine will route the cleaning task and start cleaning within a rectangular area of 2m x 2m based on the target position defined in the map in the App.
Scheduled cleaning
Users can schedule a cleaning task in App, and ma in the machine will start the cleaning task as scheduled and return to the charging dock upon the end of the task.
Tips: Any scheduled cleaning task will not be executed during the time when the non-disturbance mode is activated.
Constituency cleaning
The user may select one or more rooms in the selected section, and then the machine will go to the section and start cleaning.
Virtual Wall/ Restricted Area
Users can define virtual wall/ restricted area in App which main mach ine will avoid cleaning.
Tips: Before using this function, you have to store a map in the App.
Moving the main machine or change of indoor environment may caus e the original map lost and any virtual wall/ restricted area unavailable.
Product Maintenance
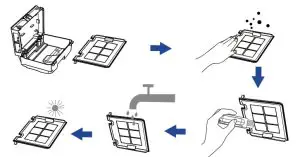
Two-in-one water tank
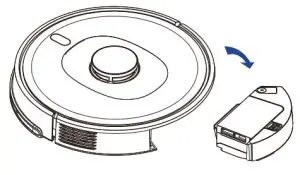
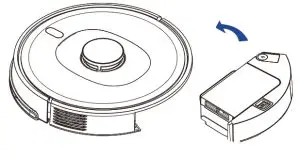
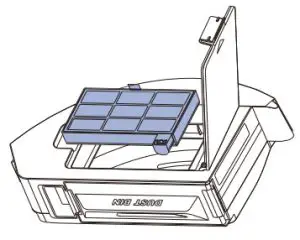
- Take out the two-in-one water tank from the robot, as shown in the figure.

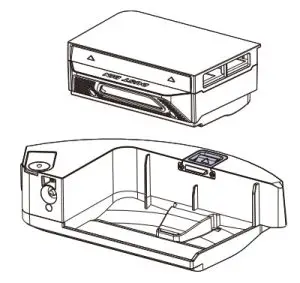
- Detach dust collector and tank.

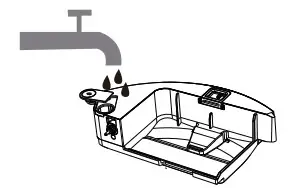
- Clean the water tank.
(1) Pull out the plug and pour water into the tank. (2) Shake the tank gently after pushing the plug into the hole.
 (3) Follow the picture to quickly pour the remaining water out of the tank.
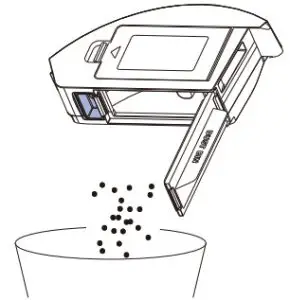
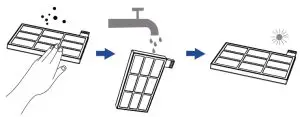
- First, uncover the dust collector, remove the filter components and dump trash out of the dust collector.
 Two-in-one water tank
 - Clean the dust collector with a cleaning brush.

- Pull up and tap the filter net. It can be washed in clean water. Please remember to put it back after it dries.

- Re-cover the dust collector and couple it to the tank.

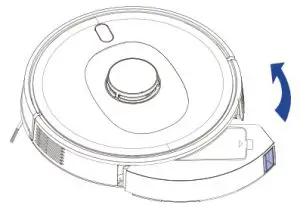
- Put the integrated water tank back into the main machine and fasten the handle.
 (2) Shake the tank gently after pushing the plug into the hole.
 (3) Follow the picture to quickly pour the remaining water out of the tank.
 Two-in-one water tank
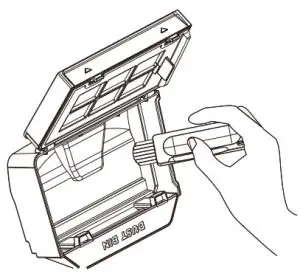
Product Maintenance
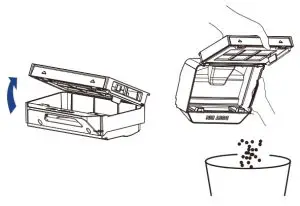
Dust tank
- Take out the dust tank.

- Open the cover of the dust tank and dump the garbage.

- Open the upper filter cap and take out the filter net.

- Wash repeatedly the filter net and tap the dust off it until it is clean. Then, dry the net completely and put it back for use.

- Put the dust tank back into the mainframe and fasten it.Tips:
* Only use the filter component when it is completely dry.
* It is critically prohibited to touch the filter net with fingernails, brushes, or any sharp stuff. Otherwise, the filter net is damaged.
 Tips:
Tips:Duster component
Clean the washable mop cloth
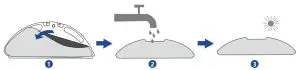
- Take the mop cloth off the mop supporter.
- Wash the mop cloth. (Caution: NEITHER strongly acidic NOR strongly alkaline detergent is allowed to use.)
- Dry the mop cloth.
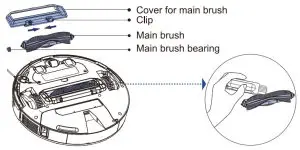
Main Brush
- Turn over the robot, lift the clip, remove the cover for the middle motor.
- Take out the rolling brush upwards and clean the main brush bearing.
- Use tools to clean the rolling brush.
- Replace the main brush and install the cover properly with the fastener clip.
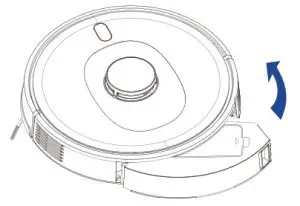
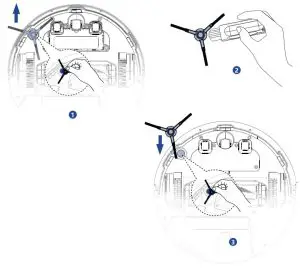
Side brush
- Reverse the machine and pull the side brush upwards.
- Take off and clean it with the cleaning brush.
- Put the side brush back.
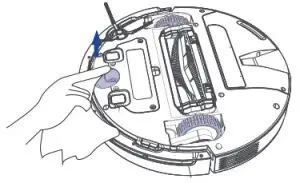
Main wheels
Clean the main wheels with a soft dry cloth or the cleaning brush.
Swivel wheel
Wipe swivel wheel with a soft dry cloth, or pull up and take them out to for a complete clean.
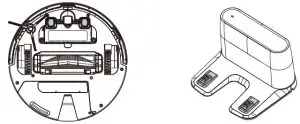
Charging Dock
Wipe the charging dock with a soft dry cloth.
Electrodes
Wipe the charger connector pins and battery pieces with a soft,clean cloth.
Caution: inside electrodes, there are sensitive electronic components.
So, when cleaning, please use a dry cloth. Do not use a wet cloth, or else electrodes may be damaged.
Optical sensor
The main machine contains three precision optical sensors: a 3D ToF sensor, visual recognition sensor, and an edge IR sensor. Be sure to clean these sensors with soft and dust-free cloth to remove any dirt or dust on them, which, if accumulating heavily, may impair the intelligent obstacle avoidance performance of the main machine.
3D ToF sensor and visual recognition season
![]() Tips: Do not use any detergent or chemical spray to clean the main machine.
Tips: Do not use any detergent or chemical spray to clean the main machine.
Boundary sensor
Clean the boundary sensor regularly with a soft cloth.
Common Problems
| Problem | Solution |
| Unable to power on | 1. The battery is low, please charge it before using. 2. The ambient temperature is too low(below 0°C) or too high(above 40°C). |
| Robot fails to start sweeping | Low battery level. Charge it to full battery level. |
| The robot cannot return for charging | 1. Too many barriers around the charging dock. Place charging dock in an unblocked area. 2. Robot is too far from the charging dock. Place robot near charging dock and try again. |
| Abnormal robot actions | Please shut down and restart the robot. |
| Abnormal sound during cleaning | Please check and clean the foreign matters on the main brush, side brush, left/right wheel after the machine is turned OFF. |
| Cleaning performance deteriorates or dust drops. | 1. Dust collector is full. Please empty the collector. 2. Filter screen is blocked. Please clean the screen. 3. Robot is blocked by any foreign object. Please clean the main brush. |
| Robot is offine | 1. Weak Wi-Fi signals. Make sure robot is in proper coverage of Wi-Fi signals. 2. Wi-Fi connection fails. Reset Wi-Fi connection and download the latest App and try again. |
| Robot fails to proceed at breakout point | 1. Make sure non-disturbance mode is not activated, which will disable proceeding at breakout point. 2. Proceeding at breakout point is unavailable when manually start recharging by performing operations in the App or short pressing recharging button, or robot is charging. |
| Unable to charge | Make sure there is sufficient spaces around the charging dock, and there is no dust or blockage on the surface of the electrode of the charging dock. |
| Fail to do scheduled cleaning | 1. Make sure the equipment has been connected to the network, as disconnection from the network will fail sync and scheduled cleaning task. 2. Make sure non-disturbance mode is not activated, which will deactivate scheduled cleaning. |
| The robot is always offline | Please ensure that the robot network configuration is successful and that the robot is always within the coverage of the Wi-Fi signal. |
| Robot fails to connect to APP | Ensure that the robot and the charging dock are in the area with a good Wi-Fi signal; reset Wi-Fi according to the steps described in the Instruction Manual; then pair again. |
Troubleshooting
| Common Problems | Solution |
| Make sure the laser ranging sensor is not blocked. |
|
| Clean boundary sensor and relocate robot. |
|
| Check the collision sensor and remove any foreign object on it. |
|
| Place the robot on horizontal ground and start it. |
|
| Make sure that the dust collector is mounted in place. |
|
| Remove any obstacle around the robot and try again. |
|
| Common Problems | Solution |
| Please clean the edge IR sensor. |
|
| Make sure that the visual recognition sensor is not blocked. |
|
| Make sure that the integrated tank is mounted properly. |
|
| Make sure that the mop is mounted in place. |
|
| Place robot back to charging dock. |
|
| Low battery level. Please charge the robot. |
|
Wi-Fi Connection
Before Wi-Fi setup, make sure the robot and your Wi-Fi network meet the following requirements.
Wi-Fi Setup Requirements
- Robot:
– Robot is fully charged.
– The Wi-Fi status light slowly flashes blue. - Wi-Fi Network:
– Use the correct password for your network
– Do not use a VPN (Virtual Private Network) or Proxy Server.
– Your Wi-Fi router supports 802.11b/g/n and 1Pv4 protocol.
– You are using a 2.4GHz router or a dual-band router that is configured to support a 2.4GHz frequency band. The robot does not support the 5GHz frequency band.
– If a robot cannot connect to the Wi-Fi network and you are using a 2.4/5GHz mixed network, switch to a 2.4GHz network for Wi-Fi setup. You can switch back once your setup is complete.
– When connecting to a hidden network, make sure you enter the correct network name, SSID (case sensitive), and connect ing to a 2.4GHz wireless network.
-When using a network extender/repeater, make sure the net work name (SSID) and password are the same as your primary network.
– The firewall and port settings of your Wi-Fi router allow robot to connect with the shell bot servers. - Network Security Requirement:
-WPA and WPA2 using TKIP PSK. AES/CCMP encryption.
The malfunction of Wifi
- Incorrect is the router’s username and password.
- Configure the router’s network to ensure the router’s correct username and password.
- The host is beyond the network signal coverage of the router.
- Make sure that the host is within the network signal coverage of the router.
- The host is not in the to-be-configured status.
- Only in the to-be-configured status can the network of the host be configured. First, connect the host with electricity. Then, pre ss and hold the power button and the recharge button. When the user hears the beep, the host is poised for configuration
- The 2.4G network is not in use.
- The host does not support the 5G network at the moment. Please connect the 2.4G network for configuration.


