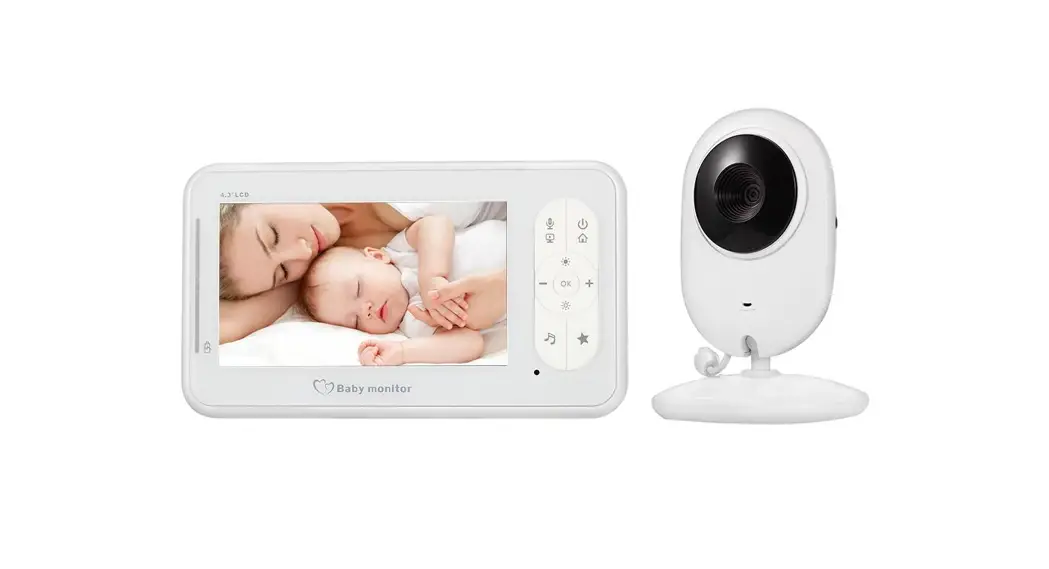
VB608 – Video Baby Monitor
User Manual

![]()
Ver.1.1
WELCOME…
to your new digital Baby Monitor!
Thank you for purchasing the product. Now you can see and hear your baby sleeping in the other room or you can monitor your older children in their playroom.
This User’s Guide provides you with all the information you need to get the most from your product.
Before you can use the baby monitor, we recommend you insert and fully charge the battery in the parent unit, so that it continues to work if you disconnect it from the mains power to carry it to another location. Please read the Safety Instructions before you install the units.
Got everything?
1 x Parent Unit
1 x Baby Unit
2 x Power adapter
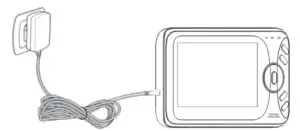
Overview of your Baby Monitor
Parent Unit:
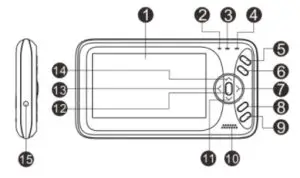
| 1. Lcd display 2. Microphone 3. Power indicating led 4. Signal indicating led 5. PTT key 6. Music play a control key 7. Backlight + key / Right key 8. VOX key | 9. Power key / Return key 10. Speaker 11. Volume – key / Down key 12. Menu / OK key 13. Backlight – key / Left key 14. Volume + key / Up key 15. Power adapter connector |
Baby Unit:
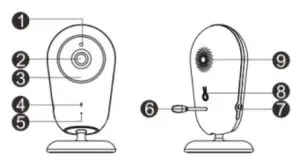
- Light Sensor
- Camera Lens
- Infrared LEDS
- Power LED
- Microphone
- Temperature Sensor
- Power adapter connector
- Pair key
- Speaker
Safety Instructions
WARNING
This baby monitor is compliant with all relevant standards regarding electromagnetic fields and is, when handled as described in the User’s Manual, safe to use.
Therefore, always read the instructions in this User’s
Manual carefully before using the device.
- Adult assembly is required. Keep small parts away from children when assembling.
- This product is not a toy. Do not allow children to play with it.
- This baby monitor is not a substitute for responsible adult supervision.
- Do not place the baby unit or cables in the cot or within arm’s reach of the baby (at least 1 meter away).
- Keep the cords out of reach of children.
- Do not use the baby monitor near water or a heat source
- Only use the power adapters provided.
- Do not touch the plug contacts with sharp or metal objects.
Getting started
Baby unit power supply
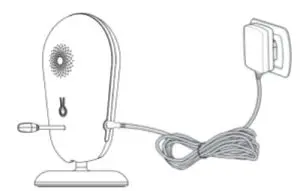
- Connect the small plug of the power adapter to the baby unit and the other end to the main socket.
NOTE: Only use the power adapter provided - A blue light led will display indicate the baby unit is working
Parent unit power supply
Charging the parent unit fully before use is recommended.
This will allow the unit to operate on battery in the event of a power failure.
- Connect the plug of the power adapter to the parent unit and the other end to the mains socket
NOTE: Only use the power adapter provided - The power indicating LED will illuminate, which means the battery start charging.
- Press the power key and hold the key for at least 3 seconds to turn on the parent unit.
Using the Baby Monitor
Setting up
Place the baby unit in a convenient location (e.g. on a table) and point the camera lens towards the area you want to monitor. Adjust the baby unit until you are satisfied with the image in the parent unit.
 NOTE
NOTE
Do not place the baby unit within the baby’s reach! If there is interference on the picture or sound, try moving the units to different locations, and ensure they are not close to other electrical equipment.
Pairing camera
The enclosed baby unit has already been registered, You do not need to register it again unless the baby unit loses its link with the parent unit. See section “5.2 Camera
Registration” for more details.
Night vision
The baby unit has 6 high-intensity infrared LEDs for picking up clear images in the dark.
music player
Press and hold music key will turn on the music player and play lullaby through the baby unit; press the music key again will turn off it.
Talk function
Press and hold the PTT key on the parent unit to talk to your baby through the baby unit loudspeaker. The symbol will be displayed in the middle of the screen.
Adjusting the volume
When the video is connecting successfully and in the monitoring interface, press the “down” key to decrease the volume or the “up” key to increase volume. The display will show the current volume for 3 seconds.
Adjusting the backlight
When the video is connecting successfully and in the monitoring interface, press the “left” key to decrease the backlight or the “right” key to increase the backlight. The display will show the current backlight for 3 seconds.
VOX function
When the video is connecting successfully and in the monitoring interface, press the VOX key to choose the VOX working mode quickly.
Power saving mode
When the video is connecting successfully and in the monitoring interface, press the Return/Power key to choose the power saving mode and then the screen will close. press any key to exit power-saving mode.
Monitoring Screen Icons
![]()
- Signal strength indicator
- The temperature of the baby’s room
- Lullaby is playing
- Vox function activated
- Alarm activated
- Battery indicator
- Date and time
- Backlight brightness bar
- Volume level bar
- PTT function activated
Press the “Menu/OK” key at monitoring screen will enter the main menu, It contains 6 items :
- Camera
- Alarm
- Settings
- VOX
- Language
- Time and date
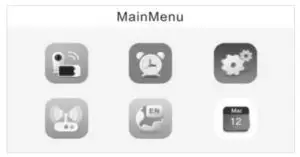
You can press the “up/down” key or “left/right” key to move the cursor to select an item and press the “Menu/OK” key will enter the sub-menu which you selected. Press return” key will back to monitoring screen.
Camera Registration
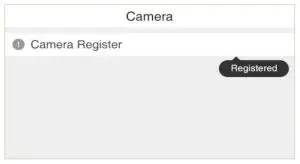
Press the “Menu/OK” key to the entry registering screen, Press the “Menu/OK” key again will prompt “Re-Register
Camera?”, then push the pairing key on the back of the baby unit within 10 seconds.
Alarm
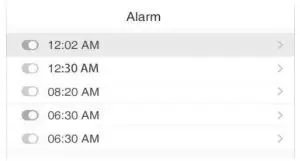
Press the “Menu/OK” key to choose an item, the“up/down” Key to move the cursor and then the “Menu/OK” key to confirm the value. Press the “Return” key will back to the previous menu.
Settings
Theme
Switch theme to Light elegant or Dark elegant.
Temperature unit
Switch the unit to Celsius or Fahrenheit
Anti-flicker
You are able to adjust the frequency of 50 / 60 Hz to suit your lighting for anti-flicker
LCD backlight
You are able to adjust the brightness of the LCD you are viewing and the LCD backlight active time in menu operation.
System Info
There are contains system information such as software version, hardware version, build date, etc.
VOX
System mode
This menu allows you to choose the working mode from the following: Normal mode / VOX mode.
VOX Sensitivity
Switch the Vox sensitivity at Low / Medium / High Level.
Language
The language setting menu allows you to choose your language from the following :
English/ Francais/Espanol/Portugues/Italiano/Deutsch/Turkce /русский
Time and date
There are contains 2 items on this menu
- Set time / date

- Set format

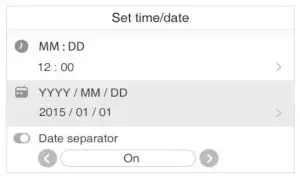
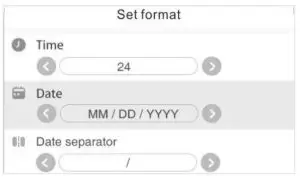
Press “Menu/OK” key to choose an item, the” up/down” key to move the cursor, and the “left/right” key to change value.
TECHNICAL FEATURES
– Frequency: 2.4 GHz Digital
– Modulation Mode: GFSK
– Operating temperature: -10 to +45°C
– Operating Humidity: <85%
– Range: 260m in an open field
Monitor
– LCD: 4.3” TFT LCD
– Resolution: 480 x 272 pixel
– Battery: Li-Polymer 1760mAh
– Dimensions (W x H x D): 82.5X151.6X19.5 mm
Camera
– Sensor: CMOS
– Minimum Illumination: 0Lux ( IR on)
– Night Vision Distance: 15ft ( 5m)
– Lighting sensor
– Temperature sensor
– Dimensions (W x H x D): 62.5 X115 X 62.5 m
FCC Statement
Changes or modifications not expressly approved by the party responsible for compliance could void the user’s authority to operate the equipment. This equipment has been tested and found to comply with the limits for a Class B digital device, pursuant to Part 15 of the FCC Rules. These limits are designed to provide reasonable protection against harmful interference in a residential installation. This equipment generates uses and can radiate radio frequency energy and, if not installed and used in accordance with the instructions, may cause harmful interference to radio communications. However, there is no guarantee that interference will not occur in a particular installation. If this equipment does cause harmful interference to radio or television reception, which can be determined by turning the equipment off and on, the user is encouraged to try to correct the interference by one or more of the following measures:
— Reorient or relocate the receiving antenna.
— Increase the separation between the equipment and receiver.
— Connect the equipment into an outlet on a circuit different from that to which the receiver is connected.
— Consult the dealer or an experienced radio/TV technician for help.
Operation is subject to the following two conditions:
(1) this device may not cause harmful interference;
(2) this device must accept any interference received, including interference that may cause undesired operation;
This equipment complies with FCC radiation exposure limits set forth for an uncontrolled environment. This equipment should be installed and operated with a minimum distance of 20cm between the radiator & your body.


