
![]() Astral Remote Alarm II
Astral Remote Alarm II
User Guide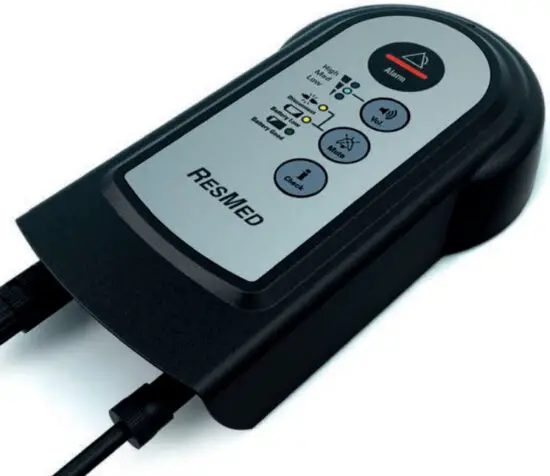
Respiratory Care Solutions
Making quality of care easy
 |  |
The ResMed Remote Alarm II (Remote Alarm) has been designed for use with Astral and Stellar ventilators.
Read the entire manual before using the Remote Alarm.
Intended use
The Remote Alarm is intended for home and hospital use. Its primary purpose is to alert the caregiver of a ventilation patient to an alarm condition on the ventilator even when the caregiver is not at the bedside or in the same room with the patient and ventilator.
The Remote Alarm generates an audible and visual signal when an alarm is triggered on the ventilator. The Remote Alarm is powered by a battery and connected to the ventilator via a cable.
![]() WARNINGS
WARNINGS
- The Remote Alarm must only be used for its intended use as described in this manual.
- Do not disassemble the Remote Alarm, it has no user-serviceable parts inside; if damaged or defective, it should be returned to your ResMed representative.
- Explosion hazard—do not use in the vicinity of flammable anesthetics.
- Ensure the remote alarm is placed in a clearly visible location on a flat surface or attached to a wall using the wall bracket provided.
Note:
- The Remote Alarm is not intended for mobile use, such as with a wheelchair.
- Refer to the ventilator’s manual for its indications for use.
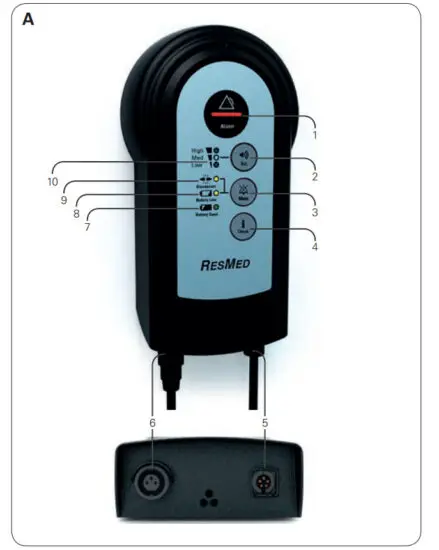
Remote alarm at a glance
Refer to illustration A
- Alarm indicator
- Volume control button
- Remote Alarm mute button
- Test button
- Output connector (5 pins)
- Input connector (3 pins)
- Good battery indicator
- Low battery indicator
- Alarm disconnect indicator
- Volume level indicator
The ResMed Remote Alarm II comprises the following components:
- Remote Alarm
- Wall bracket.
Available separately:
- 6.56 ft, 16.40 ft, 32.80 ft, and 65.62 ft (2m, 5m, 10m, and 20m) alarm cable.
Optional accessory:
- 98.43 ft (30 m) Hospital Alarm system cable
For a full list of accessories see the Ventilation accessories guide on www.resmed.com on the Products page under Service and Support. If you do not have internet access, please contact your ResMed representative.
Set up
Installing batteries before use
Refer to illustration B
- Open the battery cover at the rear of the Remote Alarm by pushing in the latch and levering the cover away.
- Insert two AA 1.5V batteries (not included).
- Replace the battery cover, ensuring that it clicks into place. A beep will sound once the batteries are inserted.
- Press
 to check the functionality of the alarm. Refer to the Testing the Remote Alarm instructions.
Note: Under normal usage conditions, new high-quality type LR6 (AA-size) batteries should power the Remote Alarm for approximately 12 weeks.
Connecting to the ventilator
Refer to illustration C
- Connect one end of the alarm cable to the (3 pins) input connector on the Remote Alarm.
- Connect the other end to the (5 pins) output connector located at the rear of the ventilator. Once connected, the alarm will beep and the Green Battery Good LED will blink once every 10 seconds.
- Once set up is complete, press to check the functionality of the Remote Alarm. Refer to the Testing the Remote Alam instructions.
![]() CAUTION
CAUTION
The Remote Alarm cable is equipped with a push-pull locking connector. To remove the cable from the ventilator, gently pull on the connector. Do not twist its outer housing.
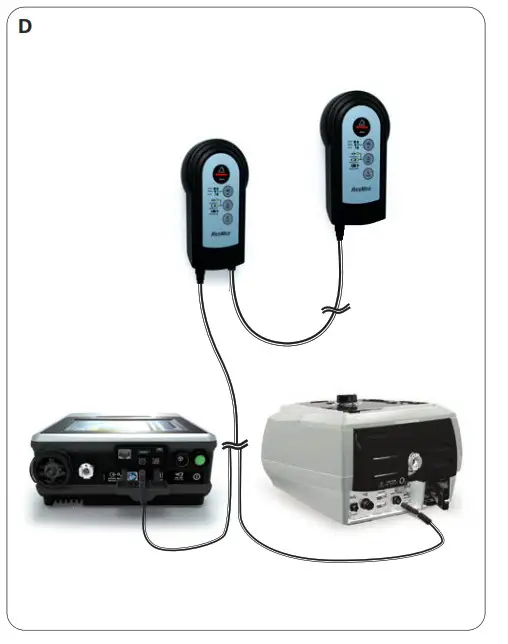
Connecting a second Remote Alarm
Refer to illustration D
If required, a second Remote Alarm can be attached to the first Remote Alarm to enable a Remote Alarm to be placed in two separate rooms or locations.
- Connect the Remote Alarm as per the instructions in Connecting to the ventilator.
- Connect one end of the alarm cable to the output connector (5 pins) of the first Remote Alarm.
- Connect the other end to the input connector (3 pins) on the second Remote Alarm.
- Once set up is complete, press on the first alarm to check the connection is correct and the second alarm is receiving the signal.
- Press to check the functionality of the second Remote Alarm. Refer to the Testing the Remote Alarm instructions.
Connecting to a Hospital Alarm System
Ventilators can also be connected to a Hospital Alarm System via the Remote Alarm.
- Connect the Remote Alarm as per the setup instructions in Connecting to the Ventilator.
- Connect one end of the 98.43 ft (30 m) Hospital Alarm system cable to the output connector (5 pins) of the remote alarm.
- Connect the other end to the Hospital Alarm Management system. (Refer to the instructions provided with the cable).
- Once set up is complete, press to check the functionality of the Remote Alarm and confirm that the alarm is heard through the Hospital Alarm Management system.
Alarm types for the Remote Alarm
Different types of alarms can be generated on the Remote Alarm. All alarms are indicated by an audible and visual signal.
Ventilator alarms
The Remote Alarm’s main purpose is to relay alarm conditions on the ventilator. The ventilator alarms on the Remote Alarm alert the caregiver that an alarm has been triggered by the Ventilator and therefore must be addressed on the Ventilator itself, not by interacting with the Remote Alarm unit.
When a ventilator alarm is activated:
- Check the patient’s status.
- View the alarm message in the Alarm display on the Ventilation device.
- Follow the on-screen help (if available) or refer to the Alarm Troubleshooting section in the User Guide that came with your Ventilation device.
Remote Alarm alarms
- Low Battery Alarm
This alarm alerts the caregiver that the batteries of the Remote Alarm are low. The batteries need to be replaced. - Disconnect alarm
This alarm alerts the caregiver that the Remote Alarm has been disconnected from the Ventilator.
Check the patient and ventilator prior to looking for the source of the disconnect.
Note: For further information regarding alarm types and indicators refer to the Indicators and alerts section in this Guide.
Indicators and alerts
The Remote Alarm provides the following indicators and buttons.
| LED indicators | Indicated by | Status |
| Audible alert and Red flashing alarm bar. | An alarm has been activated on the ventilator. | |
| Blue solid LED | Indicates current alarm volume level. | |
| Audible alert and Yellow blinking LED. | • The Remote Alarm has been disconnected from the ventilator. • The LED will continue to blink until the situation has been resolved. | |
| The audible alert and Yellow LED – will blink once every 10 seconds. | • The Remote Alarm battery is low. • The LED will continue to blink until the situation has 0been resolved. • The audible alarm can be 0muted but will sound every 4 hours until the battery is replaced. | |
| Green LED – will blink once every 10 seconds | The Remote Alarm battery is good. |
| Alarm button | ||
| Volume level button | Press until desired volume level is achieved. Refer to Setting the volume instructions. | |
| Remote Alarm mute button | • Press the Remote Alarm mute to silence the alarm generated for a Low Battery alert. • Pressing the Remote Alarm mute during a disconnect will put the Remote Alarm into a power-saving mode. | |
| Remote Alarm self-test. | Press and hold to test the functionality of the Remote Alarm. | |
Testing the Remote Alarm
![]() CAUTION
CAUTION
A test of the remote alarm should be performed prior to initial use and after every change of battery. Test the alarm periodically as per the facility policy.
Press![]() on the Remote Alarm. The following will occur:
on the Remote Alarm. The following will occur:
- The alarm LED illuminates and the alarm sounds.
- The LED corresponding to the set volume illuminates.
- The Disconnect LED blinks if the alarm is not connected to the device and lights permanently if connected.
- The battery level LED corresponding to the battery level illuminates. Yellow LED if battery life is low, or green LED if battery life is good. (Replace the battery if the battery life is low).
- If a second Remote Alarm is connected, the second Remote Alarm will also sound.
Setting the volume
![]() WARNING
WARNING
When adjusting alarm volume, ensure that the alarm can be heard above ambient noise levels.
A choice of three-volume levels for the alarm can be selected.
The default setting is the highest level, intended for use in noisy environments. A short press will show the current volume level.
To adjust the volume level:
Press and hold the![]() for one second. The alarm will beep and the blue volume LEDs will blink to indicate the volume level can be changed.
for one second. The alarm will beep and the blue volume LEDs will blink to indicate the volume level can be changed.
Press![]() until you reach your desired volume level (low, medium, or high).
until you reach your desired volume level (low, medium, or high).
After 10 seconds of inactivity, the blue volume LEDs will stop blinking and the volume level will be saved.
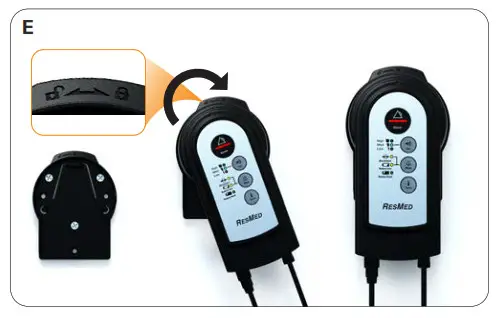
Wall mounting the Remote Alarm
Refer to illustration E
Two types of screws can be used to affix the bracket to the wall.
A minimum of three screws (not included) is required.
![]() WARNINGS
WARNINGS
- Ensure the wall bracket is securely fixed in place.
- Ensure the wall bracket is located in an area that will not be affected by moisture.
- When affixed to the wall bracket, ensure the Remote Alarm cord does not pose a tripping or choking hazard.
1. Align the rear of the Remote Alarm with the guide-line on the face plate of the wall bracket.
2. Holding the Remote Alarm against the bracket, turn the Remote Alarm from to
to position (as shown on the top of the wall bracket) so that the side of the Remote Alarm sits
flush against the bracket and is held securely.
3. To remove from the wall bracket, turn the Remote Alarm from to unlock position and remove.
Cleaning and maintenance
The Remote Alarm can be cleaned using an anti-bacterial cleaning solution such as Mikrozid® AF or CaviCide® on a clean, non-dyed disposable cloth. For a full list of approved cleaning solutions, refer to the Technical Specifications section.
Troubleshooting
| Problem/possible cause | Solution |
| The LED does not turn on when connected to the ventilator or when the Self-test button is pressed. | |
| Batteries may not be inserted or may be flat | Check that two AA batteries are inserted correctly in the rear of the alarm. If necessary, change the batteries. If the problem persists, contact your ResMed service agent. |
| The Remote Alarm detects a disconnect while the cable is connected. | |
| Poor connection | Change the cable. If the problem persists, change the Remote Alarm. |
| The Remote Alarm detects a disconnect while an alarm is raised on the ventilator. | |
| Poor connection | Change the cable. If the problem persists, change the Remote Alarm. |
| The second Remote Alarm is sounding an alarm with no alarm raised on the ventilator. | |
| Poor connection. | Check that the connecting cable is firmly plugged into the first Remote Alarm and the rear of the ventilator. If the problem persists, contact your ResMed service agent. |
| The Remote Alarm triggers a low battery alarm. | |
| Batteries are flat. | Change the batteries. |
Technical specifications
| Operating temperature | +32°F to 104°F (0°C to +40°C) |
| Operating humidity | 10% to 95% non-condensing |
| Operating altitude | Sea level to 10,000 ft (3,050 m). |
| Storage and transport temperature | -22°F to 158°F (-30°C to +70°C) |
| Storage and transport humidity | 10% to 95% non-condensing |
| Electromagnetic compatibility | This product complies with all applicable electromagnetic compatibility requirements (EMC) according to IEC60601-1-2:2007, for residential, commercial, and light industry environments. The electromagnetic compatibility tables for these ResMed devices can be found on www.resmed.com, on the Products page under Service & Support. Click on the PDF file for your device. |
| Output volume | 55-90 dBa (as per ISO 3744:2010) |
| IEC 60601-1-11:2010 classification | Transit operable equipment. |
| Nominal dimensions (L x W x H) | 5.70” x 3.15” x 1.22” (145 mm x 80 mm x 31 mm) |
| Power supply | Two AA 1.5V Batteries (LR6 – Alkaline or FR6 – Lithium) |
| Weight | 4.06 oz (115 g) Remote Alarm only (without battery) |
| Housing construction | Flame retardant engineering thermoplastic |
| Cleaning solutions | The following cleaners and disinfectants are compatible for use when cleaning the external surfaces of the Remote Alarm. • Cavicide® • Mikrozid ® AF • dilute Hypochlorite • Isopropyl alcohol • Teepol Multipurpose detergent and Actichlor Plus • Bleach (1:10) Always follow the manufacturer’s recommended cleaning instructions. |
| Compatible devices | The Remote Alarm II is compatible with the following ResMed devices: • Astral series of ventilators • Stellar series of ventilators |
Symbols
The following symbols may appear on your product or packaging.
![]() Indicates a Warning or Caution. A warning alerts you to possible injury or explains special measures for the safe and effective use of the product; a caution alerts you to possible damage to the product;
Indicates a Warning or Caution. A warning alerts you to possible injury or explains special measures for the safe and effective use of the product; a caution alerts you to possible damage to the product; ![]() Read instructions before use;
Read instructions before use; ![]() Keep away from rain;
Keep away from rain; ![]() Drip-proof;
Drip-proof; ![]() Temperature limitation;
Temperature limitation; ![]() Humidity limitation;
Humidity limitation; ![]() Class II equipment;
Class II equipment; ![]() Manufacturer;
Manufacturer; ![]() European authorized representative;
European authorized representative; ![]() European RoHS;
European RoHS; ![]() Canadian Standards Association;
Canadian Standards Association; ![]() Battery charge level;
Battery charge level; ![]() Alarm mute;
Alarm mute; ![]() Batch code;
Batch code; ![]() Catalogue number;
Catalogue number; ![]() Serial number;
Serial number; ![]() Unlock;
Unlock; ![]() Lock; Prescription-only (In the US, Federal law restricts these devices to sale by or on the order of a physician).
Lock; Prescription-only (In the US, Federal law restricts these devices to sale by or on the order of a physician).
Storage
Ensure that the Remote Alarm is clean and dry before storing it for any length of time. Remove the batteries from the Remote Alarm before storing. Store your Remote Alarm in a dry place out of direct sunlight.
Disposal
The Remote Alarm should be disposed of in accordance with local environmental regulations.
Servicing
This device is intended to provide safe and reliable operation when operated in accordance with the instructions provided by ResMed. ResMed recommends that the device be inspected by an authorized ResMed Service Center if there is any sign of wear or concern with device function.
Limited warranty
ResMed Pty Ltd (hereafter ’ResMed’) warrants that your ResMed product shall be free from defects in material and workmanship for a period of 12 months from the date of purchase by the initial consumer. This warranty is not transferable.
If the product fails under conditions of normal use, ResMed will repair or replace, at its option, the defective product or any of its components.
This limited warranty does not cover: a) any damage caused as a result of improper use, abuse, modification, or alteration of the product; b) repairs carried out by any service organization that has not been expressly authorized by ResMed to perform such repairs; c) any damage or contamination due to cigarette, pipe, cigar or other smoke; d) any damage caused by water being spilled on or into the product.
Warranty is void on products sold, or resold, outside the region of original purchase.
Warranty claims on defective products must be made by the initial consumer at the point of purchase.
This warranty is in lieu of all other express or implied warranties, including any implied warranty of merchantability or fitness for a particular purpose. Some regions or states do not allow limitations on how long an implied warranty lasts, so the above limitation may not apply to you.
ResMed shall not be responsible for any incidental or consequential damages claimed to have occurred as a result of the sale, installation or use of any ResMed product. Some
regions or states do not allow the exclusion or limitation of incidental or consequential damages, so the above limitation may not apply to you.
This warranty gives you specific legal rights, and you may also have other rights which vary from region to region. For further information on your warranty rights, contact your local ResMed dealer or ResMed office.
278632/1 2021-01
Remote Alarm II
USER
AMER MUL
Respiratory Care Solutions
Making quality of care easy
![]() Manufacturer: ResMed Pty Ltd
Manufacturer: ResMed Pty Ltd
1 Elizabeth Macarthur Drive Bella Vista NSW 2153 Australia.
See www.resmed.com for other ResMed locations worldwide.
Astral and Stellar are trademarks and/or registered trademarks of the ResMed
family of companies. For patent and other intellectual property information,
see www.resmed.com/ip


