![]() THZ00011 Wall Light
THZ00011 Wall Light
Instruction Manual
SAFETY PRECAUllONS:
- TURN OFF THE ELECTRICAL POWER BEFORE STARTING THE INSTALLATION OF THE LIGHT FIXTURE.
- IRING SUPPLIES AS REQUIRED BY LOCAL ELECTRICAL CODE.
- THIS PRODUCT MUST BE INSTALLED IN ACCORDANCE MTH THE APPLICABLE INSTALLATION CODE BY A PERSON FAMILIAR WITH THE CONSTRUCTION AND OPERATION OF THE PRODUCT AND THE HAZARDS INVOLVED.
- TO CLEAN THE Fl XllJRE, llJRN OFF THE POWER, WAIT FOR IT TO COOL, AND M PE THE Fl XTURE MTH A CLEAN, SOFT CLOTH. NEVER SPRAY CLEANER DIRECTLY ONTO THE Fl XIIJRE.
NOTE: The product may not look exactly as shown in the figures.
CAUTION: Inspect the wire insulation for any cuts, abrasions, or exposed copper that may have resulted during shipping. If there is a defect in the wire, do not attempt installation.
This fixture has been rated for up to 60-watt maximum TYPE A bulbs or 13-watt compact fluorescent light bulbs or 9-watt LED bulbs.
To avoid the risk of fire, do not exceed the recommended wattage.
This product is safety listed for damp locations.
This product may be dimmed with a standard incandescent dimmer.
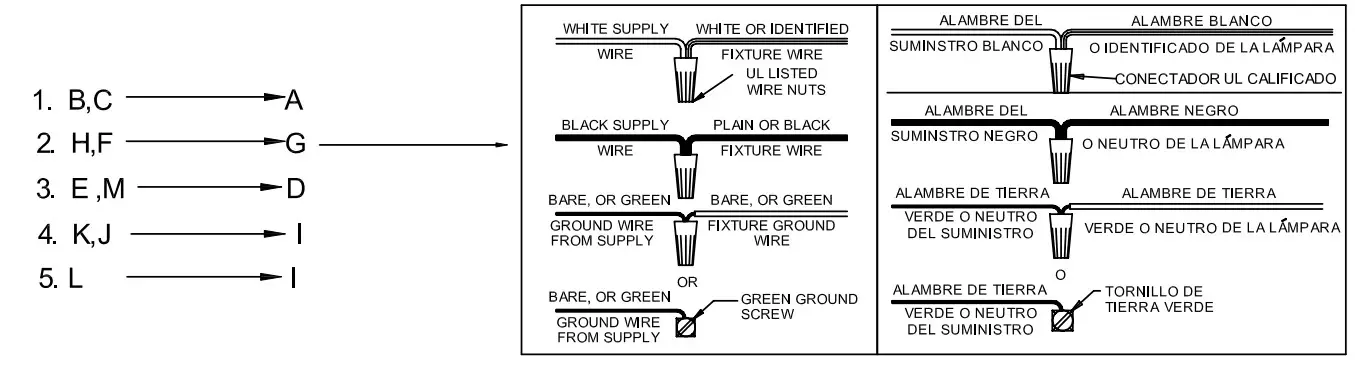
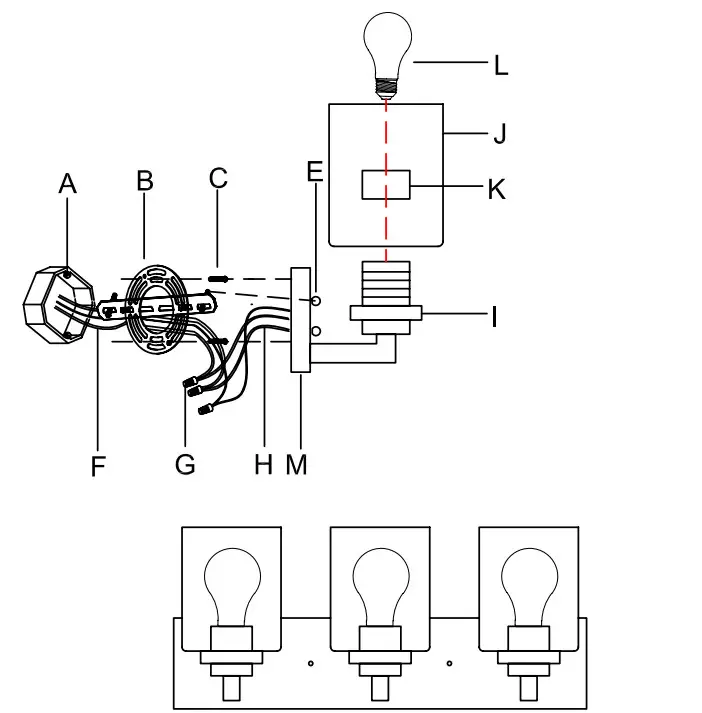
Assembly Steps
| PARTS INCLUDED | ||
| A | Junction box | 0 |
| F | Leading wire | 3 |
| G | Wire nut | 3 |
| H | Wire | 3 |
| I | Socket | 3 |
| L | Glass shade | 3 |
| K | Socket ring | 3 |
| M | Bulb | 0 |
| J | Backplate | 1 |
| HARDWARE INCLUDED | ||
| B | Mounting Bracket | 1 |
| C | Mounting Screw | 2 |
| D | Stud | 2 |
| E | Decorative nut | 2 |
Troubleshooting
| Problem | Possible Cause | Solution |
| The bulb will not light. | The power is OFF. | Ensure the power supply is ON. |
| There is a faulty wire connection. | Check the wiring. | |
| The circuit breaker is OFF. | Ensure the circuit breaker is in the ON position. | |
| The fuse blows or the circuit breaker trips when the light is turned on. | There are crossed wires or the power wire is grounding out. | Check the wire connections. Contact a qualified electrician. |


