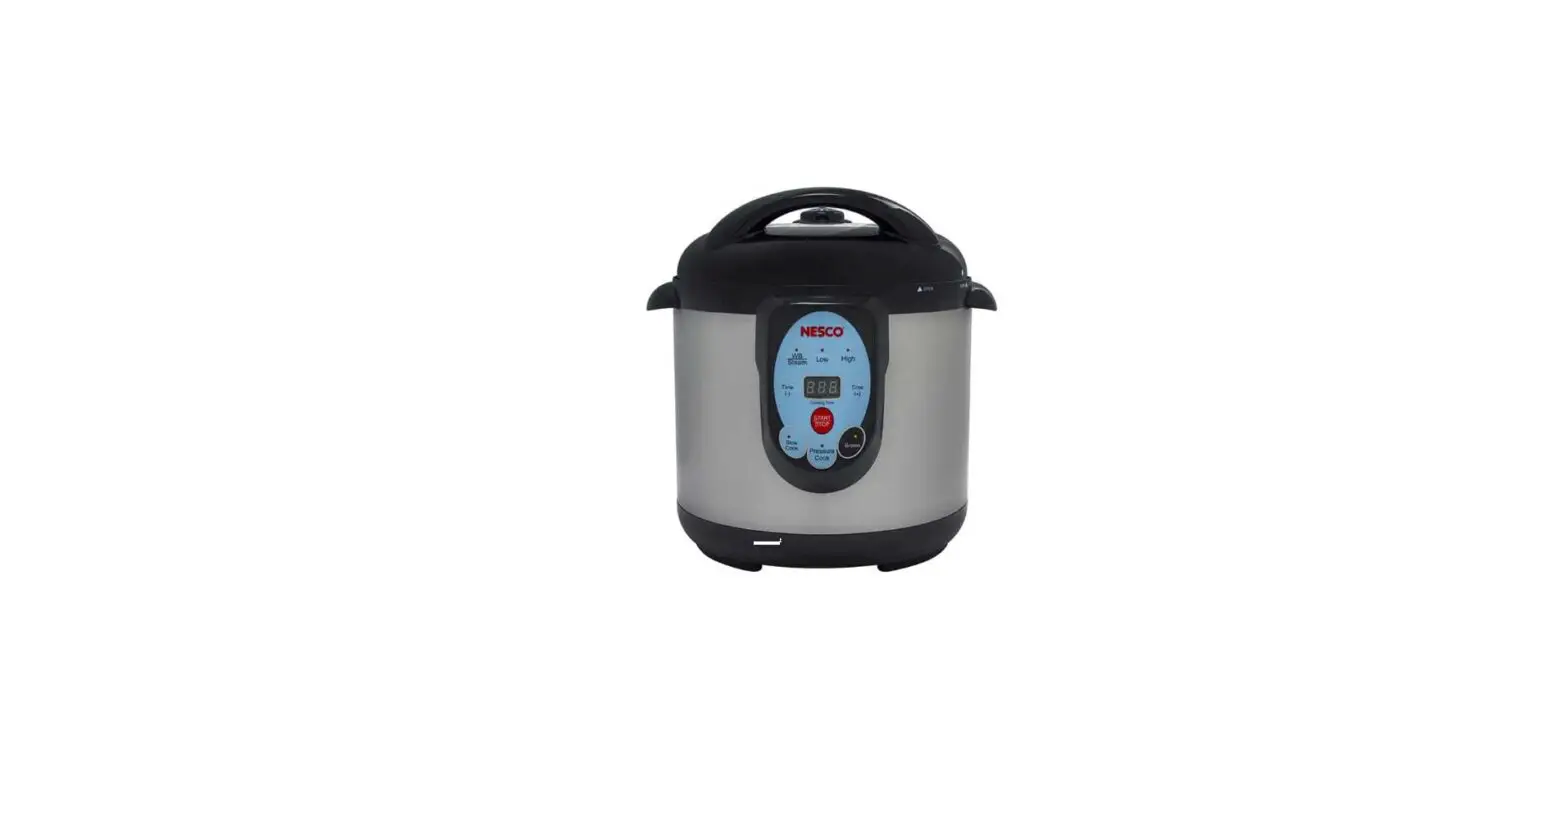
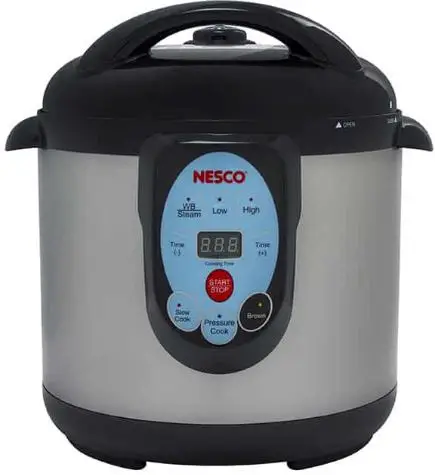
NESCO NPC-9 9.5 Quart Digital Smart Canner
IMPORTANT SAFEGUARDS
WARNING
When using any electrical appliance, basic safety precautions should always be observed including the following:
READ ALL INSTRUCTIONS
- To protect against risk of electrical shock, DO NOT put appliance in water or other liquid.
- DO NOT touch hot surfaces. Use handles, knobs or oven mitts.
- Close supervision is necessary when any appliance is used by or near children. This appliance is NOT recommended for use by children.
- Unplug from outlet when not in use, before putting on or taking off parts, and before cleaning.
- Allow to cool before putting on or taking off parts.
- Avoid contact with moving parts.
- Never put the unit near a hot burner or in an oven.
- DO NOT operate the appliance for any other purpose than the intended use. DO NOT use electrical equipment with a damaged cord or plug or after the appliance malfunctions, is dropped or damaged in any manner. Return unit to the nearest authorized service center for examination, repair, or adjustment.
- DO NOT use outdoors.
- DO NOT let cord hang over edge of table or counter, contact sharp edges, or touch hot surfaces.
- DO NOT pull on the power cord to disconnect.
- Never plug in the appliance where water may flood the area.
- Place the appliance on a firm and stable surface.
- Ensure that the appliance is not placed close to the edge of the table, worktop, etc. where it can be pushed off or fall.
- The use of attachments not recommended or sold by the manufacturer may cause fire, electric shock or injury.
- NEVER use abrasive cleaning agents or abrasive cloths when cleaning the unit.
- Only use the unit when completely assembled.
- DO NOT leave the appliance unattended while it is running.
- Before using for the first time, remove all packaging and wash parts.
- This appliance has a polarized plug (one blade is wider than the other). To reduce the risk of electric shock, this plug will fit in a polarized outlet only one way. If the plug does not fit the outlet perfectly, reverse the plug. If it should still not fit, contact a qualified electrician. Do not modify the plug in any way.
- Prior to unplugging unit, turn power off.
- Do not place on or near hot gas, electric burner or in a heated oven.
- Extreme caution must be used when moving an appliance containing hot oil or other hot liquids.
- To disconnect, turn any control to “off”, then remove plug from wall outlet.
- CAUTION: Turn unit on and off using timer or On/Off button only.
SAVE THESE INSTRUCTIONS
OVERVIEW OF COMPONENTS
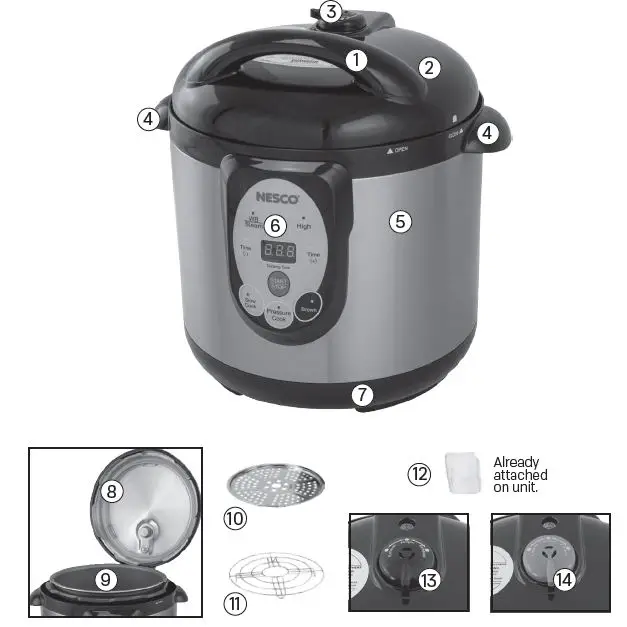
- LID HANDLE
- LID
- STEAM RELEASE VENT
- BODY HANDLES
- STAINLESS STEEL BODY
- CONTROL PANEL
- LOWER BODY BASE
- REMOVABLE SILICONE LID GASKET
- REMOVABLE INNER POT (Non-Stick Interior)
- STEAMING RACK
- CANNING RACK
- REMOVABLE CONDENSATION CATCHER
- BLACK PRESSURE LIMITING VALVE – PSI (Low Altitudes)
- GREEN PRESSURE LIMITING VALVE – 15 PSI (For Use at Elevations Higher Than 1,000 Ft. Above Sea Level)
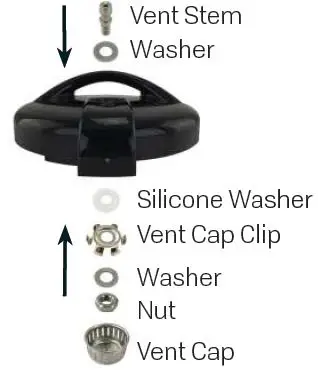
VENT STEM SUBASSEMBLY
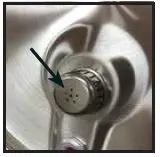
Vent parts can be disassembled for cleaning purposes.
NOTE: Remove the inner vent cap periodically and check the vent assembly. Tighten nut as needed.
- On the outside of the lid, place a washer over the vent hole and insert the vent stem.
- On the inside of the lid, slide the silicone washer, vent cap clip, and washer over the vent stem.
- Attach the nut to the end of the vent stem and tighten it securely. Place the vent cap over the assembly and attach to the vent cap clip.
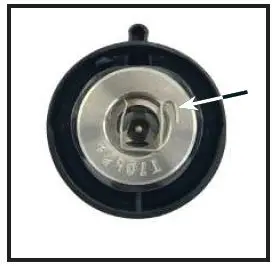
PRESSURE LIMITING VALVE SUBASSEMBLY
 Limiting Valve
 Inner U-clip
- Insert one end of the u-clip into the underside of the limiting valve. Push the other end of the clip inwards and down to lock into place.
BEFORE FIRST USE
- Remove packaging materials such as cardboard, plastics or styrofoam and discard appropriately.
- Wipe clean all the parts with a soft damp cloth or sponge and dry thoroughly.
- DO NOT immerse in water or place in dishwasher.
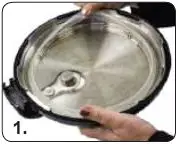
- The GASKET sets in behind the wire guide. Before your first use, gently pull the GASKET out. (IMAGE 1)

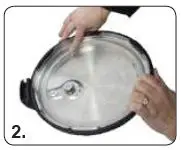
- Hand wash in warm soapy water. Dry, then firmly press the GASKET back in behind the wire guide. Make sure the GASKET is properly installed into the groove inside the LID. (IMAGE 2)

HOW TO OPEN THE LID
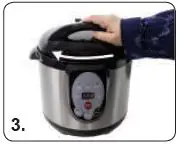
- When the LID of the cooker is at the “Closed-Lid Position”, hold the LID HANDLE and turn it about 1/8 of a turn clockwise (IMAGE 3), until you reach the “Open-Lid Position”. Lift up on the LID HANDLE.
- NOTE: For brand new units, the seal of the LID may be slightly stronger than normal and may be slightly difficult to unlock. Once the LID has been opened and closed several times, it will loosen up.
HOW TO CLOSE THE LID
- When the LID of the cooker is in a vertical position hold the handle and close it downwards at the “Open-Lid Position”. After that, turn it in a counterclockwise direction until you reach the “Closed-Lid Position”.
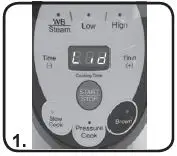
- IMPORTANT: The lid must be closed and turned to the “Closed-Lid” position for the control panel settings to function. If the lid is not turned to the closed position, the display will illuminate the word “LID” and beep three times continuously. (IMAGE 1)
 HOW TO DISMANTLE THE LID
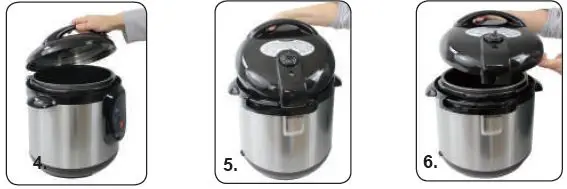
When the LID of the cooker is in the upright vertical position, hold the LID with both hands, and adjust the height between the LID and the upper edge of the cooker to around 4 inches (IMAGE 4). Then turn it in a counter clockwise direction until you reach the “Closed-Lid Position” (IMAGE 5). Then lift the LID up and away from the SMART CANNER body (IMAGE 6).
WARNING – Hot steam will periodically be released out of the STEAM RELEASE VENT. Be sure nothing is directly above this area when using the “Smart Canner”.
 NOTE: Unit may bypass the E10 countdown if proper temperature and pressure is already reached.
4/5 RULE: NEVER fill a pressure cooker more than 4/5 full with food. Also, don’t pack food tightly into a pressure cooker. These practices may cause the pressure cooker to operate incorrectly which will affect the outcome of your food.
IMPORTANT: Before you start select the BLACK LIMITING PRESSURE VALVE for all usage unless you are located at altitudes above 1,000 feet above sea level. At altitudes higher than 1,000 feet above sea level always use the GREEN LIMITING PRESSURE VALVE.
- For general rules on safe canning guidelines please reference: https://nchfp.uga.edu/.

- For the USDA’s Complete Guide to Home Canning and tested recipes please reference: https://nchfp.uga.edu/publications/publications_usda.html. and follow their instructions precisely.


OPERATING INSTRUCTIONS
PRESSURE COOKING
Pressure cooking is an easy way to seal in the flavor and nutrition of your favorite foods. You can cook single foods like corn on the cob or rice, or an entire pot roast dinner.
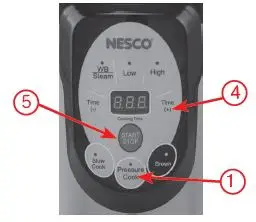
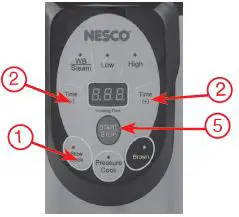
- Press the “PRESSURE COOK” function button on the front control panel.
- Add the ingredients from your favorite recipe.
- Close the LID, turn the LID about an 1/8 turn counter clockwise into the “Closed-Lid” position. Set the PRESSURE LIMITING VALVE to the “AIRTIGHT” position.
- Press the TIME (+) to set time for what recipe calls for.
- Press “START” to start the process. The display will circle until the internal pressure is reached. You may notice some clicks as the unit heats up, this is normal. Once the internal pressure is reached, the “Cooking Time” will start counting down to “000” and beep 3 times.
- CAREFULLY move the PRESSURE LIMITING VALVE to the EXHAUST position. A large amount of steam will be released from the PRESSURE LIMITING VALVE, so make sure to keep your face, body and fingers away from the steam.
- Once the steam has been released, turn the LID HANDLE an 1/8 turn clockwise and open the LID.
 SLOW COOKING
Sometimes it’s a desired option to slow cook dinners instead of pressure cooking. The “SMART CANNER” allows this option. Simply add your favorite ingredients to the inner pot. Remember not to exceed the 4/5 height rule for filling the cook pot.
- Press the “SLOW COOK” function button on the front panel.
- The Cooking Time display will show 30 minutes, which can be adjusted up (+) or down (-), to a max of 600 minutes (10 hours).
- Close the LID, turn the LID about an 1/8 turn counter clockwise into the “Closed-Lid” position.
- Set the PRESSURE LIMITING VALVE to EXHAUST so the pressure does not build up inside the cooker while slow cooking. You will still seal in liquids for moisture to create the perfect slow cooking environment.
- Press “START” to begin cooking. The “Smart Canner” will beep three times once the time has finished.
HINTS: Consider browning meats that will be slow cooked first by using the BROWN function on the SMART CANNER. It is usually not necessary to add cooking oil or butter to the bottom of the INNER POT when browning meats, but a small amount of liquids such as water, soup stock or fruit juices can help when SLOW COOKING. There are many resources for slow cooking recipes, which can easily be adapted to use with the “Smart Canner”.
BROWNING
The SMART CANNER is versatile enough to handle browning meats prior to slow cooking or pressure cooking. Browning meats help release and develop the flavors you expect and appreciate. The browning function on the SMART CANNER acts similar to a standard fry pan.
- Press the “BROWN” function on the control panel.
NOTE: DO NOT close the LID while browning. - Place meat into the INNER POT. It is not necessary to add butter or cooking oil, unless desired for flavor.
- Turn and brown the meat as you would as if using a fry pan.
NOTE: You can brown an entire roast, or cut up meat into smaller pieces before browning for stews.
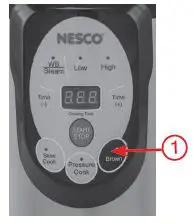
NOTE: Avoid using metal utensils on the INNER POT, as you may damage the non-stick surface.
STEAMING
Steaming foods offers a great way to save time, energy and nutritional benefits. Steamed foods don’t require cooking oils, which can save both money and unwanted calories. The steaming process keeps the foods from coming in direct contact with boiling water, so foods cook evenly and gently in their own juices. Nutrients are less likely to be swept away in the boiling water. Nearly all meats, vegetables, pasta, rice and seafood can be steamed.
HINTS
- Instant rice can be steamed, but long grain rice is best pressure cooked.
- Check your foods occasionally for desired doneness.
- When cooking several different types of foods, put the items that have the longest cook time toward the bottom of the INNER POT.
HOW TO STEAM FOODS
- Place the CANNING RACK into the INNER POT.
- Fill with hot water to the rack level. (approximately 4 cups)
- Place the STEAM TRAY over the rack.
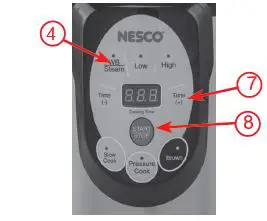
- Press the “WB/STEAM” function on the control panel.
- Add foods that you wish to steam, not exceeding the 4/5 fill rule of pressure cooking.
- Close the LID, turn counterclockwise an 1/8 turn, set the PRESSURE LIMITING VALVE to the EXHAUST position.
- Press the “TIME” (+) to set time for what recipe calls for. (Use chart on the next page as a common guide.)
- Press the “START” button.
- Digital Dial Chase will begin to rotate. You will see a constant stream of steam coming from the PRESSURE EXHAUST VALVE when boil has been reached.
- Press “START” again when the constant stream of steam is seen. This will activate the timer.
- CAUTION: DO NOT HIT THE START BUTTON A 3RD TIME. This will result in the unit shutting off.
| Approximate Steaming Times for Vegetables | |||
| Vegetable | Size/Preparation | Time in minutes | Suggested seasonings |
| Artichokes | Steam whole artichokes | 25-40 min | extra virgin olive oil and lemon zest |
| Asparagus | Whole spears, thick spears peeled lightly | 7-13 min | olive oil combined with lemon zest or sesame seeds |
| Beans, green | Whole beans | 6-10 min | garlic |
| Beets, small or medium-sized | Whole, un-peeled beets scrubbed clean; peel off the skins after steaming | 35-50 min | fresh thyme |
| Broccoli | Trimmed stalks split in half or florets | 5-7 min | extra-virgin olive oil, pumpkin seed oil, lemon juice, lime juice, or balsamic vinegar |
| Brussels sprouts | Whole, trimmed | 8-15 min | fresh thyme |
| Cabbage | Cut in wedges | 6-10 min | lemon or lime juice |
| Carrots | Cut into ¼-inch thick slices | 7-10 min | honey combined with cinnamon or ginger |
| Carrots, baby | Whole baby carrots | 10-12 min | honey combined with cinnamon or ginger |
| Cauliflower | Florets | 5-10 min | lemon or lime juice |
| Corn on the cob | Whole, husks removed | 7-10 min | chicken or vegetable stock |
| Okra | Fresh whole okra, trimmed | 6-8 min | lemon/lime juice and parsley, or with sauteed scallions |
| Onions, pearl | Whole onions, peeled | 8-12 min | |
| Peas, green | Fresh, shelled peas | 2-4 min | fresh herbs (such as mint) or lemon juice |
| Potatoes, all | Peeled or scrubbed clean, cut into ½ – inch slices | 8-12 min | fresh parsley, rosemary, or dill |
| Potatoes, new | Whole, scrubbed clean | 15-20 min | fresh parsley, rosemary, or dill, or with chopped red onions |
| Scallions | Cut into ½ – inch slices | 3-5 min | |
| Spinach | Cleaned, whole leaves | 3-5 min | olive oil and garlic, or sesame seeds |
| Squash, butternut | Peeled and cut into 1-inch cubes | 7-10 min | honey, lemon juice, and rosemary |
| Turnips | Cut into ½ – inch cubes | 8-12 min | olive oil and fresh herbs |
| Turnip greens | Cleaned and coarsely chopped | 4-6 min | olive oil and garlic |
| Sweet potatoes | Cut into large chunks | 8-12 min | Honey and lemon juice |
| Zucchini | Cut into 1-inch slices | 5-8 min | olive oil, lemon/lime juice, and fresh herbs (such as thyme or rosemary) |
FOOD PRESERVATION
Ready to enjoy home canning with the SMART CANNER?
- Few things are more satisfying than opening a jar of something you’ve canned yourself. Home canning has a long and important legacy for families. You’ll be able to take advantage of many benefits by canning your own fruits and vegetables. It’s more than just the great taste of produce you’ve preserved at their peak, it’s the health benefits of controlling what goes in the foods you eat. Plus, it’s a step toward self sufficiency. You can enjoy the taste of your garden all year! Home canned products make thoughtful and healthy gifts.
- The SMART CANNER helps make the process easy and safe. Digital controls will make the process easier, even for first time home canners. The process of pressure canning safely eliminates and protects against unwanted microorganisms. We’ve included some tips on the basics of canning. Feel free to explore the many recipe resources available online or through your local library. Join a club and learn even more.
BASIC CANNING TIPS
- We highly recommend that you familiarize yourself with the canning procedures, the different acid levels of fresh foods and FDA guidelines that can be found on the Internet. http://nchfp.uga.edu/.
- There are a wide variety of products that can be successfully canned. However, not every food item is suitable. Check for recipes before proceeding. • Follow recipe directions carefully.
- Select jar sizes in servings that you and your family will be able to consume in a timely manner. Make sure there are no small chips along the top of jars that would prevent adequate sealing. With proper care, canning jars can be reused for many years. NEVER ATTEMPT TO REUSE LIDS.
- Some handy items that you may normally need include saucepans, measuring cups and measuring spoons, sharp kitchen knives, large spoons or ladles, cutting boards, nonmetallic spatula, funnels, jar lifters, oven gloves and clean rags. Also, adhesive labels can add a nice look to your final product.
- Make sure all utensils, jars and lids are thoroughly clean before canning. It’s best to keep your newly cleaned jars warm to help reduce chance of breakage caused by temperature changes when adding hot foods.
- The “Smart Canner” can seal jars through both pressure canning and water bath techniques—check with your recipe for suggested method.
- Follow guidelines for safety procedures from canning jar and lid manufactures. Never use jars that are not designed for home canning.
- Seasonings intensify during canning, err on the side of caution. Do not use Sage as it gets bitter.
HOW TO CAN WITH THE “SMART CANNER
- The SMART CANNER comes with 2 racks to use during the canning process. The CANNING
- RACK must be used to keep the canning jars off the bottom of the INNER POT. The STEAMING
- RACK can be used as a separation layer when stacking smaller size jars.
The SMART CANNER will hold and process
- Up to 4 Quarts (WIDE MOUTH jars) or
- Up to 5 Pints (WIDE MOUTH jars) or
- 16 – 4 oz jelly jars at a time
NOTE: There are many varieties of canning jars available. Not all will fit perfectly into the Smart Canner. Please use WIDE MOUTH canning jars for best results. QUART size jars cannot be used with the Water Bath function.
Botulism spores must be killed at temperatures higher than boiling water (pressure canned) or by extreme pH balance found in vinegar of pickled vegetables or sweet jams and jellies (water bath).


