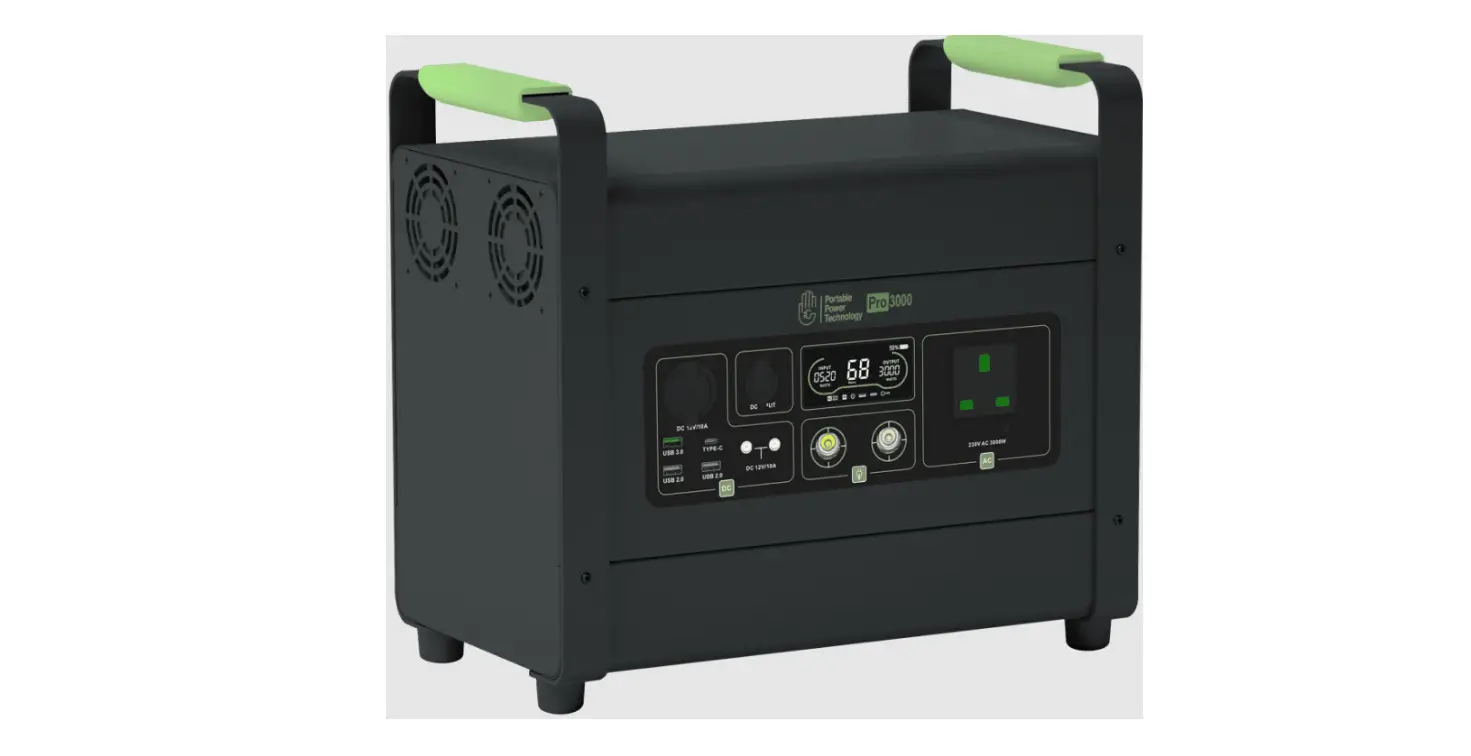
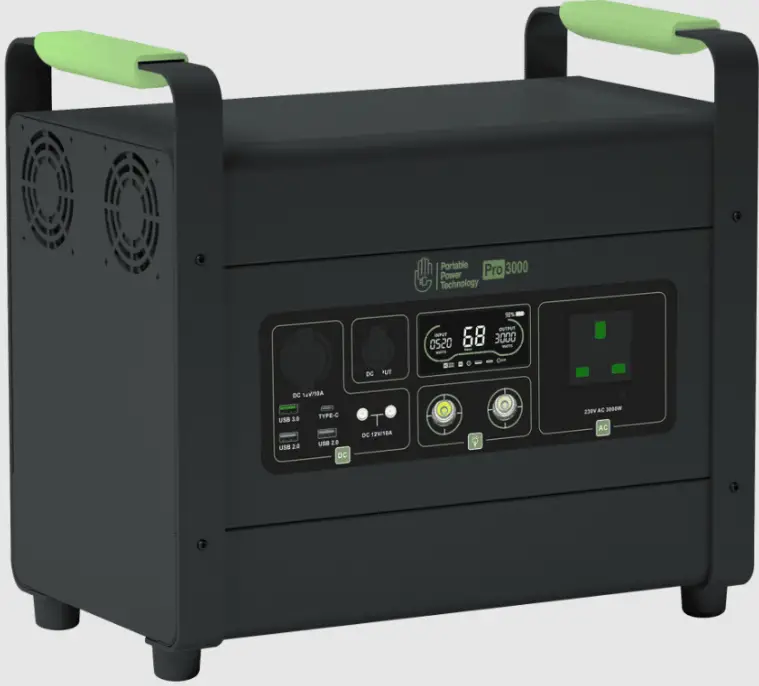
Portable Power Technology Pro Series Power Pack
Introduction
Thank you for choosing the Power pack Pro for your power needs.
This manual covers the following model variants:
Pro 1000, Pro 1500, Pro 2000 and Pro 3000.
Please read this manual carefully and follow the guidance.
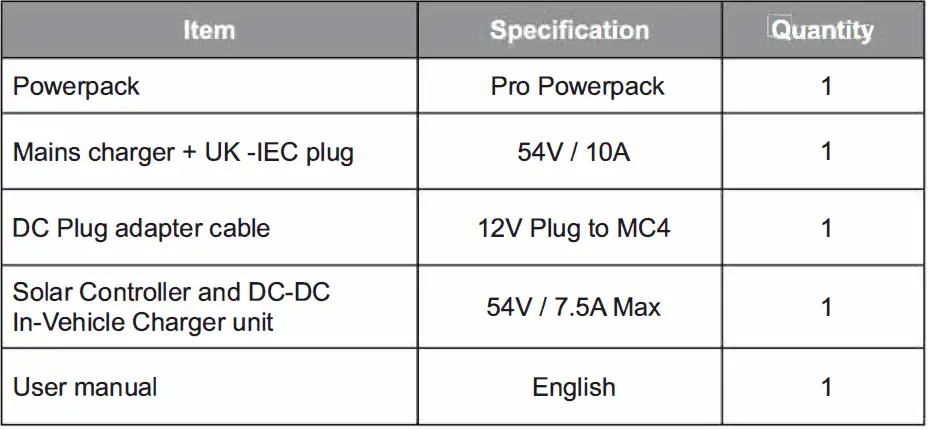
Included in the box
 Note: Goods must be disposed of correctly.
Please leave goods with your nearest lithium battery battery disposal services. For help on finding the nearest location near you visit;
https://www.recyclenow.com/recycle-an-item/batteries#locator
Safety Tips and Precautions
- Please use this product in a clean and dry environment to ensure the device stays safe and in the best condition possible.
- Keep away from flammables and explosives at all times.
- If you have a cardiac pacemaker, please consult your health professional before using this equipment.
- Do not use excessive force when using this equipment.
- Handle with care, do not throw or drop the unit.
- Do not use the unit while upside down.
- Avoid violent vibration and collisions with the device.
- Store this equipment securely, in a fully charged state within a dry and ventilated space.
- Do not place heavy objects on top of the powerpack.
- Do not disassemble the equipment by yourself.
- Keep away from high temperature objects such as fire sources.
- Ensure the product is kept dry and avoid contact with rainwater/ moisture.
- Do not obstruct ventilation and heat dissipation while in use.
Note: If the equipment needs maintenance and repair, we recommend users to contact the Portable Power Technology (PPT) team directly.
Seeking repairs or disassembly from an unauthorized service centre or individual will void your manufacturers warranty service.
Product information
Appearance 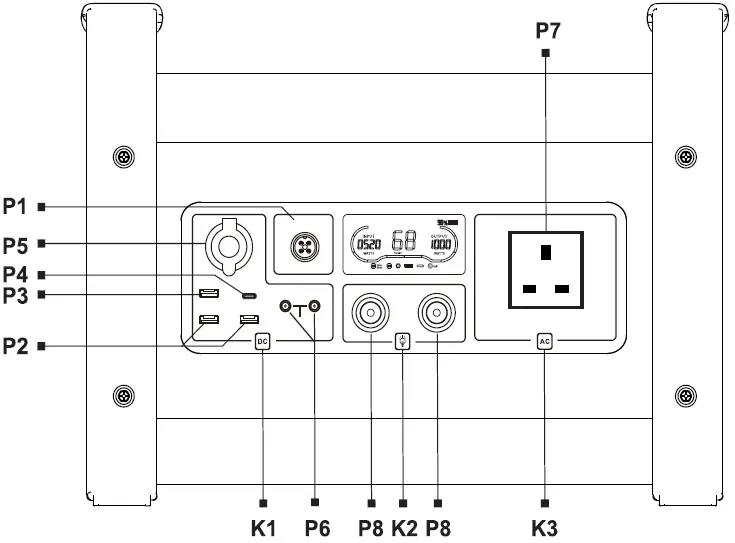
| SN. | Name | Function |
| Charging Input Port | Connects to mains charger | |
| P2 | USB 2.0 Port | Dual 5V 2.A Output |
| P3 | USB 3.0 Port | Max 65W Output |
| P4 | USB Type-C Port | Max 100W Output |
| P5 | 12V DC Socket | DC 12V 1QA Output |
| P6 | 12V DC Port | DC 12V 10A Output |
| P7 | UK Plug Socket | 230V AC Output |
| PB | Lighting | On / Off I Flashing |
| K1 | DC Button | Turn on/off the DC Power |
| K2 | LED Button | Turn on/off the LED lights |
| K3 | AC Button | Turn on / Off the AC power. Long press for 5 seconds to switch between 50/60 Hz |
P7: Maximum 230V output is based on model. See page 9 for more details.
LCD Display
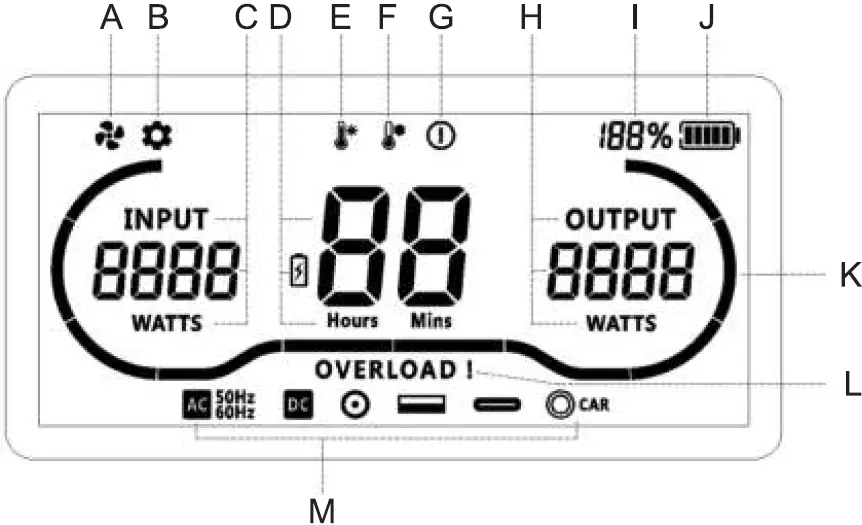
| SN. | Icon | Function | Function |
| A | Cooling fan indicator | Rotates when fans are active. | |
| B | Development mode | Used for engineering purposes. | |
| C |  | Input power | Displays the current input power in watts. |
| D | 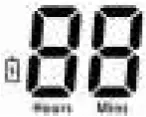 | Remaining charge time / discharging time left | Based on power consumption the remaining use or charging time is displayed. Battery icon lights up to indicate charging status. |
| E | High temperature indicator | Indicates that the temperature of the unit is too hot. Unplug all loads and allow unit to cool. | |
| F | Low temperature indicator | Indicates the temperature of the unit is too cold and should be moved to warmer environment . | |
| G | Fault indicator | When this prompt appears stop using the device. Follow instructions or contact the PPT team directly. |
| H |  | Output power | Displays the current output power in watts. |
| Battery percentage | Displays the remaining battery capacity, O – 100%. | ||
| J | Battery level indicator | Indicates remaining capacity and displays a filling animation when charging. | |
| K | Atmosphere LED | Aesthetically shows different animation based on usage. | |
| L | Overload indicator | Indicates the that too much power is trying to draw from the unit. Remove any loads and turn off the AC & DC. | |
| M | AC indicator | When illuminated 230V AC output is enabled at 50/60Hz. | |
 | DC indicator | When illuminated DC outputs are enabled. | |
| DC port indicator | When illuminated the 12V DC ports are enabled. | ||
| USB indicator | When illuminated USB output is enabled. | ||
| USB Type-C indicator | When illuminated USB Type-C output is enabled. | ||
 | 12V DC socket indicator | When illuminated the 12V DC socket is enabled. |
Note: For more information on faults and how to fix them visit page 14 – 15
Technical Parameters
| Pro Model | 1000 | 1500 | 2000 | 3000 |
| Battery Capacity | 960Wh | 1344Wh | 1530Wh | 1920Wh |
| Battery Type | LiFePO4 – Lithium Iron Phosphate | |||
| Mains Charging (54V/10A) | Estimated time for a complete recharge of 0% to 100% | |||
| 2 Hours | 2.5 Hours | 3 Hours | 3 – 4 Hours | |
| Solar Charging (54V/7.5A) | 2 – 3 Hours | 3 – 4 Hours | 3 – 4 Hours | 4 – 5 Hours |
| Solar Controller | MPPT + 12V In-Vehicle Charger (See Page 11) | |||
| Temperature Range | Charging: 0°c – 45°C Discharging: 10°c – 60°C | |||
| Life Cycles | 2000 Times | |||
| USB 2.0 | 5V / 2.4A * 2 | |||
| USB 3.0 | 5V (Max 65W) | |||
| USB Type-C | Max 100W | |||
| 12V Socket | 12V / 10A | |||
| 12V Port | 12V / 10A | |||
| LED Light | 2W* 2 | |||
| Rated AC Output | 1000W | 1500W | 2000W | 3000W |
| AC Overload | 115% for 15 minutes subject to SOC and temperature | |||
| AC Waveform | Pure sine wave | |||
| Output Frequency | 50/60 Hz | |||
| Output Voltage | 230VAC ± 10% | |||
| Weight | 14.35 KG | 18.75KG | 21KG | 31KG |
| Dimensions | 373 X 192 X 295 mm | 394 X 223 X 320 mm | 394 X 223 X 320 mm | 427 X 244 X 383 mm |
Instructions for Use
Battery Level Checking and Recharging
While the unit is off, press the DC button (K1) to observe the remaining battery capacity and battery percentage (I / J). Unit will shut down again if the same button (K1) is pressed again. The unit is turned off when the LCD display is off. You can use the AC button (K3) instead of (K1 ). Connecting a charging source will also turn on the power pack and display.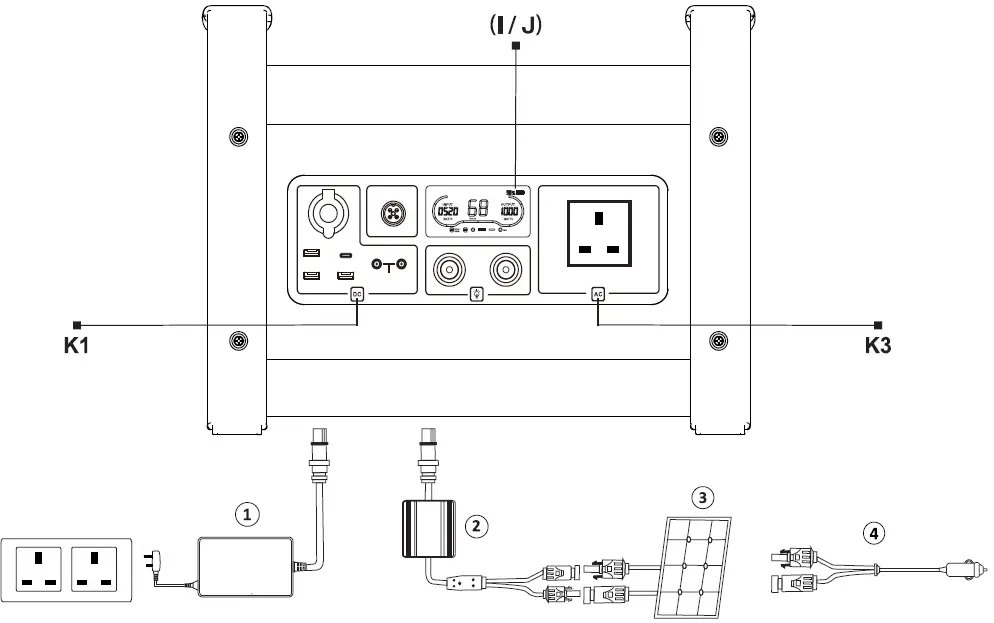
- CD Wall Charger
- Solar controller and In-Vehicle charger (10V-50V input )
- Solar panel (Refer to precautions regarding voltage and power of the solar panels)
- DC adapter cable
Please connect a charging source to input (P1) when the battery capacity is low. While charging the LCD provides charging information. You can view the input power (C) and the remaining time until the unit is fully recharged (D) After being fully charged, the battery percentage will display 100% and the LCD will turn off after 10 seconds and enter standby mode if the AC and DC are off.
Solar Controller and DC-DC In Vehicle Charger
Controller Technical Specifications
| Minimum Panel Size | 20W (1DOW Recommended) |
| Input | 10V – 50V / 25A (Max) |
| Max Solar Input | 18V (12V panel)/ 200W 36V (24V panel)/ 400W |
| Output | 54 I 7.5A (Max) |
| Controller Mode | MPPT with99% efficiency |
| No load loss | <5mA |
| Over voltage protection | 58V±1.5V |
| Anti-reverse connection protection | In the event of a reverse polarity, the internal fuse will blow. Please replace this with a 15A 250V, 5×20 glass tube fuse. |
| Working temperature | -25°C – 65°C |
| Weight | 0.8Kg |
| Size | 115 x 111 x 43 mm |
Charging In-Vehicle
Connect the MC4 connectors of the DC adapter to the corresponding MC4 connectors on the solar controller. Then simply insert the DC plug into an automotive socket within your vehicle. After starting your vehicle engine, power will be supplied to the socket and the charger will engage within 10 seconds.
Charging from in-vehicle is a great way to receive a trickle charge to your unit while on the go but is not recommended as the primary or sole charging method. Note : The power pack can be used to power both AC and DC loads while simultaneously being recharged from any of the mentioned charging sources.
Solar Charging
Charging via solar is simple and easy. Just connect your 12V or 24V solar array into the solar controller via the MC4 connectors. Ensure your solar array is within the supported solar parameters and that the panels are not shaded. For more information on solar see page 13. With sufficient sunlight, the MPPT controller will begin recharging your device and the LCD on the controller will illuminate. Please see below for controller status.
Controller Status
After connecting the controller to a 12V socket or solar panel the LED light will flash several times and then the display and LED’s will light up. When using solar, this will only happen when sunlight is sufficient Shortly after the controller will begin to work and the tube will display the system parameters in a cycle on the display and the LED light will indicate green.
Status indication as shown in the table below:
| Contents | Indicator | Status description |
| Front LED’s | Red | Solar panel / 12V Source detected |
| Green | Power pack detected | |
| Display Panel Indicator | b | Displays Battery voltage |
| C | Displays solar input voltage | |
| d | Displays DC charging current |
Output Indication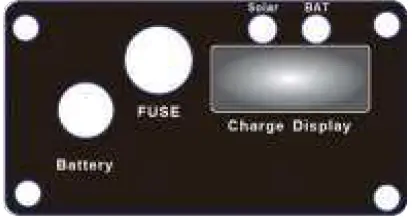
- Solar (PV indicator)
- Bat (Power pack indicator)
- Fuse (15A)
- Battery (Output cable)
Controller Fuse (15A 250V)
If the internal fuse is blown, please replace this with a 15A 250V, 5×20 glass tube fuse. To achieve this, unscrew by hand the fuse cap to reveal the fuse. Swap out the old fuse with a new one and tightly secure fuse cap back in place.
Solar Connection Information and Precautions
- Please check the parameters of your solar panel before making connection.
- The controller can adapt to 12V and 24V solar panels/ arrays.
- Please do not use with solar panels or a solar array with an open circuit voltage higher than 50V.
- Do not exceed the recommended solar input specification.
The maximum input power (W) of a 12V array is 200W.
The maximum input power (W) of a 24V array is 400W.
If two 12V solar panels have a combined power of more than 200W but less than or equal to 400W then please connect them in series. (24V)
If you have two or more 24V solar panels you can connect these in parallel If their combined power (W) is not greater than 400W.
Solar panel parameter quick reference:
12V solar panel working voltage is 18V, open circuit voltage is 22V. *
24V solar panel working voltage is 36V, open circuit voltage is 44V. *- Actual solar panel voltages may vary slightly.
- The controller will generate heat during operation.
It is recommended to use this in a well ventilated and cool environment. - It is recommended to connect together the controller with the solar panel /solar array first, and then connect the controller to the powerpack. Otherwise the phenomenon of ignition may will appear when connecting.
- The input and output of the controller adopt isolation design, and do not share a negative pole or positive pole.
- Do not disassemble. The internal voltage is high and can cause harm.
There are no maintenance or repair parts inside the controller. - Keep the controller away from water or corrosive liquid.
Contact with any liquid will cause damage to the controller. - When operating, ensure the controller is kept dry and well ventilated.
Lighting Function
Press the lighting button (K2) to turn on the illumination LED (PB) Press the lighting button (K2) again to increase the LED brightness. A third press of (K2) will turn the illumination LED off. A long press of (K2) for 2 seconds will make the illumination LED flash in an SOS pattern. Press (K2) again to turn off the SOS mode.
USB / 12V DC Output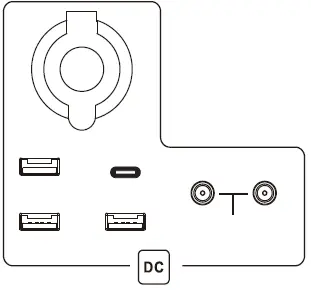 Under the power off state, press the DC button (K1 ), to turn on the device and activate DC output to the USB ports and DC socket/ ports. The LCD will display the consumption of the device in real time if the load’s draw power is greater than 1W. Press the DC button again to turn off all DC outputs. DC Output is rated at 1 0A max and is shared between all the DC and USB outputs.
Note: If the load power is less than 1W, DC will shut down automatically after 24 hours.
AC Output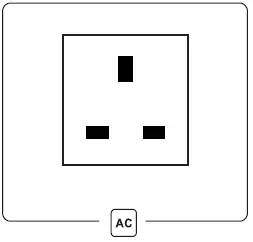 Press the AC button (K3), to turn enable AC output to the 230V UK plug socket. This will also turn on the device from a powered off state. After the AC indicator (M) lights up, the AC sockets output the rated AC Voltage. Long press the AC button (K3) to switch between 50Hz and 60Hz output. We strongly recommend using 50Hz output with all 230V devices. Once AC output has been activated, press AC button (K3) again to turn off the AC output.
Note : If there is no load or a power draw of less than 1 OW, then the AC module will automatically shut down after 12 hours.
Protection Status Indication
| Display | Status | Measures |
 | Low battery | When the battery icon flashes, the battery is depleted. Please recharge the device using the mains charger only. |
 | High battery temperature | While constant, this light indicates the power pack is too warm and unable to be charged until it’s cooled down. While flashing, the icon indicates that the battery is too warm to be discharged and must be cooled down before use. |
 | Low battery temperature | While constant, this light indicates the power pack is too cold and unable to be recharged until it’s temperature increases. While flashing, the icon indicates that the battery is to cold to be discharged and must be warmer before use. |
 | DC overload protection | DC and overload icon flash together: Please remove the DC load from the power pack . Should this status not automatically resolve, power off the device for 5 seconds and restart. |
 | DC overload temperature protection | DC and high temperature icons flash together: please remove DC load and turn off the DC Output function. Wait until the unit has cooled down before attempting to use it again. |
 | AC overload | AC and overload icons flash together: Please remove the AC load and restart AC functionality (K3) to recover. Should this status not automatically resolve, power off the device for 5 seconds and restart. |
 | System error | The Error icon flashes and displays E01-E17 : Shut down the power pack, remove all loads and restart. If the error code persists please contact PPT directly. (Error codes are listed on Page 17) |
Troubleshooting
| Display | Status |
| No AC output | Check if the electrical equipment is connected securely. |
| Check if the high temperature indicator is flashing. | |
| Shut down and wait for 60 seconds before restarting. | |
| The battery is not fully charged even after more than 12 hours of charging | Check whether the charging cable is connected properly. |
| Check whether any temperature prompt is given. |
For other non-common failures, and if multiples restarts have not solved the issue, then please contact Portable Power Technology for further assistance.
Maintenance, Storage and Disposal
Maintenance
- Be sure to remove all loads and charging sources before maintenance.
- Use a dry cloth to remove the dust and oil marks on the ports and casing.
- Do not dissemble the equipment. There are no parts that may be repaired by end-users and all repair services must be provided by qualified maintenance personal, as assigned by Portable Power Technology only.
Storage
- Before long-term storage, the power pack must be fully charged at 100%
- Storage environment: Temperature around 25°C, dry and ventilated.
- Do not completely discharge the battery or attempt to run any power loads while the battery state of charge is at 0%
- It is recommended to fully recharge the product after each use.
- When not in frequent use, ensure the power pack gets a recharge from the AC charger at least once ever 3 months to avoid excessive discharge.
Scrapping
For the scrapping of this product, please refer to your local lithium battery disposal centre: https://www.recyclenow.com/recycle-an-item/batteries#locator
Error Codes
| E01 | CAN communication issue | E10 | Current acquisition failure |
| E02 | Battery output overcurrent | E11 | Charger failure |
| E03 | Battery output short circuit | E12 | MOS failure or over temperature |
| E04 | Battery temperature difference | E13 | Storage failure |
| E05 | Battery pressure difference | E14 | NTC disconnection |
| E06 | Battery under voltage | E15 | Heating film failure |
| E07 | Battery overvoltage | E16 | Temperature control switch failure |
| E08 | Battery voltage failure | E17 | Charge overcurrent |
| E09 | Voltage acquisition failure | EOO | Unrecognized fault |
Warranty Time
The product warranty is valid for one year from the date of shipment of the product (the shipping fee after initial failure is borne by the customer)
- The cancellation period is valid up to 14 days from the date of purchase. Should you wish to return the product during this 14 day “cooling-off period” then you will have to arrange your own return shipping to our office address.
- Be sure to keep the power pack and all accessories safe.
- Repairs may take some time depending on the content of the problem.
- If repair is not possible, we will replace the unit from stock if the warranty is still valid. If stock is not available an alternative may be offered instead.
For repairs please ensure all accessories are supplied with the product.
Warranty Coverage
The warranty of this product is to provide repair in the event of a failure, despite normal use. If the unit is unable to be repaired we will replace from stock.
Your warranty does not cover any of the followings items apply:
- Failure or damage caused by incorrect use or improper repair/ modification.
- Failure or damage caused by transportation, movement, dropping etc.
- Damage caused by external factors such as rain, fire, earthquake, flooding, lighting strike, and other natural disasters.
- Cosmetic wear due to use or deterioration over time.
- If the product itself or accessories are lost.
- Dirt, scratches, dents etc., that do not cause any issue with functionality
- Purchases other than authorized retailers, such as individual sales or resale.
- Failure due to misuse by the customer or usage in unsuitable environment (High temperature and humidity or a place with poor ventilation and dust)
Disclaimer
The product warranty policy promises to repair defective parts of this product and replace it free of charge during a valid warranty period. PPT are not liable for any accidents or damages caused by the failure of this product or its use. Products in need of repair are reviewed on a case by case basis and can vary in repair times. As such PPT will ensure all repairs are swiftly executed and returned to the customer but can’t always provide a fixed time-frame for this.
Precautions
The warranty is valid only for items that we have officially sold and handled. The nominal value depends on the usage conditions and is not covered by the warranty. If repair parts or replacement parts are out of stock, you may have to wait until the next arrival date. This warranty is subject to change without notice.
After Sales Service
Please keep the warranty card safe. This product is guaranteed for one year, starting from the date of purchase. For any questions please contact your local supplier or call the PPT team directly. For failure caused by defects in materials or workmanship, PPT will provide free maintenance service for one year from the date of shipment. This warranty does not cover failures caused by normal wear or misuse. For further details on warranty coverage and warranty information please contact the PPT team directly.
Contact Information
For any queries or questions regarding your device or technical issue, you can contact us directly through our website contact form:
https://www.portablepowertech.com/shop/support/
Alternatively you can call us between 9am and 5pm weekdays
(Excluding bank holidays)
Office telephone: +44 (0)1474 761051
For information regarding returns, please call or reach out to our expert team by emailing [email protected]
Our Office address:
Portable Power Technology
Unit 2 Meadow House Business Centre
West Kingsdown
TN15 6ER
Please do not return items to the above address without consultation. We receive numerous packages on a daily basis and the incorrect reception or handling of returned products can result in lost or damaged goods.
Please do not hesitate to get in contact if you need assistance.
www.portablepowertech.com
Portable Power Technology,
Unit 2 Meadow House Business Centre
West Kingsdown, Kent, TN15 6ER
Office Hours: 9am – 5pm Avaliable: Mon – Friday
+44 (0)1474 761051


