ContentSpeed 35FVX003 Smart Charging Pile AC EV Charge Instruction Manual
Safety Instruction
Read this manual completely and master the safety matters related to operation.
| caveat If the charging gun or charging cable is damaged: • Do not use, stop using immediately • Contact the charging operation staff immediately | |
| caveat In case of emergency: • Press the emergency stop button • Contact the charging operation staff immediately • Take action according to the emergency measures of the owner or charging operator | |
| caveat If operating after injury, accident, typhoon, accident or disaster, please observe: • Are there any flames or smoke inside and outside the charger? • Whether the charger has been soaked in water, whether there are other liquids and traces • Whether the charger is damaged due to other reasons If any of the above conditions occur, please stop charging immediately and contact the charging operator |
| caveat Charge gun lock During the charging process, the charging gun will be locked to the socket of the charging vehicle. It cannot be pulled out before charging is stopped. Strong pulling is prohibited. Strong pulling with more than 1000N may damage the locking mechanism and risk arcing. | |
| Note Gun insertion and drawing: • Take the gun carefully and insert the gun, do not drop and bump • Pull out the gun carefully and put the charging cable and the charging gun back in place • Only applicable to national standard interface electric vehicles |
Specification
AC Charging Pile Incoming Current (Circuit Breaker )and CABLE specification
| Number | Charger Specification(KW) | Incoming Current (Circuit Breaker) Type | Cable Specification |
| 1 | Single phase AC One Gun 3.5 | 20A/2P | 3×4mm² |
| 2 | Single phase AC One Gun 7 | 40A/2P | 3×6mm² |
| 3 | Three phase AC One Gun 11 | 20A/4P | 5×4mm² |
| 4 | Three phase AC One Gun 22 | 40A/4P | 5×6mm² |
| 5 | Three phase AC One Gun 43 | 80A/4P | 5×16mm² |
| 6 | Single phase AC Two Gun 3.5+3.5 | 40A/2P | 3×6mm² |
| 7 | Single phase AC Two Gun 7+7 | 80A/2P | 3×16mm² |
| 8 | Three phase AC Two Gun 11+11 | 40A/4P | 5×6mm² |
| 9 | Three phase AC Two Gun 22+22 | 80A/4P | 5×16mm² |
| 10 | Three phase AC Two Gun 43+43 | 160A/4P | 3×35mm²+2×16mm² |
Charging process steps
Step 1
Remove the charging gun from the charging pile and connect it tothecar charging port.
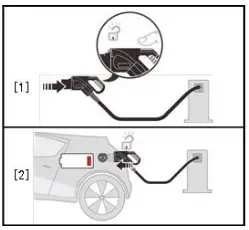
Step 2
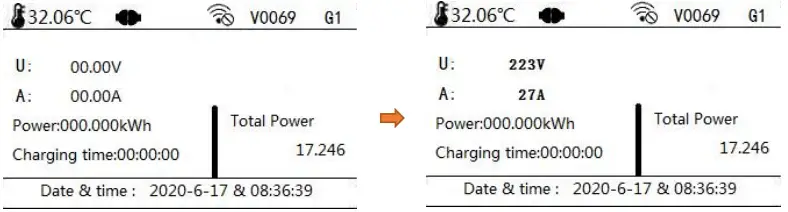
After the charging pile is powered on, there is a waiting time of 10 seconds.After 10 seconds, it enters the main charging page. The UI is as follows。
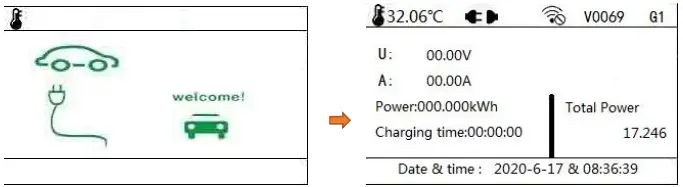
| Display internal temperature | |
| Gun status: no gun inserted (not ready for charging) | |
| Gun status: plug in the gun (ready for charging) | |
| The network is not connected | |
| V0Q69 | Program Version |
| G1 | 1 gun |
Step 3
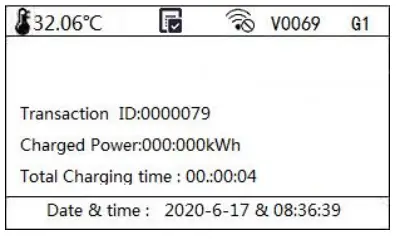
Move the charging card to an area closer to the card. After successfully swiping the card, the charging indicator will light up.Wait for the vehicle communication to complete and start charging.The UI interface is as follows:
| finished charging | |
| Transaction | Transaction number |
| Charged Power | KWH |
| Total Charging Time | Charging time |
Report an error
If there is a fault alarm during charging, the fault indicator will alwaysbe on.
The UI interface is as follows:
| An error occurred Please refer to common exception handling methods (The error light is always on when an error occurs) | |
| Charger failure out of service | Display the error code, you can check the error code table |
Common exception handling
| NO. | unusual phenomenon | possible reason | Solution | ||||
| 1 | Defective power light | The power connected | cord | is | not | Check the power line again by installer | the |
| The light cable is not connected | Check the lamp line again by installer | the | |||||
| Open trip | Reset MCB | ||||||
| 2 | The fault light is always on. | Emergency stop switch is pressed | Reset the emergency stop button turning it clockwise | by | |||
| 3 | No response when swiping | The charging card is not near the swiping position | Remove the card first, and then close to the swipe area again, do not move the card up, down, left, or right | ||||
| Magnetic card failure or damage | Please contact the customer service center to replace the card (man-made damage requires paid replacement card) | ||||||
| 4 | Charging failed | The charging gun is not plugged in | Reconnect the charging gun to ensure that the gun head is in place; check whether there is an error light on the charging pile; check whether the buttons on the upper part of the charging gun are in a natural state; try to restart the charging pile after power off. | ||||
| Vehicle itself | Go to the 4S shop to investigate the vehicle’s own problems. |
| error code | Error alarm information | solution |
| 0X4 | Memory error shutdown | Power off and restart, if the fault cannot be recovered, please contact the operator or equipment manufacturer customer service |
| 0X5 | Screen communication timeout and shutdown | Power off and restart, if the fault cannot be recovered, please contact the operator or equipment manufacturer customer service |
| 0X6 | Leakage shutdown | Please check the charging pile, if in the normal range, contact the operator or equipment manufacturer customer service |
| 0X7 | Main board temperature shutdown | Please check the internal temperature of the charging pile, if it is within the normal range, contact the operator or equipment manufacturer customer service |
| 0X8 | Overtime shutdown in the background | Please check the charging pile and network, if in the normal range, contact the operator or equipment manufacturer customer service |
| 0X9 | Charging timeout 99h59m59 timeout | Power off and restart, if the fault cannot be recovered, please contact the operator or equipment manufacturer customer service |
| 0XA | Door switch | Please check whether the rear door of the charging pile is closed, if in the normal range, contact the operator or equipment manufacturer customer service. |
| 0X20 | Emergency stop | When the emergency stop is pressed, turn the emergency stop switch to the right to recover. 18 If the emergency stop is restored, it will report the fault and contact the operator or equipment manufacturer customer service. |
| 0X21 | Meter timeout | Power off and restart, if the fault cannot be recovered, please contact the operator or equipment manufacturer customer service |
| 0X22 | CP communication | Please check whether the on-board charger is faulty. If the on-board charger is in the normal range, contact the operator or equipment manufacturer’s customer service. |
| 0X23 | Grid fluctuation | If the AC voltage is lower or higher than 230V ±10% (or 15%), check the input voltage range, and contact the operator or equipment manufacturer customer service if it is within the normal range. |
| 0X24 | Relay failure | Power off and restart. If the fault cannot be |
| recovered, please contact the operator or the equipment manufacturer’s customer service. | ||
| 0X25 | Temperature failure shutdown | Please check the internal temperature of the charging pile, if it is within the normal range, contact the operator or equipment manufacturer customer service. |
| 0X26 | overcurrent | Check whether the on-board charger is faulty. If the on-board charger is in the normal range, contact the operator or equipment manufacturer’s customer service. |
| 0X27 | Gun temperature is too high | Please check the internal temperature of the charging pile, if it is within the normal range, contact the operator or equipment manufacturer customer service. |
| 0X28 | Ground Fault | Please check the ground connection, if in the normal range, contact the operator or equipment manufacturer customer service. |


