![]() For household use only
For household use only
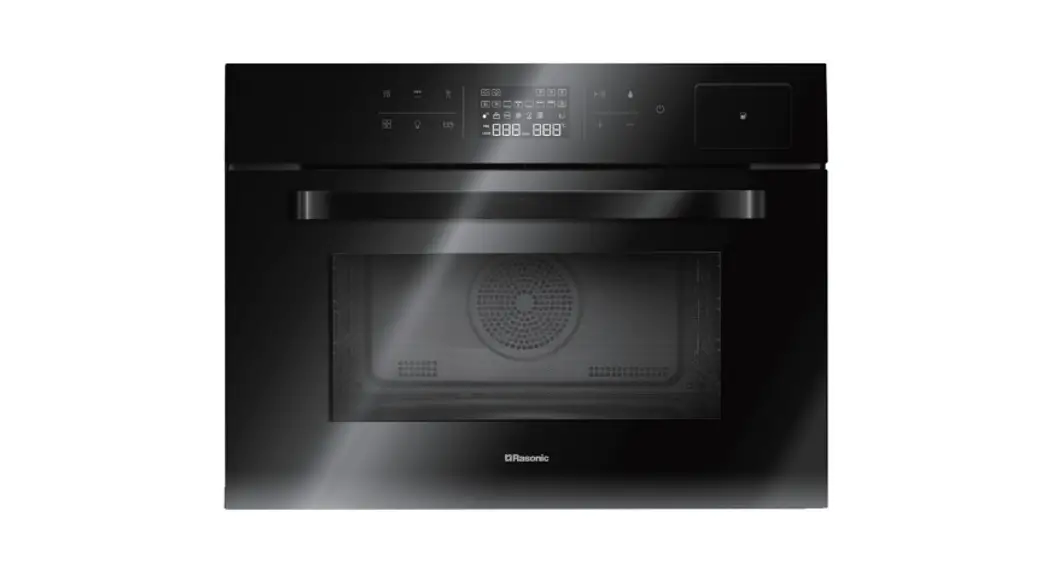
Built-in Steam Grill Oven RSG-R80G
OPERATION MANUAL
- Please read the operation manual carefully before using and well keep it in a safe place for future reference.
- Some figures in this manual may not match with the real object, just for reference only.
Thank you for choosing Rasonic Built-in Steam Grill Oven. Read the operation manual carefully before using it and keep it for your future reference.
Important Safeguards
Observe the following safety precautions when using the appliance.
Failure or negligence in observing these safety precautions could cause fire, electric shock, or personal injury.
1.1 Note for first use
- Remove all packaging materials. The appliance may have a protective film covering the oven door, remove the protective film carefully before use.
- Check if there is any damage to the appliance. Ensure that the oven door can be closed properly, cavity, and interior door opening with no damage. If there is any damage, contact Shun Hing Electric Service Center Ltd. for checking and repairing.
- The appliance is not working properly due to the power cord being damaged. Or, if the appliance is damaged or dropped, do not use it and contact Shun Hing Electric Service Center Limited to check and repair it immediately.
- During installation, check the power cord to ensure it is dry and has no sharp edges in contact with the appliance back. In addition, high temperatures may damage the power cord.
- To ensure proper operation, the appliance will be tested repeatedly during production. Water vapor and stains may remain in the water tank or cavity. This is a normal phenomenon, wipe with a dry damp cloth.
- During the first time of use, follow the instructions shown in Chapter 3. Cleaning and Maintenance to clean the appliance and accessories.
1.2 After usage
- Turn off the appliance and power supply to avoid damaging the internal electronic components, which may cause a fire.
- Keep the appliance clean with pests control, dust, and moisture protection, which prevents cockroaches and other insects from entering the steam outlet, causing a short circuit.
1.3 Important safety instructions
- CAUTION! If there is smoke or fire, keep the oven door closed to suffocate the flames. Turn off the appliance, and cut off the electricity supply in a safe situation.
- Overheated fat or oil can easily catch fire. When roasting meat, heating oil is very dangerous and should be prohibited. To extinguish burning oil or fire, never use water or any liquid (it may explode). Put out the flames with a damp cloth and keep doors and windows closed.
- WARNING: When operating the appliance, do not use alcohol as it may overheat and cause an explosion!
- Accessible parts may become hot during use. Do not touch the heating element or any hot parts with your hands, holding rack, or heat protective glove, as it could cause a burn or product damage.
- CAUTION! When opening the oven door at the end or during the operation, be careful of hot steam discharged from the ventilation vent and hot water droplets. Keep an appropriate distance to avoid burns!
- CAUTION N! Make sure the power cord is not in contact with the oven door. Otherwise, the insulating material of the power cord may melt resulting in a risk of a short circuit!
- Our company is not liable for any direct or indirect loss or damage to any person or property, howsoever, caused arising from improper use or any stoppage, breakdown, or failure of the product.
- To avoid damaging the appliance or dangerous situations, follow the instructions below:
• Do not cover or block the ventilation vent.
• Do not place flammable items in the cavity because it may cause a fire.
• Do not store food in the appliance.
• Do not pour alcoholic beverages (such as brandy, whiskey, alcoholic beverages, etc.) on hot food. There is a danger of an explosion! - Do not stand, sit or place heavy items on the oven door. Do not place any object on the oven door.
- To avoid any damage, the loading weight of the shelf should not be more than 3.5kg.
- Always ensure that the oven door is closed firmly. Operate the appliance only when the door is closed accordingly.
- Do not let children play with the appliance or play inside the cavity.
- Avoid scratching the door sealing or the appliance with sharp items to prevent the appliance from rupturing or leakage of water as a result of electric shock. If the door sealing is damaged, replace a new one before use.
- If the oven door could not be closed properly, deformation or damage to door components, to avoid danger, stop using and contact Shun Hing Electric Service Center
Limited to check and repair. - Do not place any objects between the appliance and the oven door, or allow dust to accumulate on the door gap.
1.4 Operating precautions
- When taking out food from the cavity, use suitable tools or wear heat-insulated gloves to avoid scalding.
- WARNING: Other than qualified service personnel, no experienced personnel to perform maintenance services are forbidden because it can be dangerous.
- If the power cord or oven lamp is damaged, to avoid leakage of electricity, disconnect the power supply and contact Shun Hing Electric Service Center Limited for repair and replacement.
WARNING: Ensure that the appliance is switched off before replacing the lamp to avoid the possibility of electric shock. - The power socket and circuit connection must be grounded and properly installed by professional personnel. Make sure the appliance can be completely disconnected from the power electricity easily.
- Do not put flammable items inside or on top of the appliance to avoid causing a fire. Do not use the appliance when all accessories have not been installed.
- Do not use an external timer or remote-control system to operate the appliance.
- The appliance will become very hot when in use or after use. Do not touch the heating parts, and keep children away from the appliance. Wait for 30 minutes to allow the appliance to cool down before cleaning to avoid burning by residue heat.
- Do not use the appliance for purposes other than cooking food. (Use it for other purposes may malfunction.)
- The appliance and power cord should not be in touch with liquid, as it will affect its safety performance and causes an electric shock.
- Do not place heavy objects on the power cord; Never modify, twist or pull the power cord; Do not hang the power cord on the table, or the edge of the cabinet, or make in touch the heated surface.
- When not in use, disconnect the power to prevent electric shock caused by insulation aging.
- It is recommended to fill the water tank to the maximum indicator “MAX” before the operation, and insert the tank properly into the appliance. Make sure that the water tank is fixed in place, and prevents water cannot be pumped during operation.
- During operation, do not open the oven door to ensure no steam and heat loss, affecting the cooking result.
- During operation, open the oven door if turning over the food is needed, ensure body parts (especially the face) are not near the oven door, avoiding steam burn or scalding.
*WARNING: Do not clean the glass with a cool cloth during operation to prevent the glass crack. - Before moving, checking, or cleaning the appliance, disconnect the electricity and use it after the appliance has been completely cooled down.
- This appliance is for household use only, do not use it in outdoor areas or for other purposes.
If it is used improperly or for (semi) commercial use, the warranty will be invalid and Shun Hing Electric Service Center Limited will not be liable for any damage to the maintenance and compensation. - Keep infants away from the appliance. Use the appliance with care and take good care of your children, make sure they do not play with the appliance. Do not let children use it alone, and place it and its power cord away from children’s reach.
- This appliance can be used by children aged 8 years old and above, and persons with reduced physical, sensory or mental capabilities, or lack of experience and knowledge. If they have been given supervision or instruction concerning the use of the appliance in a safe way and understand the hazard involved.
- The appliance is intended to be used in household or similar applications such as staff kitchen shops, offices, and other working and residential type environments. Do not use it outdoors.
- Always check if the power cord or plug is damaged, the appliance is not working properly, or if the steam oven is damaged or dropped, if there is doubt, do not use the steam grill oven immediately to avoid hazards, and contact Shun Hing Electric Service eCenter Limited for repair and checkup.
- The warranty will be invalid if this appliance is repaired or modified by unauthorized personnel, or unauthorized parts are installed.
- Follow the safety regulations to prevent accidents from happening. Contact Shun Hing Electric Service Center Limited when a repair is needed (address is printed on the back cover of the manual or call 2406 5666 for inquiry). Make sure to show the warranty registration card and receipt during the repair.
Installation Instructions
The appliance complies with the safety requirements. The following notices for installation must be observed when using. Failure to comply with the installation instructions or cause damage to the appliance, manufacturers, and distributors would not take any responsibility.
To prevent fire, burns, and electric shock, observe the following before usage:
- The appliance is high power consumption, uses a separate power socket, and should not share a power socket with other electrical appliances. Ensure that the input voltage specified on the rating label is consistent with the local voltage.
- Make sure that the power cord and electricity supply are connected firmly; otherwise overheating of the power cord due to poor contact will affect the function of the appliance, and speed up the damage to the appliance or cause fire and other hazards.
- In the case of fixed electrical installation, get qualified technical personnel to perform.
- Make sure the appliance is under good ventilation when using. Avoid overheating by blocking the ventilation holes of the steam grill oven. Do not place anything on top of the product and insert metal objects (such as needles or wire, etc.) into the product, inside the gap or vapor outlet.
- Place the appliance in a ventilating environment without corrosive gas, fire, high temperature, strong magnetic, vapor, moisture, fumes, or contact with flammable materials.
IMPORTANT NOTE
The supplied wires in the mains lead are colored in accordance with the following code:
Earth: Green and Yellow
Neutral: Blue
Live: Brown
As the colors of the wires in the mains lead of the appliance may not correspond with the colored markings identifying the terminals in the power socket, proceed as follows:
- The wire which is colored green and yellow must be connected to the terminal in the socket which is marked by the letter
 or by the safety earth symbol
  or colored green or green and yellow.
 - The wire which is colored blue must be connected to the terminal in the socket which is marked with the letter N or colored black.
- The wire which is colored brown must be connected to the terminal in the socket which is marked with the letter L or colored red.
Note: Replacement or installation of the power socket shall be performed only by authorized/qualified personnel.
Product dimension
Note: The unit in below picture is in millimeter (mm)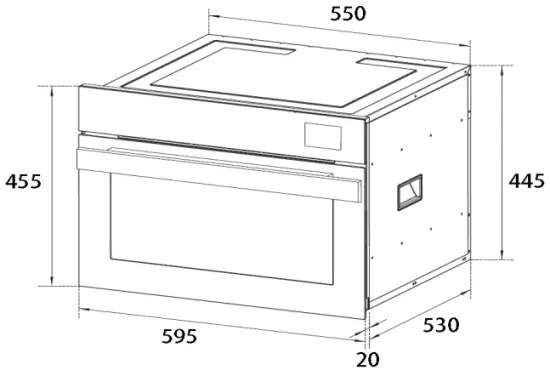
Suggested dimension of cabinet
Note: The unit in the below picture is in millimeters (mm).
Note: At least 400 cm2 should be reserved for proper ventilation.
| Cabinet Size Requirement | X | Y | Z |
| The panel located outside the cabinet (W x H x D) | 560 | 450 | 580 |
 Installation Method
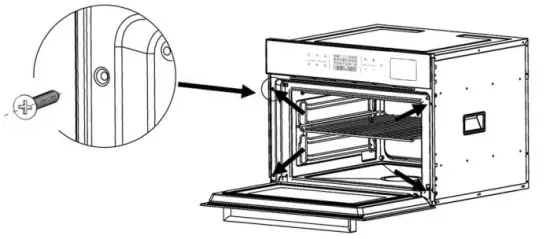
First, put the appliance inside the preserved area in the cabinet. (Pay attention to the power cord location, such as to connect the electricity after installation). Open the oven door, and tighten the 4 screws supplied to the 4 holes as the arrows illustrated above. Make sure that the appliance is fixed in place before connecting to the electricity.
Notice for Installation
WARNING: The appliance must be grounded to avoid electric shock!
- Installation must comply with the prevailing standards and regulations and be conducted by qualified technicians.
- For cabinet installation, the material of the cabinet (plastic and molding wood) should be heat-resistant bonding. Improper materials or bonding agents will lead to deformation and incomplete adhesion.
- There should be enough space left for the electrical connection of household appliances.
- The cabinet holding the appliance should be firm with enough supporting strength.
- Install the appliance firmly.
- The appliance could be installed in an in-line type cabinet or right under the standard cabinet, given it is ventilated adequately.
- The length of the power cord is around 1.3 meters and earth, neutral and live conductors must be connected correctly.
- Place the food tray, grill rack, and oil tray into the shelf horizontally. Do not impede the oven door close.
Cleaning and Maintenance
Regular inspection and maintenance could avoid operation failure, check the following on a regular basis:
- The appliance will still be hot after use. Wait until the appliance cools down before cleaning.
- To ensure the appliance is in good condition, always keep the door surfaces clean. Do not use abrasive cleaners or sharpened metal blades to clean the glass of the oven door as they can scratch the surface, and may cause the glass to break.
- Shut down the appliance and disconnect the electricity before cleaning the oven cavity.
- Clean the oven cavity with a wet cloth if food or soup is splashed on the interior surfaces.
It is not suggested to use hard material (e.g. metal brush and scouring pad) for cleaning.
Use a soft and mild detergent if the interior surface is too dirty while abrasive detergent is not suggested. - Please use distilled water or purified water to operate. Using tap water for a long time will generate water scales inside the cavity. Do not use mineral water, which speeds up the formation of the scale.
- Suggested cleaning the water tank at least once a week. Take out the tank horizontally, if necessary, and use a soft cloth to clean the tank. Put the tank back after cleaning.
- Do not use a steam cleaner to clean the appliance.
- Clean the rubber sealing of the oven door with a soft cloth frequently.
- With electricity disconnected, use a soft cloth to clean the control panel if it gets wet. Make sure do not use abrasive detergent to clean instead.
- Disconnect the power and clean the oven cavity if the appliance will not be used for a long time. Store it in a ventilating environment without corrosive gas.
- If the appliance is out of service, send it to Shun Hing Electric Service Centre Limited for checking and repair.
- Clean the food tray, oil tray, and grill rack with soft material (e.g. cloth) instead of hard material (e.g. metal types) to avoid scratches on trays or damage to the protective coating.
- Never use toxic or corrosive cleaner for cleaning.
- After cleaning, accessories must be completely dry before connecting to electricity.
- The appliance must be completely cooled down and cleaned before storage. Store it in a carton and place it in a dry environment.
- Never wrap the power cord around the appliance or place any object above the cord, as it may cause damage and rupture the cord.
CAUTION: Do not clean the appliance with strong detergent, thinner, gasoline, abrasive powder, or metal brush.
If there is an odor accumulated inside the oven after a long-time usage, put 5-6 slices of lemon in the cavity and select High Steam ![]() mode at 110°C for 15-20 minutes to remove the odor.
mode at 110°C for 15-20 minutes to remove the odor.
Product Specification
| Model | RSG-R80G |
| Rated Voltage | 220V~ 50-60Hz |
| Rated Power | 2,800W |
| Product Dimension (W x D x H) mm (Approx.) | 595 × 550 x 455 |
| Cavity Size (W x D x H) mm (Approx.) | 470 × 410 x 260* |
| Water Tank Capacity (L) | 1.1 (MAX) |
| Net Weight (kg) | 31 |
- Internal capacity is calculated by measuring the maximum width, depth, and height of the cavity. The actual capacity size may be less than the above cavity size.
Product Description
5.1 Product Structure
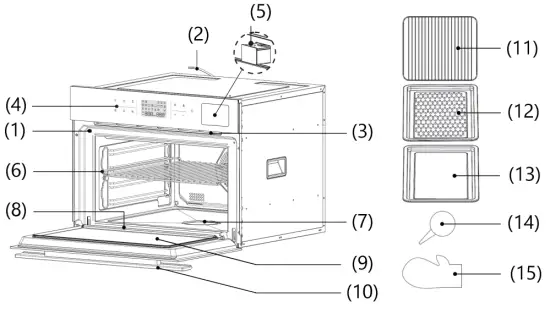
Remarks: Above illustration is for reference only.
| No. | Component Name | Description |
| 1 | Oven door safety switch | Ensure the oven is closed before operation. When the oven door is open, the appliance stops working; When the oven door is closed, press the [Start/Pause] key to resume the operation. |
| 2 | Power Cord | Connect to a stable power supply system before operation |
| 3 | Ventilation vent | Discharge excessive steam remained in the cavity |
| 4 | Control Panel | For details, see Chapter 5.2 Display and Control panel guide |
| 5 | Water tank | The place to store clean water. Press the [Water Tank] key once, water tank will be popped out automatically |
| 6 | Shelf | To hold the grill rack, cooking tray, and oil tray |
| 7 | Heating element | To evaporate water accumulated in the cavity |
| 8 | Droplets tray | To collect water condensed on the oven door |
| 9 | Oven door | Attention! The door is hot after use, beware to avoid burns |
| 10 | Oven door handle | To close and open the oven door |
| 11 | Grill rack | To hold the cooking food when grilling |
| 12 | Food tray | To place the cooking food |
| 13 | Oil tray | To collect oil extracted from cooking food |
| 14 | Water absorber | To absorb water in the cavity or droplets tray |
| 15 | Heat insulating gloves | To pick the hot food tray and grill tray after use |
5.2 Display and Control panel guide
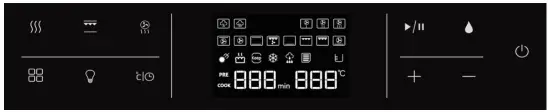 Display
Icon | Description | Icon | Description |
| Steam | Low Steam Grill | ||
| High Steam | Medium Steam Grill | ||
| Quick Grill | High Steam Grill | ||
| Convection | Sterilization | ||
| Upper and Lower Grill | Ferment | ||
| Convection and Upper Grill | Keep warm | ||
| Lower Grill | Defrost | ||
| Upper Grill | Descaling | ||
| Upper High Grill | Auto menu | ||
| Convection and Lower Grill | Refill indicator | ||
PRE | Preheat indicator | COOK | Operate indicator |
| Time display |
| Temperature display |
Control panel
Icon | Key Name | Description |
| STEAM | Tap to choose STEAM cooking functions including Steam and Steam (High) | |
| GRILL | Tap to choose GRILL cooking functions including Quick Grill, Convection, Upper and Lower Grill, Convection and Upper Grill, Lower Grill, Upper Grill, Upper High Grill and Convection and Lower Grill | |
| STEAM GRILL | Tap to choose STEAM GRILL cooking functions including Low Steam Grill, Medium Steam Grill, and High Steam Grill | |
| Mode | Tap to choose auxiliary functions including Sterilization, Ferment, Keep warm, Defrost, Descaling, and Auto menu | |
| Lamp | Tap once to switch on and off the lighting system | |
| Temp./Time | Interchange to choose cooking time or temperature settings | |
| Start/Pause | To confirm the operation setting or pause the operation | |
| Water Tank | Tap once, the water tank will pop out of the appliance automatically | |
+ | Increase |
|
– | Decrease |
|
| On/Off | Long press to turn on/off the appliance |
5.3 Operation time of cooking modes
Category | Cooking Mode | Icon | default time (Min.) | Default Temperature (t) | Time setting range (Min.) | Temperature setting range (°C) |
| STEAM functions | Steam | 20 | 100 | 1-120 | 55-100 | |
| High Steam | 20 | 120 | 1-120 | 100-120 | ||
| GRILL functions | Quick Grill | 30 | 200 | 1-120 | 40-230 | |
| Convection | 30 | 200 | 1-120 | 40-230 | ||
| Upper and Lower Grill | 30 | 160 | 1-120 | 40-230 | ||
| Convection and Upper Grill | 30 | 220 | 1-120 | 40-230 | ||
| Lower Grill | 30 | 160 | 1-120 | 40-180 | ||
| Upper Grill | 30 | 180 | 1-120 | 40-230 | ||
| Upper High Grill | 30 | 180 | 1-120 | 40-230 | ||
| Convection and Lower Grill | 30 | 150 | 1-120 | 40-230 | ||
| STEAM GRILL functions | Low Steam Grill | 20 | 180 | 1-120 | 120-230 | |
| Medium Steam Grill | 20 | 180 | 1-120 | 120-230 | ||
| High Steam Grill | 20 | 180 | 1-120 | 120-230 | ||
| Auxiliary functions | Sterilization | 20 | 100 | 1-120 | 100 | |
| Ferment | 60 | 40 | 1-600 | 35-45 | ||
| Keep warm | 120 | 60 | 1-120 | 60-70 | ||
| Defrost | 20 | 60 | 1-120 | 60 | ||
| Descaling | Not applicable | |||||
Note 1. Long press Increase [+ ] or Decrease [ -] key to access quick adjustment to the time and temperature.
Note 2. Press the Increase [ +] or Decrease [- ] key to increase or decrease 1 minute cooking time setting.
Operation Instruction
6.1 Standby mode
Once connected to the electricity, the buzzer will sound “beep” for one time. All the buttons and icons on the display will blink once while the [![]() ] key will keep flashing, known as the standby mode. If the appliance is left idle, [
] key will keep flashing, known as the standby mode. If the appliance is left idle, [ ![]() ] key will switch off and the power-saving mode will be activated.
] key will switch off and the power-saving mode will be activated.
Note: Press any key during the power-saving mode, the appliance will resume standby mode, and the [ ![]() ] key will keep flashing again.
] key will keep flashing again.
6.2 Selection mode
Under standby mode, press the [ ![]() ] key for 1 second, the buzzer will “beep” and the appliance will enter selection mode while all access keys and icons will light up. Users can access different cooking modes and auxiliary functions accordingly.
] key for 1 second, the buzzer will “beep” and the appliance will enter selection mode while all access keys and icons will light up. Users can access different cooking modes and auxiliary functions accordingly.
6.3 First time of use
Before first use, make sure to operate the appliance empty in order to eliminate the smell of the new unit by the below procedures:
- Under selection mode, press the Grill [
 ] key to select Convection and Upper Grill (
 ) cooking mode. Default cooking temperature and time will be shown on display.
 - Press Temp./Time [
 ] key once, and cooking time indicators will blink. Press the Increase [ +] or Decrease [ -] key to set 15 minutes of cooking time. Once finished, press Temp./Time [] key again, cooking temperature indicators will blink. Press the Increase [+] or Decrease [-] key to set a 230℃ cooking temperature. Press the Start/Pause [
 ] key once to confirm, Convection and Upper Grill () will start to operate.
(Note: When operating the oven empty, smoke and smell may appear which is a normal phenomenon.) - Once finished, open the oven door, and use the appliance until it is cooled down.
6. 4 Filling Water
Make sure to install the fill sufficient water in the water tank if STEAM or STEAM GRILL functions are needed.
Follow the procedures below to fill water:
- Under selection mode, press the Water Tank[
 ] key once, and the water tank will be popped out automatically. Pull out the tank from the appliance horizontally.
 - Open the circle rubber lid and fill with water to the maximum indicator “MAX”. Suggested to use distilled water or purified water.
CAUTION! Water should not exceed the maximum indicator “MAX” of the tank. - Once finished, Cover the circle rubber lid and insert the tank in the bracket to make it done.
Note:
- After taking out the tank, to avoid damage recommended to wait for 15 seconds before putting back the tank into the appliance.
- To avoid deformation, do not fill liquid with temperature 70℃ or above into the water tank.
- When the appliance is out of water during operation, the Refill indicator (
 ) will blink on the display with buzzers to remind the user to refill the water.
6.5 Cooking function setting
The appliance offers 13 cooking functions in total including STEAM, GRILL, and STEAM GRILL functions for users, meeting different cooking preferences. Cooking functions are classified as follows:
STEAM functions: including Steam and High Steam
GRILL functions: including Quick Grill, Convection, Upper and Lower Grill, Convection and Lower Grill, Lower Grill, Upper Grill, Upper High Grill and Convection, and Lower Grill
STEAM GRILL functions: including Low Steam Grill, Medium Steam Grill, and High Steam Grill
Follow the below procedures to operate: Select cooking functions->Setting cooking time->Setting cooking temperature->Operation starts
6.5.1 Select cooking functions
Under selection mode, press the STEAM [![]() ], GRILL [
], GRILL [![]() ] or STEAM GRILL [
] or STEAM GRILL [![]() ] key to select steam cooking modes, grill cooking modes, and steam grill cooking modes in order. Press them repeatedly to select different cooking functions under that category, or the user can press the Increase [+] or Decrease [-] key to choose in the cycle. The corresponding icon will blink on display for the selected function, and the default cooking temperature and time will be shown on display. Once selected, press Temp./Time [
] key to select steam cooking modes, grill cooking modes, and steam grill cooking modes in order. Press them repeatedly to select different cooking functions under that category, or the user can press the Increase [+] or Decrease [-] key to choose in the cycle. The corresponding icon will blink on display for the selected function, and the default cooking temperature and time will be shown on display. Once selected, press Temp./Time [![]() ] key once, cooking time indicators will start to blink.
] key once, cooking time indicators will start to blink.
6.5.2 Setting cooking time
Press the Increase [+] or Decrease [-] key to set desired cooking time. Press and hold can access quick adjustment (Increase or decrease by 10 minutes each time). Once finished, press Temp./Time [![]() ] key again, cooking temperature indicators will start to blink.
] key again, cooking temperature indicators will start to blink.
6.5.3 Setting cooking temperature
Press the Increase [+] or Decrease [-] key to set desired cooking temperature. Press and hold can access quick adjustment.
Once finish press start/pause [![]() ] once to confirm. Preheat indicator (PRE) and oven lamp will light up, representing that preheating are in progress.
] once to confirm. Preheat indicator (PRE) and oven lamp will light up, representing that preheating are in progress.
6.5.4 Operation starts
When the appliance reaches set temperature, the buzzer will sound “beep” three times. Preheat indicator (PRE) will switch off while the Cooking indicator (OPE) will switch on. Users can put the ingredient prepared into the cavity.
Once the operation is completed, the buzzer will sound “ding dong” and the display will show the wording “End”, representing the cooking function has been completed.
Attention! The cavity temperature is still high after cooking, the cooling fan will keep operating for a period of time to discharge the residual temperature.
Note:
- If default cooking time and temperature are used, the user can start the operation directly by pressing the Start/pause [] key once the cooking function is selected.
- Once the cooking time and temperature are set, press Temp./Time [] key can switch cooking time and temperature settings alternatively.
- If STEAM or STEAM GRILL cooking functions are used, out of water may happen during operation. The water tank will automatically pop out to remind the user to refill water, or the user can press the Water Tank [] key manually to fill water during operation.
6.6 Application of auxiliary functions
Apart from STEAM, GRILL, and STEAM GRILL cooking functions, there are 6 auxiliary functions offered to meet the different needs of users. Auxiliary functions include Sterilization, Ferment, Keeping warm, Defrost, Descaling, and Auto menu.
6.6.1 Application of Sterilization/Ferment/Keep warm/Defrost functions
Users can follow the below procedures to setup: Select cooking functions->Setting operation time>Setting operation temperature->Operation starts
Under selection mode, press the Mode [![]() ] key to select different auxiliary functions in order. Or, the user can press the Increase [+] or Decrease [-] key to choose in the cycle. The corresponding icon will blink on display for the selected function, and the default cooking temperature and time will be shown on display. Once selected, press Temp./Time [
] key to select different auxiliary functions in order. Or, the user can press the Increase [+] or Decrease [-] key to choose in the cycle. The corresponding icon will blink on display for the selected function, and the default cooking temperature and time will be shown on display. Once selected, press Temp./Time [![]() ] key once, operation time indicators will start to blink.
] key once, operation time indicators will start to blink.
Press the Increase [+] or Decrease [-] key to set desired operation time. Press and hold can access quick adjustment (Increase or decrease by 10 minutes each time). Once finished, press Temp./Time [![]() ] key again, operation temperature indicators will start to blink.
] key again, operation temperature indicators will start to blink.
Press the Increase [+] or Decrease [-] key to set desired operating temperature. Press and hold can access quick adjustment. Once finished, press Start/pause [![]() ] once to confirm, and the appliance will start to operate.
] once to confirm, and the appliance will start to operate.
Note: The operation temperature of Sterilization and Defrost functions CAN NOT be adjusted.
6.6.2 Application of Descaling function
After using for a period of time, in order to avoid the accumulation of scale in the evaporator and pipes, which will affect the performance of STEAM or STEAM GRILL functions. The appliance will remind the user to operate the descaling function after the above 2 category cooking functions have accumulated 50 working hours (accumulated under electricity connected). The Descaling indicator (![]() ) will light up. If the user does not operate the descaling function, the above-said functions will not operate. Procedures are as follows.
) will light up. If the user does not operate the descaling function, the above-said functions will not operate. Procedures are as follows.
- Fill the water tank with clean water and descaling agent. (Taking citric acid as a descaling agent as an example, add 20g citric acid into 1-liter of water.)
- Under selection mode, press the Mode [
 ] key to select the Descaling function, and the (
 ) icon will flash. Press the Start/pause [] key to confirm, that “C01” will be shown on the display. Press the Start/pause [] key to start the first stage of the descaling function.
 - When the first stage of the descaling function is completed, the appliance will automatically change to the second stage and“C02” will be shown on the display. The user must empty the tank and refill it with clean water. Then, put it back into the appliance and press the Start/pause [] key to start the second stage of the descaling function.
- The entire descaling function can be divided into 3 sections (including water filling, soaking, and boiling) and 2 cycles. The first cycle will be completed in about 25 minutes while the second cycle will be started immediately until the entire descaling function is completed. The entire descaling function takes about 60 minutes.
- After completion, the buzzer will sound and the display will show “End” representing that the descaling function has been completed. Empty the remaining water in the water tank.
Note:
- The operating time of the two stages’ descaling function will be slightly different in accordance with the actual situation and condition of the appliance.
• Open the oven door to dissipate heat (ATTENTION! High-temperature steam), after the appliance is cooled down completely, clean and wipe the water in the cavity with a damp cloth. The appliance can be used again.
6.6.3 Application of auto menu
Users can press the Mode [![]() ] key to select a totally of 50 built-in recipes, the auto menu indicator (
] key to select a totally of 50 built-in recipes, the auto menu indicator (![]() ) will light on the details of each menu are as follow,
) will light on the details of each menu are as follow,
Code | Recipe Name | Cooking function | Temkpeinrgature (C) | Cooking Time (Min.) |
| P-01 | Steam tofu with scallops | High Steam | 115 | 13 |
| P-02 | Steamed tofu | Steam | 100 | 8 |
| P-03 | Chinese steamed eggs | Step 1: Steam Step 2: Steam | Step 1: Temperature setting 100°C and operate for 12 minutes; Step 2: Temperature setting 100°C and operate for 7 minutes. | |
| P-04 | Steamed eggplant with soy sauce | High Steam | 110 | 20 |
| P-05 | Steamed pumpkin with garlic | High Steam | 110 | 15 |
| P-06 | Steamed Zucchini | High Steam | 115 | 25 |
| P-07 | Steamed minced pork with mushroom | High Steam | 115 | 20 |
| P-08 | Steamed minced pork with squid | High Steam | 115 | 12 |
| P-09 | Soy sauce steamed pork ribs | High Steam | 115 | 25 |
| P-10 | Steam pork ribs | High Steam | 115 | 35 |
| P-11 | Steamed chicken feet in soy sauce | High Steam | 115 | 12 |
| P-12 | Steamed pork | Steam | 100 | 20 |
| P-13 | Steamed pork belly with wood ear, mushroom, mustard, and red dates | High Steam | 110 | 20 |
| P-14 | Steamed pork belly with bacon | High Steam | 115 | 20 |
| P-15 | Steamed chicken with lily flower and wood ear | High Steam | 115 | 25 |
| P-16 | Lotus leaves steamed chicken with mushroom | High Steam | 115 | 22 |
| P-17 | Steamed Siu Mai | High Steam | 115 | 17 |
| P-18 | Steamed shrimp with garlic | High Steam | 105 | 12 |
| P-19 | Steamed hairy crab | Steam | 100 | 30 |
| P-20 | Steamed Grouper | High Steam | 115 | 17 |
| P-21 | Steamed dace | High Steam | 115 | 16 |
| P-22 | Steamed sea bass | Steam | 100 | 17 |
| P-23 | Steamed fish with mushroom and wood ears | High Steam | 115 | 40 |
| P-24 | Steamed abalone | High Steam | 115 | 10 |
| P-25 | Chinese Green Mochi | High Steam | 110 | 15 |
| P-26 | Beancurd sheet sweet soup | Step 1: Steam Step 2: High Steam | Step 1: Temperature setting 100°C and operate for 10 minutes; Step 2: Temperature setting 115°C and operate for 35 minutes. | |
| P-27 | Dishes and soup set meal | Step 1: High Steam Step2: High Steam | Step 1: Temperature setting 115°C and operate for 26 minutes; Step 2: With vegetables added. Temperature setting 115°C and operate for 9 minutes. | |
| P-28 | Steamed cake with raisin | Steam | 100 | 125 |
| P-29 | Roasted chicken with lemon | Step 1: Convection and Upper Grill Step 2: Convection and Upper Grill | Step 1: Temperature setting 200°C and operate for 40 minutes; Step 2: Temperature setting 220°C and operate for 15 minutes. | |
| P-30 | Kebab | Upper and Lower Grill | 200 | 20 |
| P-31 | Baked potato | Step 1: Upper and Lower Grill Step 2: Upper and Lower Grill | Step 1: Temperature setting 230°C and operate for 45 minutes Step 2: Temperature setting 180°C and operate for 20 minutes | |
| P-32 | Potato chips | Upper and Lower Grill | 210 | 22 |
| P-33 | Korean grilled squid | Upper and Lower Grill | 200 | 15 |
| P-34 | Scallops with butter | Upper and Lower Grill | 200 | 8 |
| P-35 | Garlic roasted toast | Upper and Lower Grill | 115 | 25 |
| P-36 | Cookies | Step 1: Upper and Lower Grill Step 2: Upper and Under Grill | Step 1: Temperature setting 220°C and preheat for 3 minutes; Step 2: Temperature setting 150t and operate 35 minutes | |
| P-37 | Cream Puffs | Step 1: Upper and Lower Grill Step 2: Upper and Lower Grill | Step 1: Temperature setting 220°C and preheat for 3 minutes; Step 2: Temperature setting 190°C and operate for 27 minutes. | |
| P-38 | Swiss Roll | Step 1: Upper and Lower Grill Step 2: Upper and Lower Grill | Step 1: Temperature setting 230°C and preheat for 3 minutes; Step 2: Temperature setting 160°C and operate for 18 minutes | |
| P-39 | Madeleine cake | Upper and Lower Grill | 200 | 12 |
| P40 | Butterfly Cracker | Upper and Lower Grill | 180 | 30 |
| P41 | Banana cake | Upper and Lower Grill | 200 | 25 |
| P42 | Roast pork ribs | Medium Steam Grill | 230 | 25 |
| P43 | Grilled salmon steak | Step 1: Medium Steam Grill Step 2: Medium Steam Grill | Step 1: Temperature setting 220°C and operate 15 minute Step 2: Turn it over. Continue with a temperature setting of 220°C and operate for 5 minutes. | |
| P44 | Roasted corn | Medium Steam Grill | 200 | 35 |
| P45 | Grilled dumplings | Medium Steam Grill | 150 | 20 |
| P46 | Glutinous rice ball with red beans | Medium Steam Grill | 200 | 30 |
| P47 | Roasted chicken wings | Medium Steam Grill | 180 | 20 |
| P48 | Roasted chicken | Medium Steam Grill | 200 | 30 |
| P49 | Roasted eggplant | Step 1: High Steam Step 2: Medium Steam Grill | Step 1: Temperature setting 120°C and operate for 30 minutes Step 2: Cut in halt with marinade added. Continue with a temperature setting of 180°C and operate for 10 minutes. | |
| P-50 | Roasted purple sweet potato | Medium Steam Grill | 180 | 25 |
Note:
- Some of the recipes consist of two steps.
- The above cooking time is for reference only, the user may adjust the cooking time according to the actual cooking condition and experiences.
Cooking Tips:
- Frosted food may take a longer time to cook. Users may adjust the cooking time according to the actual cooking condition.
- Always pay attention to the food during cooking to avoid food burns.
- When cooking, steam may appear on the glass of the oven door due to water evaporating from the food. It is a normal phenomenon and does not affect the operation. Never rub the glass with water during operation or just after use, otherwise the glass may crack.
- To avoid overheating, the heating elements are equipped with an auto power switching device. Heating elements will turn off temporarily when the oven reaches the set temperature, and resume operation when the oven cools down. This is a normal phenomenon.
- Do not remove the food during operation; otherwise, the food may not be heated up adequately, affecting the cooking results.
6.7 Change cooking functions
During operation, if the user needs to change the set cooking function, time, or temperature, press the Start/pause [![]() ] key once to suspend the operation. Users can adjust the cooking function, time, or temperature setting. Once completed, press the Start/pause [
] key once to suspend the operation. Users can adjust the cooking function, time, or temperature setting. Once completed, press the Start/pause [![]() ] key to confirm, and continue the operation.
] key to confirm, and continue the operation.
6.8 Application of oven lamp
During operation, the user can press the Lamp [![]() ] key to switch on the oven light in order to check the ingredient cooking status. To switch off the light, press the Lamp [
] key to switch on the oven light in order to check the ingredient cooking status. To switch off the light, press the Lamp [![]() ] key again, or wait a few minutes until the oven light goes off.
] key again, or wait a few minutes until the oven light goes off.
Troubleshooting
The phenomenon below is normal conditions:
| Phenomenon | Cause |
| Steam cluster in air outlet vent | Redundant steam will be cooled down and discharged through the air outlet vent during operation while a part of it will be clustered in the air outlet vent. |
| Voltage fluctuation will influence cooking time and performance | When voltage fluctuates, the appliance can still function normally. But with the influence of high or low voltage, the output power will be higher or lower respectively, affecting the cooking time and performance. |
Check the following if the appliance does not work:
- Is the power cord connected properly?
- Is the oven door closed properly?
- Is the water tank installed correctly?
- If MCB is tripped or the fuse blew out?
Operation Tips:
- Suggested minimum working time not less than 5 minutes.
- If the oven door is open during operation, the operation will be paused immediately; when the door is closed, the operation will resume again.
Troubleshooting
Phenomenon | Possible cause | Solution |
| Cannot operate |
|
|
| The display does not light up |
|
|
| Abnormal indication on the display |
| Contact Shun Hing Electric Service Centre Limited to check and repair |
| Water or steam leakage from the oven door |
|
|
| Temperature not rise |
| Contact Shun Hing Electric Service Centre Limited to check and repair |
| Gas leakage from the oven door |
| Contact Shun Hing Electric Service Centre Limited to check and repair |
| The oven light is not lit |
| Contact Shun Hing Electric Service Centre Limited to check and repair |
| Exhaust fan malfunction |
| Contact Shun Hing Electric Service Centre Limited to check and repair |
| Button failure |
| Contact Shun Hing Electric Service Centre Limited to check and repair |
| No steam generated |
| Contact Shun Hing Electric Service Centre Limited to check and repair |
If error codes are found on the display, check the following table carefully and follow the solutions before repairing.
Error Code | Cause | Solution |
| E-1 | High-temperature protection ((Temperature in the sensor is higher than the protection value) | Contact Shun Hing Electric Service Centre Limited to check and repair |
| E-2 | Evaporator high-temperature protection (Temperature in the evaporator is higher than the protection value) | Contact Shun Hing Electric Service Centre Limited to check and repair |
| E-3 | Cavity low-temperature protection (Long idle time resulting in cavity temperature keeps lower than 35°C, which is not suitable to continue cooking function) | Stop the operation and restart the appliance. If the situation continues, contact Shun Hing Electric Service Centre Limited to check and repair |
| E-4 | Evaporator low-temperature protection (No temperature rise after operating 5 minutes. Temperature of evaporator keeps lower than 35°C) | Stop the operation and restart the appliance. If the situation continues, contact Shun Hing Electric Service Centre Limited to check and repair |
| E-5 | Sensor failure | Contact Shun Hing Electric Service Centre Limited to check and repair |
| E-6 | Connection failure | Contact Shun Hing Electric Service Centre Limited to check and repair |
Special Avowal
- The content in the manual has been checked. Our company reserves the hermeneutic power to any printing errors or misunderstandings of the content.
- If there are technical improvements on the appliance, the operation manual will be updated in a new version without prior notice. The product appearance and specification are subject to the manufacturer’s information.
- In case there is any inconsistency or conflict between the English versions and Chinese versions of the terms, the Chinese versions shall prevail.
- E-copy of the user manual can be sent by e-mail on request, please call Shun Hing Electric Works and Engineering Co., Ltd. at 2861 2767.
After Sales Service
- For any defect, in the judgment of the technician from Shun Hing Electric Service Center Limited, caused under normal use, our company is responsible for repairing any parts of the said electrical appliance free of charge within one year guarantee period commencing from the date of purchase. Any defective part which has been replaced shall become our property. Warranty service does not cover the repair or replacement of the following spare parts and consumable parts such as power cord, water tank, oven door, enclosure, food tray, grill rack, oil tray, water absorber, heat Insulating glove, etc. If the appliance is used improperly, for commercial use or semi-commercial use, or not following the instructions in the operation manual, the warranty becomes invalid and our company will refuse any liability and repairing cost for the damage caused.
- The user must present the official invoice/redemption voucher and the warranty registration card with the chop from the sales point/redemption center for maintenance. For inquiries, please call Shun Hing Electric Service Center Limited hotline at 2406 5666.
![]()
![]() SINCE 1953
SINCE 1953
SHUN HING ELECTRIC WORKS AND ENGINEERING CO., LTD.
Office: Room 909-912,9/F., Peninsula Centre, 67 Mody Road, Tsimshatsui East, Kowloon, H.K.
Tel: 2861 2767
Fax: 2865 6706
Website: http://www.rasonic.com
E-mail: [email protected]
11/F, Shun Hing Centre, 2 Shing Yiu Street, Kwai Chung, N.T. HK
Service-Hotline: 2406 5666
Fax No.: 2408 0316
Website: http://www.shesc.com/en
Customer Service Centres:
1/F, Shun Hing Centre, 2 Shing Yiu Street, Kwai Chung, N.T.
20/F, Sino Cheer Plaza, 23-29 Jordan Road, Jordan, Kowloon
22/F, Parkview Centre, 7 Lau Li Street, Tin Hau, Hong Kong
For the latest information on Hong Kong and Macau service centers, please visit http://www.shesc.com/en
RSG-R0321


w Microwave Oven With Grill User Manual")


