![]()
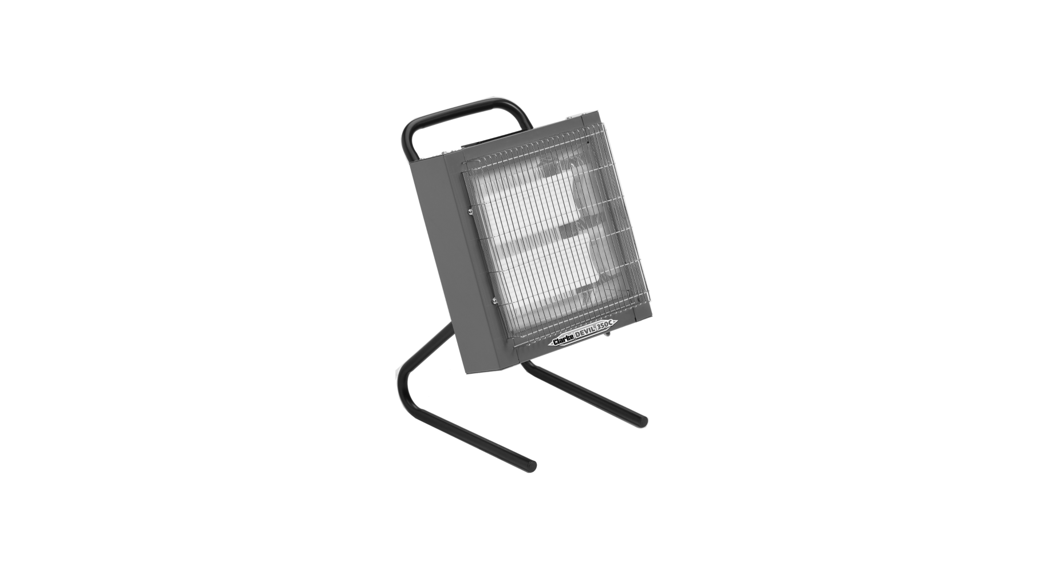
Devil 350C Ceramic Heater
Instruction Manual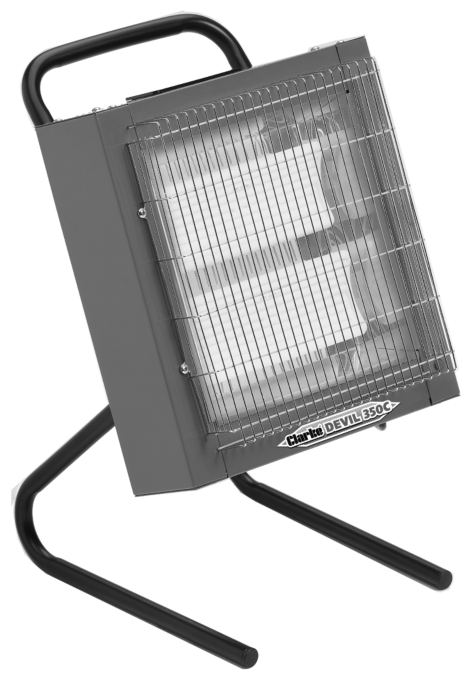
CERAMIC HEATER
MODEL NO: DEVIL 350C
PART NO: 6920252
OPERATING & MAINTENANCE INSTRUCTIONS
INTRODUCTION
Thank you for purchasing this CLARKE Ceramic Heater.
Before attempting to use this product, please read this manual thoroughly and follow the instructions carefully. In doing so you will ensure the safety of yourself and that of others around you, and you can look forward to your purchase giving you long and satisfactory service.
SPECIFICATIONS
| Model Number | Devil 350C 230V |
| Part Number | 6920252 |
| Weight | 8 kg |
| Dimensions (L x W x H) | 610 x 410 x 400mm |
| Rated input Current | 10.4 A |
| Supply Voltage | 230V/50 Hz |
| Fuse Rating | 13A |
| Ingress Protection Rating | IP20 |
| Max Heat Output | 2.4kW (1.2kW per element) |
Please note that the details and specifications contained herein, are correct at the time of going to print. However, CLARKE International reserve the right to change specifications at any time without prior notice.
GUARANTEE
This product is guaranteed against faulty manufacture for a period of 12 months from the date of purchase. Please keep your receipt which will be required as proof of purchase.
This guarantee is invalid if the product is found to have been abused or tampered with in any way, or not used for the purpose for which it was intended.
Faulty goods should be returned to their place of purchase, no product can be returned to us without prior permission.
This guarantee does not effect your statutory rights.
THE FOLLOWING TABLE ADDRESSES THE INFORMATION REQUIREMENTS OF REG.2015/1188
| Item | Symbol | Value | Unit |
| Heat output | |||
| Measured seasonal space heating energy efficiency | 35% | ||
| Nominal heat output | Pnom | 2.4 | kW |
| Minimum heat output (indicative) | P min | 1.2 | kW |
| Maximum continuous heat output | P max | 2.4 | kW |
| Auxiliary electricity consumption | |||
| At nominal heat output | elmax | n/a | kW |
| At minimum heat output | el min | n/a | kW |
| In standby mode | elSB | 0.001 | kW |
| Type of heat input for electric storage local heaters only | |||
| Manual heat charge control with integrated thermostat | No | ||
| Manual heat charge control with room and/or outdoor temperature feedback | No | ||
| Electronic heat charge control with room and/or outdoor temperature feedback | No | ||
| Fan assisted output | No | ||
| Type of heat output/room temperature control (select one) | |||
| Single stage heat output, no temperature control | No | ||
| With mechanical thermostat temp control | No | ||
| With electronic temperature control | Yes | ||
| Electronic temperature control with day timer | No | ||
| Electronic temperature control with week timer | No | ||
| Other control options (multiple selections possible) | |||
| Room temperature control with presence detection | No | ||
| Room temperature control with open window detection | Yes | ||
| Room temperature control with distance control option | No | ||
| Room temperature control with adaptive start control | No | ||
| Room temperature control with working time limitation | Yes | ||
| Room temperature control with black bulb sensor | Yes | ||
GENERAL SAFETY RULES
Please keep these instructions in a safe place for future reference.
- These heaters are for INDOOR USE ONLY in well insulated spaces.
- DO NOT expose the heater or power cable to rain or wet conditions. Any water entering the heater will increase the risk of electric shock. DO NOT use this heater in a bathroom, shower room or any other wet environment.
- NEVER locate the heater near combustible materials such as curtains, furniture etc. Allow at least 1 metre distance.
- DO NOT locate the heater close to an adjacent wall or low ceiling. Allow a distance of at least 1 metre from a wall or ceiling. Avoid placing the heater directly below power socket outlets.
- Take care to ensure that the wire guard cannot be covered.
- DO NOT operate heater in explosive atmospheres such as in the presence of flammable liquids, gases or dust such as in a paint spray booth or any explosive environment.
- NEVER stand the heater on a movable vehicle where it could tip over.
- DO NOT allow the heating elements to become covered with dust which could become a fire hazard. If used in a dusty workplace it should be cleaned as described under Cleaning and Maintenance.
- NEVER touch the heating elements for at least 15 minutes after switching off.
- DO NOT leave the heater unattended.
- If children are present always use with a fireguard.
- Store the heater out of the reach of children and do not allow persons unfamiliar with these instructions to operate it.
- This heater must only be located on a firm, level surface but is fitted with an anti-tilt switch which will turn the unit off if it should tip over.
- ALWAYS disconnect the heater from the power supply before moving it.
- NEVER leave the heater unattended while in use. Turn off at night if unattended.
ELECTRICAL SAFETY
- Electrical appliances must match the power outlet. NEVER modify the plug in any way. DO NOT use adaptor plugs with earthed (grounded) appliances. Correct plugs and outlets will reduce the risk of electric shock.
- DO NOT abuse the electrical cable. Never use the cable for pulling or unplugging the heater. Keep the cable away from sources of heat, oil, sharp edges or moving parts. Damaged or tangled cables increase the riskof electric shock.
- DO NOT use this product with an extension cable.
- ALWAYS disconnect from the power supply before moving the heater or performing any cleaning or maintenance tasks.
- Keep the power cable well away from machines and ensure an adequate electrical supply is close at hand so that the operation is not restricted by the length of the cable.
- Inspect the power cable regularly for signs of damage. DO NOT use if it is damaged and ALWAYS keep it away from the source of heat.
- Check the heater for damage before use. Any damage should be properly repaired or the part replaced. If in doubt, DO NOT use. Consult your local CLARKE dealer.
SERVICE & REPAIRS
- If necessary, have your heater repaired by a qualified person using identical replacement parts. This will ensure that the safety of the appliance is maintained.
ENVIRONMENTAL RECYCLING POLICY
![]() Through purchase of this product, the customer is taking on the obligation to deal with the WEEE in accordance with the WEEE regulations in relation to the treatment, recycling & recovery and environmentally sound disposal of the WEEE.
Through purchase of this product, the customer is taking on the obligation to deal with the WEEE in accordance with the WEEE regulations in relation to the treatment, recycling & recovery and environmentally sound disposal of the WEEE.
In effect, this means that this product must not be disposed of with general household waste. It must be disposed of according to the laws governing Waste Electrical and Electronic Equipment (WEEE) at a recognised disposal facility.
This product contains valuable raw materials. Metal products should be takento your local civic amenity site for recycling of metal products. Recycle unwanted materials instead of disposing of them as waste. All unwanted accessories and packaging should be sorted and taken to a recycling centre for disposal in a manner which is compatible with the environment.
ELECTRICAL CONNECTIONS
DEVIL 350C (230V) UNITS![]() WARNING: READ THESE ELECTRICAL SAFETY INSTRUCTIONS THOROUGHLY BEFORE CONNECTING THE PRODUCT TO THE POWER SUPPLY.
WARNING: READ THESE ELECTRICAL SAFETY INSTRUCTIONS THOROUGHLY BEFORE CONNECTING THE PRODUCT TO THE POWER SUPPLY.
The 230v model is provided with a 13 amp BS 1363 plug, fitted with a 13amp fuse and MUST be connected to a standard, 230 Volt (50Hz) electrical supply, preferably through a suitably fused isolator switch.
If the plug has to be changed because it is not suitable for your socket or because of damage, it must be removed and a replacement fitted, following the wiring instructions shown below. The old plug must be discarded safely as insertion into a power socket could cause an electrical hazard.
![]() WARNING: THE WIRES IN THE POWER CABLE OF THIS PRODUCT ARE COLOURED IN ACCORDANCE WITH THE FOLLOWING CODE:
WARNING: THE WIRES IN THE POWER CABLE OF THIS PRODUCT ARE COLOURED IN ACCORDANCE WITH THE FOLLOWING CODE:
BLUE = NEUTRAL BROWN = LIVE YELLOW AND GREEN = EARTH.
The wires in the mains lead should be wired up in accordance with the following colour code:
- Connect the GREEN & YELLOW wire to the plug terminal marked with a letter E or

- Connect the BROWN wire to the plug terminal marked a letter “L”.
- Connect the BLUE wire to the plug terminal marked a letter “N”.

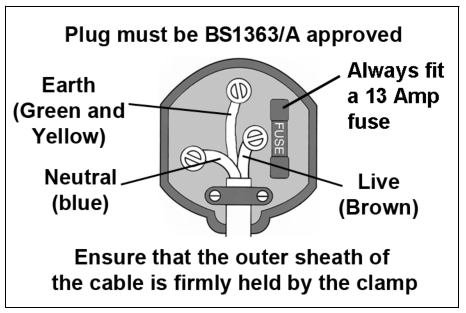
The fuse in the plug must be replaced with one of the same rating and this replacement must be ASTA approved to BS1362.
We strongly recommend that this machine is connected to the mains supply via a Residual Current Device (RCD).
UNPACKING AND ASSEMBLY
Before assembling, please check contents against the following list and advise your dealer immediately if any parts are missing.
- 1 x Heater
- 2 x Legs
- 1 x Handle
- 1 x Remote Controller (batteries not included)
- 1 x Set fixings (screwed into back of the heater)
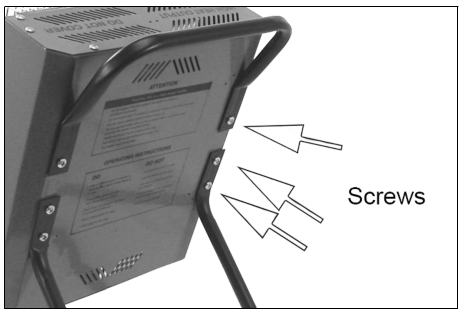
![]() CAUTION: TAKE CARE TO REMOVE ALL PACKAGING MATERIALS FROM WITHIN THE FRONT OF THE HEATER. YOU WILL NEED TO RELEASE THE SCREWS SECURING THE FRONT GRILLE IN ORDER TO DO THIS.
CAUTION: TAKE CARE TO REMOVE ALL PACKAGING MATERIALS FROM WITHIN THE FRONT OF THE HEATER. YOU WILL NEED TO RELEASE THE SCREWS SECURING THE FRONT GRILLE IN ORDER TO DO THIS.
- Remove the 4 x lower screws from the heater and use them to attach the legs as shown.
- Repeat with the two remaining screws to fit the handle as shown.
- DO NOT use the heater without fitting the legs.
OPERATION
![]() WARNING: FOR SAFE OPERATION OF THIS HEATER IT IS ESSENTIAL TO READ THESE INSTRUCTIONS BEFORE USE.
WARNING: FOR SAFE OPERATION OF THIS HEATER IT IS ESSENTIAL TO READ THESE INSTRUCTIONS BEFORE USE.
WARNING: PLEASE NOTE THAT THE HEATING ELEMENTS OF THIS PRODUCT DO NOT GLOW WHILST IN OPERATION. ANY PICTURES SHOWING THIS IN ADVERTISING MATERIAL ARE FOR ILLUSTRATION ONLY.
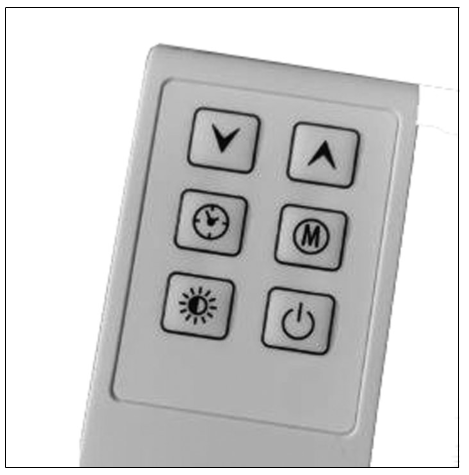
USING THE REMOTE CONTROL
All operations must be done using the remote control.
- 2 x AAA batteries are required and are installed as shown by the diagram found inside the control unit.
- The remote control must be directed at the heater display panel. It has a range of approx 2.5 metres and must be aimed at the correct angle.
- The function of each button on remote control is the same as operation panel.

MANUAL OPERATION
- Stand the heater on a firm, level surface and following all safety precautions, connect to a suitable power supply.
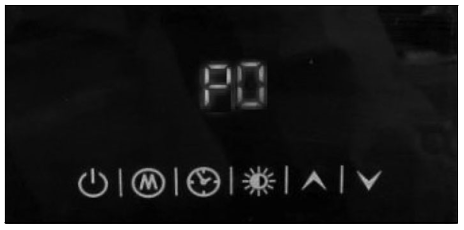
• The heater is equipped with an anti-tilt switch that automatically cuts the power off should the heater tip over. If this happens, stand the heater upright and it will immediately re-set. - Switch on the power at the primary switch.
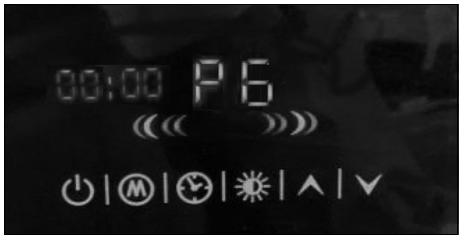
• The heater will be in Standby with the display showing PO.
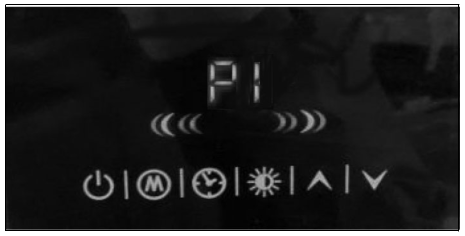
- Press
 to turn on the upper heating lamp and the screen will show P1.
- Press
 to select the mode from P1-P6, referring to the different temperature settings.
P1 Only the upper element is working P2 24o P3 26o P4 28o P5 30o P6 Both elements are working • During mode P2-P5 the upper element is working all the time and the lower element will be turned off automatically according to the set temperature.
- The user can change from mode
P1 and P6 by pressing . The screen will show a cascade effect when in mode P6.
- To power off the unit, press again, the heater stops working, and returns to standby with the screen showing ‘PO’.
- Then switch off the main switch and unplug the heater.
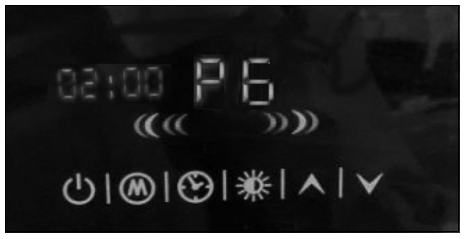
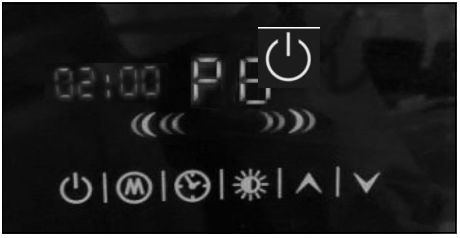
SETTING THE SHUTDOWN TIMER
- Press
 to set the shutdown timer. The time on the screen flickers with initial status 00:00.
- Press and to set the
 and
and  time to turn the heater off.
• It increases/decreases 1 hour per press. - Press
 when you finish setting and the heater will be in the countdown mode.
• It will shut down 2 hours later. - When the time is up, the heater turns off automatically and enters the standby state P0.
FUNCTION FOR DETECTING OPENING WINDOWS
- When the ambient temperature drops over 5º C within 10 minutes, the heater will turns off automatically and enters a standby state with three alarm beeps.
• Users need to turn on the heater manually by pressing-
CLEANING & MAINTENANCE
Always allow the heater to cool down for at least 15 minutes and disconnect it from the mains supply before performing any maintenance tasks.
PERIODICALLY
- Inspect the power cable for damage. Undue heat will cause the cable to stiffen and crack. If this is found, have the cable replaced. Check your cable routing and ensure it is well away from the heat source.
- Should the heater become dirty, disconnect it from the power supply, remove the front guard and wipe the reflector and elements with a clean damp cloth. DO NOT use abrasive cleaners. Take care that no moisture enters the heater.
- Refer to your CLARKE dealer if internal maintenance is required.
- When storing the heater, allow it to cool down before storing it in a dry, well ventilated place.
ELEMENT REPLACEMENT
Ceramic heating elements are long lasting and should not need replacing under normal circumstances. Should this become necessary take the heater to your CLARKE dealer.
FAULT FINDING
| SYMPTOM | PROBLEM | SOLUTION |
| Heater does not operate, although plugged in and switched on. | Plug is loose/bad connection. | Remove the plug & check the connection of the plug and socket. |
| Fuse blown. | Replace if necessary and investigate the cause. If the fuse blows repeatedly, consult your CLARKE dealer. | |
| No power at socket outlet. | Insert the plug into a suitable socket. | |
| Tilt safety switch is disabling the heater. | Ensure heater is upright. If the switch does not re-set, consult your CLARKE dealer. | |
| Heater does not respond to remote controller | Batteries defective. | Replace batteries. |
| Controller is out of range or not pointing at the display panel. | Move closer or try different angles of pointing the controller at the heater. | |
| Unit damaged | Consult your CLARKE dealer. |
PARTS DIAGRAM
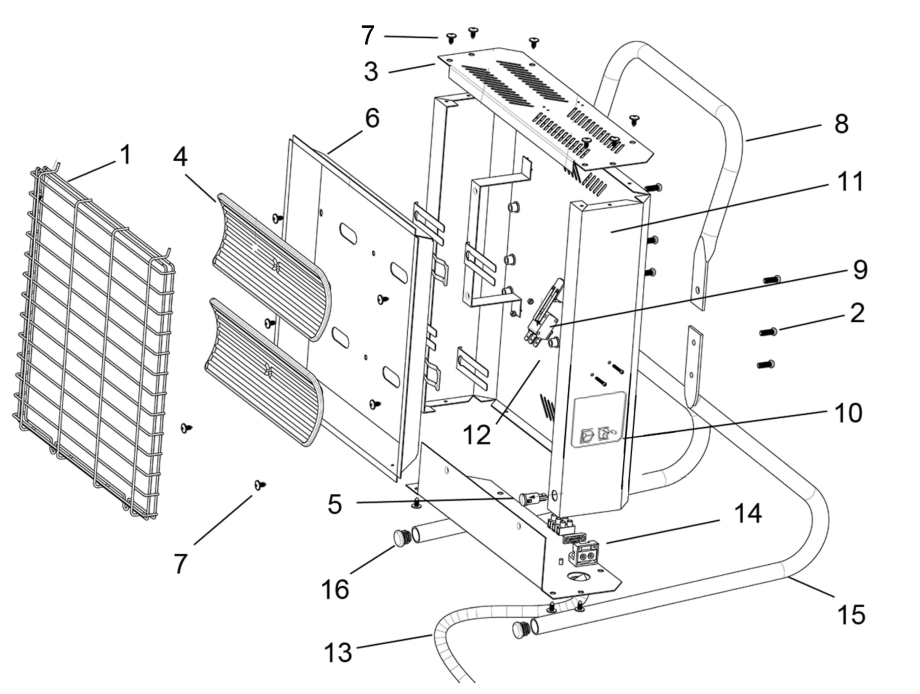
| No | Description | No | |
| 1 | Front Guard | 9 | Tip-Over Switch |
| 2 | M6x15 Pan Head Screw | 10 | Switch Assembly |
| 3 | Top Panel | 11 | Casing |
| 4 | Ceramic Heat Element | 12 | Screw |
| 5 | Neon Indicator Lamp | 13 | Power Cable & Plug |
| 6 | Reflector Panel | 14 | Cable Clamp |
| 7 | No10 x12 Pan Head Screw | 15 | Leg |
| 8H | 8Handle | 16 | End Plug |
| n/a | Remote Control Unit |
A selection of suitable extension leads & plugs is available from your nearest CLARKE dealer, for further information, contact your nearest dealer, or telephone CLARKE International Sales department on 01992 565300.
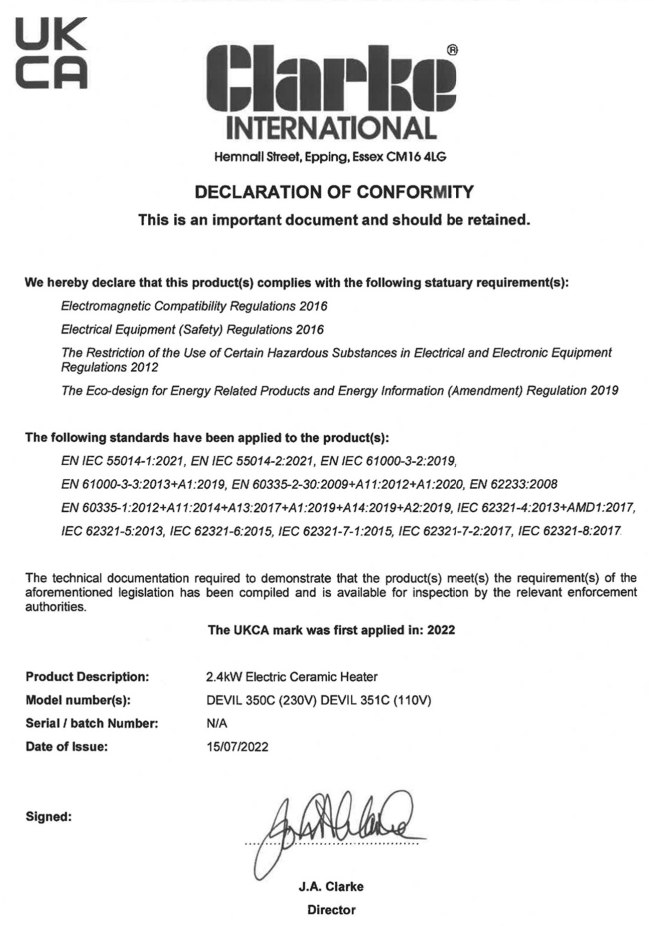
DECLARATIONS OF CONFORMITY
 |  |

PARTS & SERVICE:
0208 988 7400
Parts Enquiries
[email protected]
Servicing & Technical Enquiries
[email protected]
SALES: UK 01992 565333 or Export 00 44 (0)1992 565335![]() INTERNATIONAL Hemnall Street, Epping, Essex CM16 4LG
INTERNATIONAL Hemnall Street, Epping, Essex CM16 4LG
www.clarkeinternational.com ![]()


