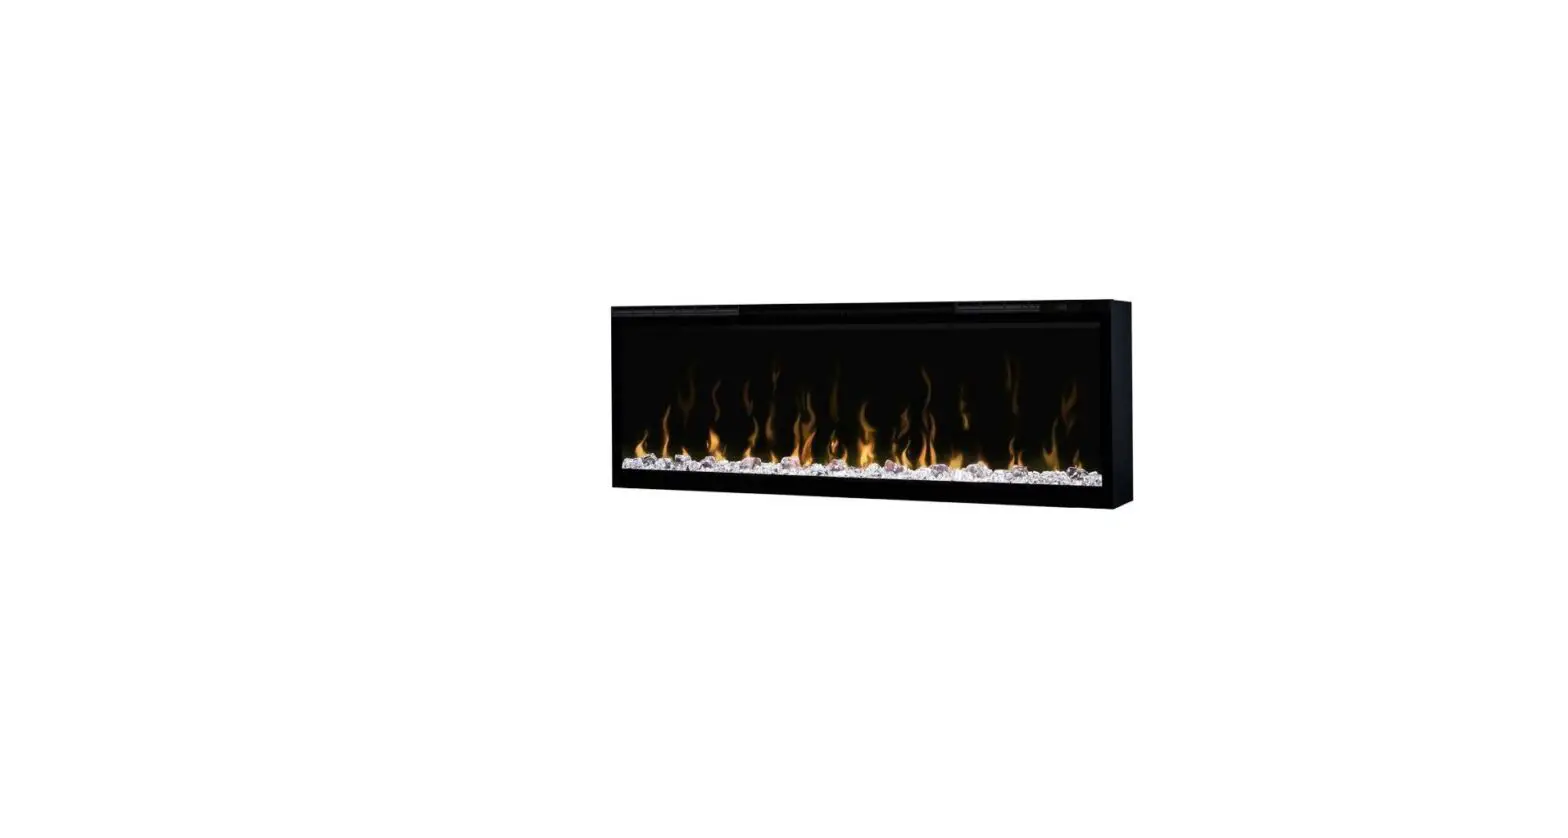
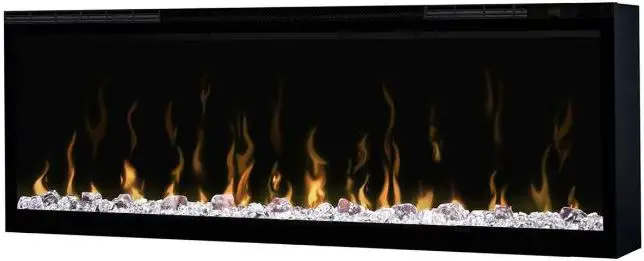
REAL FLAME XL F50 Wall Mounted Electric Fireplace
The product is compliant with the local electrical standards of all countries where offered for sale by Glen Dimplex and its subsidiaries.
WELCOME
- Thank you for purchasing the IGNITE XL electric fireplace. The edge-to-edge panoramic display will ensure you create endless memories in front of this dazzling electric fire.
CAUTION: Read all instructions and warnings carefully before starting installation. Failure to follow these instructions may result in a possible electric shock, fire hazard and will void the warranty.
Important Safety Advice
- When using electrical appliances, basic precautions should always be followed to reduce the risk of fire, electrical shock and injury to persons, including the following:
- If the appliance is damaged, check with the supplier before installation and operation.
- Do not use outdoors.
- Do not use in the immediate surroundings of a bath, shower or swimming pool.
- Do not locate the appliance immediately below a fixed socket outlet or connection box.
- Do not use this heater if it has been dropped.
- Do not use if there are visible signs of damage to the heater.
- Use this heater on a horizontal and stable surface.
The appliance is not intended for use by persons (including children) with reduced physical, sensory or mental capabilities, or lack of experience and knowledge unless they have been given supervision or instruction concerning use of the appliance by a person responsible for their safety. Children should be supervised to ensure that they do not play with the appliance. Children shall not plug in, regulate and clean the appliance or perform user maintenance.
CAUTION: Some parts of this product can become very hot and cause burns. Particular attention has to be given where children and vulnerable people are present.
- Do not use this appliance in series with a thermal control, a program controller, a timer or any other device that switches on the heat automatically, since a fire risk exists when the heater is accidentally covered or displaced.
- Although this appliance complies with safety standards, we do not recommend its use on deep pile carpets or on the long hair type of rugs.
- In the event of a fault disconnect the appliance.
- Disconnect the appliance when not required for long periods.
- The appliance must be positioned so that the plug is accessible. Electrical Requirements section for more details. If the supply cord is damaged it must be replaced by the manufacturer or service agent or a similarly qualified person in order to avoid a hazard.
- Keep the supply cord away from the front of the appliance.
Warning: This appliance must be earthed.
- The use of an extension lead or multi-plug adaptor is not advised when connecting this product to the mains.
- Connection through these devices could lead to a risk of overloading, overheating and even fire at the extension lead or adaptor due to inadequate connection quality.
- This heater must be used on an alternating current supply (~) only and the voltage marked on the heater must correspond to the supply voltage.
WARNING: In order to avoid overheating, do not cover the appliance. Do not place material or garments on the appliance, or obstruct the air circulation around the appliance.
- The appliance carries a DO NOT COVER warning symbol.
- This appliance is equipped with a device to control the room temperature. Do not use this appliance in small rooms when they are occupied by persons not capable of leaving the room on their own, unless constant supervision is provided.
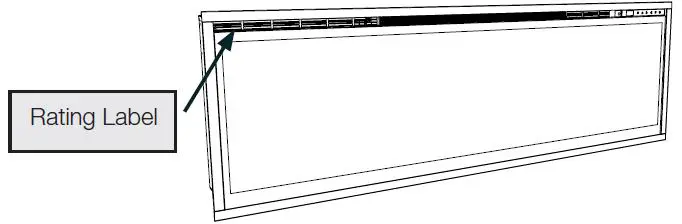
- The electrical information regarding your electric fireplace can be found on the rating label located on the top of the unit.
- If you have any technical questions or concerns regarding the operation of your electric fireplace or require service contact the relevant customer service as listed on your warranty card.
WARNING – KEEP BATTERIES OUT OF REACH OF CHILDREN
- Swallowing may lead to serious injury in as little as 2 hours or death, due to chemical burns and potential perforation of the esophagus.
- f you suspect your child has swallowed or inserted a button battery immediately call the 24-hour Poisons Information Centre on 13 11 26 (in Australia) or 0800 764 766 (in New Zealand) for fast, expert advice.
- Examine devices and make sure the battery compartment is correctly secured, e.g. that the screw or other mechanical fastener is tightened. Do not use if the compartment is not secure.
- Dispose of used button batteries immediately and safely. Flat batteries can still be dangerous.


INSTALLATION
CAUTION: Ensure installation does not allow the fireplace to be in direct contact with building vapor barrier or insulation and meets all local building codes.
NOTE: A dedicated 10 AMP, 230-240 Volt circuit is required. A dedicated circuit is preferred but not essential in all cases. A dedicated circuit will be required if, after installation, the circuit breaker trips or fuse blows on a regular basis when the heater is operating.
WARNING: Construction and wiring must comply with local building codes and other applicable regulations to reduce the risk of fire, electric shock, and injury to persons.
WARNING: To reduce the risk of fire, electric shock or injury to persons, always use a licensed electrician.
WARNING: To reduce the risk of fire, do not store or use gasoline or other flammable vapors or liquids in the vicinity of the heater.
- Select a location that is not susceptible to moisture and is away from drapes, furniture, and high traffic.
- Unpack the fireplace and hardware from the box.
NOTE: Leave the front glass and partially reflective glass, safely, in the box until the time you are ready to install it. - Store the fireplace in a safe, dry and dust-free location until you are ready to install the fireplace. Installation.
CAUTION: Two people will be required for various steps of this procedure. This design of this unit allows three options for installation: partial recess, flush mounted or sub-surface mounted.
CAUTION: Sub-surface mounting should be limited to ½ in. (12 mm) to ensure adequate airflow of heated air out of the firebox area.
- Prepare a wall with a framed opening of 16 in. (406 mm) high,
- XLF50 – 50 ⅝ in. (1287 mm)
- XLF74 – 74 ⅝ in. (1897 mm)
- XLF100 – 100 ⅝ in. (2557 mm) wide, with a bottom sill that is a minimum of 4 in. (102 mm) deep. The sill can be constructed to support the front of the unit to allow the power supply wires to easily be run behind or flush with the back of the unit and a pass-through hole drilled for electrical wire routing.
WARNING: Do not attempt to wire your own new circuits. To reduce the risk of fire, electric shock or injury to persons, always use a licensed electrician.
WARNING: Ensure that the circuit on which the fireplace is to be installed has the power cut off at the service panel until installation is complete.
- The unit is provided with an installed ¾ in. (20 mm) trim. Depending on the installation, this trim can be removed by removing the securing screws and the 4 trim pieces.
- Lift the fireplace, from the bottom and the handles located on the back, and insert them into the opening to the desired depth.
- Using a bubble level (supplied) ensure that the fireplace is level within the framing. Adjust as required.
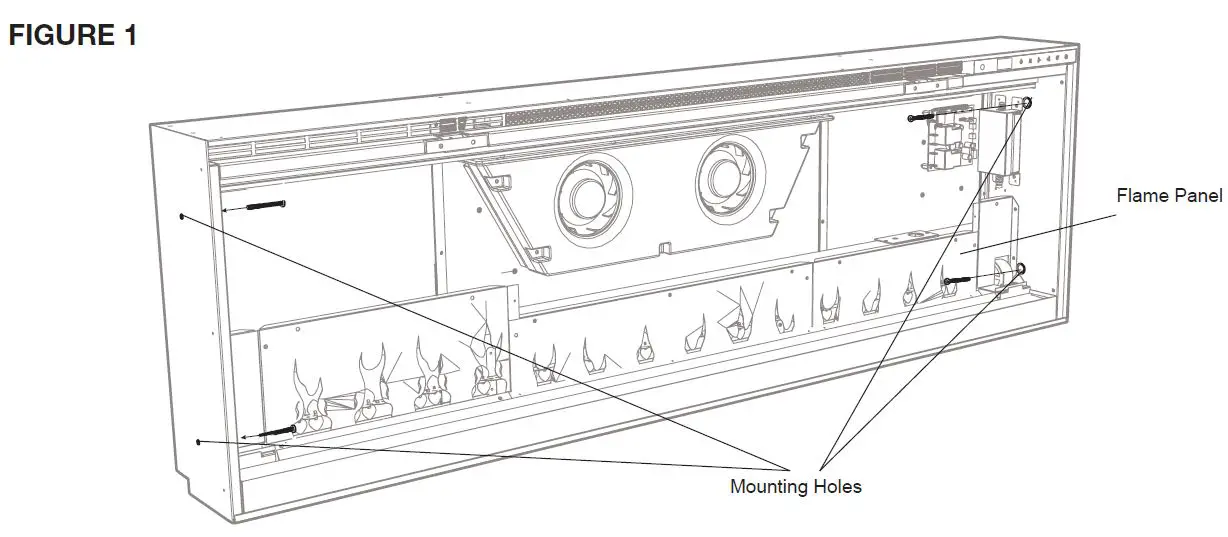
- Drive four supplied mounting screws through the four mounting holes located on the inside surface of the fireplace chassis, into wall studs (Figure 1).
NOTE: The unit can also be installed without the trim for a seamless installation look.
For Bathroom Use
- If this unit is installed in a bathroom it must be protected by a GFI receptacle or circuit. If a receptacle is used it must be readily accessible.
- To prevent electrical shock this unit is an electrical appliance that is NOT watertight and must be installed as to prevent water from entering the unit. This must be installed away from showers, tubs, etc.
- Never locate a fireplace where it may fall into a bathtub or other water container.
Final Assembly
- Locate and remove the 12 screws securing the partially reflective glass bracket to the unit, along the top of the opening, and set the bracket and screws aside.
- Remove the provided suction cup from the inside cavity of the unit (only for XLF74 and XLF100 units).
- Before installation ensure that the front glass and the partially reflective glass are clean. Particles can be removed by dusting lightly with a clean dry cloth. To remove fingerprints or other marks, the glass can be cleaned with a damp cloth. Ensure that the glass has completely dried before installation.
- Carefully secure the suction cup to the partially reflective glass, reflective side out, and place it into the openings on either side of the unit.
- Tip the glass into the unit and using the removed screws secure the glass into the unit with the provided bracket (Figure 2). Remove the suction cup.
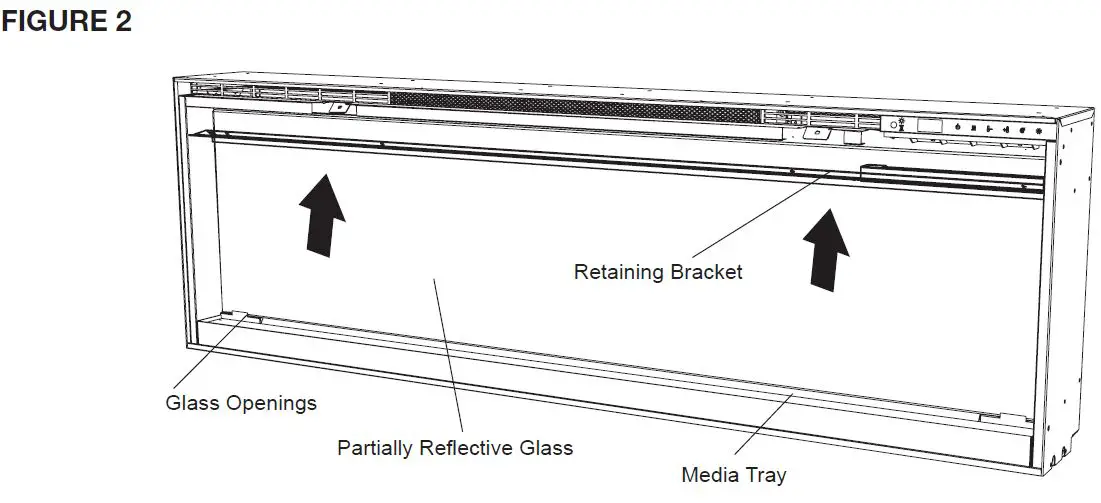
- Evenly space the large media in the media tray along the back of the media tray (for optimum media effect), then carefully pour and evenly distribute the smaller media into the Media Tray.
- Carefully place the front glass into the lip located at the bottom of the opening of the firebox.
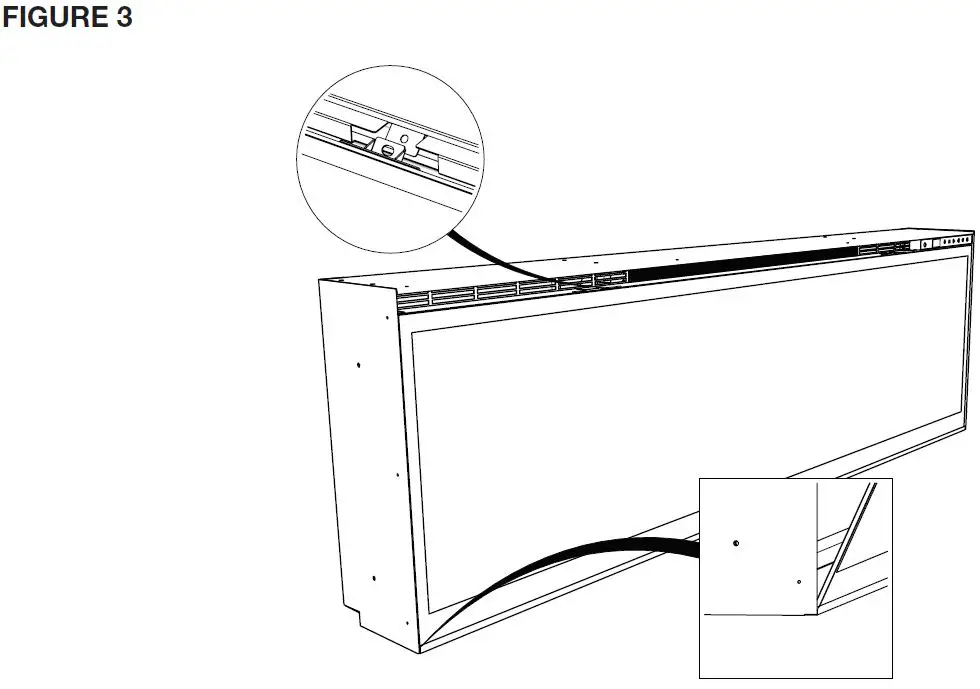
- Tip the front glass into the unit and secure using the provided screws and Allen key. (Figure 3).
- NOTE: Ensure that the suction cup and Allen key are kept for any future maintenance or service.
UNIT DIMENSIONS
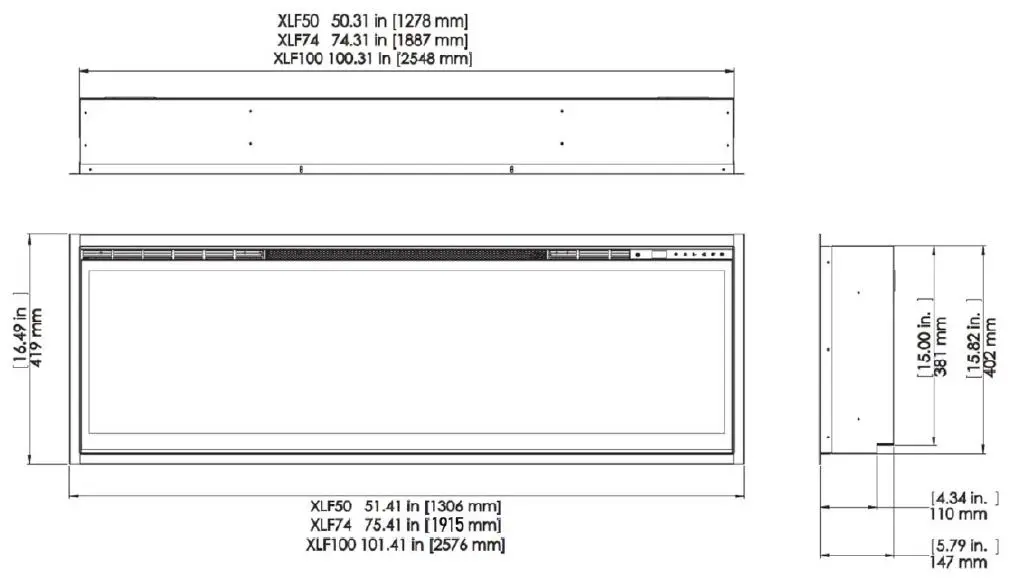
FRAMING DIMENSIONS
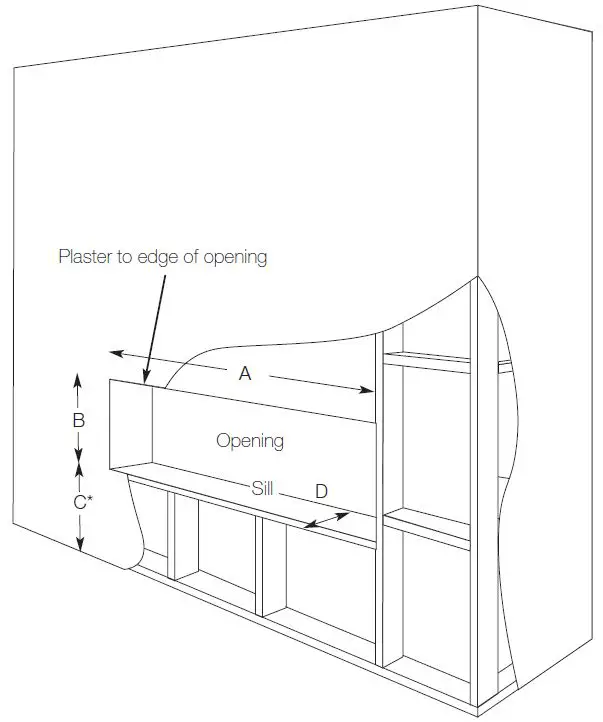
| XLF50 | XLF74 | XLF100 | |
| A | 1287 | 1897 | 2557 |
| B | 406 | 406 | 406 |
| C* | 600 | 600 | 600 |
| D | 160 | 160 | 160 |
- C has no minimum, these measurements are for ideal viewing only.
General Operation
WARNING: This electric firebox must be properly installed before it is used.
This firebox operates with Comfort$averTM technology, which automatically adjusts the fan speed and heater wattage to safely and precisely match the requirements of the room based on the thermostat setting. The heater operates such that once the room reaches the set point, the fan and heater will continuously run at a low level, to maintain the desired room temperature. If the temperature in the room rises significantly, i.e. sun coming through a window or a central furnace turns on, the heater will turn off and periodically turn back on to circulate the air around the unit, until the room temperature drops and requires the heater to be constantly on again.
NOTE: The unit is designed so that the fan will run continuously while the heater is on.
NOTE: The element retains heat after shutdown, there is a built-in cool-down period of 2 minutes before the fan shuts off completely when the heat function is turned Off.
Remote Operation
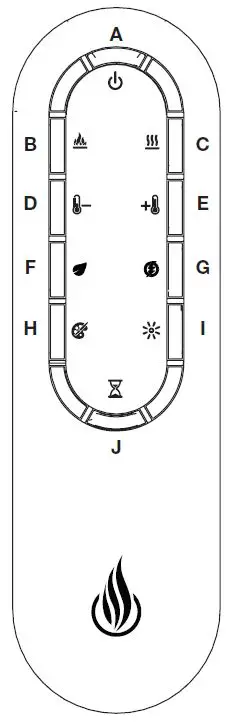
The fireplace is supplied with an IR multi-function remote control.
NOTE: To operate correctly, the remote control must be pointed toward the front of the unit.
 A. Power Button
Switches the product on and off. Restores to the previous setting when switched on.- B. Flame Effect
Turns the Flame Effect On and Off - C. Heat
Switches the heat on and off. Use Temp buttons to regulate heat. - D. Temp Down
Decreases the temperature in intervals of 1o C. - E. Temp Up
Increases the temperature in intervals of 1o C. - F. Eco Operation
Runs the heater in a reduced wattage range when activated. - G. Heat Boost
Turns the Heater Boost On and Off. Runs the unit at the full rated wattage. - H. Colour Theme
Different presets of lighting color combinations are available in the unit. - I. Brightness
Press to change the brightness of the LEDs from high to low. - J. Sleep Timer
The timer button increases the timer by 0.5hrs on each press. Up to 8hrs cycle.
 A. Power Button


