BN Products BNMS-100B Mixing Station
Product Information
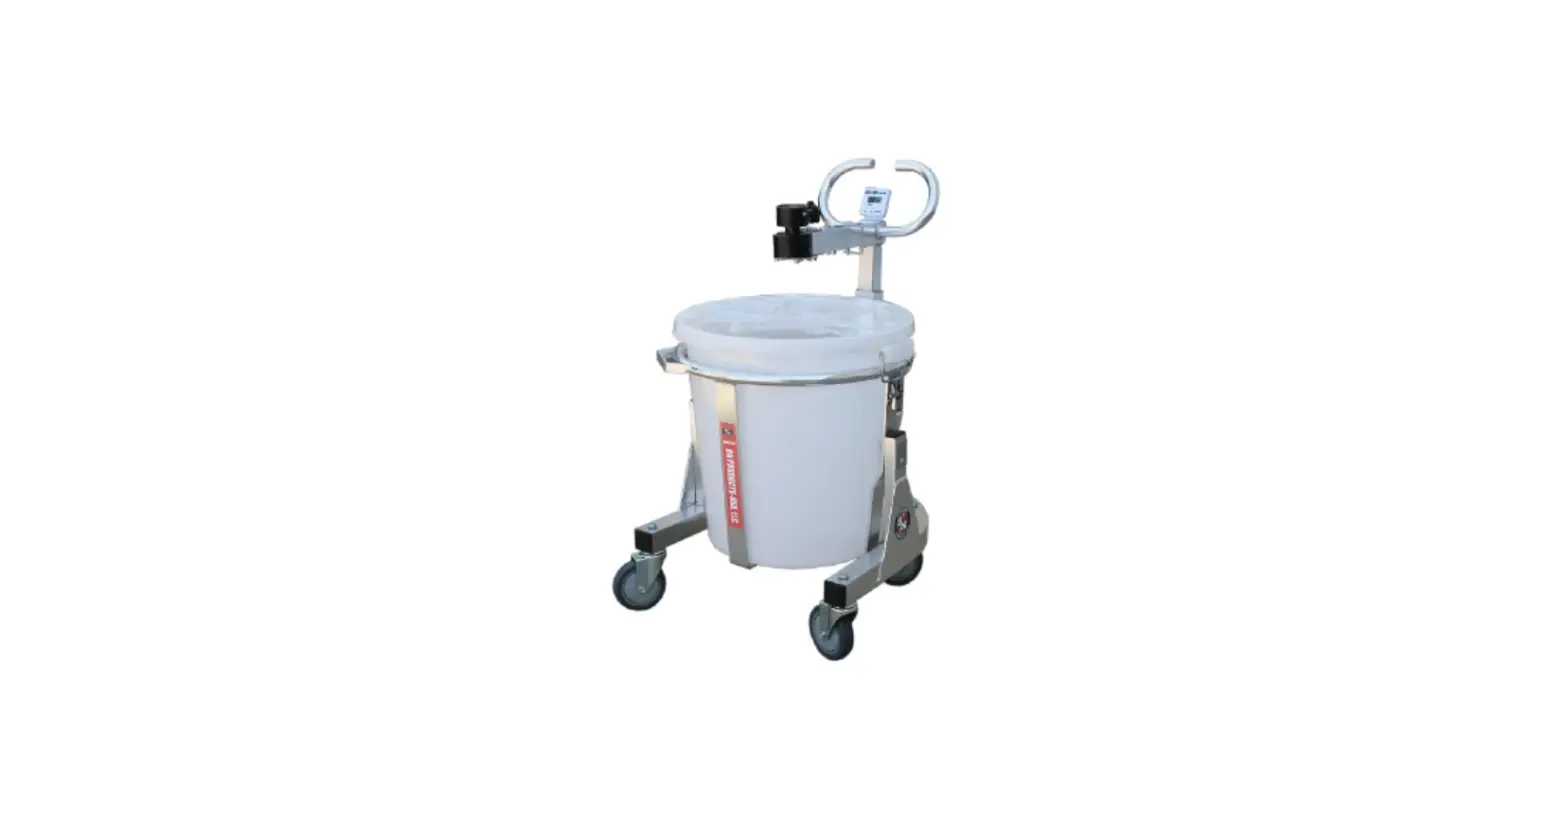
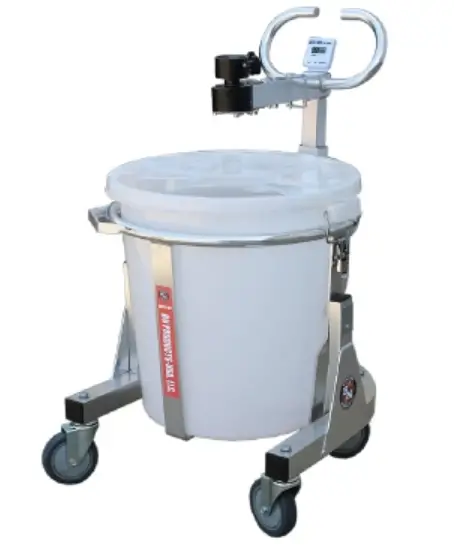
The BNMS-100B Mixing Station is an electric mixer stand that allows you to mix concrete, mortar, and other materials with ease. It comes with a sturdy frame, extension tube, extension frame, and back plate. The mixing station also features casters that can be locked in place for stability, making it easy to move around your worksite. Additionally, the electric mixer can be easily attached and adjusted with the swivel assembly and bottom knob.
Product Usage Instructions
- Check the package to ensure all parts are included. If any parts are missing, contact BN Customer Service instead of returning the product to the store.
- Turn the Lower Frame Assembly upside down on a level surface. Install the two locking casters in the back of the frame near the Foot Lock Lever using a 3/4 open end wrench and a 3/4 socket. Install a wheel bolt and washer up through the Lower Frame and through the Caster and attach with a Lock Nut on each wheel.
- Place the Back Plate inside the Bucket Frame with the threaded stud sticking out of the bottom hole and loosely start the Wing Nut. Thread the Lock Handle through the Bucket Frame and into the Back Plate but leave loose.
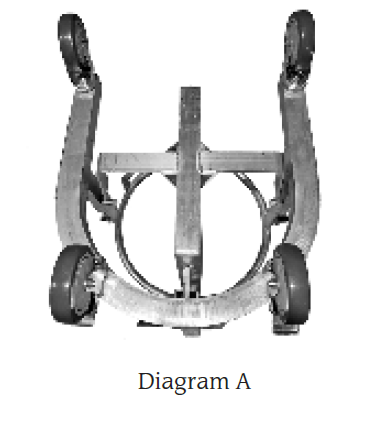
- Slide the Extension Frame into the Bucket Frame with the Back Plate very loose. Lock it into place about 4 inches from the bottom.
- Slide the Extension Tube with swivel into the Extension Frame and lock in place with the Pin.
- Attach the two Knob Bolts to the Swivel Assembly.
- Install the battery in the Timer and attach it to the back bracket.
- Attach the electric mixer by pushing the paddle up through the Swivel and threading it into the mixer.
- Adjust the Swivel with the Bottom Knob.
Note: When attaching an electric mixer, make sure to push the paddle up through the Swivel and thread it into the mixer.
Assembly Instructions
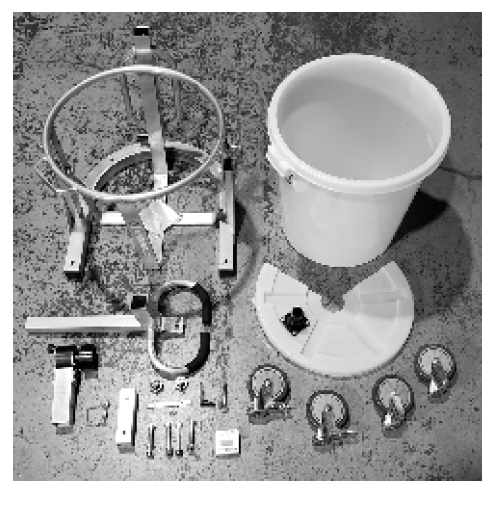
- Check the package you received to ensure all parts are in-cluded. If any parts are missing do not return this product to the store but contact BN Customer Service at 1-800-992-3833.
- To attach the Casters (#1) turn the Lower Fame Assembly (#5) upside down on a level surface. The two locking cast-ers need to be installed in the back of the frame that is near the Foot Lock Lever (#4). Use a 3/4” open end wrench and a 3/4” socket to install the casters. Install a wheel bolt and washer up through the Lower Frame (#5) and through the Caster and attach with a Lock Nut (#3) on each wheel.

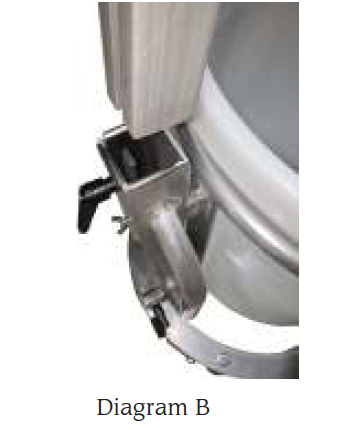
- Place the Back Plate (#22) inside the Bucket Frame (#21) with the threaded stud sticking out of the bottom hole and loosely start the Wing Nut (#27). Thread the Lock Handle (#26) through the Bucket Frame and into the Back Plate but leave loose. See Diagram B.

- With the Back Plate (#22) very loose slide the Extension Frame (#8) into the Bucket Frame and lock into place about 4 inches from the bottom.
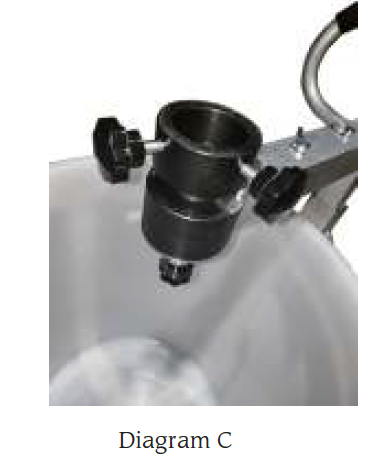
- Slide the Extension Tube (#10) with swivel into the Extension Frame and lock in place with the Pin (#9). See Diagra C.

- Attach the two Knob Bolts (#13) to the Swivel Assembly.
- Install the battery in the Timer and attach it to the back bracket.
- The electric mixer can now be installed and the Swivel adjusted with the Bottom Knob (#18).
Note: When attaching an electric mixer, the paddle will need to be pushed up through the Swivel and threaded into the mixer.
DESCRIPTION
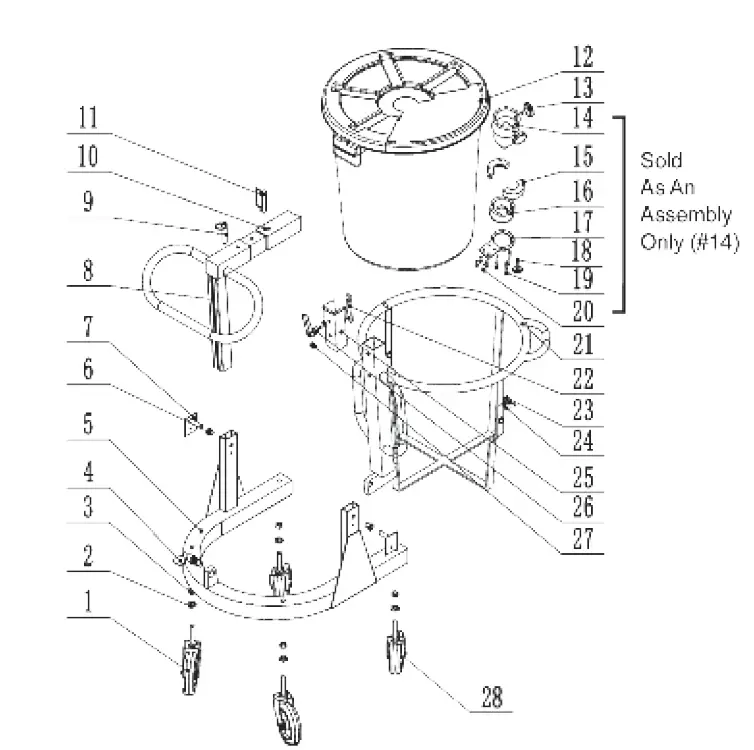
| No. | DESCRIPTION | PART No. |
| 1 | CASTER BNMS-100B NON LOCKING | 101113 |
| 2 | WASHER BNMS-100B | 101114 |
| 3 | LOCK NUT BNMS-100B | 101115 |
| 4 | PIN BNMS-100B | 101116 |
| 5 | STAND BNMS-100B | 101117 |
| 6 | SLEEVE BNMS-100B | 101118 |
| 7 | ROTATING SHAFT BNMS-100B | 101119 |
| 8 | EXTENSION FRAME BNMS-100B | 101120 |
| 9 | PIN BNMS-100B | 101121 |
| 10 | EXTENSION TUBE BNMS-100B | 101122 |
| 11 | HOOP PIN BNMS-100B | 101123 |
| 12 | BUCKET BNMS-100B | 101124 |
| 13 | BAKELITE BOLT M8 BNMS-100B | 101125 |
| 14 | SWING AXLE ASM BNMS-100B | 101126 |
| No. | DESCRIPTION | PART No. |
| 15 | UPPER BALL BNMS-100B | 101127 |
| 16 | LOWER BALL BNMS-100B | 101128 |
| 17 | MOUNTING PLATE BNMS-100B | 101129 |
| 18 | BAKELITE BOLT M6 BNMS-100B | 101130 |
| 19 | HEX BOLT M8 X 30 BNMS-100B | 101131 |
| 20 | HEX BOLT M8 X 15 BNMS-100B | 101132 |
| 21 | FRAME BNMS-100B | 101133 |
| 22 | BACK PLATE BNMS-100B | 101134 |
| 23 | HOOK BNMS-100B | 101135 |
| 24 | RND HD BOLT M6 X 12 BNMS-100B | 101136 |
| 25 | PROTECTION BOARD BNMS-100B | 101137 |
| 26 | LOCK BOLT BNMS-100B | 101138 |
| 27 | NUT M6 BNMS-100B | 101139 |
| 28 | CASTER BNMS-100B LOCKING | 101113L |
BNMS100B Assembly Instructions.indd
BN Products-USA, LLC. 3450 Sabin Brown Road Wickenburg, AZ 85390 (800) 992-3833
[email protected]


 Cobalt Black Bath Shower Mixer Tap Instruction Manual")


