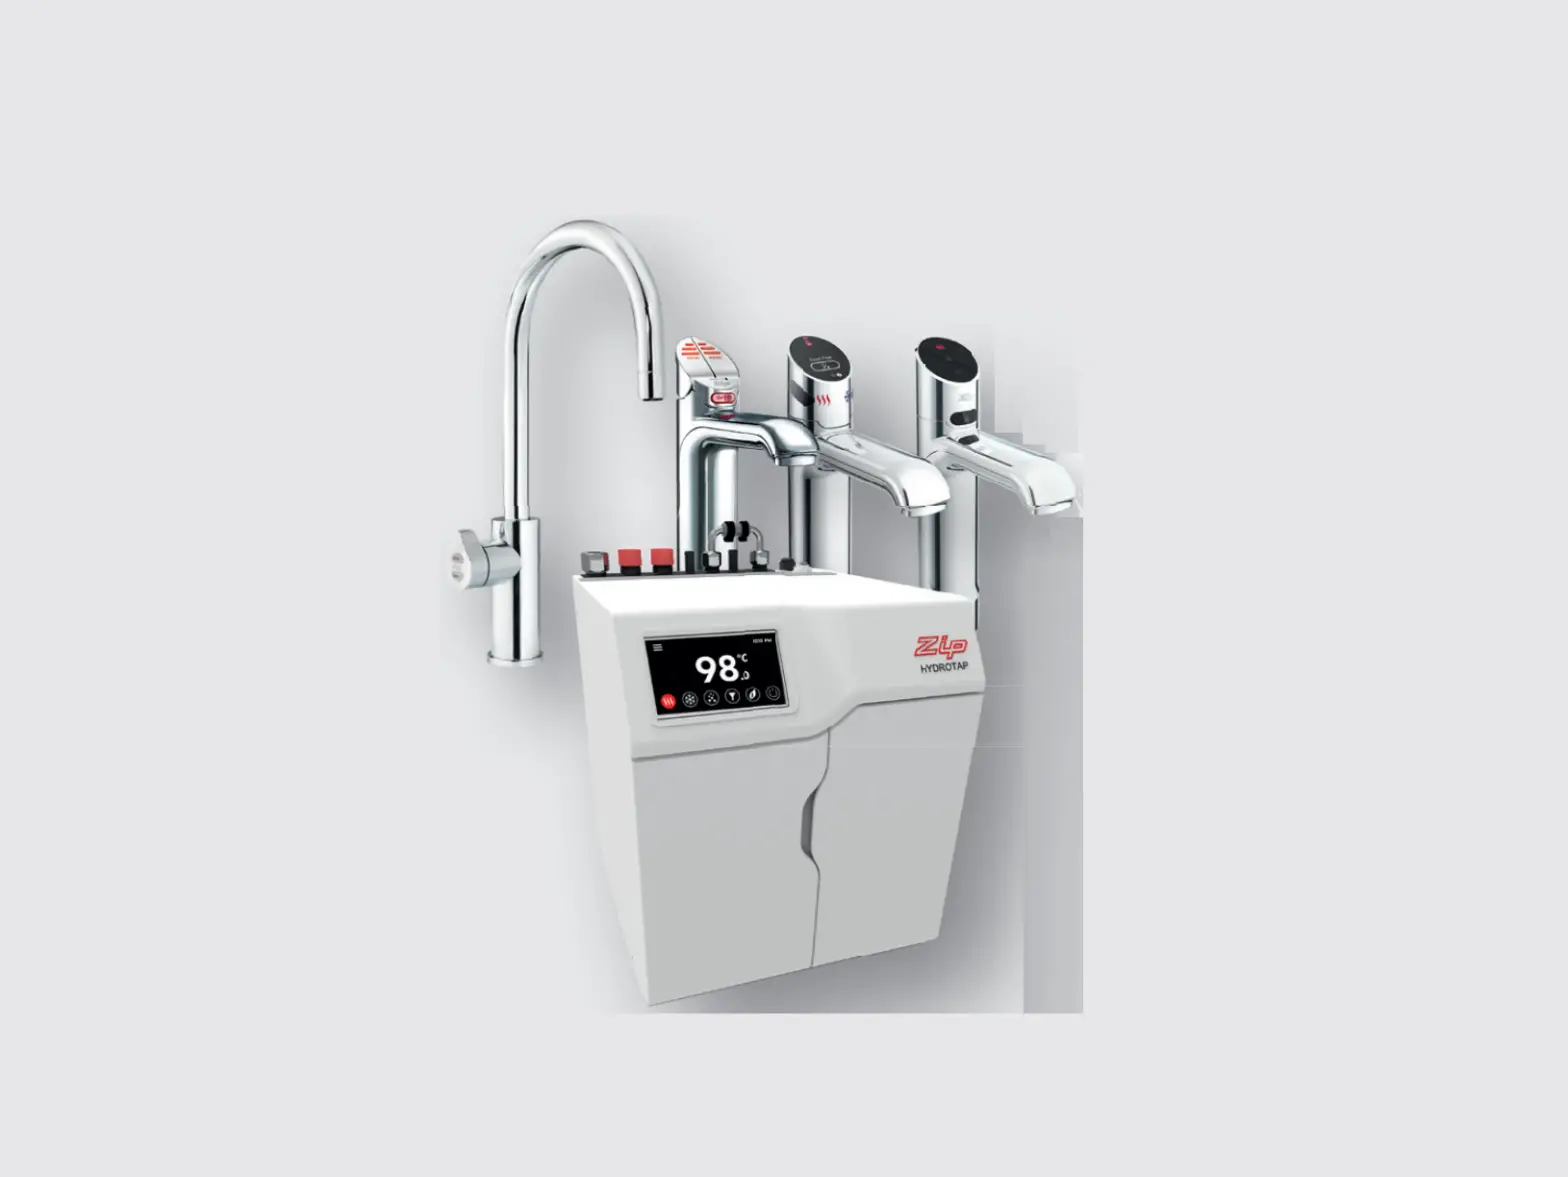
CLAGE Zip HydroTap G5 B 60 Classic Brushed Chrome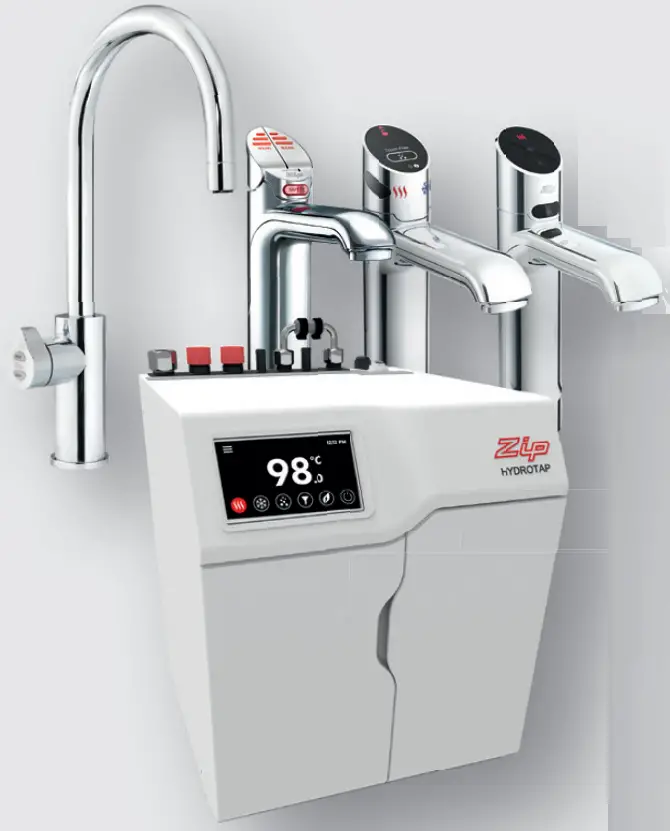
Tap Safety
The safety lock feature is provided to prevent boiling water fl owing if the hot button is inadvertently operated.
This function can be activated and deactivated from the menu in the security settings (see page 38).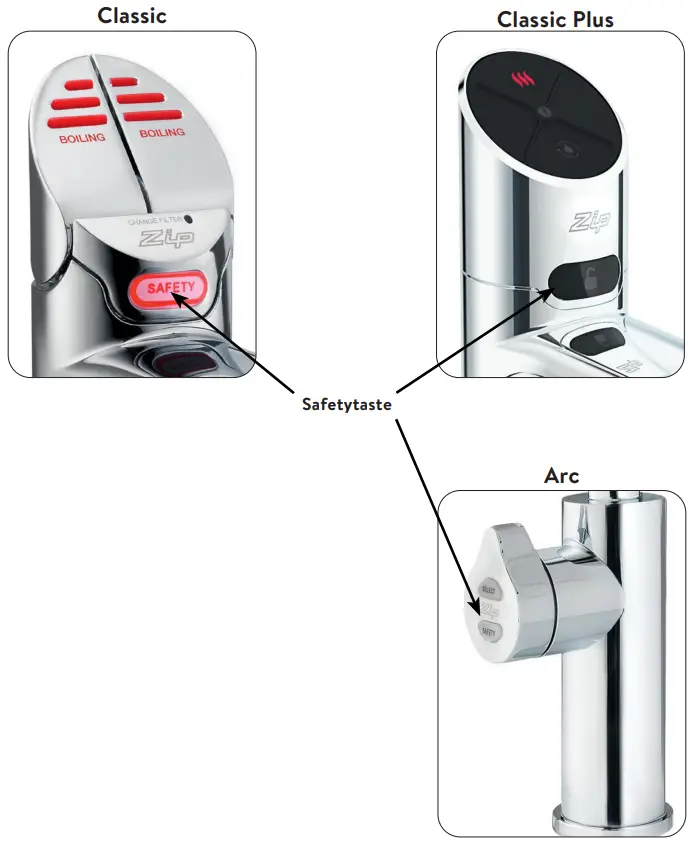
Tap Operation
Classic tap
Hot Water (With the safety OFF)
Depressing the red lever allows the dispensing of hot water as long as the lever is held down (max. 15 sec.). Pulling forward the red lever allows the tap to operate in a “no-touch” mode. Water will fl ow from between 5 and 15 seconds (this is user adjustable). To reset, return the handle to the off position and repeat the step. The lever has to be manually returned to the off position.
(With the safety ON)
Depress the Red lever, while simultaneously covering the safety lock button with a second finger. These two actions need to occur within 2 seconds for the successful dispensing of hot water.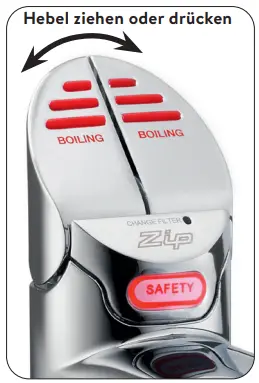
Classic Plus tap
Hot Water
(With the safety OFF)
Press the red button to tap hot water. When the button is pressed, hot water flows as long as it is held down (max. 15 sec.).
(With the safety ON)
Depress the Red button, while simultaneously covering the safety lock button with a second finger. These two actions need to occur within 2 seconds for the successful dispensing of hot water.
Quantity Filling
Before selecting the water type, press the fi ll button. After pressing the red, blue or white button briefly, water flows for a period of between 5 and 15 seconds, which can be set in the menu.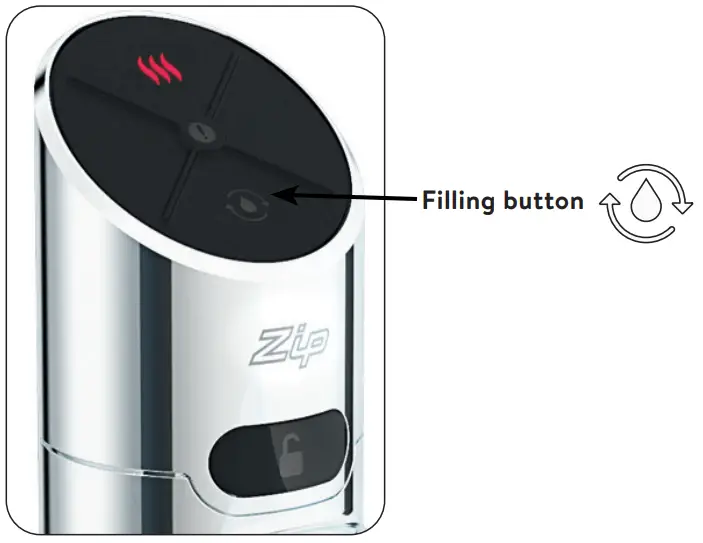
Touch-Free Tap
Hot Water
Hold your hand approx. 1.5 – 5 cm in front of the left and rear sensors to dispense hot water. Hot water fl ows as long as the hand is held in the sensor area (max. 15 sec.).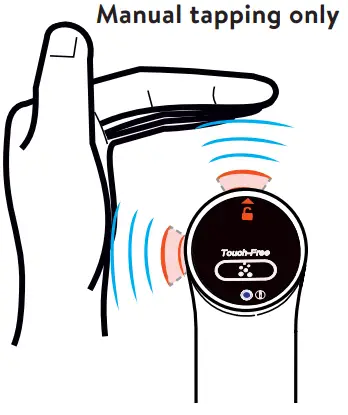
Arc tap
Select the desired type of water by tipping to on the Select button on the Zip lever at the tap.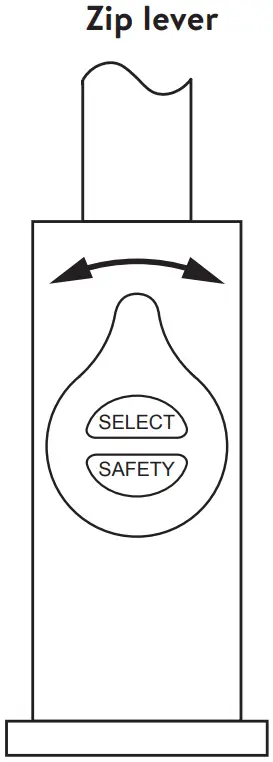
> Red: boiling water
Turn the lever to dispense water. When the lever is turned back, water will fl ow as long as the lever is held. If the lever is turned forwards, water will fl ow continually for 5 to 15 seconds. This time can be set in the menu.
The lever then has to be manually returned to the Off position.
(With the safety ON)
The safety button must be pushed twice within one second. The red LEDs start to fl ash and boiling water can be dispensed by turning the lever. After 3 seconds without operation, the LEDs light up continuously and the tap is locked again.
Note: When dispensing water at the Celsius Arc tap, pay attention to the orientation of the swivel spout.
Safety Sensor Calibration (Classic only)
Light intensity varies from site to site, therefore it is recommended that a re-calibration be performed at the time of the installation.
All direct natural sun light must be shaded from the HydroTap, during the calibration. This can be achieved by closing any nearby curtains, blinds and so on.
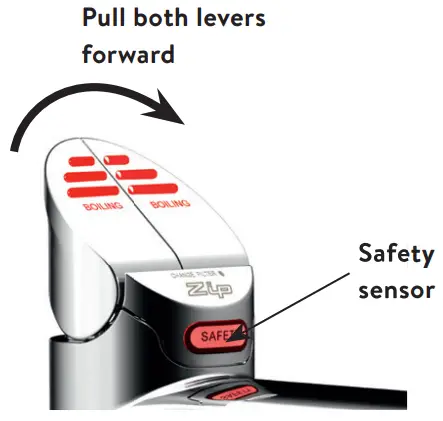
Safety sensor calibration
- Shield the HydroTap from any direct sun light e.g. using a dark cloth.
- Bring the unit in normal operating mode.
- Turn the power OFF.
- Pull both tap levers to the forward position.
- Turn ON the power.
- The unit will calibrate the safety switch automatically.
- Return the levers to the neutral position.

Tap LEDs (Touch-Free excluded)
Red Hot Water LED
On all the time
This indicates that the hot water is ready.
Flashing slowly
This indicates that the temperature of hot water is not within the set range.
When the hot water is at the set temperature, the light will stop flashing. This could take several minutes.
The flashing light will typically occur after switching on, during heavy usage or coming out of sleep mode.
White Filter LED (Classic only)
White filter LED off
This indicates the filter is operating within its normal specified lifespan.
White filter LED flashing slowly
The light will flash slowly when the filter is due for replacement and the LCD will show “Filter Change”. Refer to chapter “Replacing the filter”.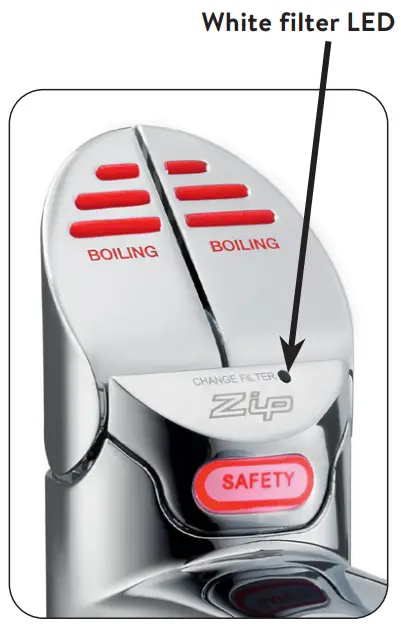
Note: For the Arc taps the need for a filter replacement is indicated by cyclically flashing all the LEDs in all three colours.
LCD Screen
The Zip HydroTap has a touch screen for easy operation and setting.
By tapping on the various icons, diff erent views can be called up or the unit can be switched to standby. Tapping on the three bars at the top left opens the main menu.
Hot water temperature
The set hot water temperature is displayed.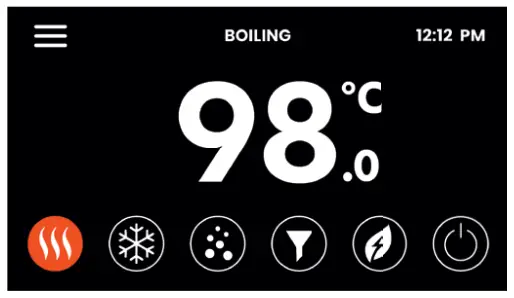
Filter status
When the maximum fi lter life is reached, a warning indicator appears.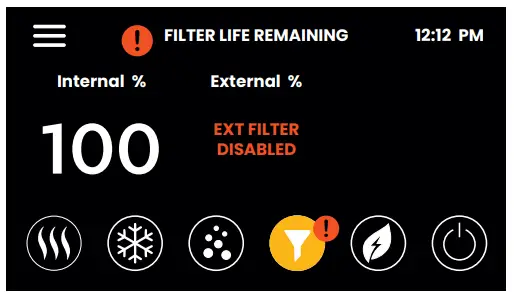
Energy saving
The settings for saving energy are displayed here. By tapping on the arrows, the associated settings menus can be called up directly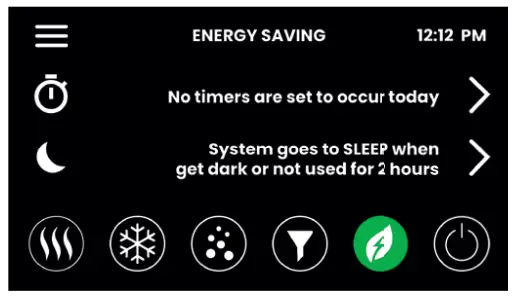
| Main menu | Sub menu | Sub menu options | Part |
| General Settings | > Language > Date & Time > Network (n/a) | > German > English > French > 12/24 h Mode | A |
| System Settings | > Filter Settings > Temperature > Dispense Time > Light Sensor > Advanced Settings > System reset | > Filter Flush > Tank Flush > Set Target Values > Calibrate Boiling Point > Booster > Set Dispensing Times > Calibrate Sensor | B |
| Safety & Security | > Boiling Safety > Password Protect | > Boiling Safety Lock > Hot Isolation > Set Password > Change Password | C |
| Energy Saving | > Sleep Mode > ON/OFF Timer > Energy Use | > Sleep When > When Sleeping > Operating Times | D |
| Info & Logs | > Filter Logs > System Faults > Recent Faults > About System | E | |
| Serial number | > Serial number as a bar code | – | |
| Register Product | > n/a | – | |
| Service | > Password protected | H |
LCD Screen Operation – Section A
A General Settings
During the initial start-up, the language must be selected and the time with the current date must be entered. In addition, both menus can be found under General Settings.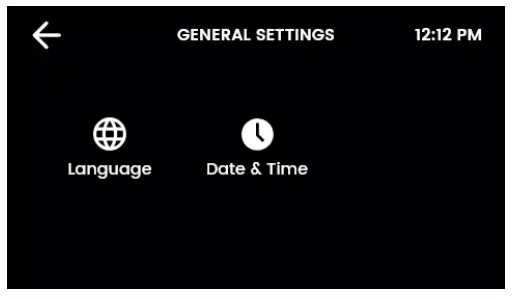
I. Language Tap the circle above your preferred language. You can choose between German, English and French.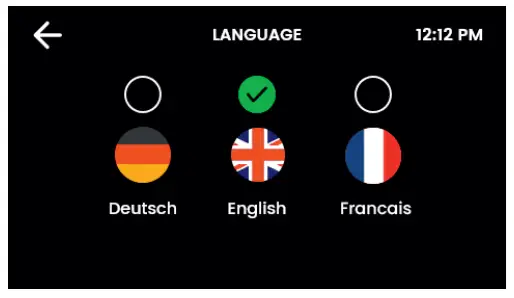
II. Date & Time Touch the text boxes on the screen and then touch + and – to set the current date and time. Select the tick to confirm and save.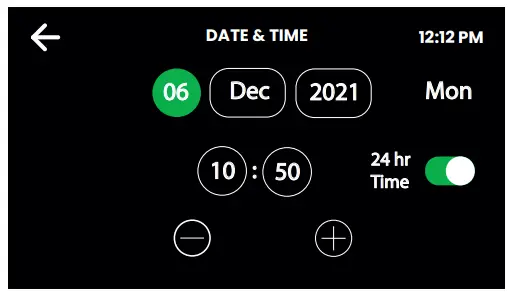
LCD Screen Operation – Section B
B System Settings
As soon as your Zip HydroTap G5
is connected for the first time, the configuration starts automatically. In addition, the unit can be configured manually in the system settings.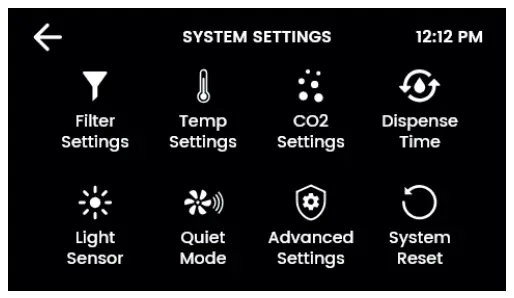
I. Filter Settings
The filter and water tanks must be rinsed during initial operation, after each filter change and after a longer period of non-use.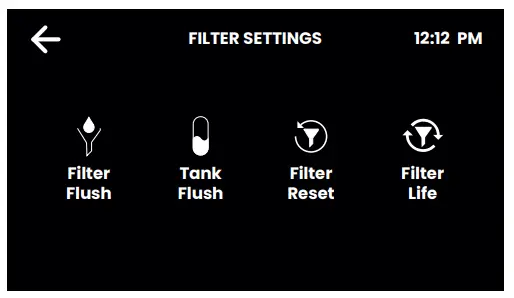
Filter Flush
Have a bucket or similar container at the ready to hold a quantity of water that will be ejected while the filter flush mode is in operation. Open the filter access door on the front of the HydroTap and the filter cartridge will be exposed. Located to the rear RHS of the cartridge is a flush line, approx 600 mm long and the flush line stop cock. Hold the free end of the flush line into the bucket or container.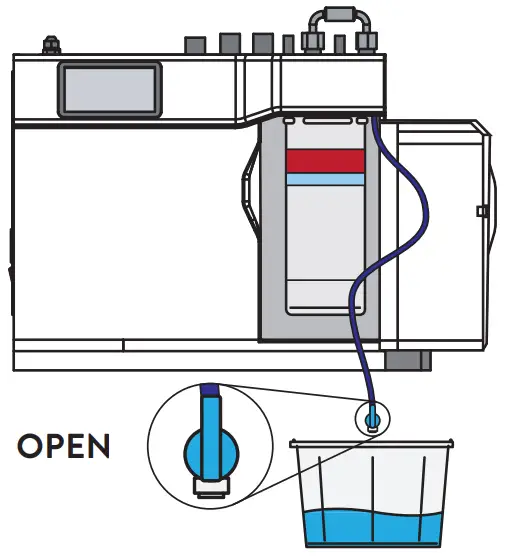
Open the valve as shown in the picture above and start the rinsing process by tapping on the green arrow.
The flushing process takes about two minutes.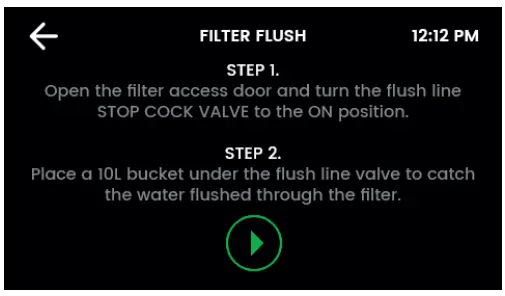
After the rinsing process is completed, a message appears. Close the valve, guide the flushing line back into the filter compartment and close the filter flap. Next, reset the filter counter.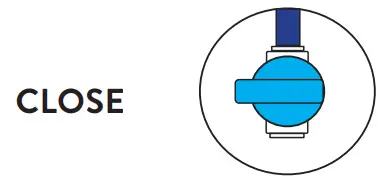
Filter Reset
Select the internal/external filter consumption and reset it by keystroke after each filter change.
Internal Filter Life
Enter the lifetime of the filter and the current consumption (new filter: 000).
If the consumption exceeds the service life of the filter, flashing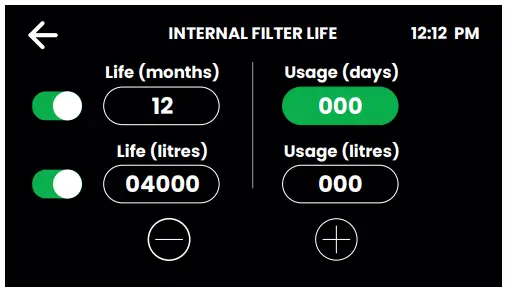
LEDs and the unit display indicate that the water filter must be changed on some taps.
Standard service life of the internal water filter:
- Private households: 12 months or 4000 litres
- Commercial: 6 months or 6000 litres.
Tank Flush
The tanks must be rinsed during initial commissioning and after a long period of non-use.
Start the rinsing process by tapping on the green arrow and follow the instructions on the display.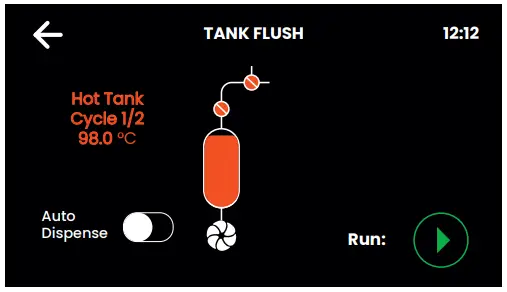
During the rinsing process, the tank contents must be emptied several times through the tap. If the spout of your tap is above a sink or a draining board with a drain, you can activate the automatic dispense for this.
Note: When the automatic tap is active, water will fl ow out of the tap several times without warning.
II. Temperature Settings
This is where the water temperatures are set for operation. Boiling point calibration is recommended for every change of location and especially for locations at high altitudes.
Hot water
Standard setpoint: 98 °C
Setpoint range: 68 – 100 °C.
Operation: Within 1 – 2 °C of the setpoint.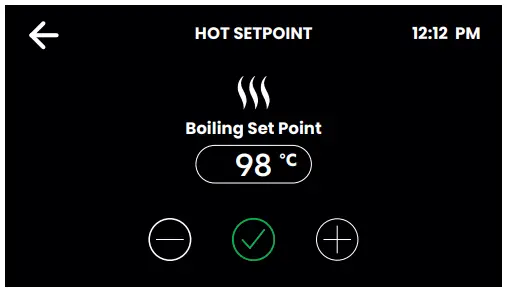
Note: The flow rate of boiling water is affected by a higher temperature setting. At a setpoint of 98 °C, up to 6 % less energy is consumed in standby mode than at 100 °C.
When setting temperatures close to boiling point, the pump is at risk of cavitation. This is indicated by a warning symbol.
Boiling calibration
The boiling point calibration is started automatically during initial commissioning and can be repeated manually here. One run takes approx. 10 minutes.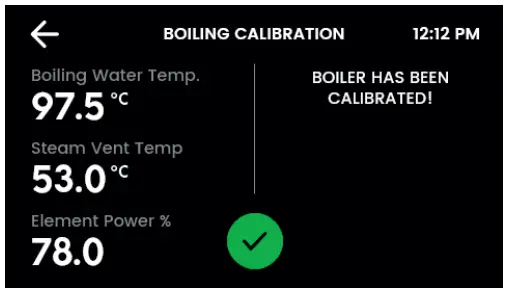
Note: Hot steam may escape from the fitting during calibration!
Booster
This function should only be considered when a Booster unit is installed.
Note: Failing to make the correct selection for ‘Booster’ will eff ect product performance.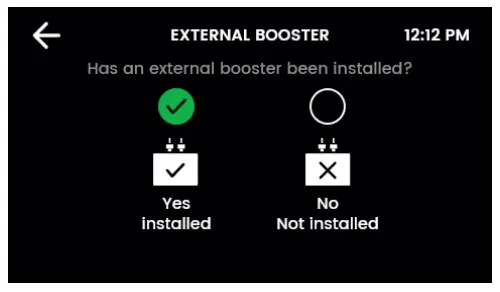
III. Dispense Times
For all taps with a filling function and for each type of water, a duration of 5 – 15 seconds can be set here for automatic dispensing.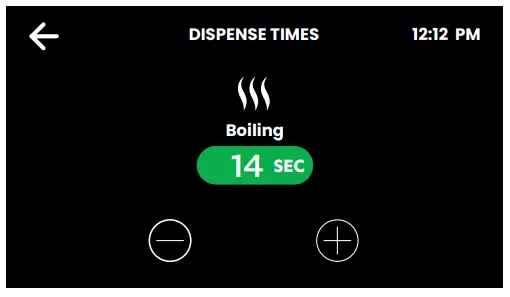
IV. Light Sensor (Classic- & Classic Plus only)
Follow the instructions on the display. Before each calibration, make sure that the ambient light corresponds to the typical lighting conditions at the installation site.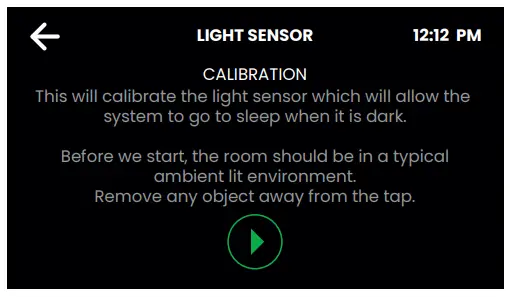
Remove any reflective or shadowing objects from around the fixture.
V. Advanced Settings I
These settings serve to reduce cavitation in the hot water pump.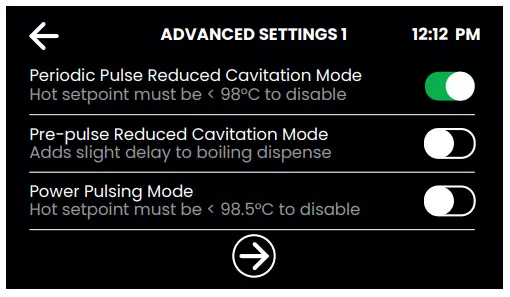
Periodic Pulse reduced Cavitation Mode
The pump is briefly moved every 5 minutes. This prevents the formation of air bubbles in the pump and ensures a steady flow of hot water.
Pre-Pulse reduced Cavitation Mode
Before each hot water tap, the pump is moved briefly to flush out bubbles. There is a delay of 150 milliseconds before the water is dispensed.
Power Pulsing Mode
To ensure that the hot water is kept as close as possible to the setpoint, the tolerances for temperature fluctuations are reduced.
V. Advanced Settings II (Touch-Free only)
Touch-Free Sensor Demister
The heating prevents the sensors from fogging up due to escaping water vapour.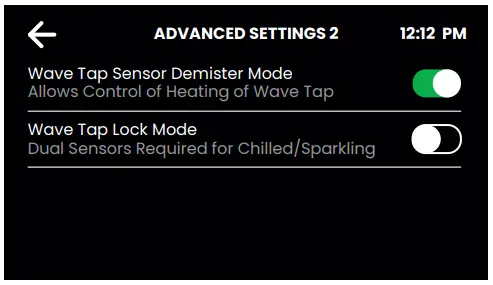
Touch-Free Lock Mode
When the mode is active, the rear safety sensor must also be activated for cold water and sparkling water in addition to the water sensor.
This prevents malfunctions, e.g. due to reflective surfaces near the tap.
The filling function is no longer available when the function is active.
VI. System Restart
Tap first on the upper circle and then on the lower circle to switch off and restart the system. Use this function to reset errors or reset the password for the settings.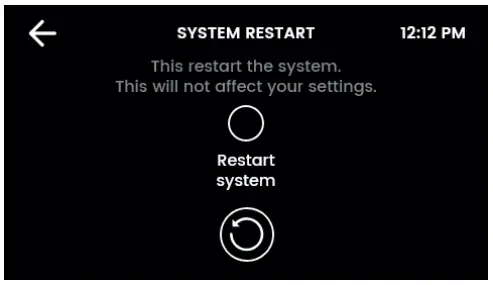
LCD Screen Operation – Section C
C Safety & Security
You have the option of activating protection against the accidental tapping of hot water. In addition, the system settings can be protected against unauthorised changes with a password.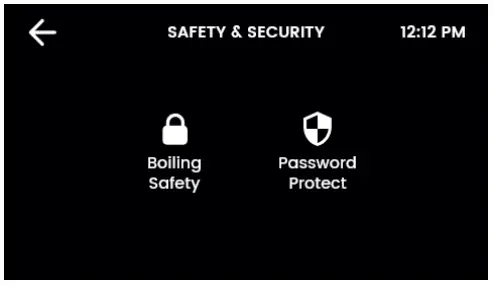
I. Boiling Safety (except Touch-Free)
Boiling Safety Lock
In addition to the hot water button, the safety button must be pressed to dispense hot water.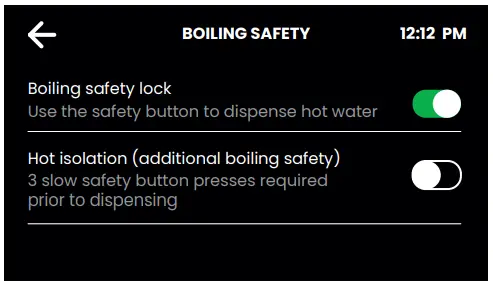
Hot Isolation (Classic & Classic Plus only)
The safety button must be touched three times before hot water can be tapped.
II. Password
The Zip HydroTap allows the appliance coordinator to set up a password to protect against users changing the preferred system settings.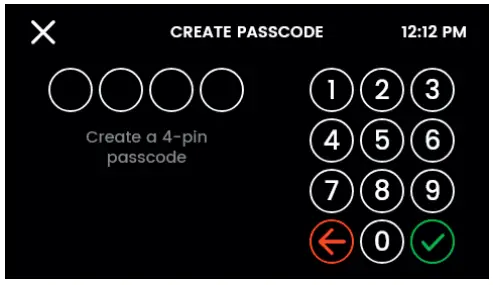
LCD Screen Operation – Section D
D Energy Saving
Different sleep modes can be selected, the operating times can be set and the previous energy consumption can be viewed.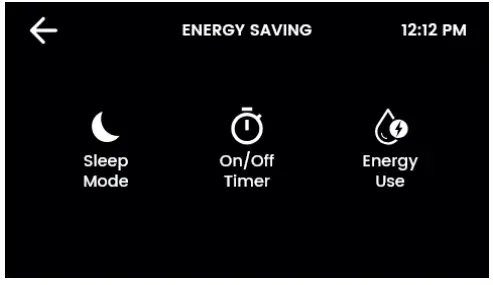
Note: For the best possible water hygiene, it is recommended to leave the heating and cooling of the unit permanently active.
I. Sleep Mode
When the function is active, the water temperature control is reduced or switched off completely.
Each tapping during the sleep mode activates the unit. However, a few minutes are needed to bring the water back to the setpoint.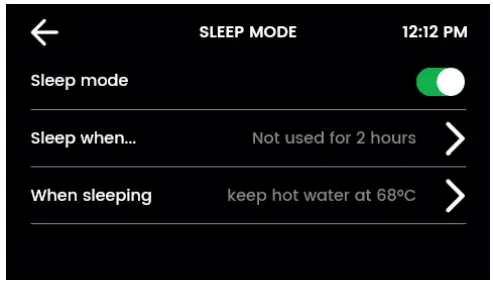
Sleep when…
Choose: in it gets dark, not used in 2 hours or both.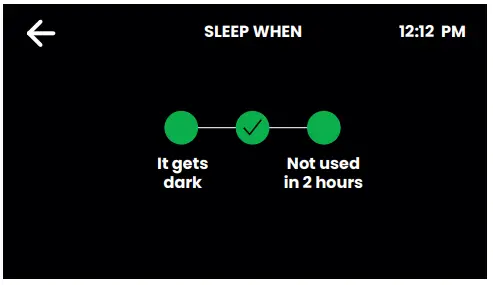
The “darkness” option only works on taps with a light sensor (Classic, Classic Plus). It is recommended to calibrate the light sensor (see page 32).
When Sleeping
Set the actions for your HydroTap during the sleep mode.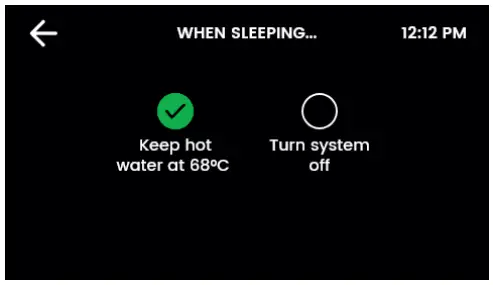
Keep water at 68 °C: The hot water temperature is lowered to 68 °C.
Switch off system: Water heating is deactivated. The water temperature adjusts to the room temperature.
Note: The unit needs a few minutes to heat/cool the water to the setpoint again when the sleep mode is interrupted.
II. On/Off Mode
The On/Off Mode allows the user to turn the unit on or off at a specific time. One On/Off period is possible per day.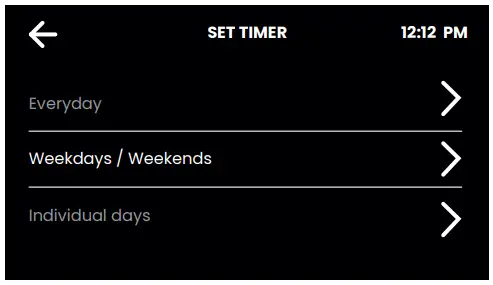
Note: Any attempt, during OFF mode, to dispense water, will bring the unit out of sleep mode. Please allow sufficient time for the water to reach the set temperature after disabling the sleep mode. The unit will return to sleep mode after 30 Minutes of non use.
Select one of the functions Everyday, Weekdays / Weekends or Individual days for your time switch. Then set the desired switch-off and switch-on times in the function. Tap the tick to confirm and save.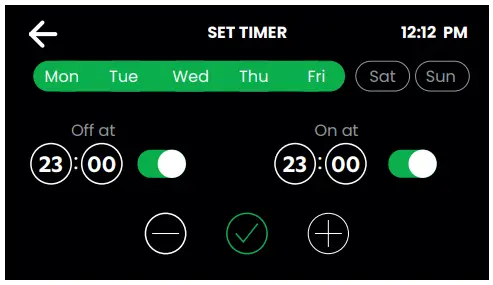
III. Energy Use
Track the energy consumption of your HydroTap by viewing the total energy consumption and the energy consumption since the last energy consumption reset.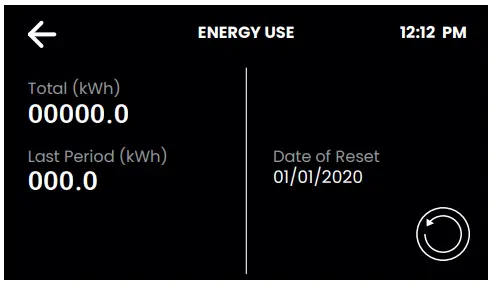
LCD Screen Operation – Section E
E Info & Logs
Here you can view all filter changes, logged system errors and current error messages.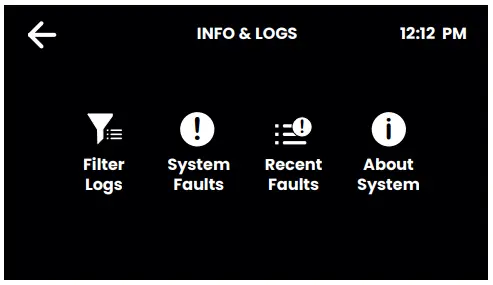
The system info gives you an overview of the serial number, model and other details of your system.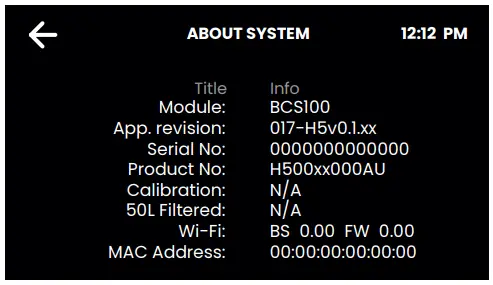
LCD Screen Operation – Section H
H Service
Caution must be observed when changing any settings within the Service Menu as any changes may affect the normal operation of the unit. This can only be done by a technician. Please contact the Clage after sales service for further assistance.
Filter Maintenance
Water Filter
The Zip HydroTap notifies when filter replacement is due. If you notice one of the following, you will need to change the filter.
- The Change Filter LED will flash white once a second and remain so until reset. The filter status light is located below the levers on the tap head assembly (Classic).
- All LEDs of the tap flash approx. every 10 seconds in all three colours (Arc / Celsius Arc).
- The filter percentage will show 0% on the Home screen.
Note: Replace the filter after a non-use of more than two months, even if the change interval has not yet been reached!
Note: Depending on local water quality conditions and usage, the filter may require changing anywhere from 500Ltrs to 10000Ltrs.
You may also need to replace the filter if you notice unpleasant odours or tastes.
Filter Maintenance
Some water may drip from the filter head (socket) during replacement. Keep a towel handy to dry up any drips.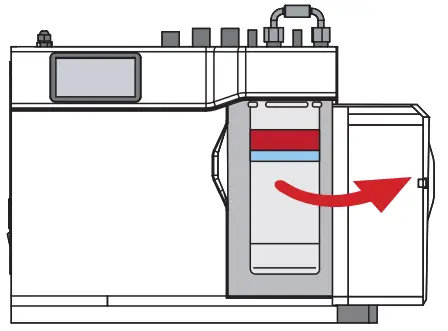
To change the Filter: (See also section B)
- Open the door of the under sink unit.
- Relieve system pressure via the filter flush stop cock, a quick open and close will do. Use the bucket to catch the discharge.
- Grasp filter cartridge and rotate the cartridge a quarter turn to the left, then gently pull down.
- Caution: a small amount of water will drip as the cartridge is removed.
- Do not tilt the cartridge as water may spill from it if tilted.
- Unpack replacement cartridge and remove sanitary cap, write today’s date where shown on the label.
- Avoid touching the filter O-rings and filter opening as this may cause bacterial contamination of the cartridge.
- Moisten the O-rings with water, align the front cartridge label to the left (as shown in the diagram for filter cartridge replacement), and push the new cartridge into the filter head.
- Turn the cartridge a quarter turn to the right until the cartridge comes to complete stop and is locked into position, with the front label facing forward.
- Initiate the filter flush programme by scrolling through the menu screen (See section B I).
- Close the door to secure the appliance.
- Adjust the filter settings as described in section B.
- Dispose of the used filter correctly.
Warning: If the Zip HydroTap is switched off for a long period of time (e.g. More than a weekend), run water through the chilled water outlet for at least 5 minutes before consumption.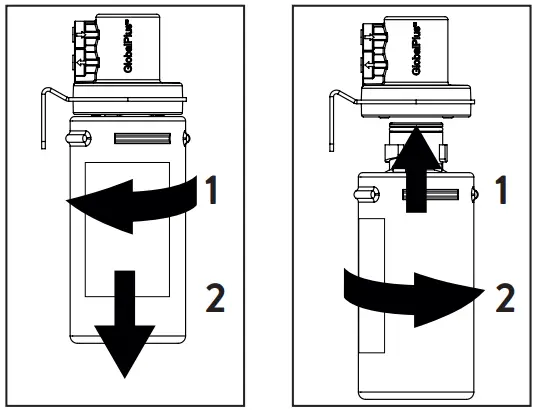
Air Inlet Filter
The Zip HydroTap air filter is conveniently located on the outside of the condenser. The filter screen is a sliding fi t in the plastic housing on the side of the under sink unit. The screen may be removed for cleaning, by sliding it forward. This needs to be inspected at least quarterly, cleaned and replaced if damaged.
Note: For best performance the unit should only be operated with a clean air filter screen, correctly fitted in place. Maintain, at least, a 50 mm air gap in front of the screen at all times. Take care not to allow cloths or other soft materials to accidentally block the air inlet.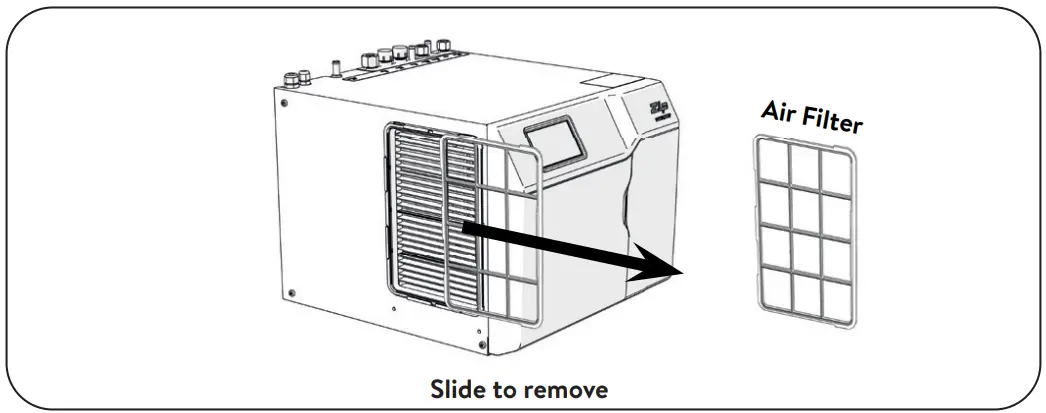
Cleaning
General cleaning
Do not use strong, corrosive, spray or abrasive cleaners. The plastic surfaces and taps should be wiped with a slightly wet and hygienic cloth only.
Under sink units must never be located near, or cleaned with water jets.
Avoid using air borne pesticides near the undersink unit.
We recommend cleaning the tap and the tap spout with CLAGE Desinfekt at regular intervals. Article number: 4100-44145
CUSTOMER SERVICE
CLAGE GmbH
Pirolweg 4
21337 Lüneburg
Deutschland
Telefon: +49 4131 8901-0
E-Mail: [email protected]
Internet: www.clage.de


